-
Welcome to the eG Forums, a service of the eGullet Society for Culinary Arts & Letters. The Society is a 501(c)3 not-for-profit organization dedicated to the advancement of the culinary arts. These advertising-free forums are provided free of charge through donations from Society members. Anyone may read the forums, but to post you must create a free account.
All Activity
- Past hour
-
The thermocouple that read 260 at the pan center is the same one that read 238 when doing this test on a different pan, and correctly reads at room temperature. Maybe it broke. I haven't done any calibration tests on it and I don't have prior experience with thermocouples. When I got the 260 reading it seemed to be stable. I waited a couple minutes and saw no change. When I say 228 at the "edge" of the pan I mean about 1cm in from the edge of the flat part of the pan that will be in contact with the induction heater---so still over a portion of the pan that should be getting heat. I readily admit that by measuring empty pans I'm measuring the thing that's easy to measure, not the ideal thing. It's not clear to me how the Chefsteps egg recipes rely on the intensity setting, or how things would work differently with a lower intensity. Would the pan fail to keep temperature at low intensity (in the presence of actual food) and therefore the eggs would cook more slowly and at a lower temperature? The interesting thing about the chefsteps recipe is that they provide several ways to get different results at different cooking temperatures ranging from I think 130 F up to 400 F. But what role does that intensity setting play? If I'm following their 350 F or 400 F egg recipe, why might I want to disobey their instructions and use medium or low intensity? I asked Cristel how thick the aluminum is in their pans and got the rather weird answer that it's 1/2" to 3/4" thick. Somehow I doubt that's correct. I wonder if they meant 1/2 cm to 3/4 cm. Anybody have experience with their handle system?
- Today
-
The Falk Copper Coeur pans are 75-80% copper. Copper is a highly-conductive material, and the amount and rate of heat that a couple millimeters of it can pass can surprise people. Assuming "slow" intensity... If your Control Freak is reading 250F at steady state and your thermocouple is reading 260F at the pan center at top, and assume you're not in a room that's at 260F+ (science humor), then I would double-check the thermocouple. Or wait a little longer to get to a true steady state (in case the 260F you're reading from your thermocouple is just leftover overshoot. Also, it's valuable to consider that pans without a thermal load in them are interesting to analyze--but it's the behavior of pans with a thermal load (i.e. ingredients, liquids, etc.) in them that is more interesting and important from a cooking perspective. Unfortunately it's significantly trickier to measure temperatures once ingredients are introduced. BTW, when you say that the pan is 228 at the edge, are you talking about the edge of the pan base or the edge of the (what I presume is a frying) pan? If you're talking about the upper ring's edge...yeah, you're going to see a gradient of temperature, especially significant as you move farther away from the induction surface. The value of clad pans (for some types of cooking) is that there's no sharp drop-off of temperature from the bottom of the pan to the sides of the pan. But few if any clad pans are going to give you a tight and even temperature all the way through the sides of the pan. As far as sugar tests go, I would just use the slow intensity. Adding the sugar afterwards may give you a more realistic view of pan evenness on a preheated pan. But both adding the sugar before heating and adding the sugar after reaching a steady state will yield results that may help inform your cooking science. As far as the Chef Steps or other egg recipes go, most people tend to cook when they need to serve or eat food. So most recipes are designed for cooking quickly. You'll note that some egg recipes also call for like a tablespoon of cooking oil (100 kcals!) to be added to a pan before cooking eggs (160-240 kcals) and then doing a water drop test, etc. to find the optimal temperature for quick-cooking of eggs. That's one of the reasons that I cook slowly: I can either use no oil or I can put a little bit of oil on the pan and then wipe almost all of it off using a paper towel, avoiding a bunch of unnecessary calories. But in any case, the Chef Steps recipe is not wrong; it's just a different style of cooking that requires more human involvement but cooks in less time. Also, there are some cooking techniques which intentionally want a food that's cooked significantly more on the outside than on the inside--or that require brief higher-temperature chemical reactions; those cooking techniques are more likely to use the fast intensity or higher temperatures. Most cooking techniques and recipes were designed long before temperature-based cooking (other than a high-temp griddle) was a viable thing in a home kitchen. There's a lot of inertia to continue doing things the way we've done them for a very long time, even when our new tools give us the opportunity for new modalities. The good news is that we can mix a bit of the old and the new--and when you have accurate precision cooking instruments you can rethink the whole enchilada.
-

Cooking from "Sunday Suppers at Lucques" by Suzanne Goin
FrogPrincesse replied to a topic in Cooking
Excellent! I have made a very large portion of the recipes in the book, and have never been disappointed. It is in my top 5 of most used cookbooks. -
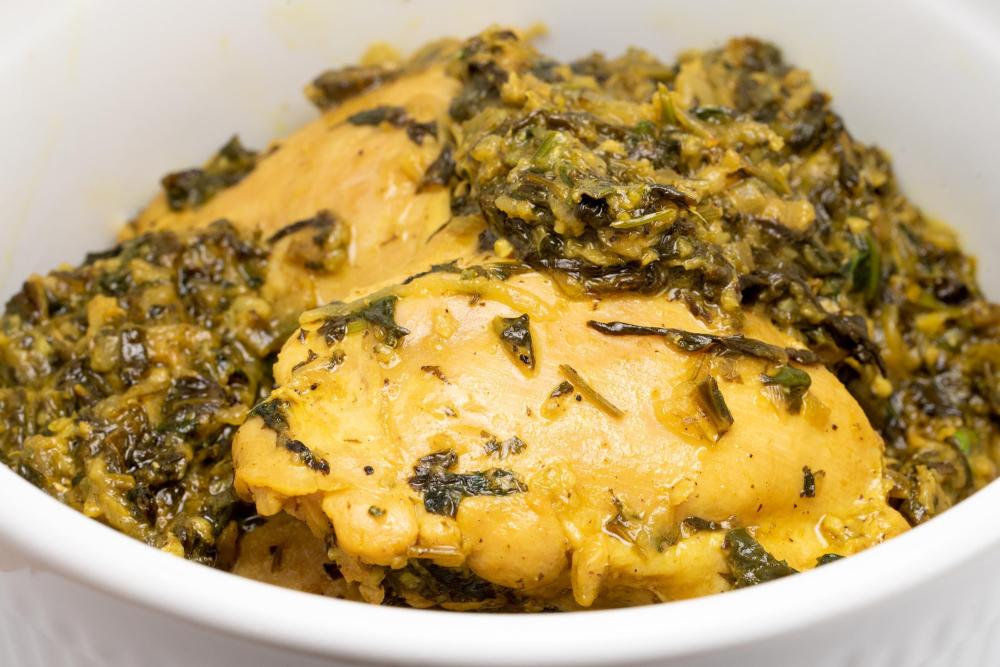
The chemical reactions that cook food mostly happen below 175F. For those standing at a stove, it's really convenient to cook at a higher temperature to get faster reactions--but often at the expense of making the food less healthy or requiring more human attention, etc. A quick example of cooking below 175F is a breakfast of steak and eggs. I fill a 24cm pot with water and then sous vide steak at 59C (138F). On another Control Freak, I put a few large eggs in a 20cm saute pan at 59C (138F) as well, using slow intensity, and I cover the pan. This holds the eggs at a temperature where the yellow is still runny but the food is safe to leave on the burner for a while. After the steak is fully cooked (45 minutes to an hour) I come back and turn up the temperature on the eggs to 79C (174F) and let them cook at that higher temperature for 3-4 minutes while I plate the sous vide steak (optionally seared on each side really quickly). Then I plate the deliciously- and consistently-cooked eggs onto the top of the steak. Breakfast is served. As for other foods, I cook veggies and pretty much everything else at <175F temperatures. I sometimes put a little water in the bottom of the pan to help with spreading around the heat--and then drain it from the pan before plating. Sometimes I turn up the temperature for a minute right at the end for charring effect for people who like that. But mostly I just start cooking a half hour or so before people or myself are going to want to eat--and then get up maybe once or twice to stir for a few seconds. And when I do meal prep and prepare several days of meals in advance, I use the same trick. I just put the already-prepared food (which itself usually wasn't quick-cooked originally) into a saute pan and maybe add a little water. Then I put a lid on it and turn the temperature to somewhere between 60C (140F) and 70C (158F) depending on the food and how "hot" I want it to feel when it's done. Then I walk away and it's ready to eat a little while later. [I've even done this with frozen dinners from the grocery store; it's amazing how much better frozen meals taste--especially ones with chicken or the like in them--when warmed up at 60C/140F instead of using the microwave instructions.] Some foods require a little higher temperature. When I make brown rice for example, I basically simmer the rice in water at around 93C/200F. But honestly a good rice cooker is better-optimized for rice, so I reluctantly prefer rice-cooker-cooked rice where available. As for pasta, well, I need ~100C (~212F) for that kind of cooking. And for foods which require a few temperatures or methods, I tend to use a few pans at different temperatures and then combine everything at the end. Being able to hold an already-cooked food at a precise temperature which won't "cook" it any/much more is pretty great to be able to do. But I rarely do "quick cooking" of meats or other foods by using temperatures above 100C. I understand why it's economically important for commercial kitchens to do so. But most of my food is made in advance (either 30-60 minutes before mealtime or in big batches and then reheated on the cooktop).
-
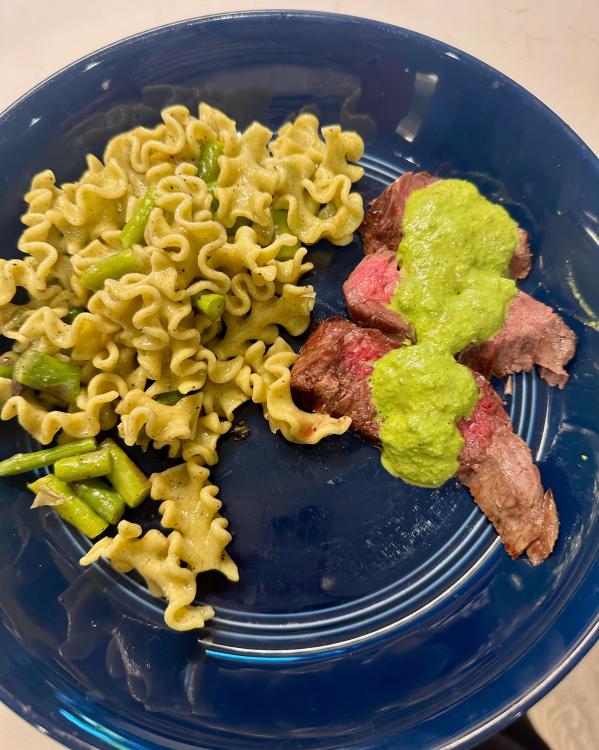
Bavette steak with leftover green sauce from the Peruvian grilled chicken. With it I served pasta with asparagus, loosely inspired by @blue_dolphin's suggestion to make Pasta alla Gricia with Slivered Sugar Snap Peas in the Farmers Market thread. I cooked some locally made lemon parsley pasta (from last year's Farmers Market), and threw in the asparagus at the end to cook it briefly. Drained then mixed it all together butter, parmesan, a bit of pasta cooking water, and a lot of black pepper. We liked and it's something I'd do again, especially with a pasta like this that has its own thing going on.
-
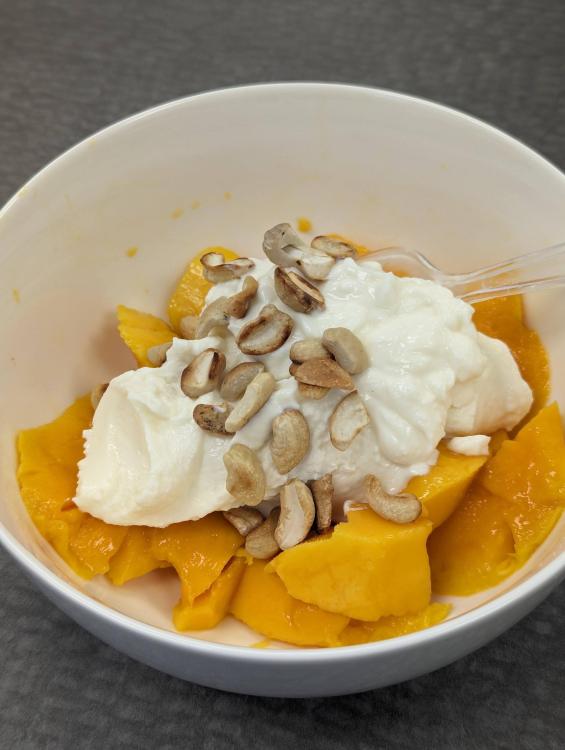
Scored some very ripe marked down fruit at an Asian supermarket near my office, mango with skyr and toasted cashews for lunch.
-

PLANNING: eGullet Chocolate and Confectionery Workshop 2024
RanaMN replied to a topic in Pastry & Baking
25 grams soapwort with 300ml of water. Boiled it until I had 75ml liquid. The meringue itself was beautiful I made it with sugar syrup but was inedible. I saw here somebody else complained their meringue was super bitter, the writer thought it was probably the soapwort. https://www.anissas.com/natef-a-miraculous-transformation/ -
Now this is interesting, what kind of cooking do you do below 175F?
-
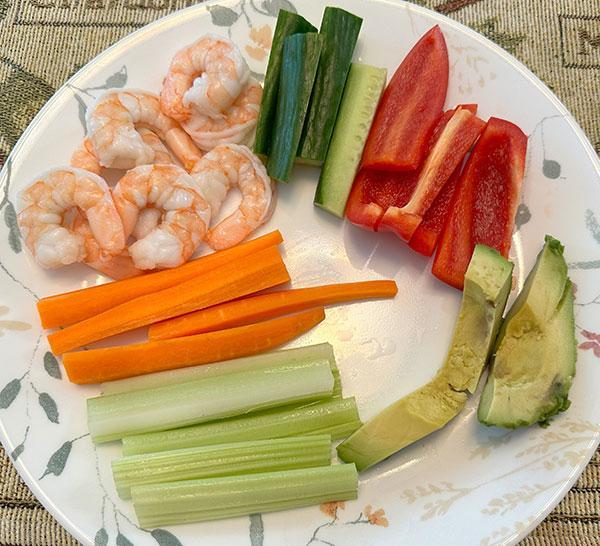
Cold shrimp with carrots, celery, red bell pepper, cucumber and avocado.
-
Okay, you've convinced me that this book belongs in my library! I went back to the original posts, and those links indicated that there was no Kindle version. There is now: Sunday Suppers at Lucques, by Suzanne Goin (eG-friendly Amazon.com link). However, I think I'll want the hard-copy version. If my library doesn't carry it, I'll be picking up a used copy!
-
It's possible that almond bread just isn't great for this application. Even with wheat bread I find that the bread can brown before the insides fully melt, especially with thick bread or if I am putting meats and things in there. I usually put the ingredients that will go inside the sandwich into the microwave for a moment, to get them up at least to room temperature. Then, I finish assembly and put it in the pan.
-
Here is the regular sourdough from Wildwood Flour bakery (I really like the crusty exterior) And here is their pain au chocolat. It shatters as you touch it, exactly the way it should! Super flaky interior.
-
Cooking from "Sunday Suppers at Lucques" by Suzanne Goin
FrogPrincesse replied to a topic in Cooking
I keep going back to this great book and am never disappointed. For Mother's Day, I made this simple appetizer of prosciutto and grilled asparagus with whole grain mustard. She says to use pencil-thin asparagus; mine were slightly larger, so I peeled them to make sure they would be tender. They are dressed with olive oil, salt, pepper and grilled for a few minutes, served on top of prosciutto (I used a locally-made wild boar prosciutto from Angel's Salumi which was ultra delicious), with a mixture of crème fraiche and whole grain mustard drizzled on top. By far the easiest recipe I have seen in the book! -

PLANNING: eGullet Chocolate and Confectionery Workshop 2024
Kerry Beal replied to a topic in Pastry & Baking
How much so soapwort did you use? With how much water? -
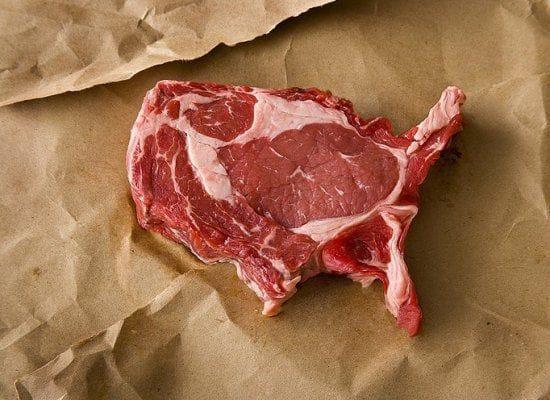
The United Steaks of America
-
It's dry warm weather here, so I just put them on a piece of parchment in my outdoor countertop oven (not turned on) and left them air dry for about 5-6 days. To be honest they were probably done in 3 days, but I kept forgetting to check them. Here's a link for an example.
-
This may be a dumb question but how do you dehydrate the grains?
-
Is there a reason you’re using almond bread ? From your description it sounds like it’s not suitable for what you’re looking to achieve. Unless there’s a particular reason you need almond bread why make life difficult.
-
PLANNING: eGullet Chocolate and Confectionery Workshop 2024
RanaMN replied to a topic in Pastry & Baking
Okay, I tried making meringue with the soapwort I ordered from Amazon today, but it turned out to be inedible because it was so bitter. I'll have to try a different type of soapwort when I'm in Turkey this summer. I suppose this will be a project for next time -
I just divided my grains and dehydrated half after rinsing thoroughly. I put the dried ones in a baggie with powdered milk and put in the freezer. These will be a backup supply in case I lose my working grains in the future.
-
I am spectacularly lazy about my kefir. I will use it regularly and then forget it. BUT, I keep mine in the refrigerator almost exclusively. It really slows down the culturing so that it harder to get away from you. It's like the slow cold bread dough method, it's still working but at a much reduced rate. Maybe try that for a while and see if it suits you. I think the 3 to 4 days is way too much at room temp. I never go more that 12-24 hours at room temp before I put it in the fridge. I would suggest to sieve it though, for your preferred consistency. And try to reuse those grains.
-
For the first few months that I was making kefir, I'd save a bit of the old batch to use as a starter culture for the new batch. Consequently a single sachet lasted me through several batches. At some point the kefir would seem to lose its good flavor, and I'd finish that batch and start a fresh batch with a new sachet. My best friend thinks that I am indeed making cheese, and that I'm leaving it at room temperature too long (3 or 4 days, compared to her 18-24 hours). What you write above is consistent with what @andiesenji reported originally, so those probably are salvageable grains. I'll try saving those grains and starting a new batch, and see how it goes. How long do you incubate your kefir?
-
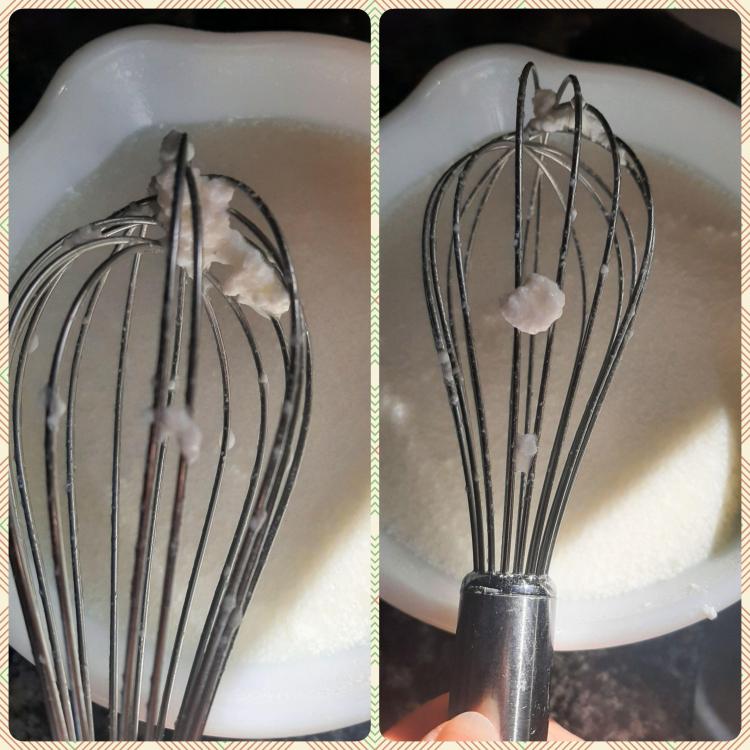
I make kefir. The lumps from what I can see are the actual kefir cultures (lumpy brain pale colored material). I get the separation in my kefir, to me it's normal. I stir it to a homogeneous consistency with a spoon and then pour through a fine sieve. What's in the sieve (the grains) I put into a container to make the next batch of kefir. The sieved liquid is the usable kefir and I mix it with the flavor of the day or just drink it straight. Are you using a new pack of that powder stuff everytime you make kefir? I've never used that method or product before, my kefir grains are years old right now. The clumps on your whisk resemble the kefir cultures (grains).
-
Probably should be looking for a particularly melty cheese. Maybe even nuking your sandwich before the grilling. But what you really need is a copy of Harold McGee's On Food and Cooking, so you can refer to the different temperatures that caramelization and the Maillard reactions begin. You also likely already know that things like bacon will--eventually--brown at quite low temperature settings.
-
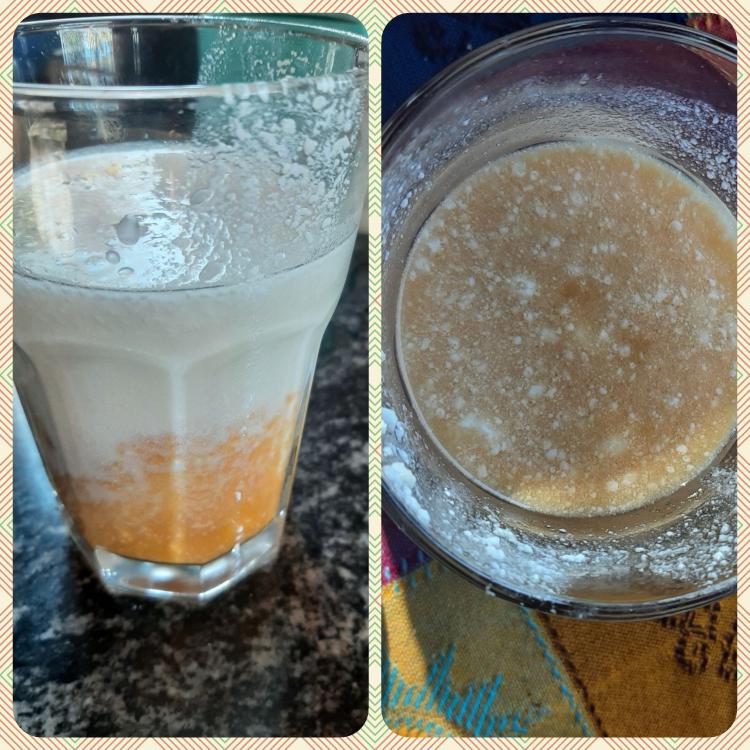
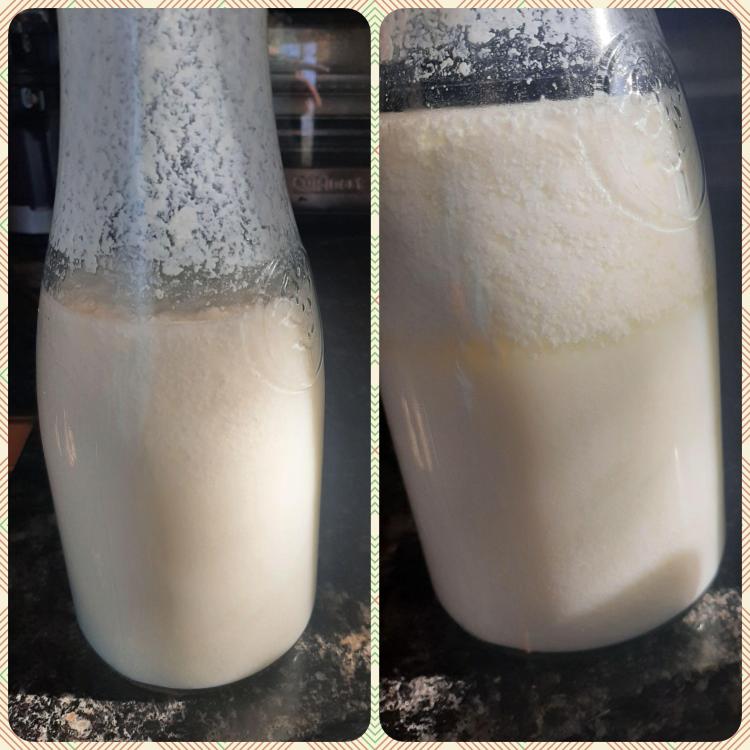
This is what it looks like this morning. The batch is "completed" in terms of taste; I'm sure it's fermented enough. It's just as separated as before. If I shake it in the carafe it looks a bit more homogenous, but starts to separate quickly. I tried pouring it into a mixing bowl and whisking, as my best friend does with hers. I discovered clumps that simply won't whisk; they're too firm. It's like trying to whisk cottage cheese, and these curds are about the firmness and texture of cottage cheese curds. My wand blender is elsewhere and I was getting hungry, so I whisked as much as I wished, then poured a glassful with some lovely mango juice to temper the tartness. The sight and texture aren't appealing! The flavor is good as long as I ignore the mouthfeel, but I don't want to have to do that over the long haul. My next step will be to try electrical assistance (stick blender) and see if it breaks up those clumps. These may actually be the "grains" that @andiesenji noted above, that she strains out for her next batch. However, my best friend never bothers with that and simply saves some of the whisked batch as a starter for the next batch. I'm trying to keep this as simple as possible, and would prefer not to have to strain the mixture. Thoughts, anyone? Why do the clumps develop? What are they? How can I avoid them, or should I just shrug and plan to use a blender?


-
Who's Online 15 Members, 1 Anonymous, 687 Guests (See full list)
-
Popular Now
-
-
Recent Forum Images