Search the Community
Showing results for tags 'Recipe'.
-
Where do Chefs get most of their ideas from(besides Sunday night projects!)? Honestly, a combination of books and leftover products. Duck fat is either in over supply or high demand in most kitchens. It depends on how many ducks you have broken down, how much time you spend rendering fat and if you are currently doing duck fat potatoes on your menu. When I worked at the Herbfarm, we would often have large vats of duck fat and pork fat. This brought about the question. What do we do with all this duck fat/pork fat? Well, you can confit everything in duck and pork fat. It tastes great. However, we were the Herbfarm. We had to try to add a twist. Now this dish may have come from Heston Blumenthal originally, I can't recall. To me, in a kitchen, what's new is old and what is old is new. Or as King Solomon said "There is nothing new under the sun" (ironically, I am sure he stole that from someone). So this dish is simple and really requires very little prep, minus the cracklins. What you will need: 8 oz of Duck/Pork Fat 2 Bunchs of Chives, slice extra thin(make sure you have a sharp knife!) Salt to taste Any leftover duck skin from rendering If you don't have that 1-2 oz of crisped and crumbed bacon will work Equipment: Cube shaped molds Butchers Twine Piping bag Whipped Version - BETTER Tasting: Now there are two ways to approach this "dish", not really a dish, product. I prefer the whipped version. It just tastes so airy. It is like whipped cream vs. cream. Let you duck or pork fat soften at room temperature. You don't want to break your kitchen aid. Once it has tempered, place all 8 oz in a mixer and beat on high for a few minutes with a few good pinches of salt. You should see the color start to brighten up. After that, let it beat for another 2-3 minutes. Then when it looks very airy, use a spatula to fold in the chives and crispy skin or back. Now make sure you have the butchers twine cut into several inch pieces. It is ok if they are too long, you can cut them later. Place the whipped fat in a piping bag. Now here is the only reason I don't like the whipped method. It produces a better product by far! However, it can be a little messier. I usually put the twine in and pull one end to a corner. Pipe the fat into the cube mold till it fills it slightly above the top. Pull the string towards the middle, and flatten the top using an offset spatula. Once all your molds are filled and wicked, place into the fridge until you need it. Then pop it out! Melted Version: Alright, this is not my preference, but it is way faster and easier but the chives and cracklins tend to settle at the bottom. Lightly warm your duck or pork fat. No need to bring it to anything above 150 degrees. Let it cool if it gets too hot Then while it is still fluid, mix in the chives and cracklins. Now using the cube molds and the wicks, put the wick in first. It will be easier, trust me! Same idea, pull the wick to the side and then pour in the fat. Obviously, way easier and cleaner than piping, but again, think whipped cream vs cream. Now once they are all wicked, place in fridge till firm. Serve with a nice slice of Rye Sour dough bread! Or maybe another bread from Tartine's Bread Book!
-
**The top portion is a little more story, but if you don't want to read that, skip on down to the recipe!** Black Sesame Seed Gelato Black Sesame, Douglas fir Granita and toasted chocolate One of the recipes I loved from Cafe Juanita was the Gelato recipe. One, it was easy to memorize and two every time I have used it and in every kitchen I have been asked for the recipe. Oh, and I forgot the best part. So this recipe is called "Black Sesame" but really I will give you the base and from there you can make any flavor you want! I have made Smoked Caramel, Douglas fir, Cardamon, Pistachio, Olive oil and 31 other flavors (actually more!). So you can make a huge batch of this and take it from there! The key to the recipe is understand how Gelato and Ice Cream works. Frozen custards relay on various variables to reduce the amount of ice crystal that from in the custard. Higher fat, higher hydrocolliods, faster sheering of a blade, etc. Each of these decrease the ability for ice crystals to form. So when considering making a flavor fat, protein, sugar and churning levels all have to be taken into account. These all play a role. Not only that, sugar, fat, and protein play a huge role in not only texture, but stability at room temperature. For instance, have you ever had chewy ice cream and I am not referring to Turkish Ice cream. I am referring to overly stabilized ice creams. Whether this is with carrageenan or guar gum. All stabilizers are double edged swords. If you have 500 hundred quenelles that you have to do. Stabilizers are a life saver. Yet, your texture suffers. **Warning***If you want to to go straight to the recipe, skip the next three sections! Fat Let me tell you a horror story about high fat gelato. One such night, the first night I went from being an Intern to a paid employee at Cafe Juanita we had to serve a 30 top down stairs. I was in charge of the dessert. A nectarine tart with Olive oil gelato. One key with high fat ice creams and gelatos is proper tempering. If you haven't tempered an ice cream with high fat, and have to scoop 30 quenelles. You are screwed. I still remember that night. Holly came down, and she didn't yell, she didn't scream. Her words still cut like a hot dagger through my young self-esteem. I told you I just started getting paid, after 3 months of interning. Her first question was "Why am I even paying you". Instant shut down, me a 17-year old kid who had plenty of imposter syndrome to deal with, was broken. I couldn't even respond.#cheflife..but that doesn't have too much to do with Gelato. It is more just to make the point that high fat means a harder freeze. Also, sometimes it makes it more like frozen butter. This is not a pleasant texture and you should think about the final fat content. If I am making a pure nut gelato, I often just use a nut butter and simple syrup. There is no need for cream, whole milk or egg. You actually want to reduce fat. Sugar Now where high fat makes ice creams more stable. Increasing sugar does quite the opposite. The sugar molecule decreases the temperature required for a hard freeze. I learned to hate the Burnt sugar gelato at Cafe Juanita. If it was even close to 80 degrees outside, the little freezer we had upstairs couldn't handle being open and closed all service. I would be able to server maybe 3 servings before I just had to say we were out. If you happen to make this recipe and have any questions about flavor adjustments, feel free to send me an email! Hydrocolliods If you don't like nerd talk, you should skip to the recipe now! If you like knowing random facts about things to "impress" people at parties. Then keep reading. The word has two parts. The hydro referring to water and the collid referring one product that is microscopically dispersed insoluble products in another substance. What this translates to, is small particles floating around in water. In particular, these products often create a matrix that suspends fluid. This would be xanthan gum, guar gum, carrageenan, egg yolks, and many others. If you have ever looked at the ingredients in store bought ice cream, some of these may be familiar. These help maintain the structure of the ice cream. Some of them can even withstand a decent amount of sitting at room temperature. Too much does make your ice cream rather chewy... But enough of that, let's get to the recipe! Recipe 1 Gallon of Whole Milk 900 g egg yolk 1000 g sugar 500 g black Sesame(toasted) 1 tbsp of salt Equipment needed Vitamix or other blender! Ice Cream Machine 2 Gallon Pot- or double the size of your final proportion 2 Gallon Bowl Whisk Alright, this recipe is pretty simple. Have you ever made custard or creme anglaise? Well, that is all you are going to do here. Start by taking the whole milk and heating it on the on a medium high heat. Make sure you watch it so it doesn't over boil (trust me, I have had to clean plenty of stove tops because of my one track mind). In a bowl that can hold two gallons! mix the egg yolks, sugar and salt, and beat until thick. Once your milk has come up to a boil, take it off the heat. Make sure you have a ladle and a whisk ready and clean(more important for cooks...). Then slowly ladle in the hot milk and whisk. This is called tempering, it protects the egg yolks from scrambling. You want to make sure you bring the egg yolks up slowly and whisk constantly. Otherwise you will end up with egg chunks! Once mixed, you will more than likely have to put this mixture on the stove top again at low heat(10% of the time it might cook to the right temperature and you won't have to do this step). Bring the mixture up to 160-165 degrees. This should be at what is called the "Nape" stage. This refers to being able to stick a spoon in the custard base, pull it out a scrape a line down the center. As in the picture below. ****Warning***** be mindful of the bottom of your pan. You have to keep mixing constantly, maybe even with a heat proof spatula. Otherwise, you will get scrambled eggs at the bottom. A little is ok, and can and should be strained out! Set up a bowl that will fit your final custard over a bowl with ice water. This will just help cool down your product faster, and if by chance you were getting too hot, save you from having scrambled eggs. Once your custard has reached the proper stage of Nape. Strain your product through a fine sieve or other strainer into your two bowl combination. That was your base. From there, you can take your base and make any flavor you want! Again, let me know if you have any questions! Black Sesame Starting with the base, take half your toasted black sesame and enough liquid to fill 1/2 of your blender. Don't over fill your blender...that is my job...I have seen blenders explode more than once... Place the sesame seeds and base you have from the previous step into your Vita-mix. Blend for a few minutes, its ok if it is not super smooth. We will be straining later on. Repeat this step until all your sesame seed is pureed and mix both of the batches with the rest of your custard. Allow this to sit over night. The next day, strain the product through a fine sieve. Season to taste with more salt if necessary. Honestly, salt in this makes it! From here, it depends on what kind of ice cream maker you have. When I did this dish, we actually used dry ice to make the ice cream. If you are curious on the steps, feel free to ask! No ice cream maker required!
-
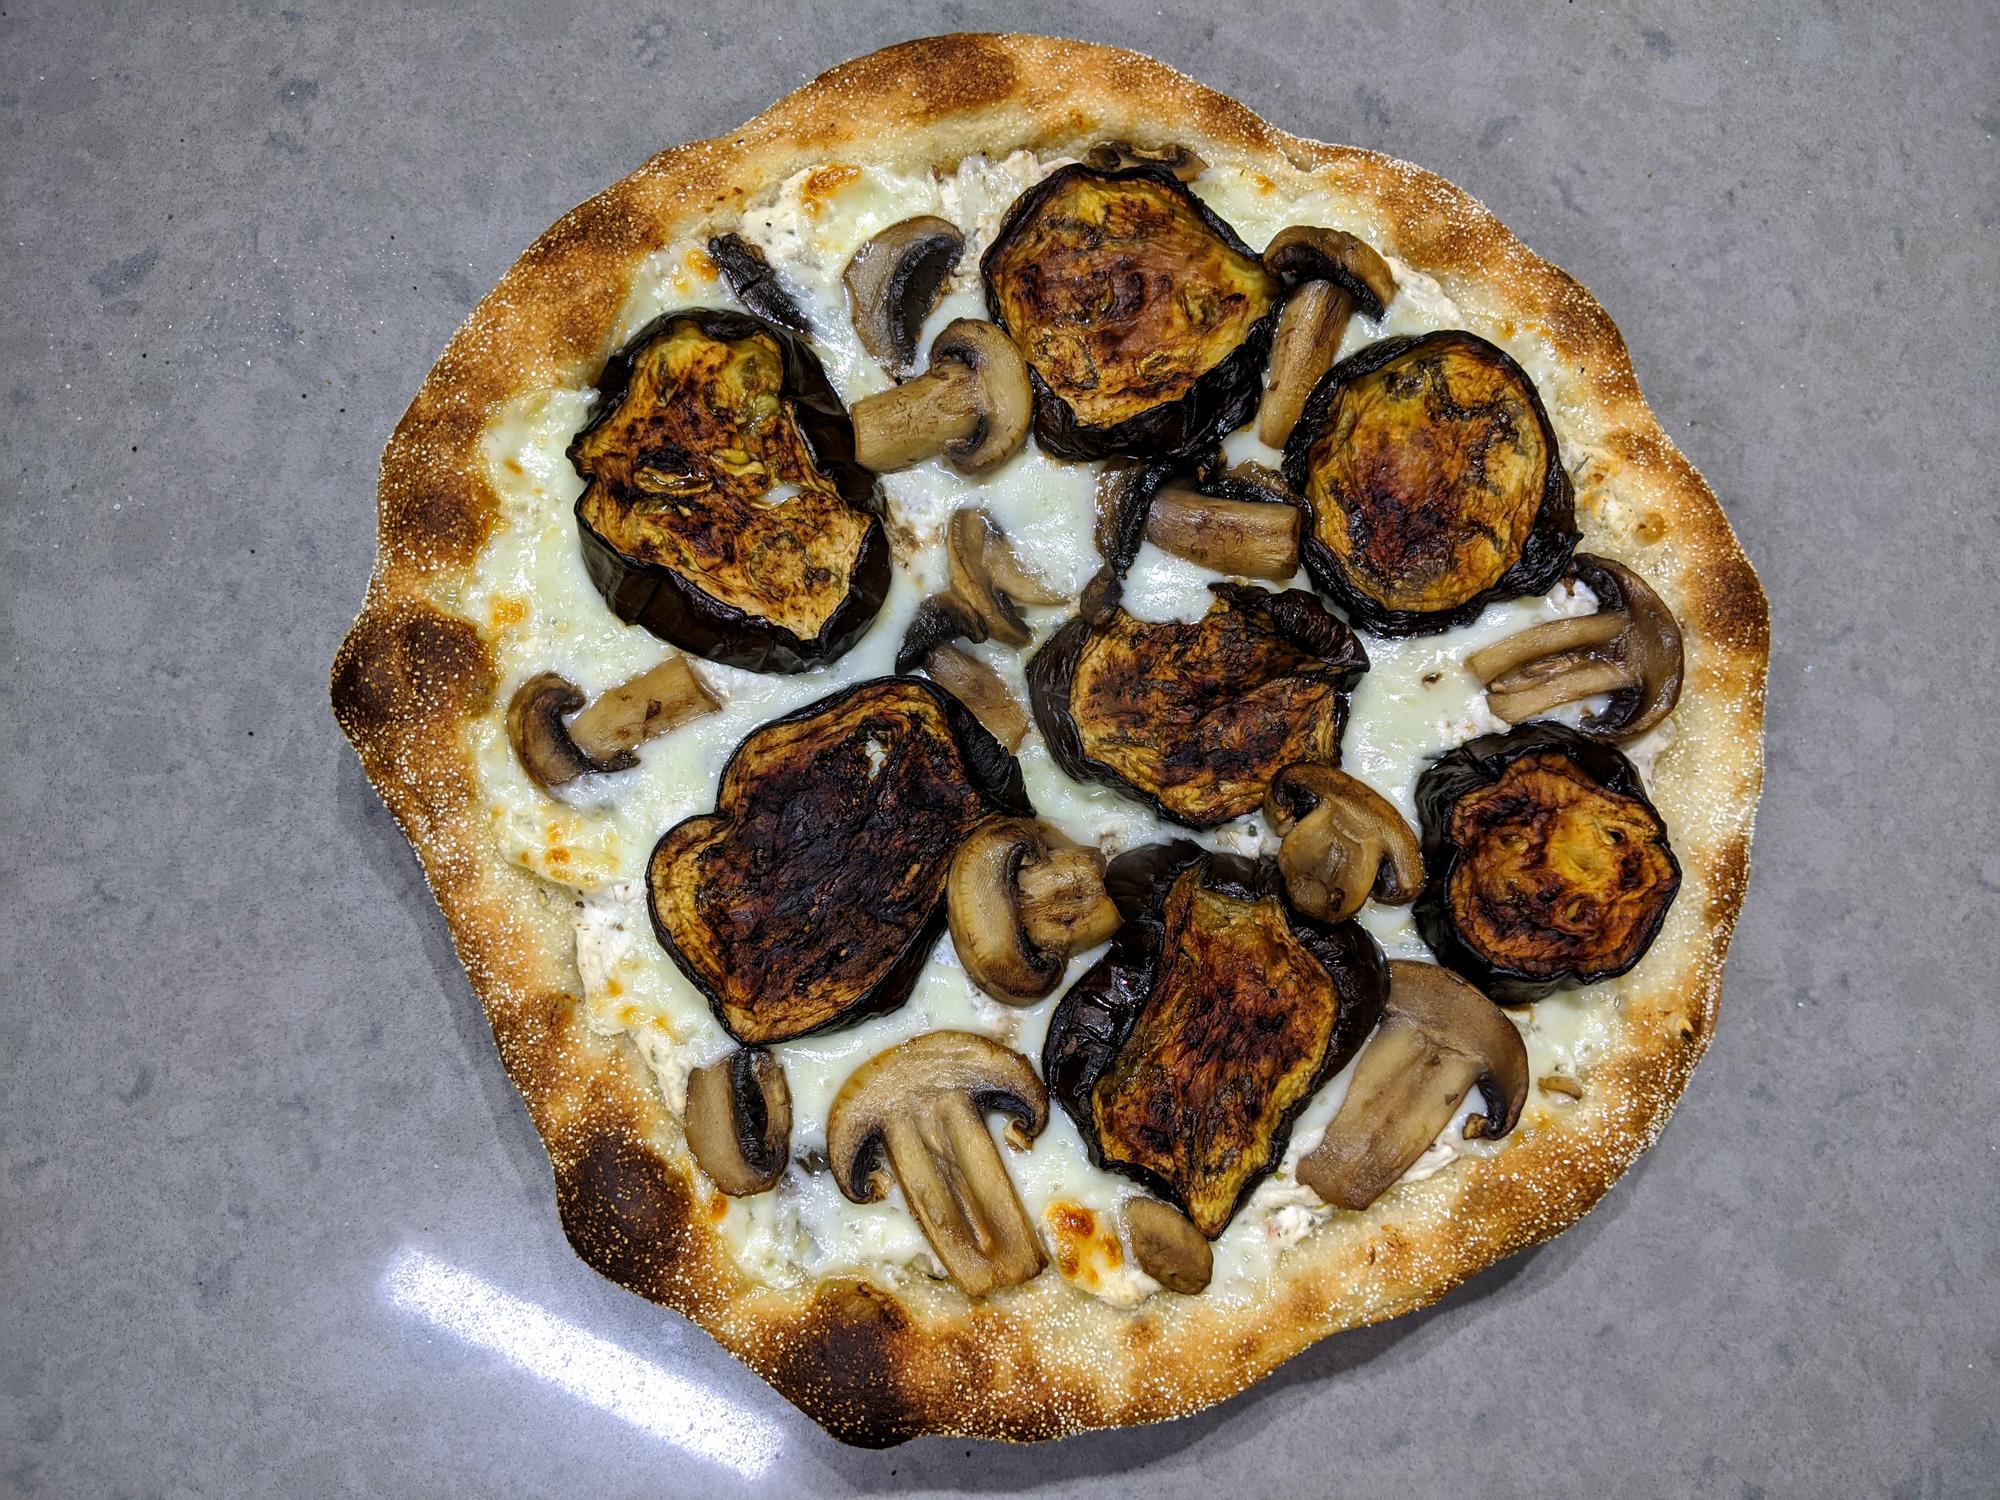
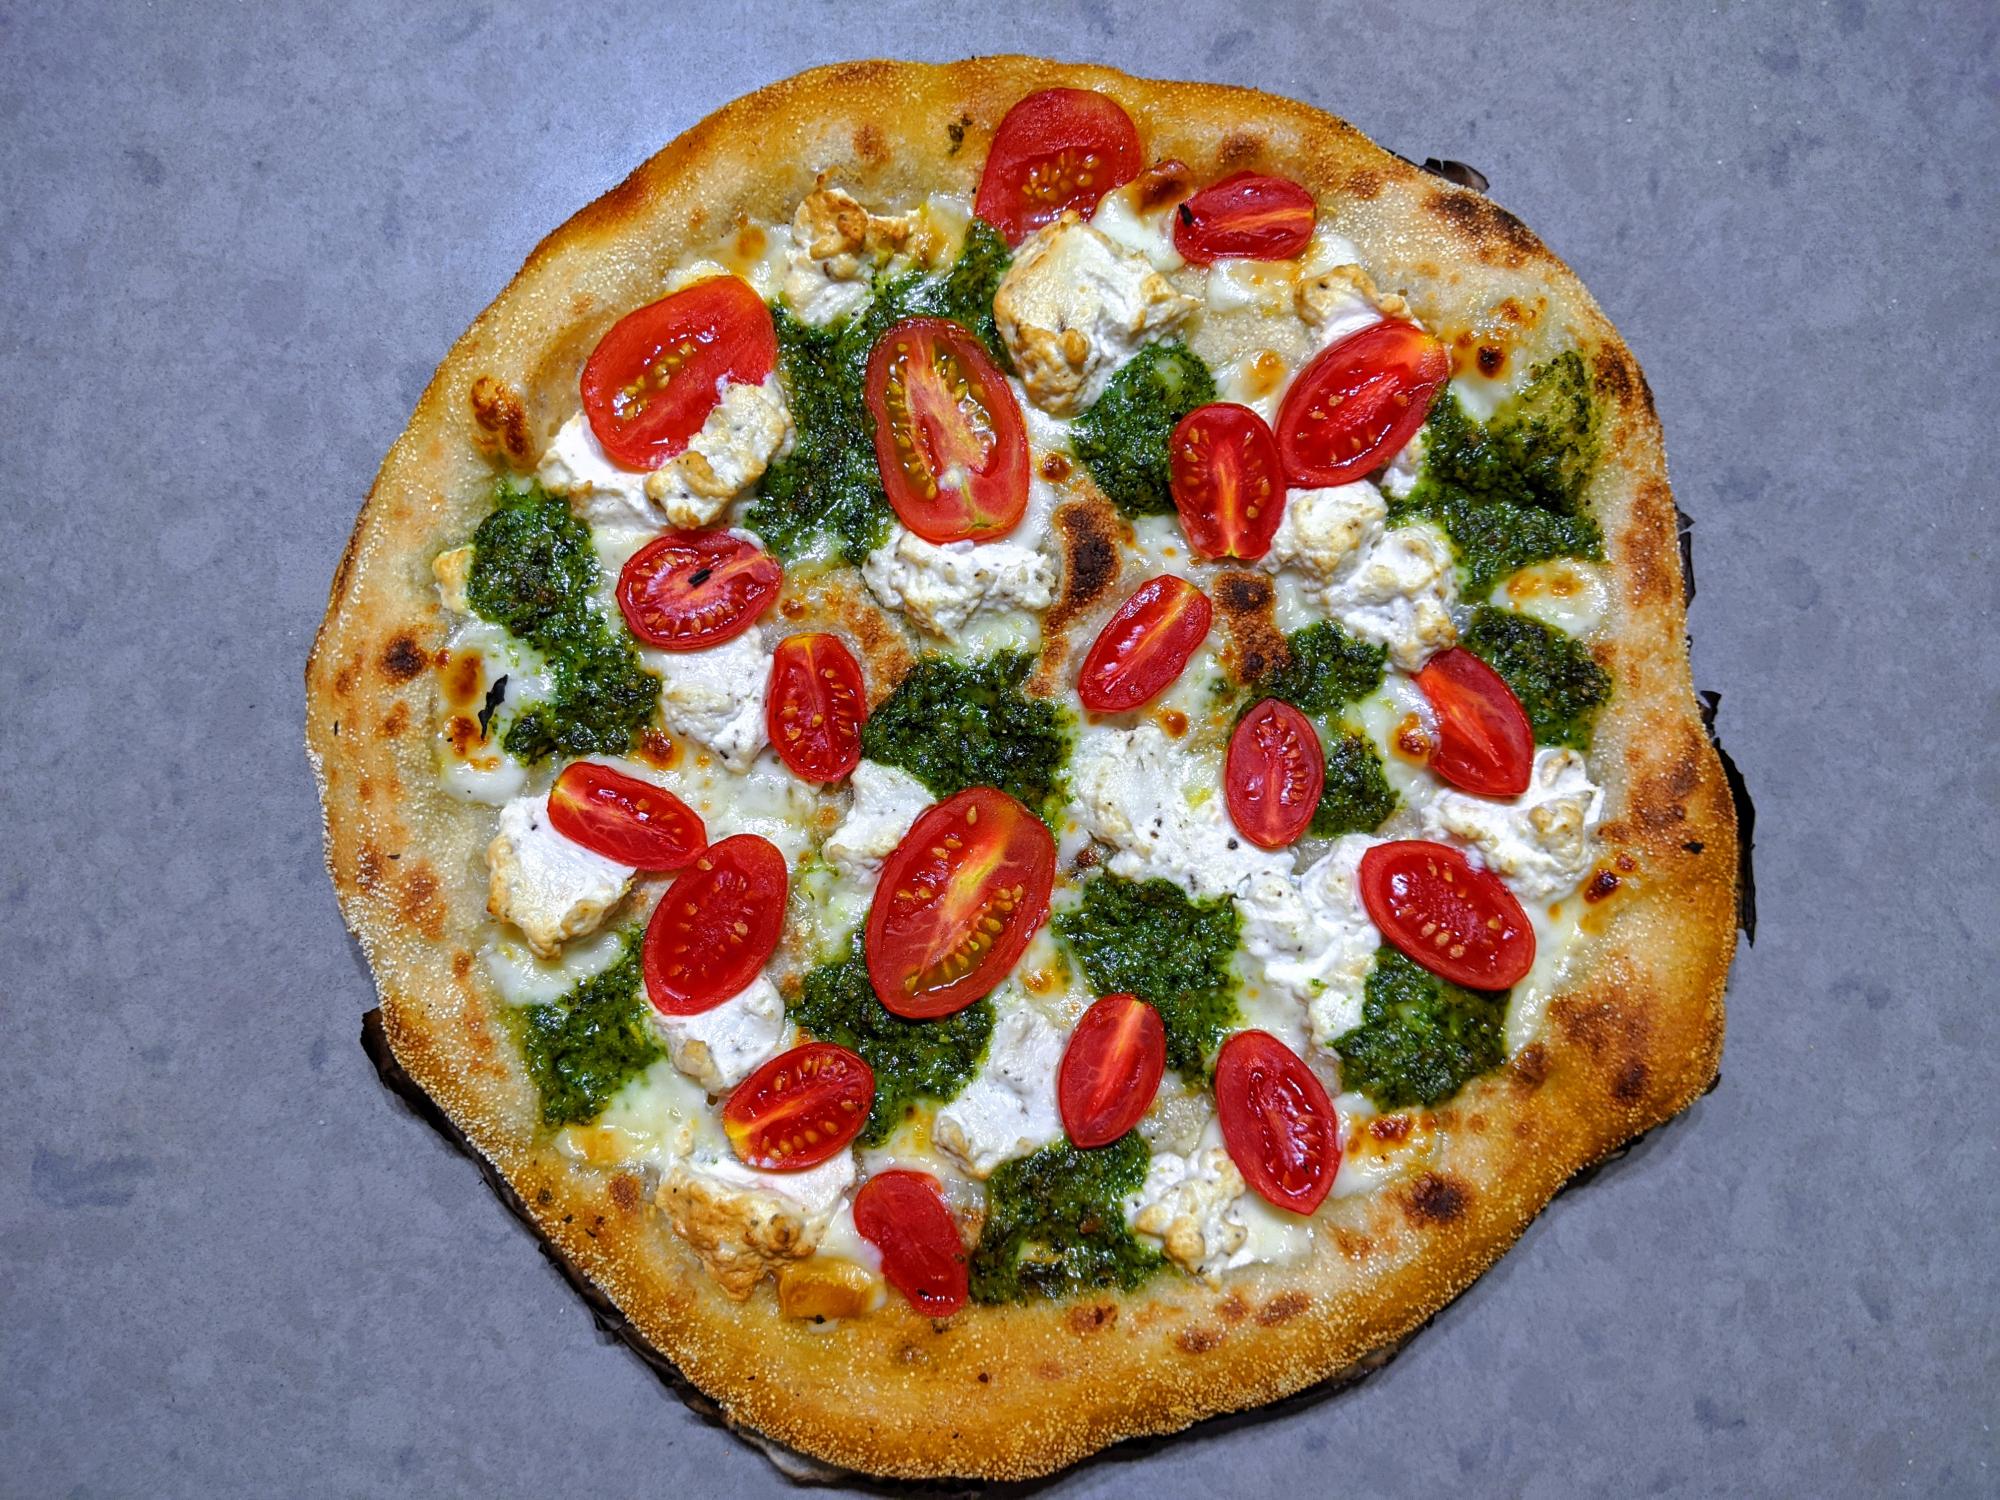
For 3 medium pizzas (4 large-ish slices each) or 2 large pizzas (I recommend that you stick to medium sized ones). 425g (15oz) high gluten (bread) flour 272g (9.6oz) room temp water (based on hydration percentage: 272=425*0.64) 10.5g ( 0.4oz) salt 16g (4 tsp, 0.53oz) sugar 17g (1.5 tbsp, 0.6oz) olive oil 6.5g (2 tsp, 0.25oz) instant yeast (or 2.5g dry) If you have non-diastatic malt powder, adding a little will add a nice flavor Note: edited 2020, since my recipe changed since 2016. The original version called for 6.5g salt, 21g olive oil, 12g sugar. If using dry yeast, dissolve it in the water, instant yeast can be mixed with the flour. Mix all dry ingredients, pour in the water. Using a mixer, knead 5 min, let rest 10 min, knead 5 min more, or until well developed. If you use your hands, it's better to knead more times, for shorter periods and shorter rests in between. Put the dough in the fridge at least overnight, preferably 2-3 days and up to 6 days. Once the dough is risen, Take it cold from the fridge and place it on a dusted surface. Divide into as many pieces as you want pizzas. Shape into tight balls. Use semolina or flour as needed, try not to overuse it, but it's better than having it stick. Place the balls on a generous dusting of semolina or flour so it won't stick to the surface. Keep it covered. I use an upside down bowl, but a dusted towel will work. Let it rise for 1 to 2.5 hours (1 in summer, 2.5 in winter). Don't forget to preheat your oven at least 40 minutes before it's time to bake (even more time if you use a stone instead of steel). You want as high as your oven will go (mine gets to ~270C). When the dough is risen, puffed and slack - Place a parchment over a peel or upside down oven sheet. I like to cut the corners of the parchment so to not risk it burning. Shaping takes a little practice and is up to personal preference. There are good videos online. Take a ball and dust lightly. Flatten it gently, don't remove much air. Do pinch any large bubbles. Put the dough on your closed fist and gently shake to extend the dough edges downwards. Hold the dough with two hands, using your finger to grab it slightly inside from the rim, as to keep the air in it. Let gravity stretch the dough downwards, as you rotate it in the, much like a steering wheel, gently stretch the dough sideways between your hands as you do so (I hope this description made sense). When the dough inside the rim is thin and almost, but not yet allowing light through, place the dough on the parchment. Lift the edges and stretch it to its full size and restore its circular shape. Top as desired. Use cold ingredients, especially the cheese, which is also better cubed than grated. I'll use apx. 90g (3.2oz) of mozzarella per medium sized pizza. Set the oven to top broiler/grill on maximum power for one minute, then slide the pizza and the parchment together into the oven and . Bake until getting slightly charred, but avoid browning the cheese. Let the oven reheat a little (back in regular, non grill setting) before baking the next pie, and turn the broiler back on a minute before inserting it. A note about baking - you want the baking steel to preheat as much as you can before inserting the pizza. You want to make sure the broiler is on for a minute before inserting the pizza, but not too long ahead so that it won't be stopped by the thermostat. Please tell me if there is something you'd like me to clarify. My favorite toppings: All are for medium sized pizzas, scale by 1.5 for a large pizza. The amounts are in grams, but that doesn't mean it needs to be precise at all. All toppings should be fridge-cold, especially the cheeses. Classic NY style: 5 large ripe, sauce tomatoes (like roma or san-marzano) either fresh or canned - peeled , chopped, salted , drained and crushed (500g / 17oz) 100g cold semi-dry mozzarella (3.5oz), chopped Fry some garlic in olive oil. Add the tomatoes and cook until slightly thickened but still bright tasting. Add salt to taste and some basil, chili, etc. Spread the sauce and sprinkle the cheese. Pesto-ricotta: 90-100g ricotta (3.5oz), mixed with some salt and pepper 50g cold mozzarella (1.8oz) 100g pesto, semi frozen or at least fridge-cold (3.6oz) 5-6 cherry tomatoes, halved Spread the mozzarella evenly, drop chunks of pesto and ricotta. Scatter the halved tomatoes. Eggplants and mushrooms: 1 small eggplant, sliced and baked, grilled or fried about 5 button mushrooms, sliced and sauteed. 80g ricotta (2.8oz), mixed with a minced clove of garlic 90g cold mozzarella (3.2oz) - optionally smoked mozzarella Some salt, pepper, oregano and thyme Margarita 4 large ripe, sauce tomatoes (like roma or san-marzano) either fresh or canned - peeled , chopped, salted , drained and crushed (400g / 17oz) 110g cold fresh mozzarella (3.9oz), teared by hand (or roughly chopped) basil leaves Some sharp EVOO Salt the crushed tomatoes to taste, spread it and place the cheese. Place the basil and drizzle olive oil immediately after baking. Ricotta & figs 100g ricotta (3.5oz), mixed with 1/3 tsp salt and some pepper, and optionally, 1/3 tsp of ground anise or fennel seeds 80g cold mozzarella (2.8oz) 4-5 large ripe figs, sliced. The narrow top-most slices are the cook's treat Bake until the figs gets caramelized. Goat cheese and olives About 5 tablespoons of cooked tomato sauce - enough for e thin even spreading Dry chili to taste 55g cold mozzarella (2oz) 75g cold soft goat cheese, salted (2.6oz) About 7-8 of olives of your choice, chopped About 5 cherry tomatoes, sliced (using multiple colors looks better) Apples and blue cheese About 5 tablespoons of cooked tomato sauce - enough for e thin even spreading 65g mozzarella (2.3oz) 65g strong blue cheese (2.3oz) 150-170g tart apple (I used Granny Smith), cubed (apx 1/2") Some salt, depending on your cheese of choice


- 20 replies
-
- 11
-

-
It's that time of year again, and these are some of the cranberry recipes I've been using for the holidays over the past few years. They are simple to prepare, easily transported, and a little different and fun to eat. Perhaps you'll try one or both. My Cranberry Salsa "The Tropics meet New England" 1 12-oz bag of fresh cranberries 1 clove garlic 1 or 2 jalapeno or serrano chilies (I usually use one of each) 4 TBS finely chopped cilantro (I like cilantro, others don't - adjust to taste) 3 scallions, minced Juice from 3 limes (about 1/3 cup) 1/2 cup sugar (I often use less - adjust to your taste) salt and freshly ground pepper to taste Boil cranberries for about a minute in one quart of water. Drain well. Mince the garlic and seed, devein (if you like - probably a good idea if you want to keep the heat down) and mince the chili peppers. Combine with chopped cilantro, scallions and the cranberries in a mixing bowl, and mix by hand, squeezing some of the cranberries to a pulp and leaving the rest whole or in large pieces. Add the lime juice, sugar, salt and pepper to taste. The salsa should be a little sweet, a little sour, and nice and spicy. Cocodrilo Cranberry Citrus Salsa makes approx. 4 cups 2 cups cranberries (fresh or frozen) 1 cup chopped yellow or red onions 1/2 cup fresh orange juice the zest from 1 orange 1 jalapeno chili, seeded and chopped 1/2 tsp. ginger 2 Tbs + 2 tsp brown sugar 1 tsp. honey 1 1/2 Tbs rice wine vinegar 1 Tbs hot sauce (I like this or this or this best) 2 T. chopped cilantro Combine all ingredients in a saucepan. Bring the mixture to a boil, then remove it from the heat and let it cool while stirring carefully - try not to split the cranberries! Chill before serving - or serve the sauce hot.
-
Shel's Version of Bishop's Hush Puppies These are called "Bishop's Hush Puppies." Bishop was a maintenance man at Texas A&M and became somewhat of a celebrity for his hush puppies. It was said that he'd often have friends and co-workers over for a feast of catfish, beans, coleslaw and, among other things, his famous hush puppies. Latecomers were in danger of missing out on the 'pups, so the guests always arrived on time for Bishop's parties. I got the recipe back in the late 1980s while on a several month driving trip around the US, following, in part, William Least Heat-Moon's journey as documented in his book Blue Highways, and stopping in Dime Box, TX. just because the name sounded interesting. Texas A&M is nearby, in College Station, and, through the recommendation of a local friend, found myself at Bishop's place where I sampled his puppies and was able to get some idea of his recipe. Ingredients 1 cup each water ground white corn meal (140 grams) and AP flour (120 grams) 2 tsp baking powder 1 tsp baking soda 1 1/2 tsp Diamond Crystal kosher salt 1/2 tsp fresh ground black pepper 1 medium yellow onion, finely chopped (Texas 1015's are great when in season) 4 scallions, including tops, finely chopped 1 or 2 jalapenos, seeds removed, diced fine 1 roasted and skinned sweet red pepper, finely diced 1 1/2 cups buttermilk 2 large eggs frying oil Directions Combine the first 9 ingredients in a large bowl. In a smaller bowl stir together the buttermilk and eggs until well mixed, and then add to the dry ingredients, stirring well. Pour some oil (1/2-inch or so) into a heavy cast iron skillet (I guess you can use your deep fryer) and heat until almost sizzling. HOT! HOT! HOT! Drop batter into oil by tablespoonsful and cook over moderate heat until browned and puffy then, if using a skillet, which is what Bishop used, turn and brown the other side. When done, remove with slotted spoon, drain on newspaper or paper towels. Keep oil hot and, if using a skillet, add more oil as needed to maintain depth. These are very good with catfish or 'cue and Terry Bryant's Carrot-Cayenne Coleslaw.
-
While travelling around the US over the past years, I've come across many similar salads, most with prepared dressings and poor ingredients. Here's my take on what some would call the American standard salad. Shel’s Middle America Salad with Chunky Blue Cheese Dressing Some hearts of romaine or iceberg lettuce wedges fresh tomato wedges rinsed, drained, and dried red kidney beans (optional) thin slices of red onion (optional) a few thick sliced bacon slices (optional) 1 Tbs best quality mayonnaise 1 Tbs good quality sour cream 1 Tbs fresh lemon juice or about 1 Tbs lemon zest, or combination About 1 cup or more rich buttermilk 4 ounces Maytag or similar blue cheese ½ tsp Diamond Crystal Kosher salt dash or two of dry mustard (optional) Divide the blue cheese into three pieces. Take one piece and chop it very fine. Take another piece and chop it medium fine, and chop or crumble the third piece in larger chunks. If using bacon, lay the bacon strips on a roasting rack over a cookie sheet and bake in a 375-degree oven until crisp, about 20-25 minutes. Remove when cooked to your liking, and set on several layers of paper towels to compete draining and to cool further. Cover with a few more layers of paper towels, and pat bacon dry, letting the towels absorb as much grease as possible. You can also put the bacon into a cold oven, and the slower heating will render a little more fat. Of course, some people enjoy a fattier bacon, so skip some of the drying/draining steps. Put the mayo, sour cream, and the very fine pieces of blue cheese together, along with the salt, into an appropriately sized glass or stainless steel bowl (preferably one that comes with a tight fitting lid, but you can use plastic wrap to cover - try not to use plastic bowls as plastic can sometimes impart a taste to whatever is stored in it, especially if you’re storing the dressing overnight or for a couple of days) Using a fork or small whisk, mix together well. If you like you can put the mixture and about ½ cup of buttermilk in a blender or food processor for a few twirls or pulses to incorporate and smooth the mixture, but it’s not really necessary to do that, plus it makes more mess to clean up. When all of the above is nicely combined (don’t over mix) add the rest of the blue cheese and optional dry mustard (start with just a pinch or two) and gently mix together very well by hand. Add more buttermilk a little at a time, mixing well with each addition. When you get the taste and texture to your liking (you may want to add a little more salt, a pinch or two more of dry mustard) cover the bowl and refrigerate at least four hours or, better yet, over night or a couple of days to let the flavors meld. The mixture may thicken up a bit when refrigerated, especially over night, so don’t be afraid to make it a little thinner than you may ultimately prefer. Before using, let the dressing warm a little, stir the mixture, adjust seasoning, maybe add more buttermilk, mayo, or sour cream to adjust taste/texture, and dollop on your salad, ideally wedges of iceberg lettuce or, second choice for authenticity, the hearts of romaine (with any soft tips cut off)with nicely sized wedges of fresh tomatoes and the optional drained and dried canned kidney beans and a few slices of red onion. If using, break up and crumble some bacon over the salad. When eating the salad, close your eyes and it will be easy to imagine that you’re in a diner in Omaha, Nebraska<LOL> Notes: Ideally, you want the lettuce to be firm enough to stand up to the dressing, that’s why it’s suggested to cut off any soft tips. It’s your choice, of course. You might want to seed the tomato wedges depending on how moist and runny the tomatoes are. My preference is for thick sliced bacon. You can sometimes find slab bacon which you or the butcher can cut for you to whatever thickness you like. I look for meatier slices of bacon. The Maytag blue cheese is a true, mid-American cheese, made in Iowa. The Rogue Creamery in Oregon makes some nice blues, too.
-
- 3
-
-
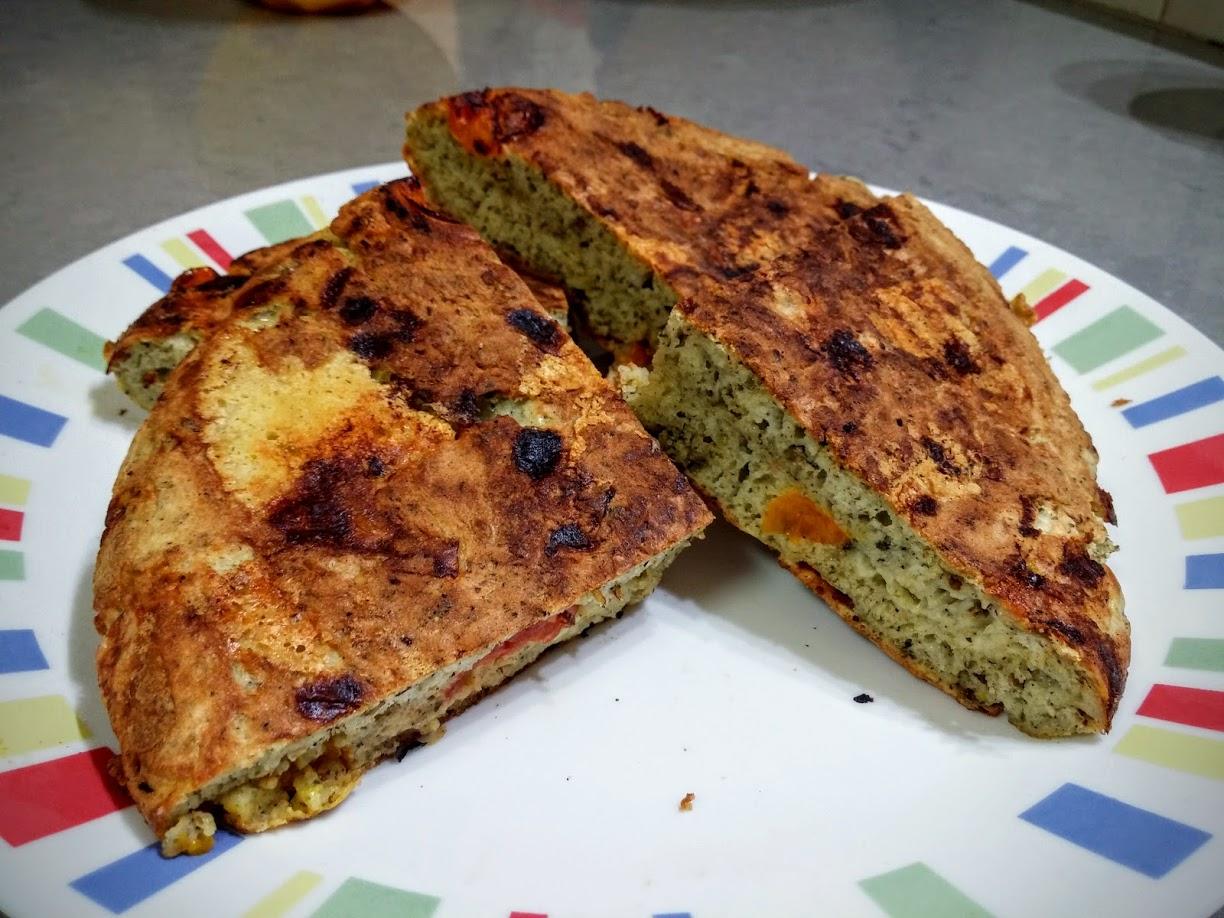
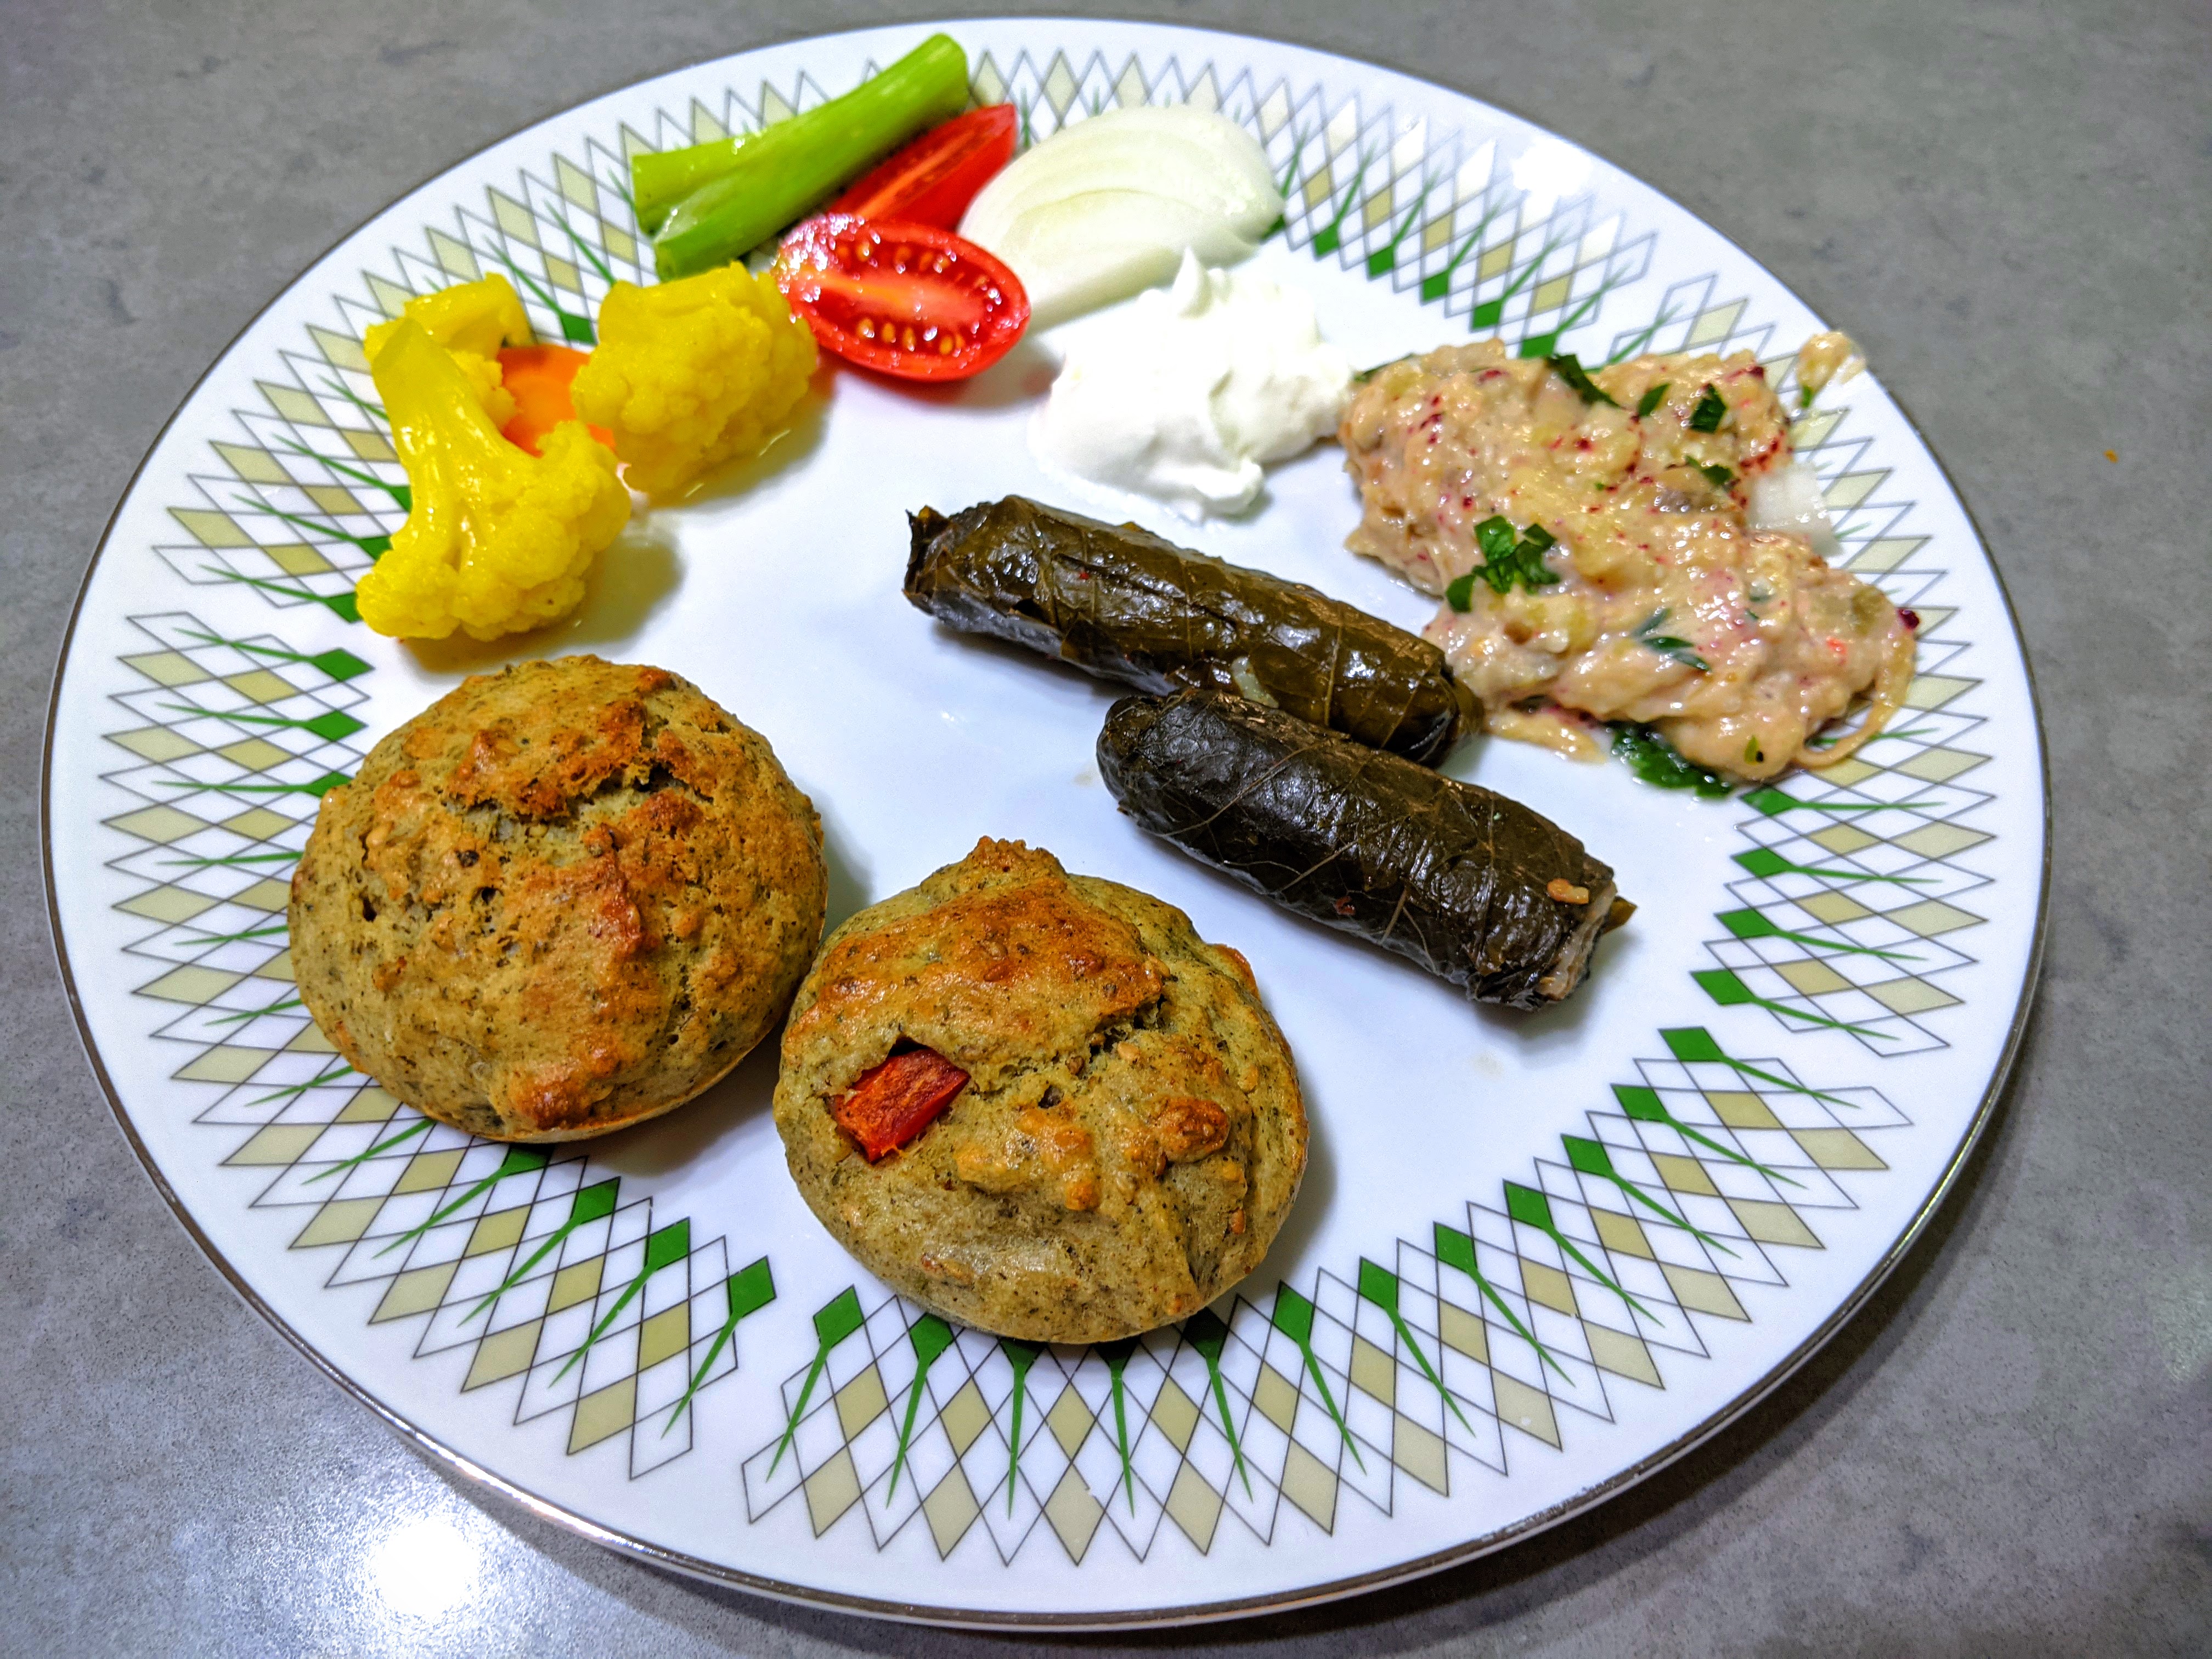
Updated Nov 1st 2020. Best served warm, with labneh and vegetables. I enjoy making a sandwich filled with of labeneh, finely chopped tomato and parsley. Also great served with scrambled eggs cooked with tomatoes and onion, and of course, labneh Ingredients for one not very big bread or 10 muffins, a 20cm frying pan (as flatbread) or a small loaf pan. dry: 85g AP flour (you can use a cake flour if you have it on hand) 1/2-1 teaspoon salt (some zaatar mixtures contains various amounts of salt, so add to taste) 2/3 teaspoon baking powder 15-20g zaatar mixture (I encourage you to also try other spices) wet: 2 eggs 1 teaspoon sugar 90g-100g thick yogurt 20g flavorful olive oil optional: 1/2 a tomato, cut into small dice optional: a handful pf chopped cheese such as mozzarella or feta (reduce salt if using feta!) Mix dry ingredients together in a bowl. In a second larger bowl, beat together the wet ingredients well. To make a flatbread in a frying pan: Preheat the frying pan over medium heat, and oil it well. Fold the flour mixture into the wet mixture. Do not over mix. Pour batter into the hot frying pan. Spread batter evenly. Cover the pan and cook until cooked through, the bottom is brown and crisp, and the top is not sticky. About 10 minutes. Avoid over cooking. Gently flip and briefly cook the second side. re-fry the browned side to get it crisp again if needed. To bake as muffins: Pour into greased muffin tin. It should make about 10-12 small muffins or 6-8 large ones. Bake at 200dC just until a toothpick comes out clean, apx 15-20 - they won't brown much so be careful not to over bake. If you want them prettier and a bit crisp, under bake them by a couple of minutes. Remove from tin, and cool a little. Brush with oil and bake at high heat until browned, apx 5-8 minutes.


-
Hi, I'm looking for a recipe that uses already cooked and shredded ham hock meat, mainly because I need to know the quantity of the ham needed. The only recipes I can find call for the whole hock to start with.
-
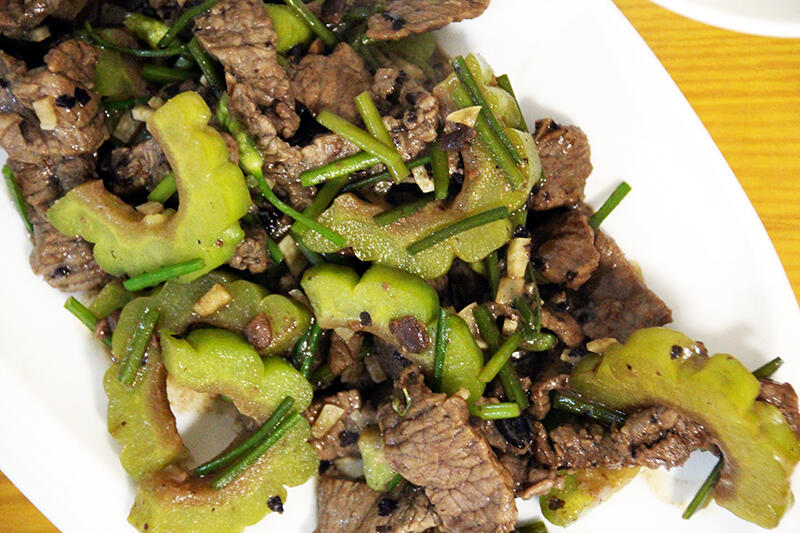
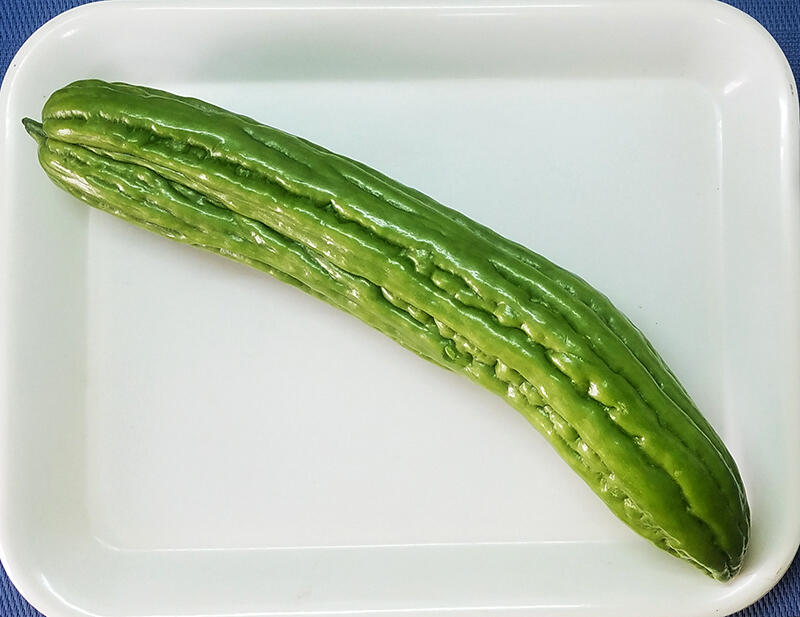
Beef with Bitter Melon - 牛肉苦瓜 The name may be off-putting to many people, but Chinese people do have an appreciation for bitter tastes and anyway, modern cultivars of this gourd are less bitter than in the past. Also, depending on how it's cooked, the bitterness can be mitigated. I'll admit that I wasn't sure at first, but have grown to love it. Note: "Beef with Bitter Melon (牛肉苦瓜 )" or "Bitter Melon with Beef (苦瓜牛肉)"? One Liuzhou restaurant I know has both on its menu! In Chinese, the ingredient listed first is the one there is most of, so, "beef with bitter melon" is mainly beef, whereas "bitter melon with beef" is much more a vegetable dish with just a little beef. This recipe is for the beefier version. To make the other version, just half the amount of beef and double the amount of melon. Ingredients Beef. One pound. Flank steak works best. Slice thinly against the grain. Bitter Melon. Half a melon. You can use the other half in a soup or other dish. Often available in Indian markets or supermarkets. Salted Black Beans. One tablespoon. Available in packets from Asian markets and supermarkets, these are salted, fermented black soy beans. They are used as the basis for 'black bean sauce', but we are going to be making our own sauce! Garlic. 6 cloves Cooking oil. Any vegetable oil except olive oil Shaoxing wine. See method Light soy sauce. One tablespoon Dark soy sauce. One teaspoon White pepper. See method Sesame oil. See method Method Marinate the beef in a 1/2 tablespoon of light soy sauce with a splash of Shaoxing wine along with a teaspoon or so of cornstarch or similar (I use potato starch). Stir well and leave for 15-30 minutes. Cut the melon(s) in half lengthwise and, using a teaspoon, scrape out all the seeds and pith. The more pith you remove, the less bitter the dish will be. Cut the melon into crescents about 1/8th inch wide. Rinse the black beans and drain. Crush them with the blade of your knife, then chop finely. Finely chop the garlic. Stir fry the meat in a tablespoon of oil over a high heat until done. This should take less than a minute. Remove and set aside. Add another tablespoon of oil and reduce heat to medium. fry the garlic and black beans until fragrant then add the bitter melon. Continue frying until the melon softens. then add a tablespoon of Shaoxing wine and soy sauces. Finally sprinkle on white pepper to taste along with a splash of sesame oil. Return the meat to the pan and mix everything well. Note: If you prefer the dish more saucy, you can add a tablespoon or so of water with the soy sauces. Serve with plained rice and a stir-fried green vegetable of choice.
-
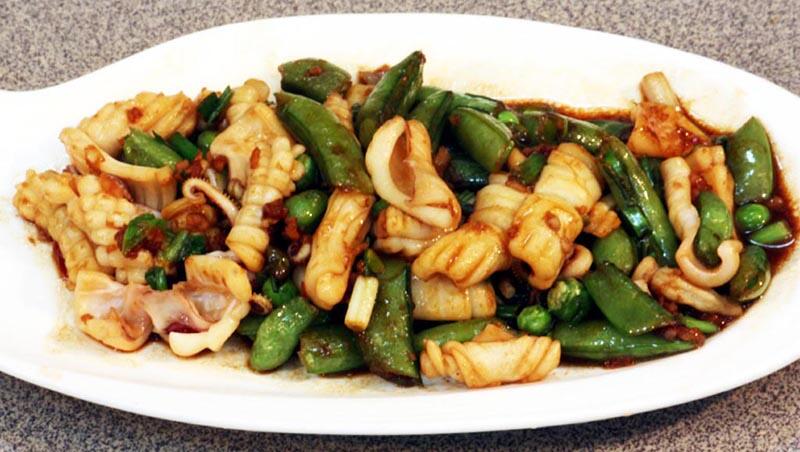
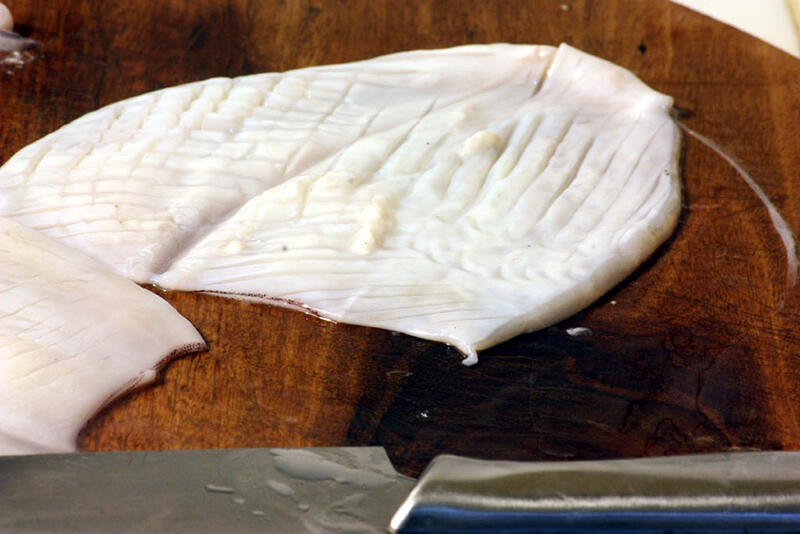
Stir-fried Squid with Snow Peas - 荷兰豆鱿鱼 Another popular restaurant dish that can easily be made at home. The only difficult part (and it's really not that difficult) is preparing the squid. However, your seafood purveyor should be able to do that for you. I have given details below. Ingredients Fresh squid. I tend to prefer the smaller squid in which case I allow one or two squid per person, depending on what other dishes I'm serving. You could use whole frozen squid if fresh is unavailable. Certainly not dried squid. Snow peas aka Mange Tout. Sugar snap peas can also be used. The final dish should be around 50% squid and 50% peas, so an amount roughly equivalent to the squid in bulk is what you are looking for. De-string if necessary and cut in half width-wise. Cooking oil. I use rice bran oil, but any vegetable cooking oil is fine. Not olive oil, though. Garlic. I prefer this dish to be rather garlicky so I use one clove or more per squid. Adjust to your preference. Ginger. An amount equivalent to that of garlic. Red Chile. One or two small hot red chiles. Shaoxing wine. See method. Note: Unlike elsewhere, Shaoxing wine sold in N. America is salted. So, cut back on adding salt if using American sourced Shaoxing. Oyster sauce Sesame oil (optional) Salt Preparing the squid The squid should be cleaned and the tentacles and innards pulled out and set aside while you deal with the tubular body. Remove the internal cartilage / bone along with any remaining innards. With a sharp knife remove the "wings" then slit open the tube by sliding your knife inside and cutting down one side. Open out the now butterflied body. Remove the reddish skin (It is edible, but removing it makes for a nicer presentation. It peels off easily.) Again, using the sharp knife cut score marks on the inside at 1/8th of an inch intervals being careful not to cut all the way through. Then repeat at right angles to the original scoring, to give a cross-hatch effect. Do the same to the squid wings. Cut the body into rectangles roughly the size of a large postage stamp. Separate the tentacles from the innards by feeling for the beak, a hard growth just above the tentacles and at the start of the animal's digestive tract. Dispose of all but the tentacles. If they are long, half them. Wash all the squid meat again. Method There are only two ways to cook squid and have it remain edible. Long slow cooking (an hour or more) or very rapid (a few seconds) then served immediately. Anything else and you'll be chewing on rubber. So that is why I am stir frying it. Few restaurants get this right, so I mainly eat it at home. Heat your wok and add oil. Have a cup of water to the side. Add the garlic, ginger and chile. Should you think it's about to burn, throw in a little of that water. It will evaporate almost immediately but slow down some of the heat. As soon as you can smell the fragrance of the garlic and ginger, add the peas and salt and toss until the peas are nearly cooked (Try a piece to see!). Almost finally, add the squid with a tablespoon of the Shaoxing and about the same of oyster sauce. Do not attempt to add the oyster sauce straight from the bottle. The chances of the whole bottle emptying into your dinner is high! Believe me. I've been there! The squid will curl up and turn opaque in seconds. It's cooked. Sprinkle with a teaspoon of so of sesame oil (if used) and serve immediately!
-
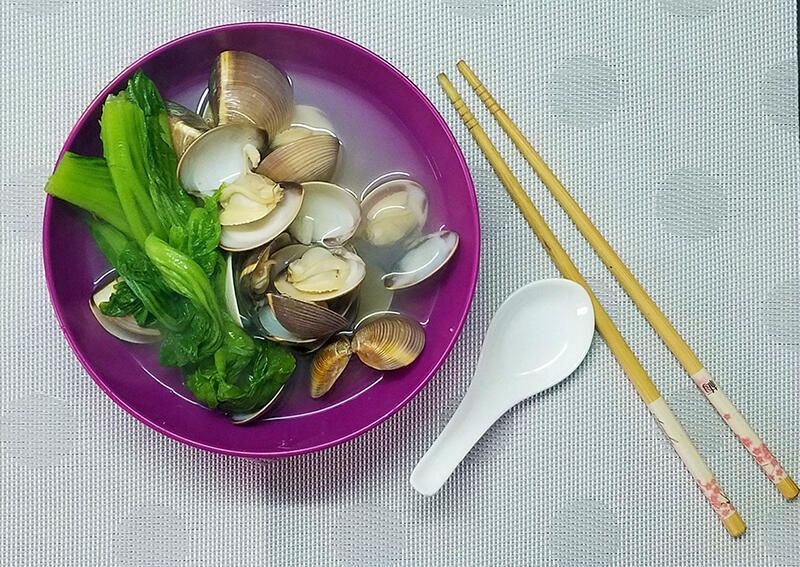
Clam Soup with Mustard Greens - 车螺芥菜汤 This is a popular, light but peppery soup available in most restaurants here (even if its not listed on the menu). Also, very easy to make at home. Ingredients Clams. (around 8 to 10 per person. Some restaurants are stingy with the clams, but I like to be more generous). Fresh live clams are always used in China, but if, not available, I suppose frozen clams could be used. Not canned. The most common clams here are relatively small. Littleneck clams may be a good substitute in terms of size. Stock. Chicken, fish or clam stock are preferable. Stock made from cubes or bouillon powder is acceptable, although fresh is always best. Mustard Greens. (There are various types of mustard green. Those used here are 芥菜 , Mandarin: jiè cài; Cantonese: gai choy). Use a good handful per person. Remove the thick stems, to be used in another dish.) Garlic. (to taste) Chile. (One or two fresh hot red chiles are optional). Salt. MSG (optional). If you have used a stock cube or bouillon powder for the stock, omit the MSG. The cubes and power already have enough. White pepper (freshly ground. I recommend adding what you consider to be slightly too much pepper, then adding half that again. The soup should be peppery, although of course everything is variable to taste.) Method Bring your stock to a boil. Add salt to taste along with MSG if using. Finely chop the garlic and chile if using. Add to stock and simmer for about five minutes. Make sure all the clams are tightly closed, discarding any which are open - they are dead and should not be eaten. The clams will begin to pop open fairly quickly. Remove the open ones as quickly as possible and keep to one side while the others catch up. One or two clams may never open. These should also be discarded. When you have all the clams fished out of the boiling stock, roughly the tear the mustard leaves in two and drop them into the stock. Simmer for one minute. Put all the clams back into the stock and when it comes back to the boil, take off the heat and serve.
-
Easy snack – courgette in pancake batter Though you can buy courgettes all year round, dishes with them in are associated with autumn. Stuffed courgette with meat or vegetables, crumpets and tarts are on the table mainly in October. Today I would like to share with you a recipe for an extremely simple and quick snack. Courgette in pancake batter is excellent as a side dish or a light supper. I prepared a yoghurt garlic-dill sauce for it. I think it will also be great with spicy tomato salsa or simply with horseradish. Ingredients 500g of courgette 170ml of milk 50ml of oil 6 tablespoons of wholemeal flour 1 egg 3 tablespoons of Parmesan 1 tablespoon of minced thyme salt and peppersauce: 200g of natural yoghurt 2 tablespoons of minced dill 1 clove of garlic salt and pepper clarified butter Crush a clove of garlic. Mix the yoghurt with the garlic and dill and spice it up with salt and pepper. Leave it to one side. Pour the milk and oil onto a flat dish, add the egg and mix them together. Add the flour, thyme and Parmesan, spice it up with salt and pepper and stir. Leave the dough for 15 minutes. Slice the courgette into 1-cm slices. Dip the slices of courgette in the dough and fry in butter until they are golden. Take them out of the pan and drain on a kitchen towel. Enjoy your meal!

-
- 2
-
-
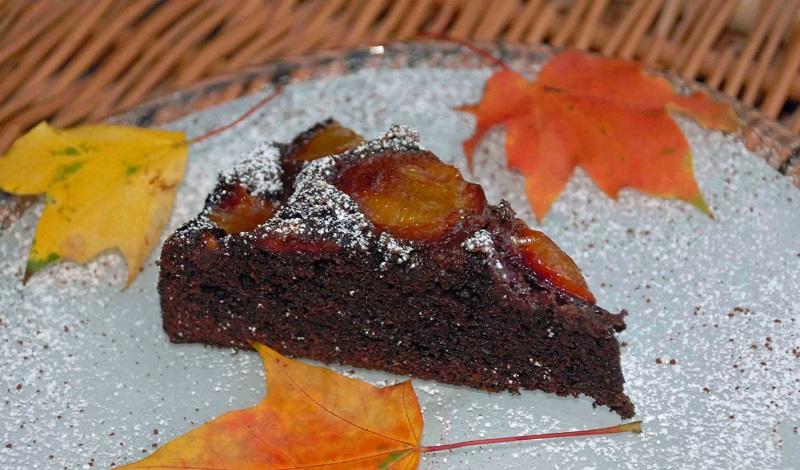
Chocolate cake with plums The first cake I ever dared to bake by myself was a chocolate cake. I have since baked it many times, always using the same recipe, and many times I have spoiled it at the beginning of preparation. It is necessary to cool down the chocolate mixture before adding the rest of the ingredients. On a hot summer day this process is very long, so I accelerated it by putting the pot with the mixture into some cold water in the kitchen sink. Many times, by mistake, I turned on the tap and poured water onto the cooling mixture. In hindsight these situations were amusing, but at the time it wasn't funny. This chocolate cake is excellent without any additives. You can enrich it with your favourite nuts or butter icing. Today I added some plums to the top of the cake. It was great and its sweet chocolate-plum aroma lingered long in my home. Ingredients (25cm cake tin): 200g of flour 150g of butter 3 tablespoons of cocoa 120g of brown sugar 15ml of almond milk 100g of dark chocolate 1 egg 1 teaspoon of baking powder plums Heat the oven up to 180C. Smooth the cake tin with the butter and sprinkle with dark cocoa. Put the butter, milk, sugar, cocoa and chocolate into the pan. Heat it until the chocolate is melted and all the ingredients have blended together well. Leave the mixture to cool down. Add the egg, flour and baking soda and mix them in. Put the dough into the cake tin. Wash the plums, cut them in half and remove the stones. Arrange the plum halves skin side down on top of the cake. Bake for 50 minutes. Sprinkle with caster sugar before serving. Enjoy your meal!
-
This recipe is inspired by the Original Lufthansa Cocktail, not the present day commercially available version, and should end up around 30% abv. For a full history about this recipe and the original that inspired it, please visit my blog, Villa Tempest. Ingredients: 250ml Rosé Vermouth 370 ml Apricot Schnapps/Brandy 75 ml Framboise/Raspberry Eau de vie 20 ml Orange Bitters 55 ml Elderflower Syrup Method: Combine all the ingredients, mix well and bottle. Makes 1 x 750ml batch. Serving Suggestion: To 2 full measures of Liqueur add an equal portion of well chilled Sekt or Champagne. Serve in a tumbler over ice, or in a saucer rimmed with a lemon segment and dipped in sugar. Garnish with a slice of lemon, or a cherry.
-
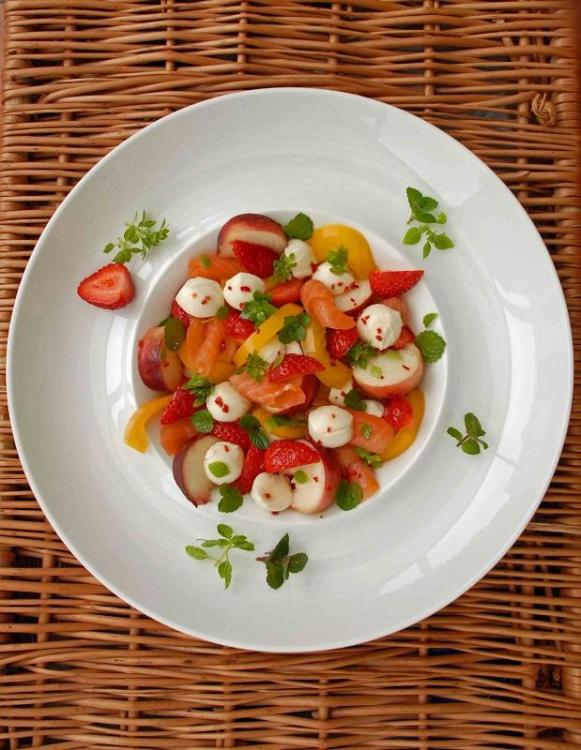
Fruit salad with salmon and mozzarella cheese I think that sometimes everybody is hungry but doesn't know what to eat. We open the fridge and although there is everything inside, we are not in the mood for anything in particular. Salads save the day. You only have to think for a while and with the main ingredients you can prepare a yummy dish. Add egg, beans, chickpeas, or any meat to the salad and you have a rich and equally light and beautiful dish. Sometimes a combination of ingredients which seemingly don't go together make a yummy and surprising effect. Today I would like to share with you the recipe for a salad with this kind of unusual combination: fruit, pepper, smoked salmon, mozzarella cheese and a spicy sweet-and-sour dip. In my opinion, it tastes heavenly, and you will have to admit it looks beautiful. Ingredients (for 2 people): salad: 1 yellow pepper 5 strawberries 2 peaches 200g of mozzarella cheese 200g of smoked salmon peppermint and basil leaves dip: 2 tablespoons of olive oil 1 teaspoon of honey 2 tablespoons of lemon juice chili pepper salt and pepper First make the dip. Dice the chili pepper, and mix in the olive oil, lemon juice and honey. Add the chili pepper and spice it up with the salt and pepper. Mix it in again and leave for a while. Cut all the ingredients of the salad into smaller pieces. Arrange them in a bowl, sprinkle with the dip and decorate with the peppermint and basil leaves. Enjoy your meal!
-
 In search of the ideal breakfast – buckwheat pudding with almonds and banana As the Chinese proverb goes: "Eat breakfast alone, share lunch with your friends and give dinner to your enemy". There is something to it, because according to dietitians, it is the most important meal of the day, because it should supply you with energy after the night's rest. Apart from weekends and holidays we rarely have enough time to prepare and eat breakfast. I am searching for the kind of breakfast which will supply a lot of nutrients and let us start our day pleasantly. Today for the first time I used buckwheat groats for preparing breakfast. I know that not everyone likes them because of their heavy "smoky" taste and smell. For breakfast I recommend using unroasted buckwheat groats. They are light and in my opinion have a slightly nutty taste, and if we only scour and soak them, the groats don't lose their fibre and valuable vitamins. I found the recipe for this breakfast in the book "Zielone koktajle. 365 przepisów" ("Green cocktails. 365 recipes"). Ingredients: 60g of unroasted buckwheat groats 1 banana 3 dates 150ml of almond milk half a teaspoon of cinnamon fruit and almonds for decoration Scour the unroasted buckwheat groats and soak them the day before. Drain them and blend with the banana, dates and almond milk. Decorate with fruit and almonds before serving. Enjoy your meal!
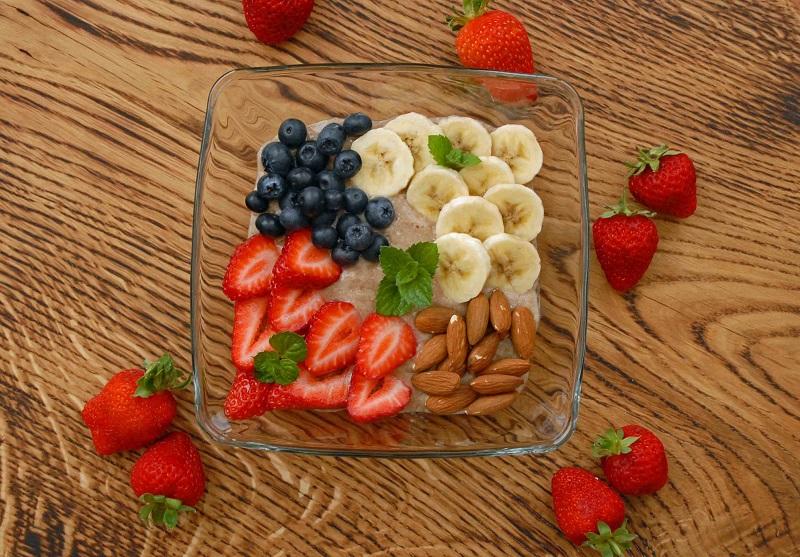
-
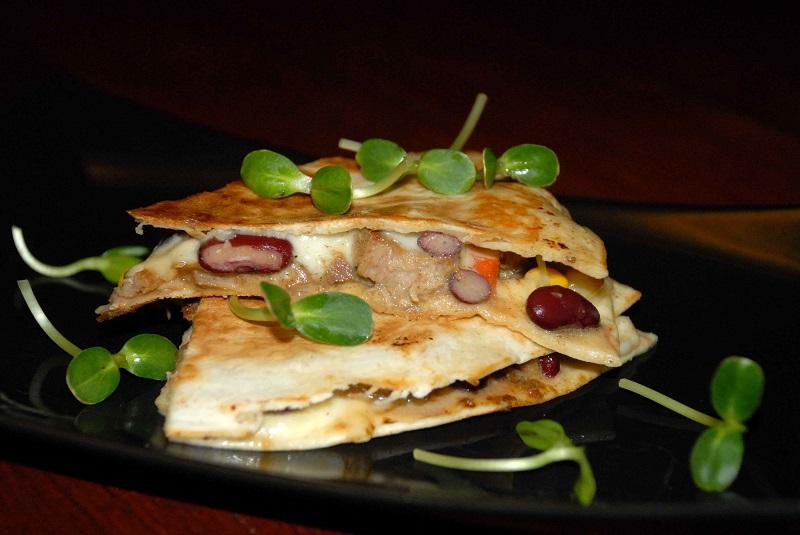
My quesadilla Today I would like to share with you the recipe for a dish which meets holiday requirements. It is easy, and it doesn't need sophisticated ingredients or an oven. A frying pan is enough. Quesadilla, the dish in question, is a tortilla with melted cheese. The rest of the ingredients you choose at your discretion. Red beans, pepper, chorizo or fried meat all work brilliantly. I added fried pieces of turkey leg. Thanks to this, my dish could be a holiday dinner. Ingredients (for 2 people) 4 tortillas 300g of turkey leg half a chili pepper half an onion 1 clove of garlic 2 tablespoons of oil 200g of tinned sweetcorn 200g of tinned red beans fresh pepper 200g of mozzarella cheese salt and pepper Cube the meat. Fry the diced onion, garlic and chili pepper in oil. Add the spiced-up-with-salt-and-pepper meat and fry on a low heat until the meat is soft. Cube the pepper. Drain the sweetcorn and red beans and slice the mozzarella cheese. Put the tortilla into a dry, heated pan. Arrange the meat, sweetcorn and red beans on it. Cover with the slices of the mozzarella cheese and the second tortilla. Fry on a low heat for a while. Turn it and fry a bit more until the cheese has melted. Put it on a plate and cut it into triangles. Enjoy your meal!
-
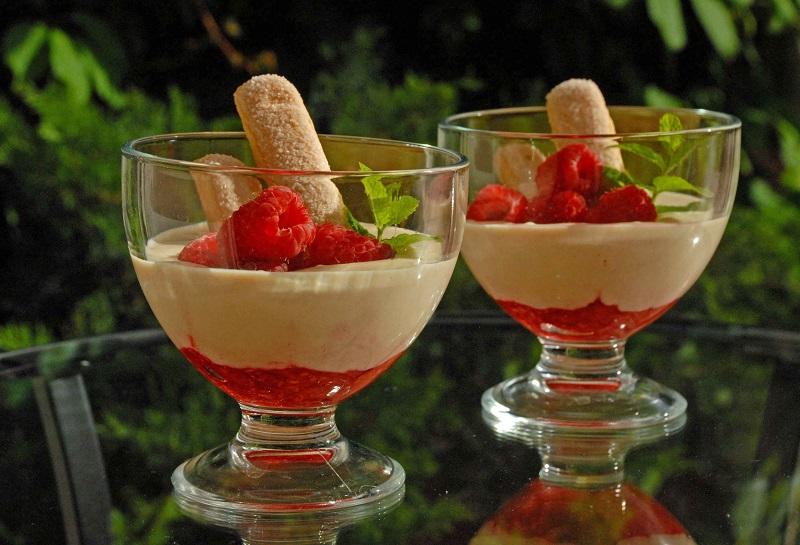
Afternoon tea with finger biscuits. With my children in mind I prepared an extremely simple dessert using natural yoghurt and biscuits as basic ingredients. It was supposed to be for children. By default, though, I prepared a bit more and we were all able to relish it. Ingredients (for 4 people) 400g of natural yoghurt 200g of finger biscuit 200g of raspberries 2 teaspoons of caster sugar Put aside a few nice raspberries and four finger biscuits. Crush the rest of the raspberries with a fork and mix them with the caster sugar. Crush the finger biscuits and blend them with the natural yoghurt. Put the raspberry mousse and then the biscuit mixture into a cup. Decorate the top of the dessert with the raspberries and peppermint leaves.
-
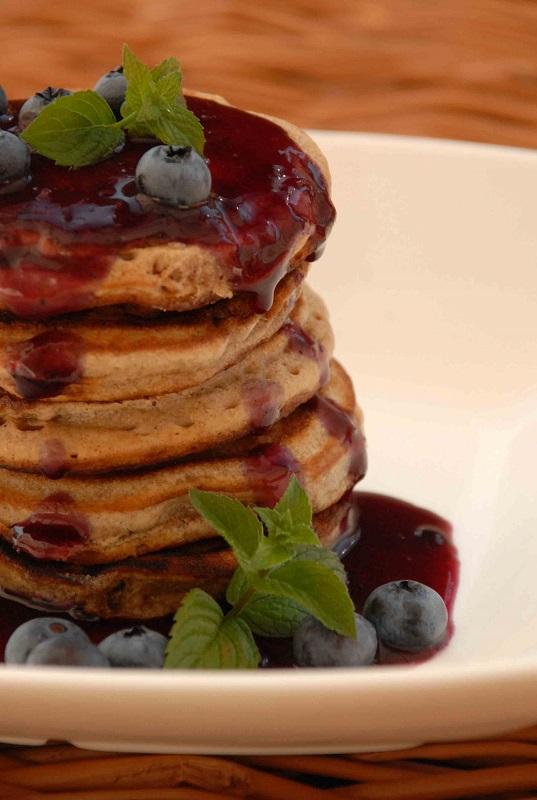
Granary pancakes with bilberry mousse Today I would like to share with you the recipe for "slimmed down" pancakes. Luckily, I don't have any problems with fruit in my children's diet; they like all kinds of fruit. But I know that for other parents pancakes could be the best way to sneak some vitamins into their food. I found the recipe for the pancakes at Polish "wegepedia.pl", and it appealed to me instantly because of the easy and basic preparation and the yummy look of the pancakes. Ingredients: 200g of granary flour one teaspoon and a half of baking powder 4 tablespoons of brown sugar 1 flat teaspoon of cinnamon 300ml of vegetable milkOther ingredients 100g of bilberries 30ml of water 3 dates Mix the sugar, flour, baking powder and cinnamon in a bowl. Pour the milk in and stir until you make a smooth dough. Put small portions of the dough into a pan (with a non-stick surface) and fry on both sides until the pancakes are golden. If you have another pan, use a bit of oil for frying. Use a handful of bilberries for decoration. Blend the rest of the clean fruit with the dates and water. Leave in the fridge for a while. Decorate the hot pancakes with the fruit mousse and bilberries. Serve at once.

-
Courgette cutlets I found the recipe for courgette cutlets at www.gotujzcukiereczkiem.pl. It appealed to me at once for three reasons. Firstly, the courgette is my favourite vegetable. Secondly, cutlets, pancakes and crumpets are my children's favourites dishes. Thirdly, this dish is fast, simple and is always a success. You must not use FB while frying, because it may end with you ordering pizza for dinner The cutlets are mild and their flavour is spiced up with feta cheese. You can complement them with your favourite herbs. In my kitchen there is always basil, dill, peppermint, rosemary and thyme. This time I chose dill (in accordance with the recipe) and thyme. Ingredients: 400g of courgette 1 egg 150g of feta cheese 110g of breadcrumbs (+ 4 tablespoons for the batter) 2 tablespoons of minced dill 1 tablespoon of thyme salt and pepper Wash the courgette and grate it. Add salt and leave it in a bowl for 15 minutes. Drain it then mix in the egg, feta cheese, breadcrumbs and herbs. Spice it up with salt and pepper. Make small cutlets with the mixture and fry in oil. Serve with natural yoghurt.

-
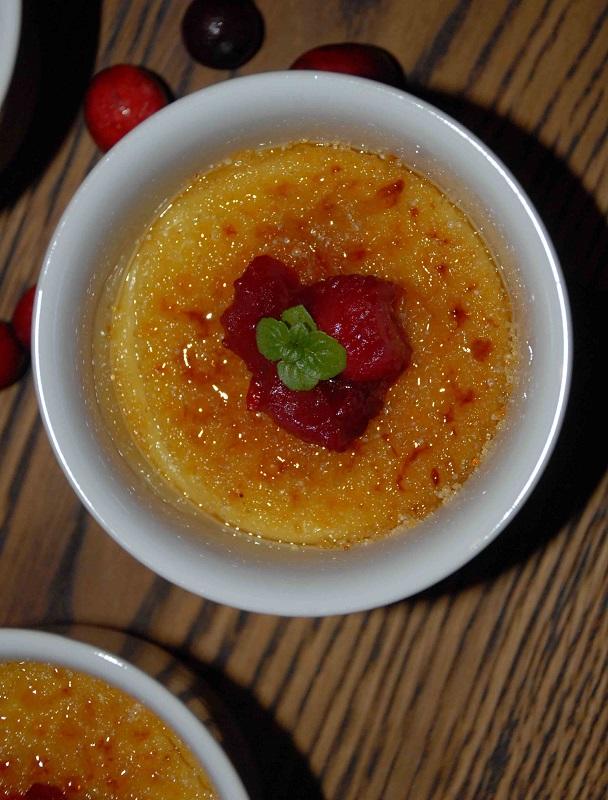
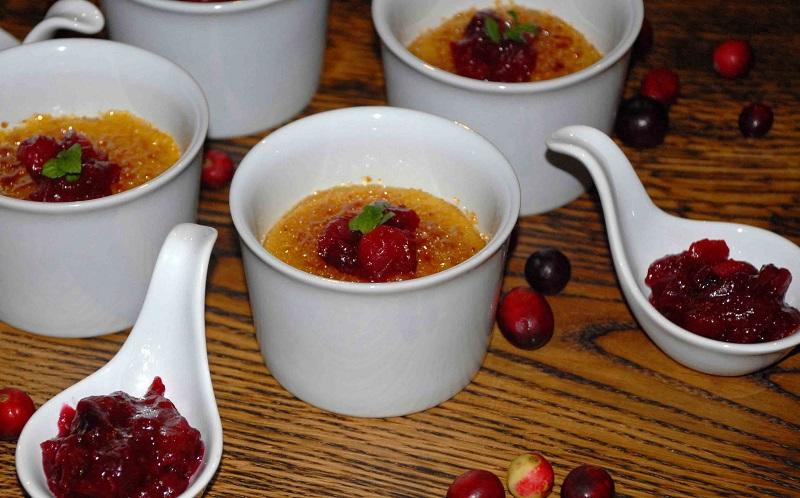
ORANGE CREME BRULEE WITH MILLET GROATS One of our friends said recently that he doesn't cook for himself. He eats what his wife prepares: sometimes it is something healthy and other times something yummy. It was a joke, of course, because his wife cooks really well, but this sentence is now in our friendly canon of jokes. Inspired by our talk about groats, flakes and healthy food, I prepared a dessert which combines excellent taste and healthy ingredients. The original recipe comes from the Lidl cookery book. I would like to share with you my version of this dish. I recommend Crème brûlée with millet groats to everybody who counts calories. It is mild, not too sweet, wonderfully creamy inside and with an incredible crunchy crust on top. That's why we love crème brûlée, don't we? I prepared a cranberry-orange preserve to offset the sweetness of the dessert. The whole dessert looked beautiful and tasted perfect. Ingredients (for 4 people)crème brûlée 100g of dry millet groats 350ml of almond milk 1 teaspoon of vanilla essence 2-3 tablespoons of brown sugar (3 additional tablespoons for the sugar crust) juice and skin from one orange confiture: 150g of fresh cranberries juice and peel from one orange 4 tablespoons of brown sugar Put the millet groats in a sifter, clean them with cold water and then douse them with hot water. Put the groats, almond milk, sugar and vanilla essence into a saucepan with a heavy bottom. Boil it with the lid on without stirring for 15-18 minutes until the liquid has evaporated. Leave to cool down. Add the orange juice and peel, mix it in and blend until the mixture is perfectly smooth. Put the dessert into small bowls and leave in the fridge for one hour. Wash the cranberries. Add the orange juice and peel and the sugar and boil for 10-15 minutes. Try it and add some sugar if you think the dessert is too sour. Take out the bowls from the fridge. Sprinkle them with the sugar and burn it with a small kitchen burner to make a crunchy caramel crust. Decorate the dessert with a small teaspoon of the cranberry preserve. Serve the rest of the preserve separately in small dishes.

-
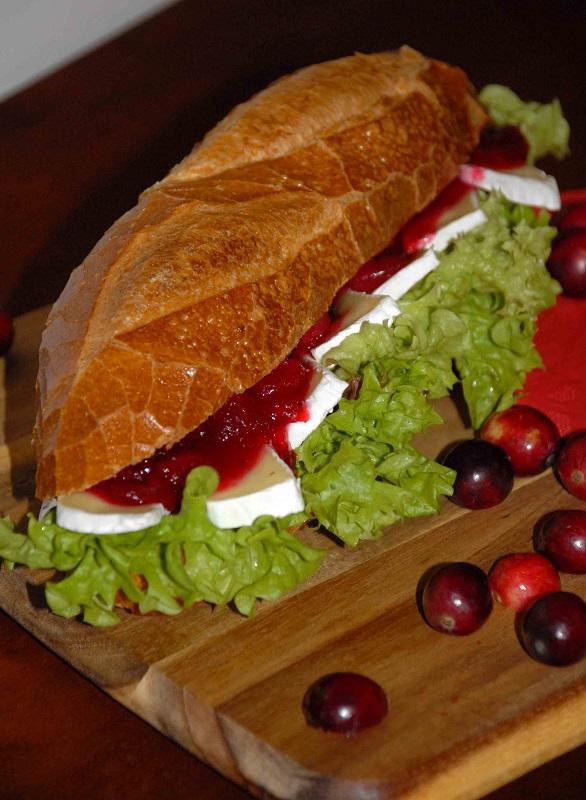
A SANDWICH TO GO Today I would like to share with you the recipe for a snack which you can grab and eat "on the go". I know that it is unhealthy. We should celebrate eating and eat calmly and with deliberation. However, sometimes the day is too short for everything on our schedule and we still have to eat. Admittedly, we can sin and go for some fast food, but it is healthier and tastier to prepare something quickly in our own kitchen. Today, Camembert cheese and cranberries in a fresh, crunchy roll take the lead role. It sounds easy and yummy, doesn't it? Try it and get on with your day . Today I used a homemade cranberry preserve which was left over from dessert, but if you like you can buy your own. Ingredients: 2 fresh rolls (your favourite ones) 150g of camembert cheese 1 handful of lettuce 2 teaspoons of butter 2 teaspoons of pine nuts or sunflower seedspreserve 100g of fresh cranberries 3 tablespoons of brown sugar 100ml of apple juice Wash the cranberries. Put the cranberries, sugar and apple juice into a pan with a heavy bottom and boil with the lid on for 10-12 minutes, stirring from time to time. Try it and if necessary add some sugar. Leave to cool down. Cut the rolls in half and spread with the butter. Put some lettuce on one half of the roll. Slice the camembert cheese and arrange it on the lettuce. Put a fair portion of the cranberry preserve on top of the cheese. Sprinkle with the roast pine nuts or sunflower seeds and cover with the second half of the roll. Enjoy your meal!

-
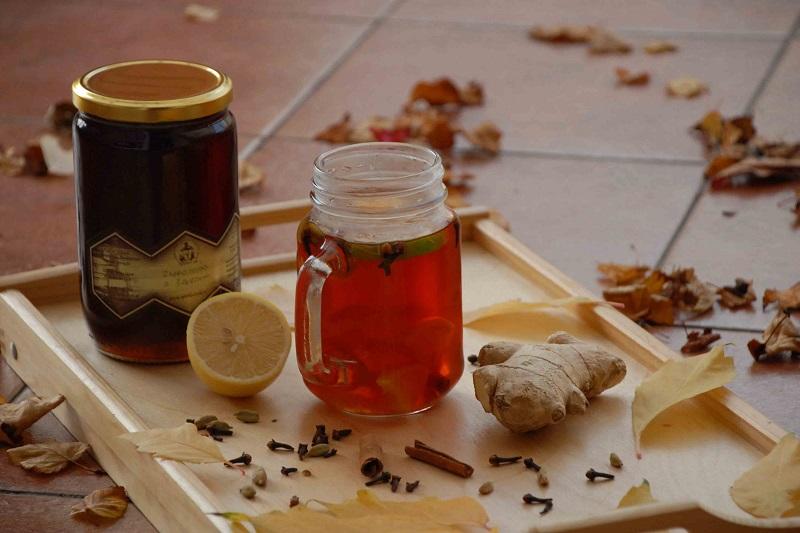
Even though I would like to change the situation, the winter is coming. Sooner or later there will be sharp winds, frost and unpleasant moisture. I don't know how you like to warm up at home, but on the first cold day I dust off my home recipe for hot and yummy winter teas. You can use my recipe or come up with your own proposals for fiery mixtures. Only one thing should be the same: your favourite tea must be strong and hot. Ingredients (for 2 teas)Raspberry-orange 8 cloves a piece of cinnamon 2 grains of cardamom 4 slices of orange 2 teaspoons of honey your favourite tea 50ml of raspberry juice or 30ml of raspberry juice and 30ml of raspberry liqueur Add 4 of the cloves, cinnamon and cardamom to some water and boil for a while to release their flavour and aroma. Remove the seasoning and brew the tea with this water. Crush two slices of orange with honey. Add the raspberry juice or a mixture of juice and liqueur to the tea. Next add the honey with orange. Mix it in. Decorate the tea with the rest of the cloves and orange. Lemon-ginger 8 cloves 3 slices of fresh ginger 2 grains of cardamom 50ml of ginger syrup or 30ml of ginger syrup and 30ml of ginger-lemon liqueur 4 slices of lemon 2 teaspoons of honey Add 4 of the cloves, ginger and cardamom to some water and boil for a while to release their flavour and aroma. Remove the seasoning and brew the tea with this water. Crush two slices of lemon with honey. Add the ginger syrup or mixture of syrup and liqueur to the tea. Next add honey with lemon. Mix it in. Decorate the tea with the rest of the cloves and lemon. Enjoy your drink!
-
Pumpkin pancakes with fig preserve, Once, when I planned pancakes for dinner, I always used to think about potato pancakes. I prepared them with onion and pepper and served them with sugar or cream. A few years ago, when I was carving a Jack O' Lantern, I made pumpkin pancakes for the first time. I prepared them like potato pancakes, but they were milder, and we liked them so much that we forgot about potato ones for a long time. Today I prepared these yummy and very simple pancakes. I used butternut squash, which is my new favourite food. You can prepare the fig preserve from fresh fruit. We brought some excellent fig preserve back from our summer holiday. It went very well with these summer pumpkin pancakes. For anyone who doesn't like fruit in their pancakes, I recommend maple syrup or natural yoghurt. Ingredients (for 20 pancakes) 600g of peeled pumpkin half an onion 5 tablespoons of flour 2 eggs salt and pepper oil for frying Peel the fresh pumpkin and grate it. Add salt and leave it in a bowl for an hour. Dice the onion. Drain the pumpkin, then mix in the eggs, flour and onion, and then spice it up with salt and pepper. Fry the pancakes on a low heat until golden. Serve with your favourite condiments.
-
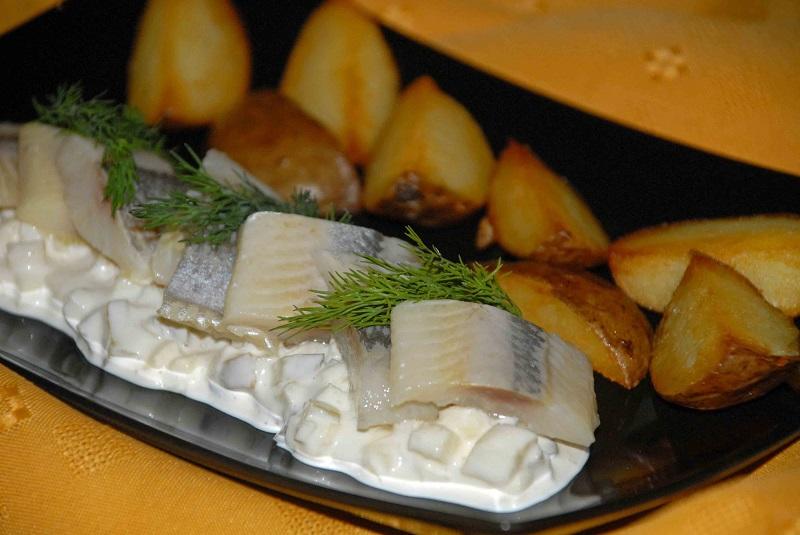
Herrings in cream Herrings with potatoes is a very painful memory of the school canteen for many of us. Though we like herrings with onion, I rarely serve it for dinner. Today I decided to break this rule and prepared herrings for dinner. I served herrings and potatoes once again, but in a completely different way. I served baked jacket potatoes. The herrings were excellent with cream sauce and onion, apple and dill pickles. See for yourself if you like this way of preparing herrings. Ingredients (for 2 people) 6 potatoes 2 tablespoons of olive oil 200g of herrings in oil 200g of 18% cream 1 tablespoon of mayonnaise 1 tablespoon of mustard half an onion 1 apple 3 dill pickles 2 tablespoons of minced dill Heat the oven up to 180C. Boil the unpeeled potatoes in salty water until they are soft. Cut the potatoes into quarters, put them in a casserole dish, sprinkle them with olive oil and bake until they are golden. Dice the onion, apple, and dill pickles. Cut the herrings into smaller pieces. Arrange the baked potatoes with cream sauce on a plate along with the pieces of herrings. Decorate with sprigs of dill.