Jump to content
  • Welcome to the eG Forums, a service of the eGullet Society for Culinary Arts & Letters. The Society is a 501(c)3 not-for-profit organization dedicated to the advancement of the culinary arts. These advertising-free forums are provided free of charge through donations from Society members. Anyone may read the forums, but to post you must create a free account.

Edit History

Wholemeal Crank

Wholemeal Crank


Minor technique update

More on how home milling is not just about bread.....


A Cracker Primer


This is how I make crackers.  I was making two different batches of crackers this day, one batch of Corny Crackers, and one batch of Four-Seed Snapper crackers from Peter Reinhart's Whole Grain Breads.

I love crackers, and like homemade ones, but was frustrated with the effort to yield ratio required, and the lack of crispness if I didn't get the dough perfectly thin, or the high proportion of scorched crackers if I did roll them perfectly thin.  I've since figured out some tricks that make it a lot easier and more efficient to make a bunch of them at once.

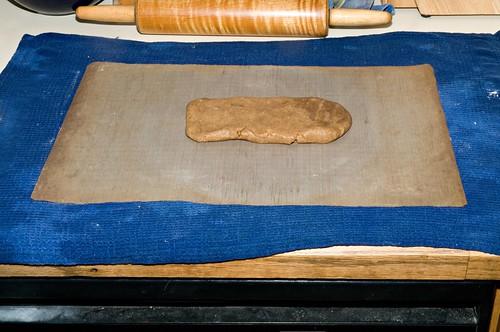
After you've prepared the dough of your choice, let it rest and chill if required, and preheated the oven to about 400 degrees or as called for in your recipe, pat handfuls of dough into a rough rectangle and place on a baking sheet liner (teflon, silicone, heck, parchment would probably work too).  If needed, set the liner on a damp towel to keep it in place on your work surface as you roll out the dough.
 

2704657045_44a753fc61.jpg


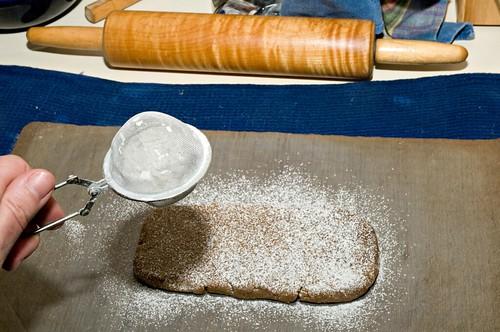
Dust below and the top of the dough lightly to keep it from sticking to the rolling pin.


EDIT: 

I've since figured out an even easier way to work with cracker doughs during the rolling out, because I can't use wheat flour for dusting when I make gluten-free crackers that might be shared by my friend with celiac disease, and the "Tangy Aromatic Crackers" from Flavor Flours are a quite wet and sticky dough.  

I just prep and flatten the piece of dough as shown in this photo, and top it with another silpat, and roll the crackers out between the dough sheets.  Usually that top layer peels off pretty easily, and I use that one for the bottom of the next tray's worth of dough.
 

2705478832_85b6d155b7.jpg


Roll out the dough to desired thinness (usually 1/16" to 1/8", 2-3mm), rolling always from the center out to the edge, to avoid the edge rolling sticking and rolling up onto the pin.  

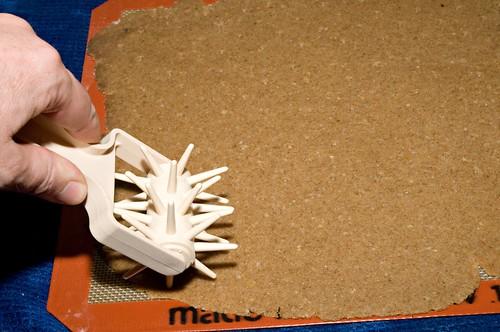
Next, dock the dough:  with a fork, or better yet, a rolling docker, prick the dough evenly.  This is to keep the dough from ballooning up like pitas as it bakes and making uneven crackers.
 

2705478374_5072efd14f.jpg


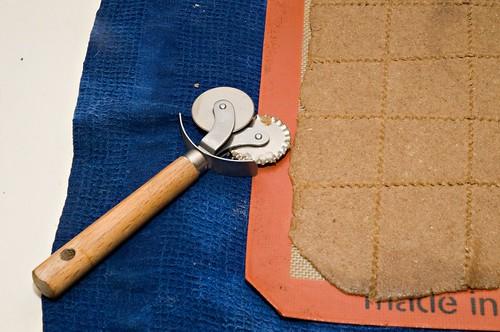
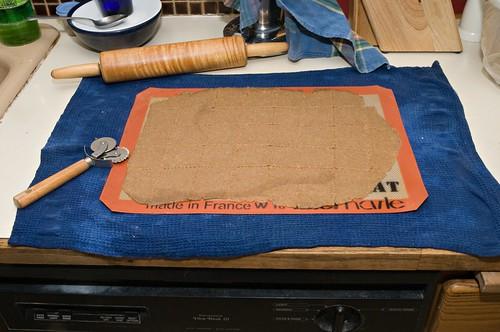
Now cut the crackers, with a knife (gently so it won't damage your baking sheet liner) or a rolling pizza cutter or other cutter.  I use a pasta cutter here.
2704655635_e619e6a631.jpg


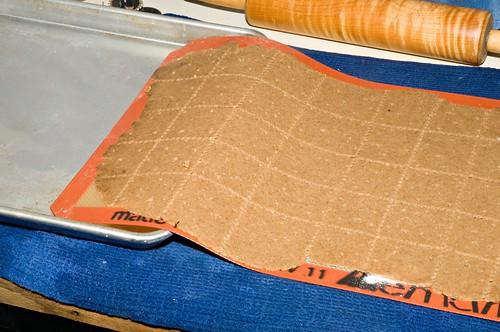
Now the crackers are ready to transfer to the baking sheet.  
2705477524_30372db126.jpg


This is a slick trick:  no spatulas and careful arrangements needed.  Just slip directly onto the baking sheet, liner and all.
2704654757_74031296c7.jpg


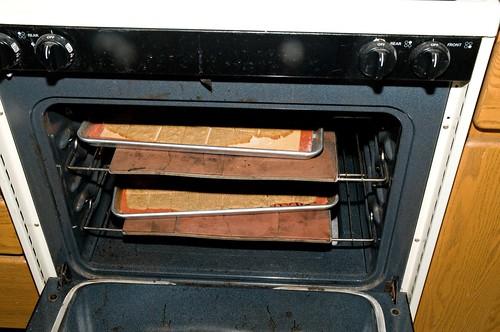
Now slide the baking sheet into the preheated oven.  I keep baking tiles in the oven pretty much all the time, and bake two sheets worth of stuff at once.

I set the timer for halfway through the baking time, and switch the sheets top and bottom and flip them front to back for even baking.
2705476588_1c3287278c.jpg


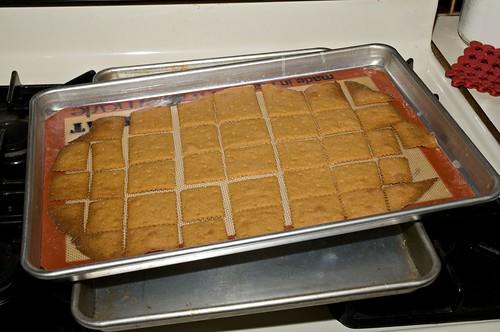
I do not try to get them fully crisp at this time--the first baking is to brown them.  They're going back in the oven like biscotti do to get crisp.  This way I will be able to get all of them crisp without burning many or any, or doing a dance with the oven to remove them as they're done while letting others bake on.  

Once they're done, I set them aside, still on their baking sheet, unless I need to reuse the sheet and liner.  If I were not double-baking them, I would remove them to cooling racks at this step.
2705476140_ea961b66de.jpg


Then after all the dough is baked once, I turn off the oven and open the door until the temp is about 250 degrees F or so.  Then I return the crackers to the oven, loosely piled on baking sheets, and set the temp to 150°F (for overnight crisping) or 200°F (for at least two hours).  This is hot enough to dry and crisp them but not hot enough to burn them.
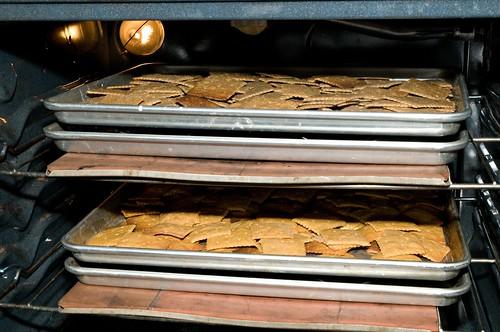
2704653597_f714c0ef4d.jpg


Remove them carefully--even 150°F is plenty hot to burn bare fingers--and let them cool on a rack.  

Then enjoy your double-baked, crisp, easy crackers.


Wholemeal Crank

Wholemeal Crank

More on how home milling is not just about bread.....


A Cracker Primer


This is how I make crackers.  I was making two different batches of crackers this day, one batch of Corny Crackers, and one batch of Four-Seed Snapper crackers from Peter Reinhart's Whole Grain Breads.

I love crackers, and like homemade ones, but was frustrated with the effort to yield ratio required, and the lack of crispness if I didn't get the dough perfectly thin, or the high proportion of scorched crackers if I did roll them perfectly thin.  I've since figured out some tricks that make it a lot easier and more efficient to make a bunch of them at once.

After you've prepared the dough of your choice, let it rest and chill if required, and preheated the oven to about 400 degrees or as called for in your recipe, pat handfuls of dough into a rough rectangle and place on a baking sheet liner (teflon, silicone, heck, parchment would probably work too).  If needed, set the liner on a damp towel to keep it in place on your work surface as you roll out the dough.


2704657045_44a753fc61.jpg


Dust below and the top of the dough lightly to keep it from sticking to the rolling pin.


2705478832_85b6d155b7.jpg


Roll out the dough to desired thinness (usually 1/16" to 1/8", 2-3mm), rolling always from the center out to the edge, to avoid the edge rolling sticking and rolling up onto the pin.  

Next, dock the dough:  with a fork, or better yet, a rolling docker, prick the dough evenly.  This is to keep the dough from ballooning up like pitas as it bakes and making uneven crackers.


2705478374_5072efd14f.jpg


Now cut the crackers, with a knife (gently so it won't damage your baking sheet liner) or a rolling pizza cutter or other cutter.  I use a pasta cutter here.

2704655635_e619e6a631.jpg


Now the crackers are ready to transfer to the baking sheet.  

2705477524_30372db126.jpg


This is a slick trick:  no spatulas and careful arrangements needed.  Just slip directly onto the baking sheet, liner and all.

2704654757_74031296c7.jpg


Now slide the baking sheet into the preheated oven.  I keep baking tiles in the oven pretty much all the time, and bake two sheets worth of stuff at once.

I set the timer for halfway through the baking time, and switch the sheets top and bottom and flip them front to back for even baking.

2705476588_1c3287278c.jpg


I do not try to get them fully crisp at this time--the first baking is to brown them.  They're going back in the oven like biscotti do to get crisp.  This way I will be able to get all of them crisp without burning many or any, or doing a dance with the oven to remove them as they're done while letting others bake on.  

Once they're done, I set them aside, still on their baking sheet, unless I need to reuse the sheet and liner.  If I were not double-baking them, I would remove them to cooling racks at this step.

2705476140_ea961b66de.jpg


Then after all the dough is baked once, I turn off the oven and open the door until the temp is about 250 degrees F or so.  Then I return the crackers to the oven, loosely piled on baking sheets, and set the temp to 150°F (for overnight crisping) or 200°F (for at least two hours).  This is hot enough to dry and crisp them but not hot enough to burn them.

2704653597_f714c0ef4d.jpg


Remove them carefully--even 150°F is plenty hot to burn bare fingers--and let them cool on a rack.  

Then enjoy your double-baked, crisp, easy crackers.


×
×
  • Create New...