Jump to content
  • Welcome to the eG Forums, a service of the eGullet Society for Culinary Arts & Letters. The Society is a 501(c)3 not-for-profit organization dedicated to the advancement of the culinary arts. These advertising-free forums are provided free of charge through donations from Society members. Anyone may read the forums, but to post you must create a free account.

Edit History

Brent

Brent

Hi all, 


Discovered this site this weekend, and spent much time reading the 747 previous Freeze Drying posts.   Thanks to all for sharing -- I've learned much.  We have been HR owners for about a year -- love it, btw -- but only into "24/7 mode" for about the last three months.


As was inevitable (though unanticipated), I've scaled the learning curve about vacuum pump maintenance, (aka water drain-offs, oil changes, power flushes, and pump cover disassembly and cleaning.)  We've followed the instructions given by HR.  Like many, I was surprised to see the buildup of gunk (I believe that's their official term  :huh:) in the pump, and the effects of the accumulated water.


Having recently completed my third anti-gunk teardown, I thought there has to be a better way.  It seemed like filtering the oil might help, so at first I tried the obvious:  coffee filters and filtering through dense cloth.  Short story:  Not worth the effort and the mess.


It occurred to me that the solution might be to use an automotive oil filter.  (There is a reason they call them "oil filters", after all.) 


The problem is, a car's oil filter operates under pressure, and has the intake and outlet on the same side of the filter.  There is no flow "through" in the sense of what goes in the top comes out the bottom.  Hmmm...


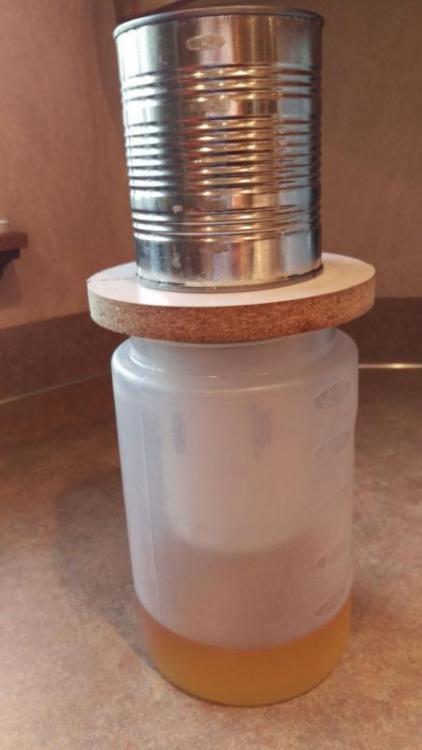
I finally came up with a solution that would work around that, and here it is:  (--don’t laugh, first impressions are often misleading).  


 IMAG0730 - Res.jpg


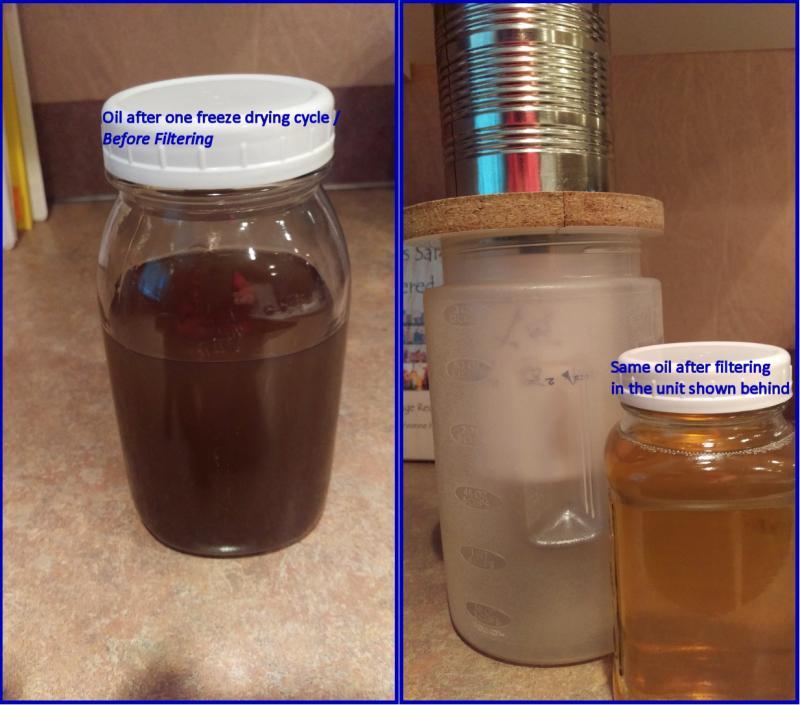
The oil goes in the can at the top, passing into the filter below, filling it.  The overflow then goes out of the filter and is caught in the container beneath. 


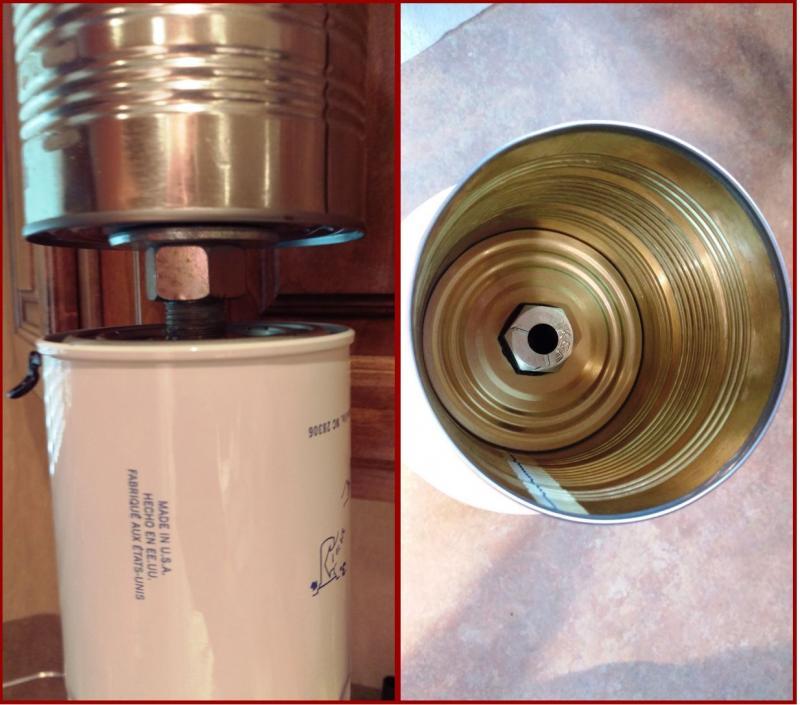
The can and the filter are linked by a threaded pipe, as shown here: 


Filter design.jpg


The one "gotcha" I encountered in making this is that a typical car oil filter attaches with a 3/4x16tpi threaded pipe.  I could find no such pipe anywhere.  My solution was to use instead a 3/4x16tpi bolt, and then drill a hole through it.  Fortunately, I have the equipment to do that, but most probably wouldn't.  Even then, bolts are hard material, and I dulled two drill bits getting it done.  


The "disk" that the can and filter rests on is just a board with a 2" hole in its center, cut in half.


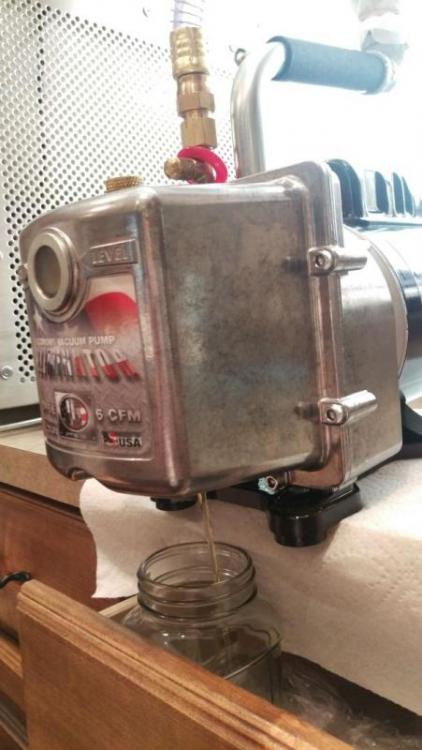
So now I change (or perhaps I should say, “recycle”) the oil after every batch.  I immediately drain the oil while it's still hot and when the water and sediment particles are mostly still suspended.  


IMAG0716 - Res.jpg


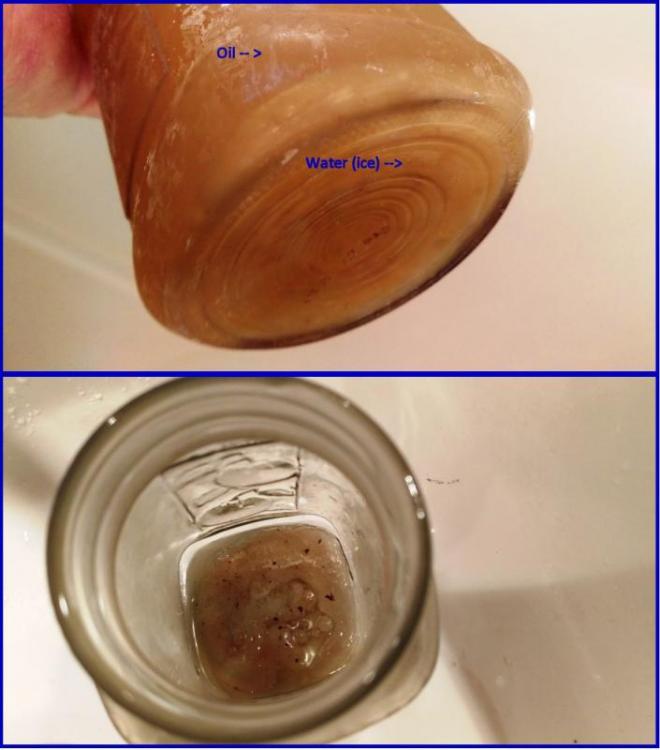
Someone's bound to ask about the water, which of course the filter wouldn't exclude, although it would probably accumulate in the bottom of the filter and not pass into the container.  I solve that problem by letting the drained oil sit a while, so that the water and sediment will settle, then I put it in the freezer until the water freezes.  The water & heavier gunk stay behind, while the oil still flows nicely.  Here are pictures showing the oil with the water frozen at the bottom, and the ice and sediment that remain after the oil is poured off into the filter.


Drail Oil Pix.jpg


Here's a before/after comparison of oil after one batch (previously new oil used for one batch of mushrooms -- yummy, btw) and the same oil after being run through the filter: 


Filter Unit.jpg


A couple of other points:  There are obvious and easy improvements that could be made, such as using a container with a dispensing faucet (think of a lemonade jar, for example).  Also, for the technically savvy, auto-mechanic-type person who may be wondering about it, there is an anti-backflow seal that has to be removed from the oil filter, but that can be removed by cutting through it and pulling it out with needle nose pliers, which is easily done.


So far there has been a noticeable difference in the cleanliness of the oil, and hopefully that will be true for the buildup of "gunk" as well.  I imagine pump disassembly and cleaning will still be needed, but hopefully not nearly as often, and with a little luck, it won't be nearly as "gunky".    


Sorry for such a long post (especially my first one!)  Hope this is helpful to someone!


Brent

Brent

Brent

Hi all, 


Discovered this site this weekend, and spent much time reading the 747 previous Freeze Drying posts.   Thanks to all for sharing -- I've learned much.  We have been HR owners for about a year -- love it, btw -- but only into "24/7 mode" for about the last three months.


As was inevitable (though unanticipated), I've scaled the learning curve about vacuum pump maintenance, (aka water drain-offs, oil changes, power flushes, and pump cover disassembly and cleaning.)  We've followed the instructions given by HR.  Like many, I was surprised to see the buildup of gunk (I believe that's their official term  :huh:) in the pump, and the effects of the accumulated water.


Having recently completed my third anti-gunk teardown, I thought there has to be a better way.  It seemed like filtering the oil might help, so at first I tried the obvious:  coffee filters and filtering through dense cloth.  Short story:  Not worth the effort and the mess.


It occurred to me that the solution might be to use an automotive oil filter.  (There is a reason they call them "oil filters", after all.) 


The problem is, a car's oil filter operates under pressure, and has the intake and outlet on the same side of the filter.  There is no flow "through" in the sense of what goes in the top comes out the bottom.  Hmmm...


I finally came up with a solution that would work around that, and here it is:  (--don’t laugh, first impressions are often misleading).  


 post-80807-0-05067300-1442286698_thumb.j


The oil goes in the can at the top, passing into the filter below, filling it.  The overflow then goes out of the filter and is caught in the container beneath. 


The can and the filter are linked by a threaded pipe, as shown here: 


post-80807-0-91664600-1442286862_thumb.j


The one "gotcha" I encountered in making this is that a typical car oil filter attaches with a 3/4x16tpi threaded pipe.  I could find no such pipe anywhere.  My solution was to use instead a 3/4x16tpi bolt, and then drill a hole through it.  Fortunately, I have the equipment to do that, but most probably wouldn't.  Even then, bolts are hard material, and I dulled two drill bits getting it done.  If someone can find a source of 3/4x16tpi pipe – be it steel, aluminum, or even plastic -- making this filter would be a pretty simple task for just about anyone. 


The "disk" that the can and filter rests on is just a board with a 2" hole in its center, cut in half.


So now I change (or perhaps I should say, “recycle”) the oil after every batch.  I immediately drain the oil while it's still hot and when the water and sediment particles are mostly still suspended.  


post-80807-0-93469300-1442286935_thumb.j


Someone's bound to ask about the water, which of course the filter wouldn't exclude, although it would probably accumulate in the bottom of the filter and not pass into the container.  I solve that problem by letting the drained oil sit a while, so that the water and sediment will settle, then I put it in the freezer until the water freezes.  The water & heavier gunk stay behind, while the oil still flows nicely.  Here are pictures showing the oil with the water frozen at the bottom, and the ice and sediment that remain after the oil is poured off into the filter.


post-80807-0-21144300-1442286975_thumb.j


Here's a before/after comparison of oil after one batch (previously new oil used for one batch of mushrooms -- yummy, btw) and the same oil after being run through the filter: 


post-80807-0-89671900-1442287015_thumb.j


A couple of other points:  There are obvious and easy improvements that could be made, such as using a container with a dispensing faucet (think of a lemonade jar, for example).  Also, for the technically savvy, auto-mechanic-type person who may be wondering about it, there is an anti-backflow seal that has to be removed from the oil filter, but that can be removed by cutting through it and pulling it out with needle nose pliers, which is easily done.


So far there has been a noticeable difference in the cleanliness of the oil, and hopefully that will be true for the buildup of "gunk" as well.  I imagine pump disassembly and cleaning will still be needed, but hopefully not nearly as often, and with a little luck, it won't be nearly as "gunky".    


Sorry for such a long post (especially my first one!)  Hope this is helpful to someone!


Brent

Brent

Brent

Hi all, 


Discovered this site this weekend, and spent much time reading the 747 previous Freeze Drying posts.   Thanks to all for sharing -- I've learned much.  We have been HR owners for about a year -- love it, btw -- but only into "24/7 mode" for about the last three months.


As was inevitable (though unanticipated), I've scaled the learning curve about vacuum pump maintenance, (aka water drain-offs, oil changes, power flushes, and pump cover disassembly and cleaning.)  We've followed the instructions given by HR.  Like many, I was surprised to see the buildup of gunk (I believe that's their official term  :huh:) in the pump, and the effects of the accumulated water.


Having recently completed my third anti-gunk teardown, I thought there has to be a better way.  It seemed like filtering the oil might help, so at first I tried the obvious:  coffee filters and filtering through dense cloth.  Short story:  Not worth the effort and the mess.


It occurred to me that the solution might be to use an automotive oil filter.  (There is a reason they call them "oil filters", after all.) 


The problem is, a car's oil filter operates under pressure, and has the intake and outlet on the same side of the filter.  There is no flow "through" in the sense of what goes in the top comes out the bottom.  Hmmm...


I finally came up with a solution that would work around that, and here it is:  (--don’t laugh, first impressions are often misleading).  


 post-80807-0-05067300-1442286698_thumb.j


The oil goes in the can at the top, passing into the filter below, filling it.  The overflow then goes out of the filter and is caught in the container beneath. 


The can and the filter are linked by a threaded pipe, as shown here: 


post-80807-0-91664600-1442286862_thumb.j


The one "gotcha" I encountered in making this is that a typical car oil filter attaches with a 3/4x16tpi threaded pipe.  I could find no such pipe anywhere.  My solution was to use instead a 3/4x16tpi bolt, and then drill a hole through it.  Fortunately, I have the equipment to do that, but most probably wouldn't.  Even then, bolts are hard material, and I dulled two drill bits getting it done.  If someone can find a source of 3/4x16tpi pipe – be it steel, aluminum, or even plastic -- making this filter would be a pretty simple task for just about anyone. 


The "disk" that the can and filter rests on is just a board with a 2" hole in its center, cut in half. Total cost of the whole system is less than $10.  If and when the filter needs replacement (which shouldn't be often, when you consider how long they last in an automobile), it costs just over $3.


So now I change (or perhaps I should say, “recycle”) the oil after every batch.  I immediately drain the oil while it's still hot and when the water and sediment particles are mostly still suspended.  


post-80807-0-93469300-1442286935_thumb.j


Someone's bound to ask about the water, which of course the filter wouldn't exclude, although it would probably accumulate in the bottom of the filter and not pass into the container.  I solve that problem by letting the drained oil sit a while, so that the water and sediment will settle, then I put it in the freezer until the water freezes.  The water & heavier gunk stay behind, while the oil still flows nicely.  Here are pictures showing the oil with the water frozen at the bottom, and the ice and sediment that remain after the oil is poured off into the filter.


post-80807-0-21144300-1442286975_thumb.j


Here's a before/after comparison of oil after one batch (previously new oil used for one batch of mushrooms -- yummy, btw) and the same oil after being run through the filter: 


post-80807-0-89671900-1442287015_thumb.j


A couple of other points:  There are obvious and easy improvements that could be made, such as using a container with a dispensing faucet (think of a lemonade jar, for example).  Also, for the technically savvy, auto-mechanic-type person who may be wondering about it, there is an anti-backflow seal that has to be removed from the oil filter, but that can be removed by cutting through it and pulling it out with needle nose pliers, which is easily done.


So far there has been a noticeable difference in the cleanliness of the oil, and hopefully that will be true for the buildup of "gunk" as well.  I imagine pump disassembly and cleaning will still be needed, but hopefully not nearly as often, and with a little luck, it won't be nearly as "gunky".    


Sorry for such a long post (especially my first one!)  Hope this is helpful to someone!


Brent
×
×
  • Create New...