

lebowits
-
Posts
594 -
Joined
-
Last visited
Content Type
Profiles
Forums
Store
Help Articles
Everything posted by lebowits
-
When I need to warm my tempered chocolate a bit, I'll wave it over a very low flame for 10 - 15 seconds while stirring continuously. I generally keep the bowl about 12" - 18" above the flame so as to prevent too concentrated a hot spot.
-
Put me down as a "maybe". Can't be sure until we work out dates and that date gets MUCH closer.
-
How about an almond flavored ganache? I've seen a number of formulas that use marzipan to add the almond flavor. Check Greweling for a reference.
-
You might want to take a look at "Fine Chocolates Great Experience 3: Extending Shelf Life" by Jean-Pierre Wybauw. The whole topic of this volume is how to extend the shelf life of different ganaches.
-
Fat free 1/2 & 1/2 is in an abomination and should be banned from all kitchens that cook for people who actually enjoy eating.
-
Report: eG Chocolate and Confectionery Conference 2011
lebowits replied to a topic in Pastry & Baking
Kerry - I want to hear more about your "Thai-one-on" pieces... sounds really interesting. -
Report: eG Chocolate and Confectionery Conference 2011
lebowits replied to a topic in Pastry & Baking
Wow! All the confectionery looks beautiful! It's amazing to see how far we've all come in a few years. Wish I could be there with you. -
I would avoid letting newbies deal with hot sugar of any kind. This type of thing screams "demo". In the classes I've planned, I demo the more complex or "dangerous" stuff and let the class handle the components to assemble final products. Something that's always fun is teaching them how to temper chocolate. Good luck!
-
Yes, I had tried to fashion a "Bananas Foster" bon bon, and while I liked it, it didn't sell very well. It was more of a banana caramel with toasted walnuts and rum. I'll go back to it someday and see if I can reformulate it and make it better.
-
Lior - I've been reviewing my copy for a while now and I'm starting to use several of the formulas. In particular, the tropical fruit bon bon is a very nice center. Notter uses a dark chocolate shell for this milk/dark chocolate flavored ganache. I'm using banana puree in place of fresh banana for the consistency of flavor and putting it into a white chocolate shell which shows off the decoration very nicely.
-
I've been absent from this thread for a very long time and wanted wish you all a great weekend. I'm really sorry that I won't be with you this year, but my commitment to my local farmers market just got in the way. Have a great time and post lots of comments and photos!
-
I believe that the reason for the loss is that the oils (either from fresh leaves or bottled) simply loses whatever volatile elements that bring the distinctive flavor simply dissipate over time.
-
I simply don't have any more room to cart things around, and even a small cooler would be burden. Electricity can sometimes be a problem. I also want to make sure that people can clearly see what I'm offering. The pieces on display are tossed at the end of the market, so as long as they hold up just enough, I'm happy.
-
Here is a link to his bio on the French Pastry School site. Ironically, the photo displayed on that page is from the class I took with him there. There is also a link to his personal web site here (which wasn't responding when I checked it as I write this).
-
Molded and Filled Chocolates: Troubleshooting and Techniques
lebowits replied to a topic in Pastry & Baking
Interesting that we've gotten such wildly different advice. This topic has come up several times over the years. Which manufacturers suggested doing this? -
Molded and Filled Chocolates: Troubleshooting and Techniques
lebowits replied to a topic in Pastry & Baking
Never, ever, ever wash your molds with anything more than plain hot water. I've gotten to the point where I don't wash them at all. I recently bought a dehydrator and am putting my molds into that and then cleaning them with paper towels. Of course, I'm also dehydrating stuff with it too. -
Molded and Filled Chocolates: Troubleshooting and Techniques
lebowits replied to a topic in Pastry & Baking
When you say a thin layer, you mean a thin hollow shell? Are you trying to remove the hollow shell or are you filling/capping before trying to extract the pieces? I find that cooling/refrigerating my molds before turning out the pieces works very well for me. It may also be possible that you're simply casting too thin a shell and need to do a thicker one (e.g. two layers). I've done this with white chocolate a few times just to make sure the shell was sturdy enough. -
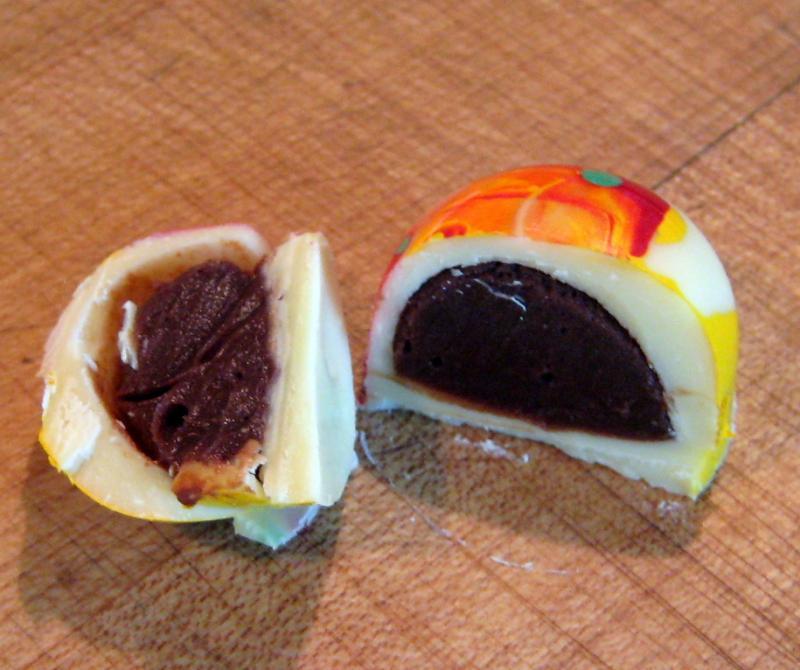
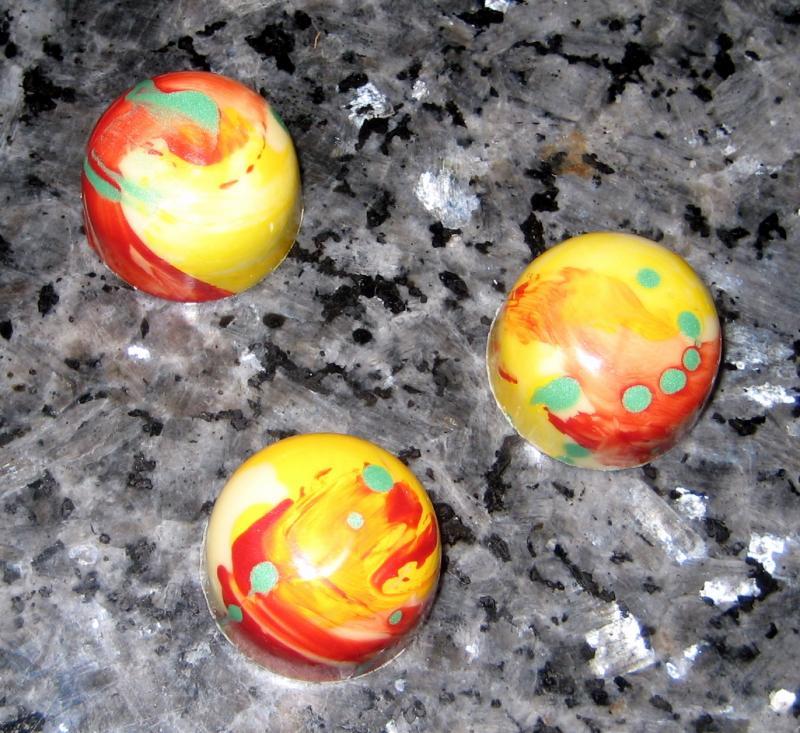
This is a Tropical Fruit Bon Bon that I put together for the first time this weekend. The center is flavored with passion fruit, mango, and banana purees along with a bit of lemon and lime juice for acidity. The shell is white chocolate decorated with red, yellow, and green cocoa butters. This is a cut away view showing the dark/milk chocolate center in contrast with the white chocolate shell. I really like the dark/light contrast. By double casting the shell, it is thick enough not to show through to the center.
-
According to Wikipedia, frappucino is in fact trademarked by Starbucks <see here>. The generic term frappe (pronounced "frap") is not and could cover a wider array of products. I like the idea of these on the menu for summer. As for the blender... can you say "VitaPrep"?
-
I've found the commercial "marshmallow fluff" found in most large groceries works just find to substitute for the frappe. It's inexpensive and lasts pretty near forever if you keep the container properly closed.
-
I took the 4 (4.5?) day artisan chocolates and confections continuing ed course at CIA several years ago. My section was taught by Chef Greweling and was a very interesting, and intensive week. This was a number of months before his first book was published and pretty much everything we made was from that set of formulas. The format of the class was an hour or so in lecture on a particular topic, time in the lab making products, break for a meal (dinner in my case), and then back to the lab to finish our days production. I can heartily recommend taking the course. I had messed around with making my own chocolates for about 2 years prior to taking this class. It corrected some things I was doing poorly, taught me new skills, and frankly, it was the little bits of technique that you just can't get from a book that I believe were most valuable.
-
The forward leg had a matched milk chocolate piece cut to almost exactly the same shape. The milk chocolate extended forward of the dark chocolate on part of the leg to give the appearance of a shadow. Unfortunately you can't see it in the photo(s). It's simply too thin. The original design had the milk chocolate the same width as the dark. I would agree that milk chocolate isn't as strong a material as dark chocolate, but in this case, mated to the dark chocolate, it would have only added support and not needed to be structural by itself.
-
Moving these just looked too risky. Two pieces crashed during the week. When the first one came down, you could hear the collective gasp in the room. Simply moving them from the floor stands to the table the previous evening was thrilling enough. None of us wanted to take chances.
-
My apologies about the photos. Give it another try. I've changed the permissions on the album to "anyone". Thank you for the complement about my writing. I'm not a paid writer though I've done quite a bit of technical writing during my career. I'm glad you enjoyed the narrative. I look forward to hearing what you think after you see the photos.
-
Photographs for this can be found here. I'm having great difficult posting them inline. Ever since getting into chocolate I've been fascinated by show pieces and the people that compete in building them. After talking to a few people and finding little about the process of creating these works of art, I found myself in Chicago, in February (who goes to Chicago in February?) attending a class in show piece design/construction at the Callebaut Chocolate Academy. The class was attended by a total of 7 students, almost all of them full time professional pastry chefs and chef instructors. Only I, and one other student still had "day jobs". As class began, I began to get this deep sinking feeling in my stomach as Chef displays a drawing of what we will be building over the next 4 days. My immediate reaction was "No way in hell!" So here I am, a bit terrified as being caught out for the fraud I truly must be and facing what we have to do. Needless to say, the first day was a bit of a blur as we cast chocolate into silicon molds for beautiful curved pieces, and hand cut the legs and body of a crane (bird, not machine) out of a slab of poured and barely crystallized chocolate. At the end of the day I had completely blown nearly my whole days work when the legs I had so carefully cut snapped in more than one place. The next morning, Chef came over, looked at my broken body of a bird and said simply, "Start again". Fortunately, the 2nd time around didn't take as long. Once the body was assembled from 3 separate pieces, it was time to draw thin sheets of chocolate and hand cut shapes to give the body dimension from side to side, and basic wing shapes. Of course, by this time, I've also snapped off the head and most of the neck of my piece. LESSON ONE: Don't, don't, don't rush! It is better to be slow and do things correctly than to go do them again. Measure 2 (or better 3) times before doing anything that can't be undone. LESSON TWO: ALWAYS be hyper aware of where YOU are and where your pieces are. This way you won't put things under a table and snap off rather important bits. Chocolate is FRAGILE! After creating the legs, body, and wings, it was time to move onto building a base to hold this thing. Thus ended our second day. We had cast a number of very pretty curved shapes on Monday which were sitting on a tray under my station. They would need to be attached to a flat surface which in our case would look much like granite but be composed completely of chocolate. Chef demonstrated how we were going to attach these lovely bits again, using nothing but a hot pallet knife and a paper cornet full of tempered chocolate. Then the base took on a whole new level of interest as Chef nestled a sphere into the curved pieces he just attached to the base. This is what our bird would rest on. "Are you kidding me?", I thought. How are we going to attach a 24"+ tall bird made of what must be 7 - 10 POUNDS of chocolate on top of that little sphere? But there it was and I dutifully began assembling my own base. So here we are at the end of day 3! Chef wants EVERYONE to have their birds mounted on top of the base. I now realize that I've made another rather large blunder. The original picture we were working from has the "feet" of the bird pretty much on top of each other. In making my second set of legs and body, I had spread them much farther apart. Nearly 5 inches apart. The sphere resting on top of the base is only about 4 inches in diameter. It's not going to fit. So I think about this and come up with what I hope is a clever if somewhat uglier way of mounting the bird. Now everyone else was cutting a hole in the top of their spheres and carefully placing a thick rectangle of solid chocolate vertically through and setting it into a pool of tempered chocolate. This would transfer the weight of the bird and transfer it over a wider area across the bottom of the sphere and then to the vertical curved pieces holding the sphere. Everything in a nice straight line going down toward the base. I decided to cut a horizontal plank from the same rectangular pieces of chocolate, level it,and attach my bird to that. My original thought was to sink the plank farther down into the sphere, but the cut-outs, but again, I was rushing to finish what Chef asked us to do and didn't think to cut the vertical post properly. Either way, I had my mount and it was now time to place the bird on top. Of course, this is a rather terrifying prospect. As we started to say, the "sphincter factor" was rather high. Nonetheless, with the help of two of my class mates, one placing the tempered chocolate "glue" and another telling me if I was holding my bird perfectly straight and not leaning in any particular direction, we got it attached. After a couple of minutes to let the chocolate set, I carefully released the bird from my grasp while keeping my hands cupped around where I had been holding it. That way I might catch it as it started to go over. Fortunately, and to my utter amazement, it stayed upright. So now I have a roughly 4' tall show piece. Of course it doesn't have a complete neck or head. This led me to begin calling it "Ichabod, the Headless Crane of Sleepy Hollow". That night I had several good drinks and simply couldn't believe that I had built this thing. And that it was STANDING! The next morning, changed into my uniform, and immediately headed into the lab to see if my bird was still standing. Fortunately it still was and we needed to begin working on additional decorations. Breast and tail feathers, additional body feathers, and of course detail for the head. But I didn't have a head. A class mate suggested that I use the head and neck that I had cut on Monday. So again with a hot knife in hand, I cut off the neck where it broadened into the body. Using this a template, I placed it atop the complete head/neck, and matching the angles, cut the good part off the rest of the body. Then, using tempered chocolate, I attached it to the cut I had just made. This wouldn't be very strong on it's own, so I attached 2 chocolate disks on either side of the join to provide more strength. I could now move on to doing the additional bits of feather decoration, the breast and tail feathers, and cutting and attaching the head and beak. Of course that would be too easy. As I was attaching one of my small bits, the curves holding the sphere gave way, (fortunately) leaving me holding the bird. Another class mates piece had fallen over late on day 3 and shattered, so I was VERY lucky. So I had to figure out how to create a new mount. Again comes out the hot pallet knife and I cut way a level surface. There were several small pieces we had cast on Monday and one of them was just perfect for placing atop my broken base to be a new platform for the sphere and bird. Now, using a metal sphere mold which I heated, I created a curved "dimple" which matched the curve of my chocolate sphere. More tempered chocolate and again, Ichabod rides high. This time with a full neck. Now I could move on to making the rest of the head details. The last details to be added were a large flower and a few swirly long decorations made from modeling chocolate which I had a hard time getting the hang of. Chef demonstrated making the flower petals and mounting them on a sphere which was decorated with white chocolate and sanding sugar to look like the center of the bloom. So, this being our last day, I got busy and made my own flower and attached it to my piece. Ichabod is now essentially complete since we're running out of time. Chef spends the remainder of our last day demonstrating how to add color with an air brush. Needless to say, by the time he's done, his own piece is stunning. Having now made what I'm sure is a rather modest show piece, my esteem for people who do this with any skill at all has gone up immensely. Now I just need to find the space, buy a few tools and parts and begin thinking about my own artistic aesthetic. It was terrifying in the beginning, but as I moved through the week, my confidence built, and I realized that I can indeed do this. Perhaps not well yet, but I can do it. Anyone else have stories to share about learning to do this?

