

kbjesq
-
Posts
711 -
Joined
-
Last visited
Content Type
Profiles
Forums
Store
Help Articles
Posts posted by kbjesq
-
-
A comment by Rocco DiSpirito, however, has totally changed the way I fry. Rocco suggested that, if the oil drops 75 degrees (or whatever the number is in your case -- you'll have to experiment, but 75 is pretty normal) when you add food to oil, that you start by heating your oil 75 degrees hotter than you need it. So, if you want to fry at 350, you heat your oil to 425. You then add the food and -- voila! -- you have 350-degree oil. Then it's easy to hold the 350-degree temperature.
Yep, been using this technique for years . . . works great.
My latest deep-frying revelation is that more is not always better. I had always been led to believe that in order to maintain temperature and achieve a quick recovery after foods are added to the oil, you must start with a large quantity of oil. In other words, you need a large fryer and lots of oil.
A couple of months ago, on a whim, I picked up a relatively shallow electric deep-fryer for $20 at Walmart, similar to this one, but a little shorter. Anyhow, this thing holds less than 2 liters of oil, but because the heating element is the same size as the other ones that hold 3+ liters of oil, the small fryer has nearly instant recovery of temperature after foods are added. You must work in smaller batches, of course, but because the recovery time is so quick, there is no waiting between batches for the temperature to recover. And you don't need to "overheat" the oil, either. Just set at 375 F or whatever, and you're good to go.
-
Ditto on using the ones with the red rose on the package. By the way, what's with the shrimp rice papers? I bought some one time on a whim, and they are still in my pantry. Is there a special use for these or just go ahead and use them for summer rolls?
This sounds like "shrimp chips" (about 2 inches in diameter) and not rice paper. Maybe they are the same thing, I don't know. Shrimp chips are made of ground shrimp and tapioca flour. In the Chinese way (perhaps Vietnamese do the same thing): we deep-fry the chips. They will curl up and expand. Drain the oil. Let them cool. Just eat them as snacks.
This is a picture of the product that I mentioned:
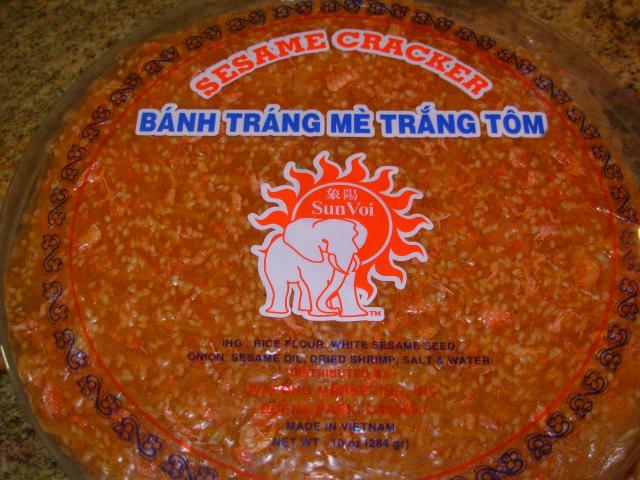
Now that I actually looked at the package, it does say "sesame cracker". In the store, they were right next to the regular rice paper that I normally use for summer rolls, so I just thought that these were shrimp-flavored rice paper. Do I break these up and toast them, as Mizducky suggests? How would these normally be served?
-
And some recommendations from other owners and how to clean really grummy range tops would be appreciated. The pots and pans cycle of the dishwasher did not do the job. Do I dare try Dawn Power Dissolver?
I can't offer any advice on the ovens as I have only the BS cooktop, but in that regard, I have a few suggestions that should help.
First, if you have a total blow-out mess on your hands, take the grates off, put them in a huge, heavy duty garbage bag and spray down with an entire can of oven cleaner. Close the bag and leave it overnight - a minimum of 8 hours. Take the grates out and rinse them off. I use an old scrub brush for any bits that still seem stuck on, and they turn out good as new. This is a once per year job, at most.
Second, if you have a decent-sized mess, but not a total blow out, take out the grates that are offending you and put them in the sink with Dawn Power Dissolve. Scrub before you rinse (after 45 min). Should be good as new.
Third, once you have the grates good and clean, it is important to keep them that way as best you can. The method that I find most satisfactory (and I've tried many) is to apply a fairly damp side towel (I use the ones that are just about to go in the laundry, anyhow) to the grates while they are hot. Simply lay the wet/damp towel on the hot grates. Steam is quickly generated and I find that steam to be more effective that any spray cleaners. This technique will loosen just about all of the day-to-day grime. Follow up by scrubbing vigorously with the now-hot-and-steaming side towel. Obviously, no rinsing or anything else required.
Step #3 sounds like a lot of work, but it really takes just a couple of minutes and if you do it while the grates are still hot, it works like a charm.
I do a lot of wokking and frying on my BS and without step #3, it would look like a wreck every day.
Hope that this helps!
ETA: I agree that the pots and pans cycle of the dishwasher is useless for this task. Try the hot towels - I think you will be pleased with the results, once you get the grates cleaned initially.
-
Maybe I should post this in the Kitchen Consumer forum, but just in time for the holidays, Amazon has a great deal on the popular "Mr. Bento" bento set. It is 44% off, only $35.99 with free shipping. I have two of the smaller bento sets from Zojirushi and they do work very well for keeping things hot/cold.
-
How do you feel about these mandatory appetizer charges? Have you had any other unique appetizers in some of these restaurants?
In my particular case, I would just be so darn glad that I was eating in HK that I would gladly pay the charges!

Unfortunately, I will not be eating in HK anytime soon, so I must console myself with your pictorials and travelogue, for which I deeply thank you!
On a more serious note, a variation of this kind of practice does happen in the US, as mentioned above, with mandatory minimum charges per customer. As long as the policy is fully disclosed, I do not object to this practice.
Highly objectionable, IMHO, is the practice in some parts of the US (South Beach Miami is one example), where establishments automatically add on an 18% "service charge" to everything . . . and that charge is not readily ascertained by patrons. Moreover, there is a line for "gratuity" to be added on the credit card charge slip, misleading you into thinking that you have not paid any gratuity. I think that this practice stinks, particularly in a place where you are already paying very high prices, and where a majority of the patrons will be tourists, who are unaware of the practice.
-
I just prepared a Beef Wellington last weekend and bunged it in the freezer for baking this coming saturday. Btw, it freezes darn well (I've done it a few times already).
I follow the Cook's Illustrated Recipe which is pretty well written. It calls for both duxelles (mushrooms) and pate. In my case, I didn't have any pate on hand so I used fresh duck foie pieces I had left over in the freezer, let it reach near room temp, put between two sheets of plastic wraps and bashed it into a longish, flatish sheet which I peeled and put on top of the filet (before rolling the duxelle over it). The idea is that the fat will melt into the duxelle and crust during the baking process.
I would like to make Beef Wellington for Christmas Dinner, and I found this old thread. Has anyone else successfully made BW ahead and frozen it? I need to make it in advance - at least the day before - because I'm serving brunch for 10 followed by the dinner for 15 on Christmas. Anything that I can do ahead of time, is going to get done . . . .
If I make it the day before, would it be OK to merely refrigerate until dinner time? Does this affect the cooking time? I'm going to follow the CI recipe, except that I'm planning to encase the duxelle/pate mixture in proscuitto before wrapping with pastry in the hope that this will keep the filling from making the pastry soggy.
And and all advice is greatly appreciated (including any side suggestions that can be made ahead!)
-
When I was last confounded by venting issues, I called the "Select Appliance" help desk for assistance. I have to say that the person I spoke with - I believe his name was Tim - was extremely knowledgeable and helpful. We had several conversations regarding venting. And while I eventually ordered a vent hood from him, I have to say that he did also recommend brands that he does not sell. So I didn't get the impression that he was just trying to "sell" me on his products, but rather, he seemed genuinely interested in helping.
You will note that this company sells both commercial and residential appliances. The website is here.
I would definitely call Select Appliance and run it by them for input. Here is the contact info:
(888) 235-0431 (help desk hours: 9:00AM - 5:00PM Pacific time, Monday - Friday)
Phone: (650) 588-9100
Fax: (650) 588-9108
All postal correspondance should be sent to:
Select Appliance Customer Care
159 W Harris Ave.
South San Francisco, CA 94080-6008
USA
-
I cast my vote for another breadmachine - specifically, this one made by Zojirushi. It makes great bread (not weirdly shaped, either) and has variable dough settings, plus a timer so you can wake up or come home to fresh bread.
Unlike many breadmachines, you can make a decent-sized (2 lb) loaf, or a smaller one if that suits you.
Which is not to say that you should not also get a stand mixer. . . .

-
I have never seen oysters this large in any Fish or Asian market. Do many different types of oyster grow to this size?
I'm hoping that someone with more credentials can answer this question. I'm just a dumb/ hungry consumer . . . .but still, why would anyone label these ginormous things "extra small" is truly a mystery!!
I'll likely buy some more this weekend, and will try to post a photo . . . .
-
(When I've needed just a few, I've actually "soaked" them by just running them under the faucet for a few seconds. They're pretty forgiving.)
I also do that when I am making just a few for myself. I find that they continue to soften for a little bit after you wet them, so I usually let it set on my work surface (a plate) for maybe half a minute while I dry my hands off and start loading the roll. I find that if I soak in a bowl I have a tendency to let them get too soft and then they fold onto themselves and make a mess.
I also don't soak mine at all - just run under water to wet both sides and lay out on a clean counter. I make 8 rolls at a time (have your mise ready!) and by the time that I've run the 8th one under the water, the 1st one is perfectly moistened and ready to roll.
Ditto on using the ones with the red rose on the package. By the way, what's with the shrimp rice papers? I bought some one time on a whim, and they are still in my pantry. Is there a special use for these or just go ahead and use them for summer rolls?
-
I used to serve hot fresh oysters that popped open after about five minutes on a grill. Lots of topping opportunities.
Mark Bittman did an episode on grilled oysters with various toppings (and other oyster recipes, as well) as part of his "The Best Recipes in the World" series. The episode is The Shell Game and the grilled oyster recipes are available in that link, plus a recipe for oysters poached in champagne that sounds lovely.
Regarding oysters, has anyone else encountered "Willapoint Fancy Extra Small Oysters"? I bought two cases and they were the biggest oysters that I have ever seen!!! They are easily the size of your palm. If these are "extra small," I'm terrified to know what the "extra large" look like (I'm picturing a shell the size of a Volkswagen). Regarding flavor, they were somewhat briny, but in a good way. It's weird to find an oyster that you need a knife and fork to handle.
The other oysters that we see around here are from Apalachicola, Florida and they are small and very mild.
I prefer to use the Willapoints in cooked dishes and eat the smaller ones raw.
-
I made the best ones I've ever made or eaten. Recipe from Cook's Illustrated.
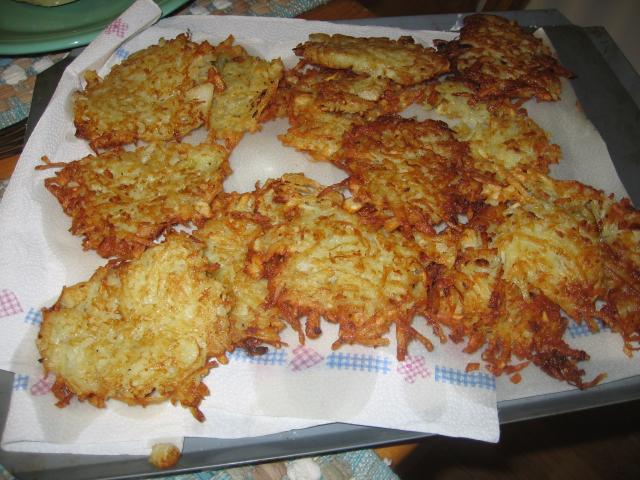
Wow, Randi, those look positively gorgeous. You are definitely getting your money's worth out of your new kitchen and I am so glad that you got it finished before the holiday season.
Maybe I should reconsider my decision to cancel my CI membership - those latkes are to die for!
-
All oyster recipe welcome, but yes, you know exactly what I'm talkin' about, Jamie Lee! Would love to see your family's recipe....
I'm not Jamie Lee but I do make oyster stuffing every year. Here's how we do it. Take two pints of freshly shucked oysters, then drain one pint (save the liquid). Eat the drained oysters raw, with a bit of cocktail sauce, while you are mixing up the stuffing.
For the stuffing, saute 2 cups of finely diced onions and celery in a few tbs. of butter. S & P to taste.
Crumble a batch of cornbread (stale is better) in a large bowl and mix in the sauteed veg. Add seasonings if you want. I usually throw in a pinch of cayenne and some minced fresh parsley.
Separately, mix the reserved oyster liquid with one raw egg, then add the other pint of oysters and liquid.
Gently fold the oysters and liquid into the cornbread/veg mixture, place into a baking dish, and either bake in the oven (350F for 45 min) or steam for 45 min.
It's best to use large, strongly-flavored oysters for this dish.
-
Thanks for the reply kbjesq, but I can't view the recipe because I am not a CI member...and I am just too darn cheap. :-)
Did you try the link? I don't think that this is a recipe that requires a membership to view. (I do have a membership but I have not had to log in to see this recipe, and usually the site requires a log-in for non-free stuff).
Let me know, I'm interested. And FWIW, I'm probably not going to renew my CI membership. I don't think that it's a good value. I'd rather spend the $20 annual fee on another cookbook.
-
I am looking for a new gingerbread cookie recipe that yields a nice fat puffy soft cookie cutouts.
Patrick, try this recipe from CI: Thick and Chewy Gingerbread Cookies.
-
I recall someone else making the same observation years ago and I tried the frozen ones and they truly were a revelation.
Oh really? That's interesting. I think I will give them a try myself.
I find the key to using frozen brussels sprouts is to let them thaw slowly. I usually let them thaw in the fridge. The consistency, when thawed, is almost the same as the blanched-until-half-done sprouts, and they have no bitterness.
When I lived in the North, we would leave them in the garden in the winter, and then traipse through the snow to break off a branch when needed. It was like a giant outdoor freezer.
-
I find the trick to getting a deep-golden bird is to roast it for about 1 1/2 hours. The instructions on the unit will tell you to roast a chicken for about an hour. Unfortunately, I find that will result in a chicken with pale skin. So going a bit longer gives a golden, crisp skin and yet the meat is still moist. It's that self-basting that makes the meat so moist.
David, I'm curious if you check the temperature when you take it out after 1.5 hours? Also, what size bird are you using? I did two 4.75 lb. chickens last night, and after 60 minutes, the meat was 160 F in the breast (and higher in the legs/thighs). I wanted to let it go a little longer because the skin was not as dark as I had hoped, but I was afraid that the meat would be overdone. (I did remove, tent and let rest for 20 minutes, at which time the breast meat was nearly 170 F -- I didn't bother re-checking the temp of the legs/thighs).
Also, I made a quick stock with the giblets and necks using a pressure cooker, and used that as the base for gravy. Perhaps I am overseasoning the birds, but I find that the stuff in the drip tray sometimes is too salty to use for gravy. I suppose that I could use less seasoning if I brined ahead of time, but that would require forethought!

-
Blanch until half done, drain well, and then saute in browned butter using fairly high heat until a bit of crunchiness begins to form on the outside. Finish with a spoonful of good dijon mustard. Pure heaven!
I think the blanching step removes much of the bitterness to which some folks object.
I haven't tried it yet, but I'm thinking that brussels sprouts would be very good in the method for "world's best cabbage" in All About Braising by Molly Stevens. Molly was nice enough to put some of her recipes, including the best cabbabe recipe, on the web. So if you don't have her book, you can get the recipe here: Molly Stevens Cooks.
I would certainly shorten the braising time for brussels sprouts, though.
-
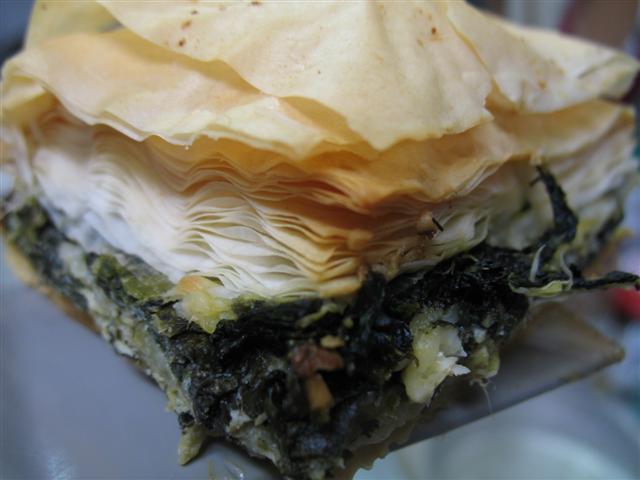
Wow, Rona, that looks great! I don't know how I missed this post earlier.
Your version looks perfect to me. I like how the top is obviously crunchy. Too much butter in baklava, spanakopita, etc. is a turn-off to me. How did it taste, when you finally tasted it? (And how did you exercise such restraint . . . .)
I'm sure that this is not conventional but I sometimes make spanakopita with layers as follows: dough/spinach/dough/spinach/dough. Also probably not conventional, but I like how it affects the texture: I crumple up a few of the leaves as I am laying them out within the dough layers. It seems to give some height to the dough layers (esp. to the middle layer of dough) so that the end product is not just flat and weighed down by the filling.
-
Another vote for the "set it and forget it" rotisserie. I had one for years, and it's one of the reasons that I bought my current oven (which has a built-in rotisserie).
Yes, the food does come out just like it looks in David Ross' pictures.
I've seen great deals on Ebay . . . nearly new ones going for around $25.
Coincidentally, I bought two chickens yesterday afternoon and tonight they are going to look like this:
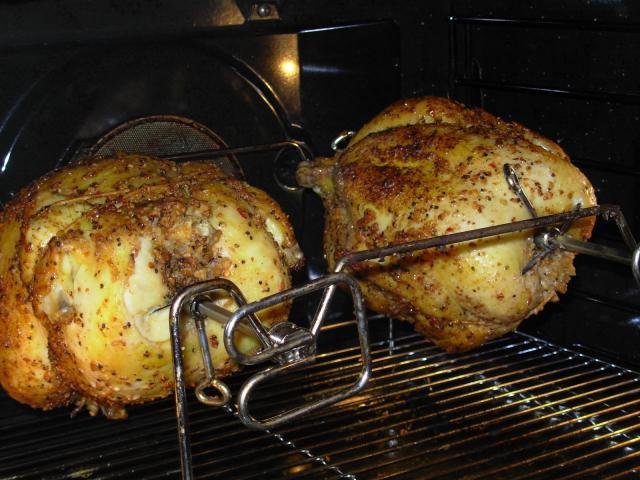
I don't bother brining or anything . . . just apply whatever spices seem to fit the mood of the moment and then into the oven.
-
There has to be at least two turkey dinners -- turkey, stuffing, gravy, cranberry sauce and pie. And yes, I make all this even when I go to someone else's house. I gotta have it.
I'm right with you, Linda. Thanksgiving leftovers are mandatory and must be available at all costs. And just to play it safe, this year I cooked a 24 lb turkey for 12 people. I figured if the recommendation was 1 lb. per person, then 2 lb pp would ensure adequate leftovers. (Also added a 10 lb ham and 12 side dishes plus 4 appetizers just to be safe - I didn't want anyone eating too much turkey!)
To be honest, though, I would have cooked the big bird even if I didn't have any guests. It's just what I do on that day, every year.
PS Don't forget turkey and dumplings . . . .
-
Using dishwasher detergent on stains works well (use the liquid type, I think that Cascade now makes one with bleach added). Fels naptha is a laundry bar soap that also works well on stains.
Any of these techniques will dramatically shorten the life of your garments, but you should have success in removing at least 90% of stains. Also, old stains are much more difficult to remove, so try to get them in the washer or at least pre-treat the stains asap.
-
Great job, Randi, and thanks for showing us your beautiful new kitchen. I cannot believe how quickly you got everything done!
I am glad that you are enjoying your single bowl sink - I don't think that you will ever regret choosing it. Also I agree with you about the Gardenweb being a great resource for kitchen planning.
Regarding your refrigerator sticking out: the KD should have at least advised you about the option of choosing a counter depth fridge. Now, you might not have chosen one because they do have much less capacity than full size, but still, you should have been alerted to the issue. My .02.
I don't know if this is helpful or an option at this point, but I do know that some people have created a niche in the wall behind a regular fridge so that it can be positioned at counter depth. I imagine that whether you could do this would depend on what's in the wall behind the fridge in your house. And also whether you feel like dealing with anymore construction issues. Anyway, just an idea if this is something that really bugs you (and I can see where it would!).
I especially like your choice of cabinets and drawer pulls!
-
I have this hard floor cleaner which cleans any type of hard floor except the rough type of paving squares. It works beautifully on hardwood, glass, ceramic and other tile, marble, honed slate and terazzo and also on poured seamless flooring and teak decks.
I agree with Andie's recommendation for the Floormate. I mix a few tablespoons of vinegar (or bleach, depending on how dirty the floor is) with hot water in the Floormate's "clean water" container. The Floormate sprays the solution onto the floor, scrubs it around, and then vacuums the dirty water into a separate container. You'd be surprised how much dirt will come off, even when the floor looks clean.
I also like the fact that the Floormate can be used as a regular vacuum on bare floors, for those times when a complete scrubbing isn't necessary.
I tried the swiffer products (wet and dry), but I really didn't care for them because it seemed as though the products (especially the wet) left some kind of residue behind, which actually seemed to attract more dirt. In other words, it seemed like the floors got dirtier faster when I used the swiffer products.
The Wok from Wokshop
in Kitchen Consumer
Posted
Bruce, can you talk a little bit about your experience with the CS and CI woks? What exactly did you like better about the CI? I think that I've got the same cooktop as you do (36" BS with power burners up front).
I currently have a CS wok and I'm curious to know if I'm missing something.