

paulraphael
-
Posts
5,175 -
Joined
-
Last visited
Content Type
Profiles
Forums
Store
Help Articles
Everything posted by paulraphael
-
Interesting read. That mostly fits my experience in Rome a couple of years ago, where the espressos were all good, but had a bit more of a "comfort shot" feel than what I get at the best US coffee shops these days. Not dark roasts, but a little darker. More emphasis on base coffee notes and toasted flavors. More mellow than bright. The thing is, the dairy and sugar in ice cream mutes the brighter notes, so all coffee gets pushed in the direction of mellower, sweeter, toastier. The challege is if you want the brighter flavors and aromatics ... you need to start with bright beans and use an extraction method that might lead to a too-bright cup of coffee. I wouldn't put add sherry vinegar to my morning cup of joe, for that matter.
-
You could use a different sherry vinegar, or even a balsamic. Some people might prefer to leave it out entirely. I wanted to bring out the fruit and acid flavors of the coffee, but my neighbor (a Café Bustello man) doesn't like those flavors. He doesn't like my favorite café, doesn't like my coffee, doesn't like my coffee ice cream. I'm pushing that PX vinegar on everyone partly because it will make the world a better place. I agree with all your thoughts on eggs. It's why I only use two yolks per liter. For some flavors (like chocolate) I leave them out entirely, and use alternate emulsifiers. That said, I didn't experiment with an eggless version of this, because I pushed it so far in the direction of low fat to begin with. Chocolate brings so much fat of its own so is a different story. If someone else wants to play around with eggless versions I'd love to taste the results, but right now I'm quite happy with both flavor and texture and so don't feel the need to start over.
-
Not yet, but I'm dying to try it. Have draft 1 of a recipe ready to go. I'd be happy to bathe in the stuff.
-
This is definitely something I would have experimented with, but it requires an espresso machine. The only espresso machines I'd let into my house are outside my budget for now, and possibly ever. And I'm not interested in racing home with 10 ristrettos to go ...
-
I'm not at all a fan of dark-roasted coffee, either for drinking or for ice cream, although I find it more tolerable in ice cream.. My post goes on a long diatribe against them. Darker roasts demolish the aromatics and the acids (which I'm trying to emphasize) and pile on bitter notes (which I'm trying to control). I've had the best luck with the medium-light roasts favored by most of the 3rd wave roasters these days. I use East African varieties, mostly because that's what I like to drink and so I have them around. I can't say that in a blind test I'd be able tell the difference between a such-and-such estate Ethiopian coffee and a similar roast from Panama.
-
Cardamom is my first thought too. Actually my second. At first I read the thread as "what spice do you like with permission?" which got me thinking of which forbidden spices I might like even more. Also maybe cloves, chilis, cinnamon, ginger, or nutmeg.
-

Baking with Myhrvold's "Modernist Bread: The Art and Science"
paulraphael replied to a topic in Pastry & Baking
Can anyone share the books' basic sourdough method? Not for creating a starter, but for building the bread from there. -
Because I spent a year figuring out how to make awesome coffee ice cream and I'm going to enjoy it, damn it. Even if it kills me.
-
Last year I did a ton of experiments and arrived at 80g coffee per 1400g water (48 fl oz, a big press pot). This is 5.7% by weight relative to the water. I'm mostly buying East African coffees, especially Ethiopian varieties, from 3rd wave roasters who favor a lighter roast. Occasionally I'll end up with beans that do better with 90g or 70g, but this is rare. The variable that took me forever to figure out was water temperature. About 8 years ago in this thread I was complaining that the coffee I made at my girlfriend's apartment, with a crappy grinder and no scale, was often better than what I made at home while geeking out. The culprit turned out to be my (supposedly fancy) Zojirushi hot water pot, which was set to 203°F. Turns out that it was about 10 degrees cooler than that, and this was throwing off everything. I use a regular electric kettle now and check the temperature. After trying every temperature in the recommended range, I found 93°C / 199°F to be my favorite. My press pot is uninsulated, so this would be the starting temperature. I've never measured to see how much it drops over 4 minutes.
-
Straight arrowroot works great. I like it more than the other options (I haven't compared with tapioca or potato starch, but I suspect they're similar in the broad strokes). The small portion of xanthan allows it to work in significantly smaller quantities, with more clarity and possibly better flavor release. But the overall texture is only slightly different. It will have a bit more shear-thinning character, as you'd probably expect.
-
I haven't tried either of these products. I take you're word for it that they are excellent, but don't see how a commercial coffee paste is going to be able to equal the flavors of the best coffee beans extracted (optimally) directly into the dairy, with a method that lets you hang on to most of the aromatics. Coffee is a perishable product. Once it's roasted those aromatic compounds start to oxidize, break down, and fly away. I'm not opposed to adding things to enhance flavors. But I'll do it if there's some structural or chemical reason that makes it necessary. I adjust the flavors with sherry vinegar, because I don't know how to keep the dairy and sugar from muting the acidic and fruity flavors, even when I do everything possible to extract those flavors. And I add salt, because even the most balanced method I've found extracts a bit too much bitterness. I don't know what I'd be trying to accomplish with black cocoa.
-
I'm not sure why you'd make coffee with water and add it to ice cream mix, other than a bit of economy (you won't be forced to throw out the milk/cream that gets retained by the grounds). If you do use water to extract the coffee, you can just hold back an equal amount of milk, and add nonfat dry milk to make up for the lost solids. Basically you're making coffee milk out of your coffee extract plus dry milk. All this stuff like adding cocoa powder sounds like attempts at compensating for inadequate coffee flavor. I think if you use enough coffee (good quality coffee) and infuse it the way I describe, this won't be a problem anymore. The downside to this method is expense. Good coffee costs around $20/lb these days. Also it's a fair amount of work. But honestly, if I'm going to make ice cream rather than just buy it, it's going to be so I can make better ice cream than what I can buy. This is much, much, much better than what I can buy.
-
For last-minute thickening I use a blend 1 part xanthan gum and 10 parts arrowroot starch. Mix the powders together thoroughly. Make a slurry with a bit of cool water and whisk it into your sauce. The arrowroot will have to come up to around 140°F before it fully thickens, so it's not instant ... but this also makes it easier to disperse without lumps. The arrowroot also helps keep the xanthan from lumping up. these ingredients will give better clarity and flavor release than wondra (or any other flour), and you won't get the slippery texture of cornstarch or the stickiness of gelatin when it cools on the plate.
-
I haven't used instant coffee, because even the best instant coffees are mostly devoid of fruity / acidic flavors from the bean, and they're utterly devoid of aromatics. So they're a big step in the opposite direction of what I'm going for. To me the best instant tastes a lot like cold brew. I don't get much flavor out of coffee liqueur, either. Not sure why; I'd think alcohol would be a good solvent for the acids and aromatics. But I mostly get the basic midrange coffee and tosted notes from alcohol-based infusions. I've made my own coffee liqueur, and like it more than the usual suspects, but it's not exactly an explosion of flavor. I like Il Lab also. I can't remember their coffee flavor. The closest I've had to my recipe is from Morgenstern's ... have you been there? But seriously, Mitch. I didn't think you'd give up so easily.
-
Over the last many months coffee ice cream has been my nut to crack—how to get the full, three-dimensional, layered flavors and aromas of coffee to blast through the dairy and sugar. Make it taste like a great macchiato, not a wimpy café au lait, or some terrible Starbucks concoction. I tried every coffee extraction method I could imagine before settling on one that resembles the Japanese iced coffee method. Really it's a cross between this method, French press pot, and sous-vide. The idea is to infuse the coffee grounds into hot milk and cream inside a sealed bag (I use ziploc gallon freezon bags, as I do for sous-vide). Agitate the grounds and dairy in the bag at the right temperature for the right amount of time, and then plunge into icewater. bring the slurry down to room temperature before unsealing the bag and straining. This keeps the aromatics in, mostly. Dairy and sugar tend to mute both the acids and aromatics that make great coffee come to life. So part of the goal is to get as much of them into the ice cream as possible, and hold on to them. Even with this method, I find the acids are a bit muted, and the bitterness is a bit out of balance, so I adjust the seasoning with a bit of extra salt, and with an addition of Pedro Ximinex sherry vinegar, whose woody, fruity, sweet-savory flavors complement coffee wonderfully. I also use a base that's only 10% milk fat. Higher fat mutes the coffee too much. This method is a bit more work than most, but I think it's worth it. Details here.
-
Yeah, milk is full of phospholipids. I think an emulsifier would be the key, although you technically wouldn't be using it for emulsifcation as much for stabilization; you'd be thickening the fat so it doesn't move around as easily. Lecithin might work, but is typically used as an emulsifier and is blended into the aqueous phase of the emulsion before adding the oil, which suggests it needs to hydrate. I don't know if it will thicken oil in the way that's needed here. Glycerol monostearate will thicken oil brilliantly, but needs to be heated to 150°F in order to be activated. I think the best bet would be to call Modernist Pantry, or TIC gums, or CP Kelco, and talk to one of the gurus. They may have a more elegant solution than what we're suggesting.
-
At $450, it's a bit over double the price of most home circulators. But it's half the price of the Polyscience ones, and half its previous price. I'd imagine this would be attractive to restaurants, or to someone who uses their circulator to death. I'd also be interested in the robustness if I did more multiday cooking. It would be a major drag to have a circulator die 3 days into a 4 day cook while I'm out all day.
-
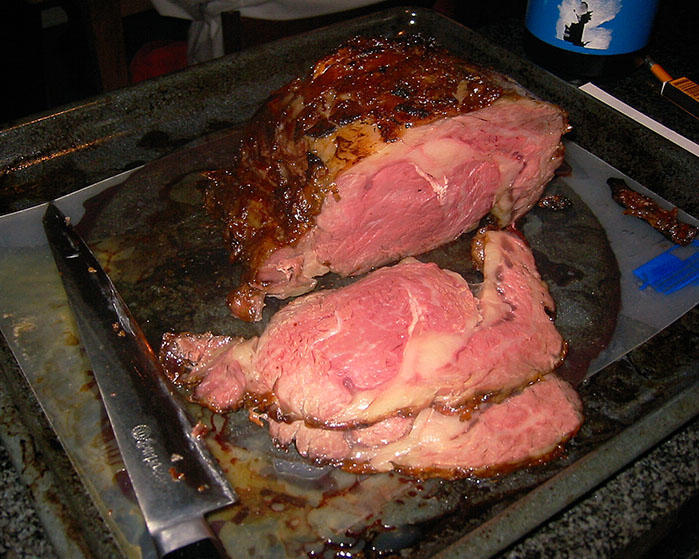
I found a picture of a prime rib roast from a few years ago, using methods fundamentally similar to what I described in this post. This is a 10-week dry-aged piece of USDA prime meat courtesy of my former butcher and partner-in-crime. This was probably cooked to an interior temperature of 129°F or so. Now I prefer to go a few degrees higher, to better melt the marbling. I find I gives a better texture, without any noticeable reduction in juiciness or flavor. It's hard for me to imagine any advantages to the lower temperature ostensibly recommended by Blumenthal. How much more evenly can you cook meat? But you you would definitely get worse texture, greater loss of juices, less predictablility, and as Btbird points out, added danger.
-
Can you explain how you use RS232? What software would you use? In the pictures there's also what looks like a USB port and some other digital connector (looks almost like midi). I sent a note to customer service to find out the story. Edited to add: I found the manual, which answers some of these questions. There's some interesting stuff about what fluids to circulate at different temperature ranges, including what kinds of water. The water details probably apply to all circulators, but the consumer companies aren't talking about them.
-
Has anyone seen or heard anything about these? I've read in a bunch of Amazon reviews that people have reliability problems with Anova's later generation circulators. This one's for lab use, looks totally butch, and the price just came down by 50%, to $450. Anova scientific seems to do zero marketing. It looks bulkier than most of the consumer circulators, although it's not so easy to get an exact sense from the pictures. It might be less of a monster than the Polyscience circulators. And it now costs around half as much.
-
I'm not generally one to argue with Mr. Blumenthal, but the method you're describing here takes a good idea way too far. Yeah, you want to brown the outside with high heat, and yeah you want to cook the meat through slowly with low heat to get a get as little gradient as possible. But a torch is much too hot, and 50C / 18 hours is much too low and slow. A torch is a poor instrument for browning meat, because it's too hot to crisp up the exterior. Part of the browning process involves dehydrating the surface, which allows it to get crisp. A torch will burn the outside before this happens, so you'll never get a crisp crust or any deep browning. And 18 hours is much too long a cook for a prime rib, or any tender cut. Are you sure this is the cut Blumnthal is talking about? 18 hours gets you well into tenderization territory, where you're using heat and time to break down collagen. A prime rib has precious little collagen to begin with; if you break it down you end up with mush. You also loose moisture over the course of that long cook—not plain water, which you lose while dry-aging (which concentrates flavors) but full-on meat juices. So you end up with a dry and yet over-tenderized mushy / grainy piece of meat. Another problem is that unless you have a steam oven / c-vap / combi oven, your oven cannot maintain 50C with any kind of accuracy, and it cannot produce the kind of humid environment necessary to reliably heat the meat. So the oven is going to be functioning like a quite unpredictable dehydrator. I also think most people find that they get better results if they brown the meat after cooking it through, rather than before. Some call this reverse-searing or post-searing. The idea is that the crust you create will not have a chance to get soggy during any any subsequent low-temp cooking. Here's an approach that's pretty foolproof. I recommend a remote probe thermometer so you don't have to think too much. -Preheating oven is optional. Set oven to 200°F (warmer if your oven is untrustworthy at this temp). be sure to have tested oven for accuracy and stablility. -roast until internal temp reaches 118°F. very roughly 20-25 minutes/lb. -put on a room temperature sheet pan; tent with foil; move to a warm (not hot) place to rest for at least 30 minutes. meat can rest for up to an hour or so to fit timing of meal. keep thermometer probe inserted. -preheat oven to 500°F. -put roasting pan in the oven to preheat -about an hour before serving, after oven has thoroughly preheated, place roast on hot roasting pan -put back in oven -remove from oven when internal temperature at center is around 7°F below your target temperature. about 15 to 30 minutes, depending on how much the meat has cooled in the middle—watch closely; it goes fast. aiming for a final temp in the the middle to high end of rare to medium-rare (between 131 and 133 after resting) makes sense with this cut, to ensure that the marbling has a chance to melt. -rest for 10 minutes or so to let juices near the surface to thicken. you can touch it up with a torch if the browning is uneven
-
Baking with Myhrvold's "Modernist Bread: The Art and Science"
paulraphael replied to a topic in Pastry & Baking
It may depend on the particular cultures you've got, but mine is very robust. I use an ischia island culture (popular with Neapolitan pizza makers) that's survived 4 months of total neglect in the fridge. I've heard from pizza makers who have neglected it for 9 months with no problems. I keep mine in the fridge until the night before (or sometimes the hours before) I'm ready to use it. If just a week or two goes by between revivals, it seems to go semi-dormant, and it wakes up quickly. The time I left it on ice for months it took about a day and a half to wake it up all the way. It must have gone fully dormant. It's certainly possible to kill these buggers likely not very easy. -
This is the first cocktail I invented from scratch, for my birthday party last month. Like most things it started simple and then took over. Ginger Panther 1-1/2 oz ginger liqueur (see below. if using store-bought pick a sweet one) 1 oz bourbon 3/4 oz lapsang souchong emulsion (see below) 1 tsp lemon juice 1/2 tsp pedro ximinez sherry vinegar (total 3.5 oz) -shake with ice. serve neat. garnish with ginger -for a longer, weaker drink mix over rocks. or split the difference and strain over rocks. (all the sweetness comes from the ginger liqueur. if the finished cocktail is too bitter / medicinal, then the liqueur is too dry. add some honey to the liqueur) Lapsang Souchong Emulsion -make tea: 1 rounded teaspoon lapsang souchong tea leaves per 8oz boiling water. steep 5 minutes, strain. -measure 0.5% xanthan gum by weight (1.13g per 8 oz water) -blend into tea with immersion blender. -cover and refrigerate a couple of hours before using, to chill and let gum hydrate. -store in sealed container in fridge up to a few days. Ginger Liqueur (about 750ml) 120g / 4 oz ginger root* (divided in half) 50g / 1/4 cup sugar 50g / 2TB + 2-1/2tsp honey (orange blossom, clover or other light variety) 375ml / 1-1/2+ cups water 5g / 1tsp lemon juice 1/2 vanilla bean (about 3”) 1/2 orange for zest (ideally organic) 375ml / 1-1/2+ cups 80 proof brandy (cheap) 200ml whole milk (for clarification) *ginger should be very fresh. No brown or soft spots. Skin should be thin. -clean the ginger. remove dirt and any dark or woody patches. -roast one portion of the ginger, unpeeled, in 400°F oven / toaster oven for 1 hour. -disolve sugar and honey into water on stove or in microwave. bring to a boil. -cut both portions of ginger into coarse pieces. no need to peel. -combine ginger and hot sugar syrup in a blender. cover lid with towel. pulverize. -pour into a jar. add brandy. -zest 1/2 orange. split vanilla pod. add zest and vanilla pod to jar -seal and hold at room temperature for 2 days Clarify: -remove vanilla pieces and rinse (should have enough flavor for other projects) -pour 100g whole milk into a jar -slowly stir liqueur into the milk. milk should curdle** -refrigerate overnight -very gently strain, using a strainer and cloth, or a fine superbag. agitate the curds as little as possible. let gravity and time strain the liqueur; if you squeeze the curds you’ll sacrifice clarity for yield (clarity is about esthetics but may also improve longevity). **if milk does not curdle, separate 100ml of the ginger/milk solution and add 2.5g / 1/2tsp more lemon juice. slowly stir this into the remaining liquid.
-
There are a couple of things you can do to make this family of sauces more wine friendly (vinaigrettes and beurre blancs are both emulsified sauces with an acid base). You can make the acid weaker, by choosing a lower-acid vinegar, or diluting it with water or another neutral liquid. Or using less lemon juice in the beurre blanc. And you can go with a more acidic wine that won't get flattened by the tartness of the sauces. Here's a Serious Eats article that discusses wines and vinaigrettes. Winefolly.com makes similar recommendations for beurre blanc, also taking into account the need to cut through the butter. Suggestions include "lighter zestier white wines and wines with more herbal and savory characteristics such as Sauvignon Blanc, Muscadet, Cortese di Gavi, Verdejo, Vinho Verde, White Bordeaux and Grenache Blanc."
-
Consumer reports has long been a black sheep, and rather bizarre player in audio equipment reviews. I've learned to ignore them in this sector. Other sources, like Tom's guide, and What Hi Fi, and some other audio-specific sites have called the the homepod the champion when it comes to audio. Nevertheless, if I wanted a smart speaker in the kitchen, or anywhere, I'd think of good sound quality as just a bonus. We've got more serious ways to listen to music when that's the point. I'd be interested in the smart features, which on the home pod are currently—weirdly, disappointingly—dumb.


