Nn, M.D.
-
Posts
36 -
Joined
-
Last visited
Recent Profile Visitors
2,742 profile views


-
It’s been a bit since I posted, but I feel the need to spread the good news of my latest creation. I’ve posted on here about my challenges making a chocolate sponge that I like, and I’m constantly looking for a way to bring chocolate decadence to a light and airy sponge without having to compromise on anything. Imagine my surprise when I found this recipe of a chocolate chiffon that felt like a good omen. I made some adaptations to the base recipe, inspired by my signature brownies, with lemon, fresh ground cardamom, and olive oil. As I built the cake, I visualized a chocolate cake that felt rich but was so easy to eat that you couldn’t help but go back for more. So I complimented the cake with a whipped espresso ganache and a deceptively light double chocolate buttercream. I’m really proud of how this turned out, and though my search isn’t quite over, I feel like I’ve gotten closer to my ideal chocolate sponge with this cake. Ingredients with asterisks (**) are optional but highly recommended. Chocolate, Lemon and Cardamom Sponge 40 g cocoa powder 50 g dark chocolate (≥ 60% cacao) 100 g hot water 1 tsp instant espresso powder** 1 tbsp fresh ground cardamom 8 eggs, separated 145 g dark brown sugar Zest of 2 lemons 110 g olive oil 140 g all purpose flour 2 tsp baking powder 1 ¼ tsp salt 115 granulated sugar Preheat oven to 335˚F and line 3 8-inch cake tins with parchment. Combine chocolate, cocoa, hot water, espresso, and cardamom in small bowl and let sit for 5 minutes before stirring to combine. Set aside. Separate eggs and put whites in electric mixer bowl. Set yolks aside. In a large bowl, rub together brown sugar and lemon zest until fragrant. Add in egg yolks and olive oil and whisk until smooth. Add granulated sugar to egg whites and whip on medium (4 on KitchenAid) until medium-stiff peaks. Don’t whip to stiff peaks and don’t whip too fast. This took me about 8 min to get to medium-stiff peaks but check often. Visual indicators will be a slight droop and wobble of a peak. While whites are whipping, add chocolate mixture to bowl and whisk until well combined. Sift dry ingredients together and whisk into wet ingredients until just combined without visible dry flour. Once whites reach medium-stiff peak, fold into batter in 3 additions with a rubber spatula. Split batter into 3 pans and bake for 24 minutes. Tap on counter once removed from oven and allow to cool completely before removing from pan. Soaking Syrup 150 g sugar Juice of 2 lemons + enough water to make 150 g liquid 2 tsp cocoa extract** Add sugar and juice/water to a microwave-safe bowl and heat until sugar is dissolved. Allow syrup to cool slightly before stirring in extract. Espresso Ganache 500 g full-fat heavy cream 300 g white chocolate (not white baking chips) 1.5 tbsp instant espresso ½ tsp salt 1 tsp vanilla extract/vanilla paste** Heat cream, espresso, and salt in small pan until heated through just without simmering. Add hot cream over white chocolate with vanilla and let sit for 5 min. Blend with an immersion blender or whisk gently. Pour into a container, place plastic directly on surface, and chill completely (around 5-6 hours) before use. Chocolate Buttercream 300 g dark chocolate, melted and cooled 1 can (~390 g) sweetened condensed milk 2 eggs 2 tbsp buttermilk powder 2 heaped tbsp (~40 g) cocoa powder 4 sticks (454 g) butter, room temperature (I used half salted and half unsalted butter) ½ tsp salt (if using unsalted butter)** Melt chocolate in a microwave-safe bowl and set aside to cool for at least 10 minutes before proceeding. Add milk, eggs, buttermilk powder, salt**, and cocoa powder to the bowl of an electric stand mixer. Bring a small pan of water up to a simmer and whisk ingredients over simmering water until heated through, at least 165˚F. Place bowl in mixer and whisk on high (8-10 on KitchenAid) until at room temperature. While the custard is whipping, whisk butter with either manual whisk or electric hand mixer in a small bowl until lightened. Once custard is at room temperature, add in whipped butter in several small additions, mixing well between each addition. Once all butter is added, scrape sides and bottom of the bowl with a spatula, and whisk again on high for 1-2 minutes. Turn mixer down to low (2 on KitchenAid) and slowly drizzle in cooled melted chocolate. Once all chocolate is added, scrape sides and bottom of the bowl and whisk again for 1-2 minutes. *To smooth buttercream, switch to a paddle attachment and mix on lowest setting (Stir) for 5-10 minutes. Assembly Remove sponges from pan and scrape level, if necessary. Drizzle or brush syrup over the three sponges. Whip ganache to stiff peaks with hand mixer or stand mixer. Do not over-mix or it will become grainy. Lay down sponge on turntable. Lay down a layer of frosting, then pipe a dam on the outside and spread whipped ganache in the center. Repeat with second sponge layer. Add third layer, crumb coat and chill for 20 minutes. Add remaining frosting to outside to decorate.


- 2 replies
-
- 19
-

-

-

-
I'm also going to leave a tool here that I used to calculate my exact recipe, which would be based on the weight of 6 jumbo eggs for an 8x4" cake tin. The original recipe is intended for a 6" tin. To use the calculator, first crack your eggs and weigh them out. Then, enter the weight in grams into the green box and it should spit out the amount of the other ingredients that you need. My base recipe is adapted from this one by Hanbit Cho. "Syrup" can be any liquid sweetener. Honey was used in the original, and I have made this cake with both maple syrup and golden syrup with good results. "Flour" means cake flour, but I've used pastry flour which I prefer. Ghee has a richer butter flavor than butter, but feel free to use either. "H/H" is half and half, which I prefer to milk, but I think any liquid dairy could work. I added in about 5 mL almond extract and a ¼ teaspoon kosher salt, but add any flavorings you like. Appreciate any feedback. genoise recipe calc.xlsx
-
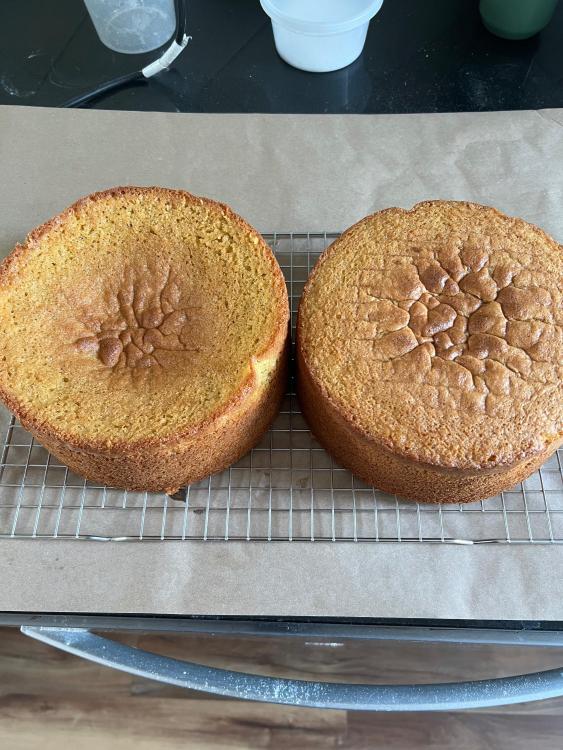
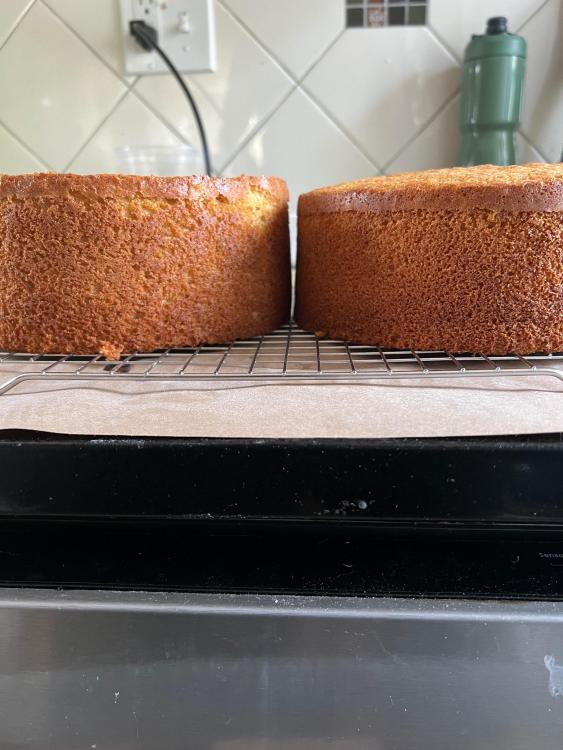
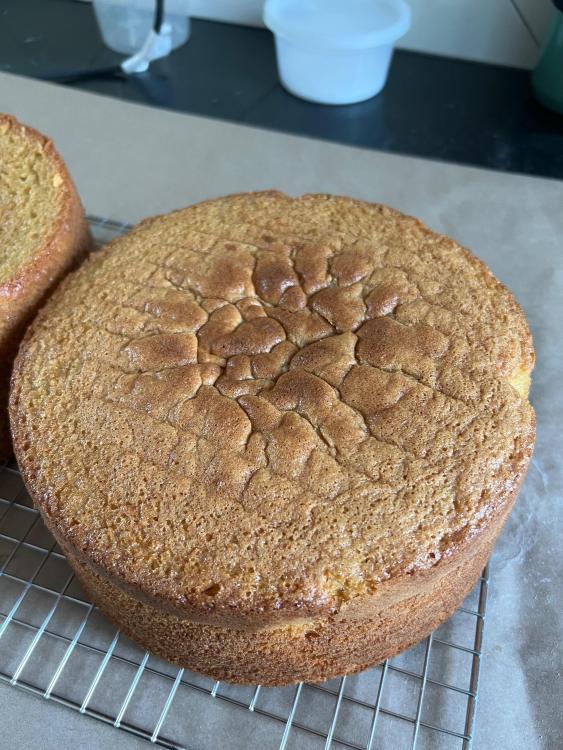
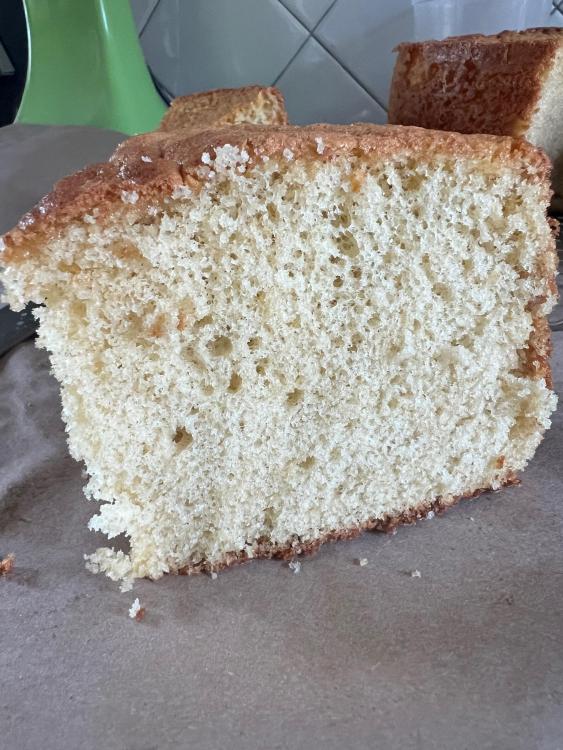
Ok so after a busy morning, I have the results. Keep in mind that for both cakes I used the exact same recipe and same method for preparing and mixing together the ingredients: The cake on the left of the picture was baked at 340F for 35 min. The cake on the right was baked at 335F for 15 minutes and then 345F for 20 minutes. As you can see, the 340F cake sank dramatically, while I got a nice rise from the 335/345F cake. Let's take a closer look at each one, starting with the 340F cake. Quantitatively, the center of the cake sank to 4 cm when baking, while the batter I poured into the cake tin sat around 7-8 cm. As cakes cook from outside->in and bottom->top, the crumb on the bottom and sides of the cake is close but regular and set. Looking at the sunken part in the center, the crumb is more open but very irregular, and instead of a fluffy texture, it looks congealed and still damp. Qualitatively, this was surprisingly very dry cake. Even the sunken parts were somehow dry. I think this fits with my theory that the right bake is a moisture game, and at 340F the batter at the center bottom doesn't set up as fast as it should to support efficient moisture release, so you get accumulation of moisture at the top of the cake. That moisture prevents a proper crumb from setting up, so you get areas of batter separated by steam pockets, thus the irregular holes. So the result is that the cake rises on the outside and stalls out and puckers in the center, until about 15-20 minutes when it gets overwhelmed by moisture and just collapses. Quantitatively, the center of the cake rose to 7.5 cm with a slight dome, compared to the 7 cm outer edge. The crumb is open and springy, and the cake slice is lighter than it appears. The crumb is overall fairly regular, and while it is a bit closer at the bottom than at the top, it may just be that the cake on the bottom is weighed down. Qualitatively, this was such a moist and tender cake! It has a nice bite and a very fine crumb, but there isn't any part of the cake that is dry. While this cake did pucker like the first cake (as evidenced by the bumpy top crust), about 5 minutes after I increased the temperature, the top started to dome up. What I find curious is how regular the crumb is despite the change in temperature halfway through the bake. Mechanistically I can't really figure out what it might be, but it's clear that this result is superior. I wonder if baking the whole time at 345F would give me a better result, but at this point I have found a technique that I like. And if it ain't broke, don't fix it.


-
So I've been toying around with some recipes, and I think one of the things that made a bigger difference than I expected was temperature. And I don't mean like big changes, but very small variations. I was doing a regular genoise in my 8x4" pan and had started it out at at 335F for a bake time of around 35 min. Around 18-19 min, I go to check on the rise and see that the center is starting to sink. I decided to bump the temperature up to 345F at min 19, and let it bake for another 15-18 min. What had been a sinking center started to rise quite nicely after the first 5 or so minutes, and after I took the cake out and cooled it, I cut it open and saw that the top of the cake had a nice light texture and soft crumb. More surprising was how much better the top was than the bottom third of the cake, which had a close texture with a tight crumb and was just a bit denser. I think there may be something special about the rate of rise for a genoise, which is directly correlated to the moisture released during baking. My theory is that if it's too slow, especially for a cake baked in one tall pan rather than split between pans, the crumb at the bottom doesn't set fast enough to release all the moisture in the batter, so the cake crumb sets with a close texture rather than an open one. As the cake keeps baking, that moisture slowly rises to the top, which prevents the top of the cake from releasing its moisture, so it never develops a crumb and just collapses. The balance that is tough to hit is baking the cake at a high enough temperature to encourage vigorous moisture release and a nice rise, but at a low enough temperature that you don't risk drying the cake out, which is a dreaded outcome for an already low moisture cake. I would like to test one final experiment: the difference between baking a cake at 335F for 15 min and then 345F for another 15-20 vs. baking a cake at 340F for 30-35 min. I will post those results here when I do.
-
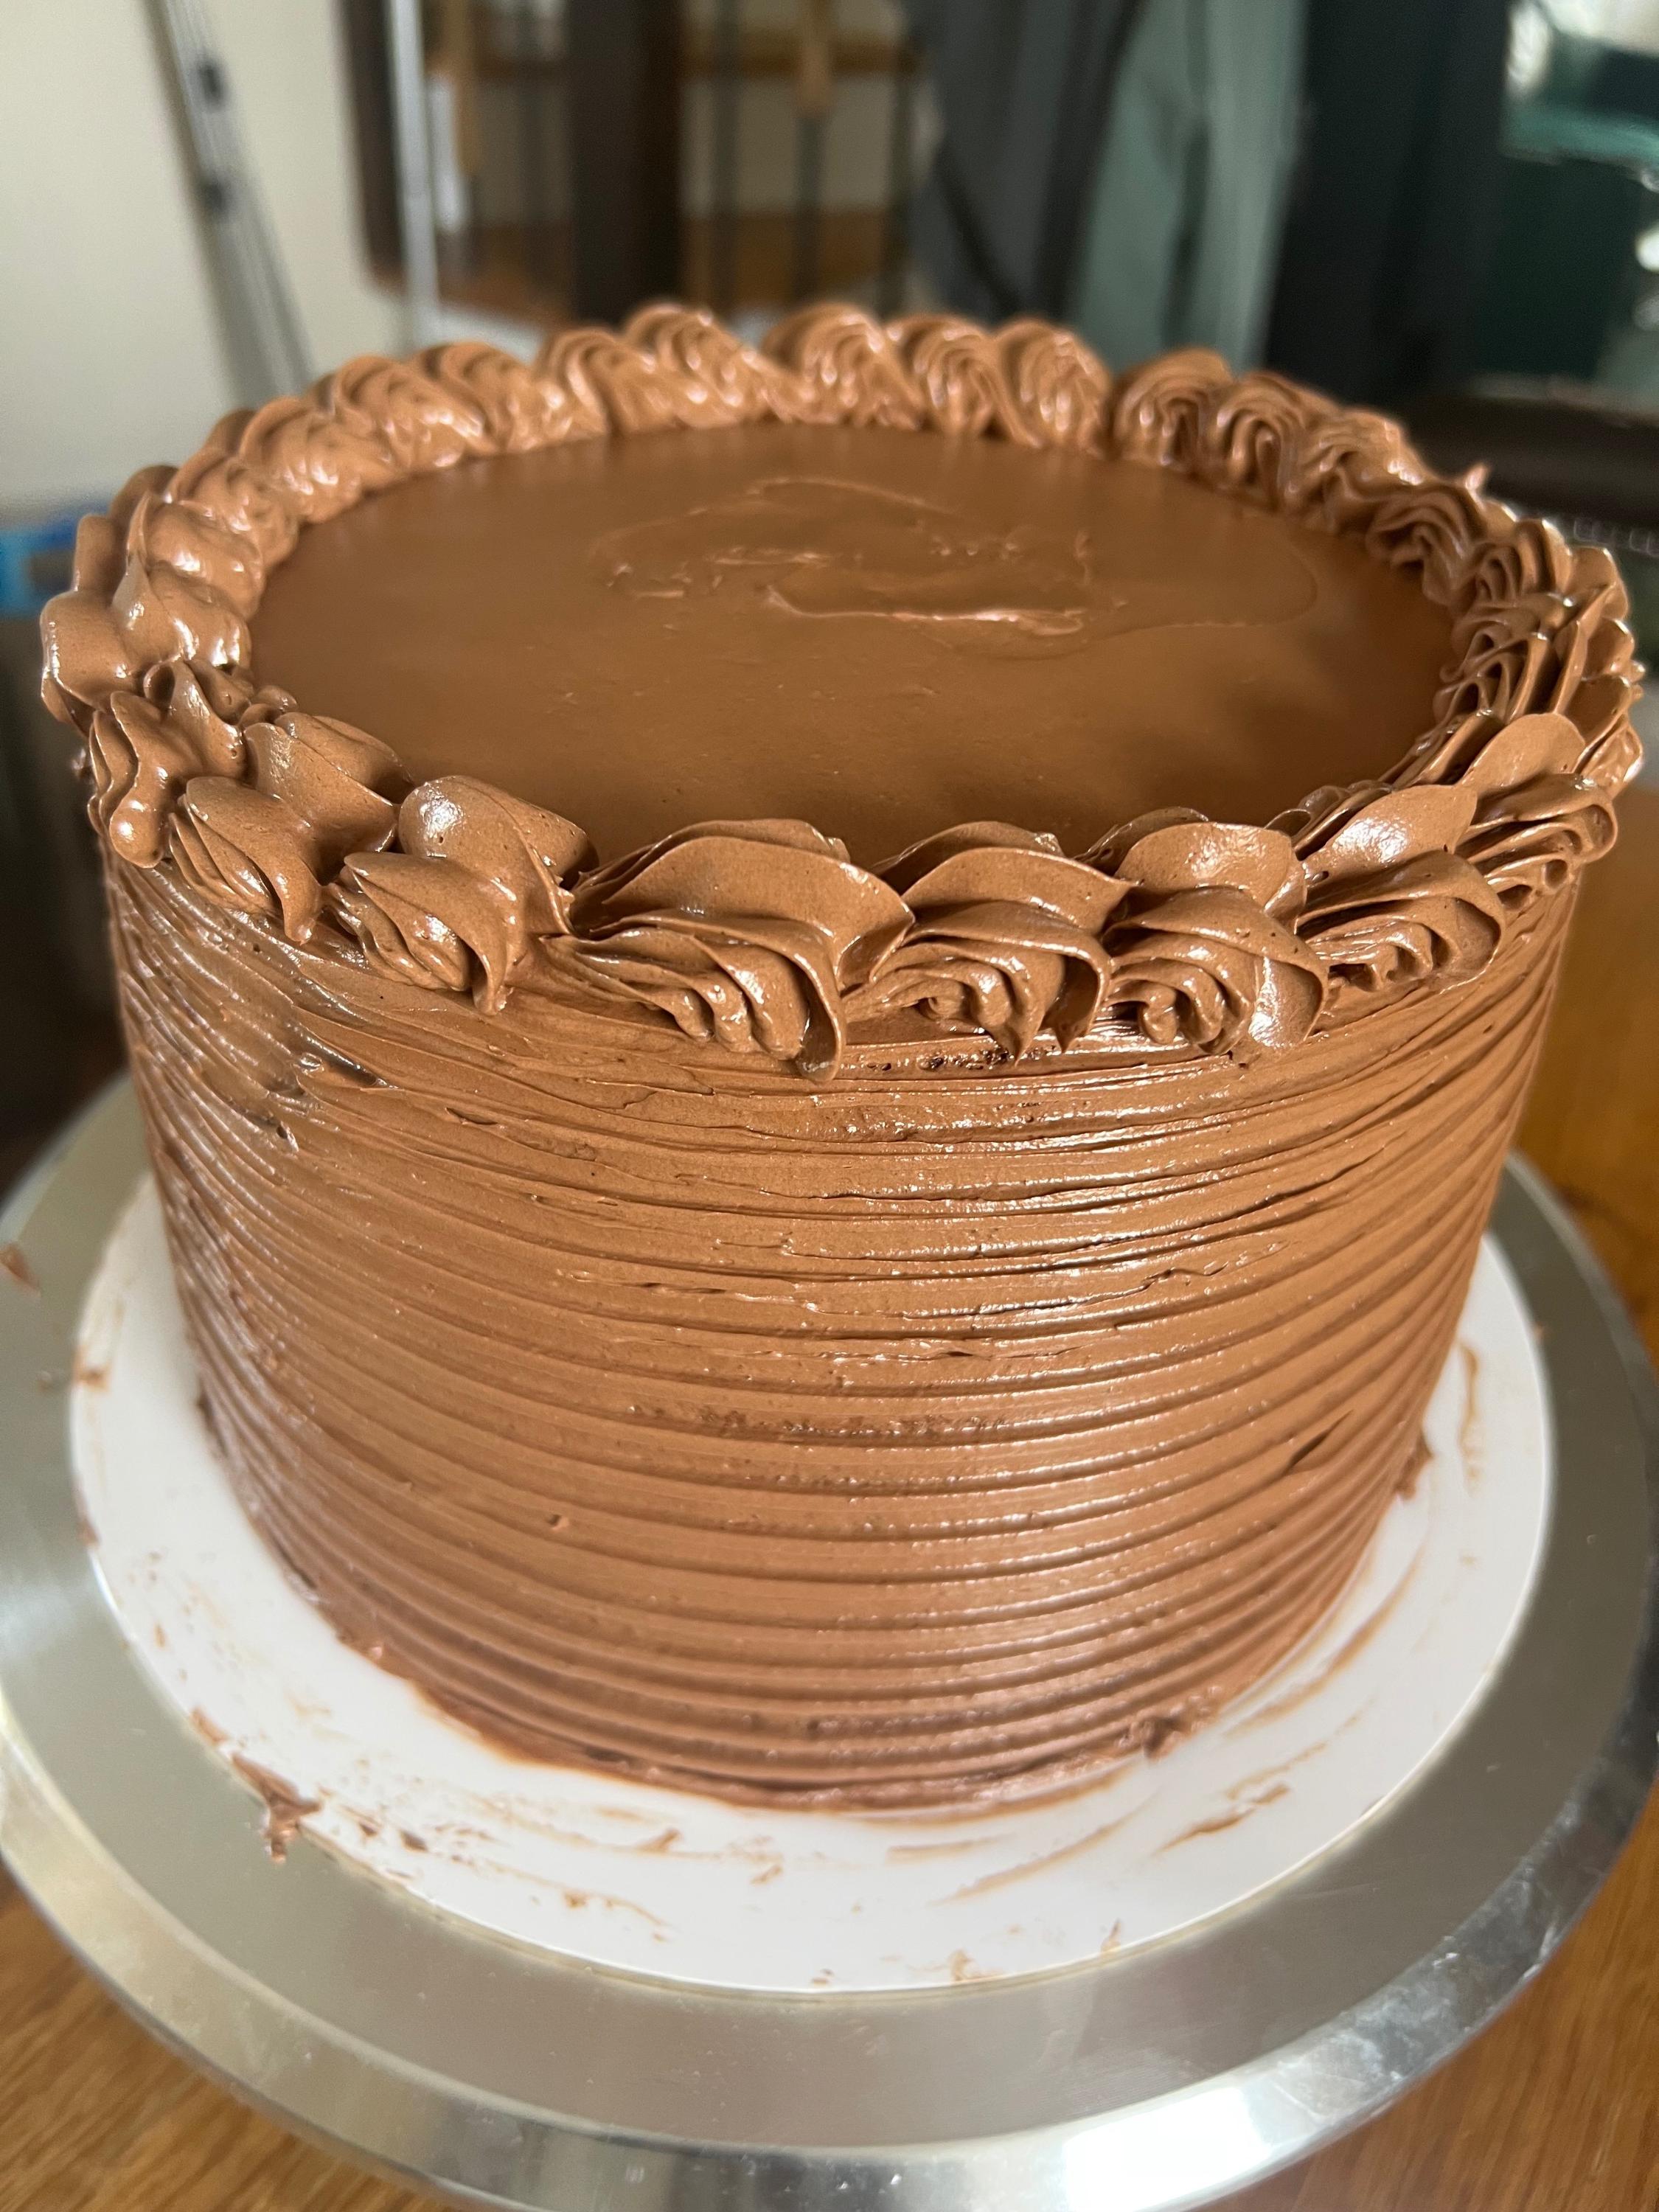
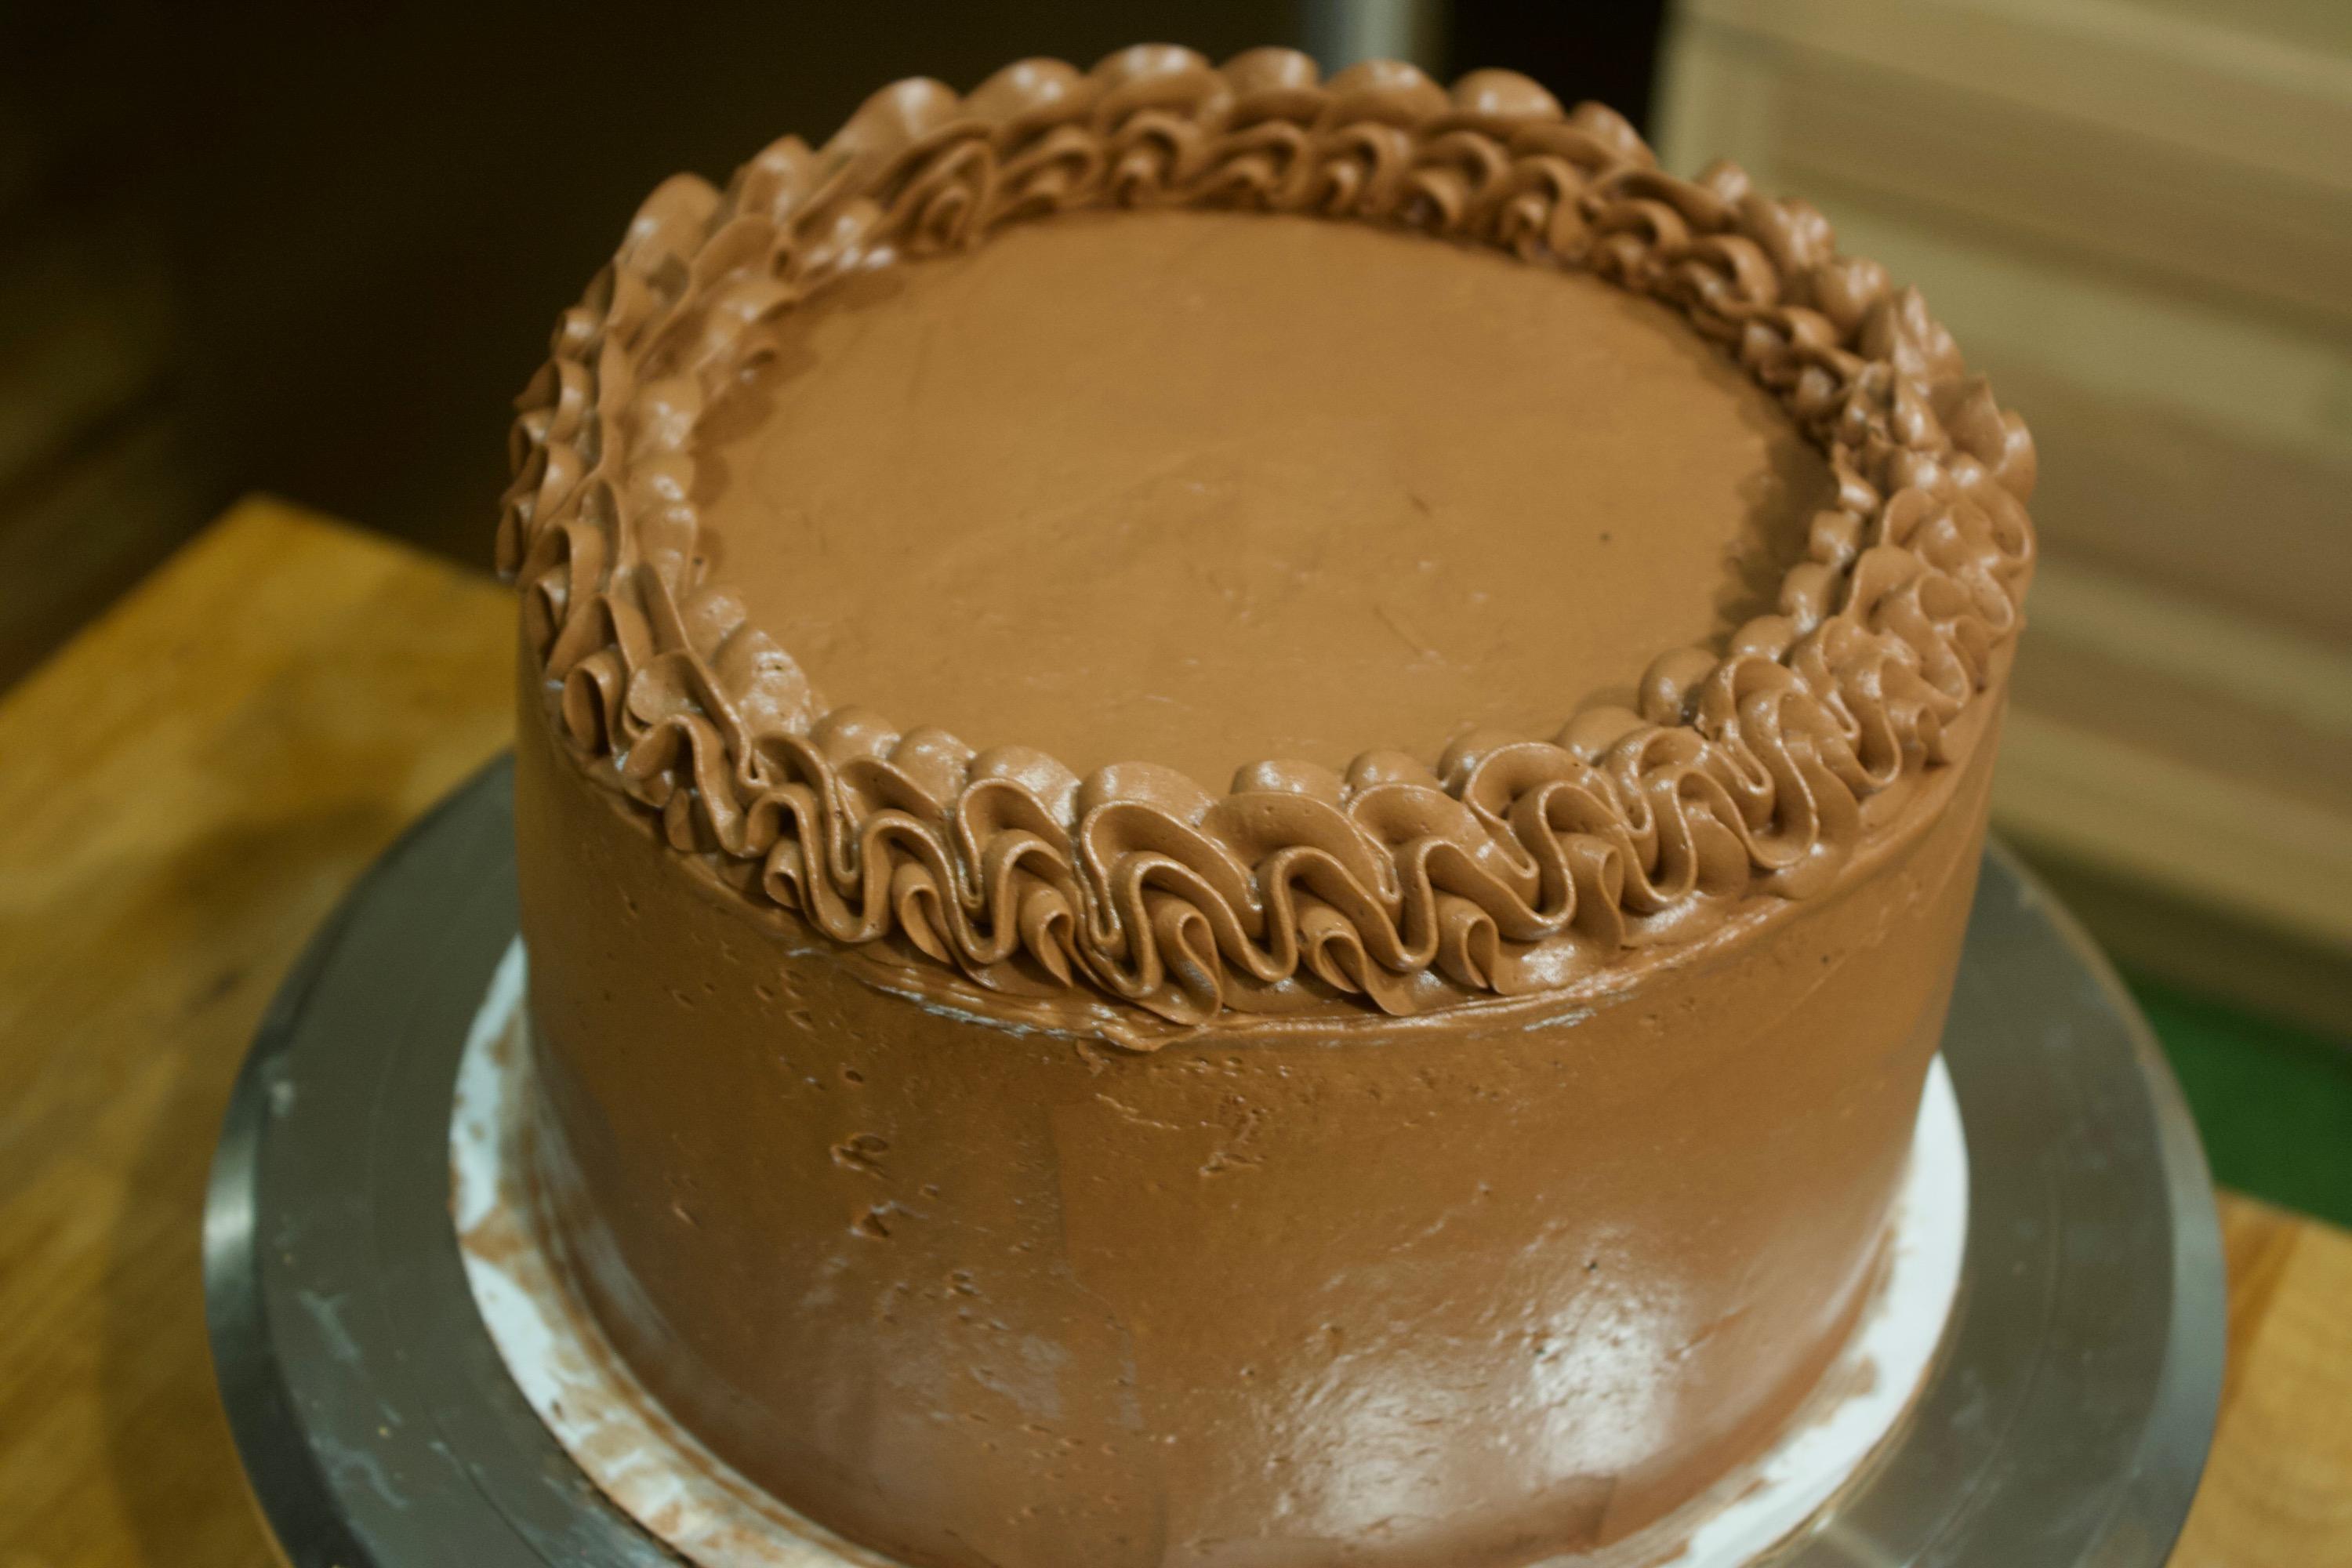
 Hello eGullet, it's been some time since I've posted anything on here, and I have spent the greater part of 2023 in high experimentation. I recently moved to a new place with a bigger kitchen, and my job now affords me a lot more free time, so I have spent most of this time throwing my entire imagination at my bakes. A few things have worked, but the vast majority have not. However my experimentation has not been in vain; rather, I would say 2023 was a year of meaningful exploration that will echo throughout my bakes for years to come. But towards the end of the year I could feel myself becoming fatigued. I had wanted so desperately for my bakes to all of a sudden be the exact flavors and textures I had been looking for, but when you experiment in baking, there is no guarantee of success. And where I would triumph on flavor, there would be poor textures, or vice versa. Needless to say, by the end of 2023 I was deeply frustrated with the yields of a year of experimentation. So in 2024, I have committed to recreating classic recipes. These are bakes that I like, reasons I started baking in the first place. I want to revisit recipes that inspired me to tie on my apron, recipes that will hopefully propel me forward in my journey of baking self-actualization. I am hoping that I can share this journey with the eGullet community and continue to learn and grow throughout the process. My first dalliance with classic recipes is--to me--the essence of baking. I cannot think of a more inviting treat to walk into than a vanilla cake with chocolate frosting. So many birthdays, parties, and gatherings with loved ones happened around vanilla cakes with chocolate frosting, and a cake like this feels like the perfect place to anchor my 2024 resolution. My goal with this cake was not to add any gimmicks or novel twists; if anything, I think the combination is perfect as it is. I wanted to express myself through this recipe, both to honor the ingredients and flavors themselves while also acknowledging my own experiences. So I have opted for a vanilla genoise sponge, adapted from this recipe and method (which I highly recommend for anyone new to the genoise sponge), and my proprietary chocolate frosting, which lies somewhere on the spectrum between a German buttercream and Russian buttercream. Vanilla Genoise Sponge Cake - 8 jumbo eggs - 280 g granulated sugar - 260 g cake flour (or 65 g cornstarch + 195 g pastry flour) - 80 g ghee - 40 g half and half - 10 g salt - 10 g vanilla extract - 10 g vanilla bean paste (optional) 1. Preheat your oven to 355˚ F. Line 3-8" baking tins with parchment paper. Sift your cake flour (or cornstarch + pastry flour) 2-3 times and set aside. Combine ghee, half and half, salt, and vanilla in a heat-safe bowl or cup and set aside. 2. In the bowl of an electric stand mixer, add eggs and granulated sugar and whisk to combine. Set over a saucepan of simmering water and whisk gently until the mixture is warm to touch and sugar is dissolved. Transfer bowl to your mixer with the whisk attachment and mix on highest speed until you reach ribbon stage. Then whisk an additional 5-6 minutes on lowest speed to break down large bubbles. - Remove saucepan from heat and place ghee mixture in the warm water. 3. Fold in sifted flour in two additions, making sure to scrape the sides and the bottom and thoroughly combine. There should be no streaks of dry flour remaining. 4. Pour over the warmed ghee mixture and fold to combine, again making sure to scrape the sides and the bottom. 5. Distribute batter between 3 tins (each should have about 350 g of batter). Use a skewer to pop large air bubbles; drop tins on the counter a couple of times as well. 6. Bake cakes for 28-30 minutes. Check the cakes around 25 minutes: press the top of the cake and if the top gently springs back, the cake is done; if the fingerprint stays, leave the cakes for another 5 minutes and check again. 7. Remove cakes from the oven and drop tins on the counter again to release the steam. Allow to cool completely upside down on a wire rack before removing from the tins. Chocolate Buttercream - 454 g butter (4 sticks: I used 3 sticks unsalted and 1 stick salted butter) - 115 g bittersweet chocolate, melted and cooled - 360-390 g sweetened condensed milk (1 can) - 2 jumbo eggs - 15 g buttermilk powder (1 tbsp) - 45 g Dutch process cocoa powder (3 tbsp) - 10 g salt 1. Allow butter to come to room temperature before handling. Using a whisk or a hand mixer, whisk together the butter until it is light and fluffy in texture. In a heat safe bowl, melt your chocolate and allow it to cool to room temperature. Set both aside. 2. In the bowl of an electric stand mixer, add your remaining ingredients and whisk to combine. Set over a saucepan of simmering water and whisk gently until the mixture comes up to 165˚ F. Transfer bowl to your mixer with the whisk attachment and mix on highest speed until the mixture reaches room temperature. 3. With mixer on low speed, add 2 tbsp portions of your whisked butter and allow each addition to incorporate before adding the next. 4. Once all the butter has been added, mix manually and scrape the bottom and sides of the bowl. Pour in the cooled chocolate and mix the frosting together on medium speed for a minute. 5. Again, scrape sides and bottom manually and then mix on high speed for 2-3 minutes. To assemble the cake, I made a simple syrup (equal parts water and sugar) and added about 50 g to each of my sponge layers once I had trimmed off some of the caramelization. Using a 2 oz scoop, I added about 3 scoops of frosting between each layer of sponge and then put a thin coat on the outside as my crumb coat. I chilled the cake for 15 minutes and then added my final coat of frosting. I decided to try a decorative rim on the top of the cake with what I had left. Overall, the cake is exactly what I was looking for. It has been a long time since I've had cake I enjoyed this much, and from something so simple too. Making this has confirmed to me that I am on the right path, as I am now more excited than ever to revisit my favorites and re-learn the joys of baking.
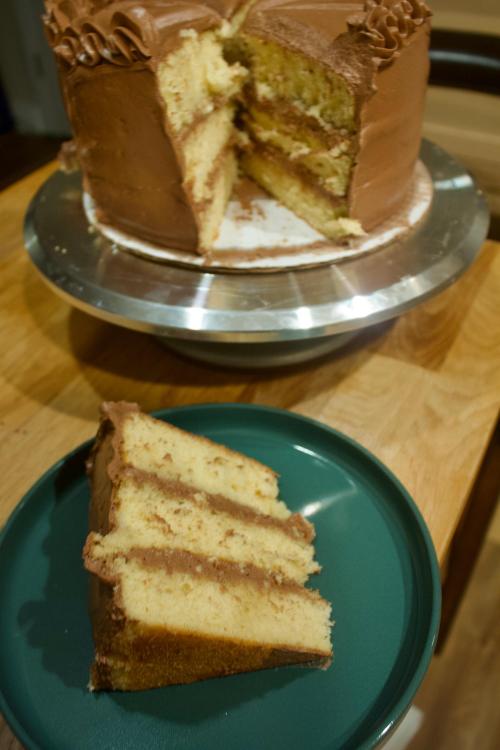


- 1 reply
-
- 12
-
-
I've been thinking about this one. I may try to do a DIY cake strip and see if that might address the doming issue. If that's not enough, then I'll start messing with the temperature.
-
I'm using pastry flour cut with cornstarch, which is essentially cake flour. Thats a really interesting idea, do you have a link to this specific method? If not, what changes to my recipe would you suggest?
-
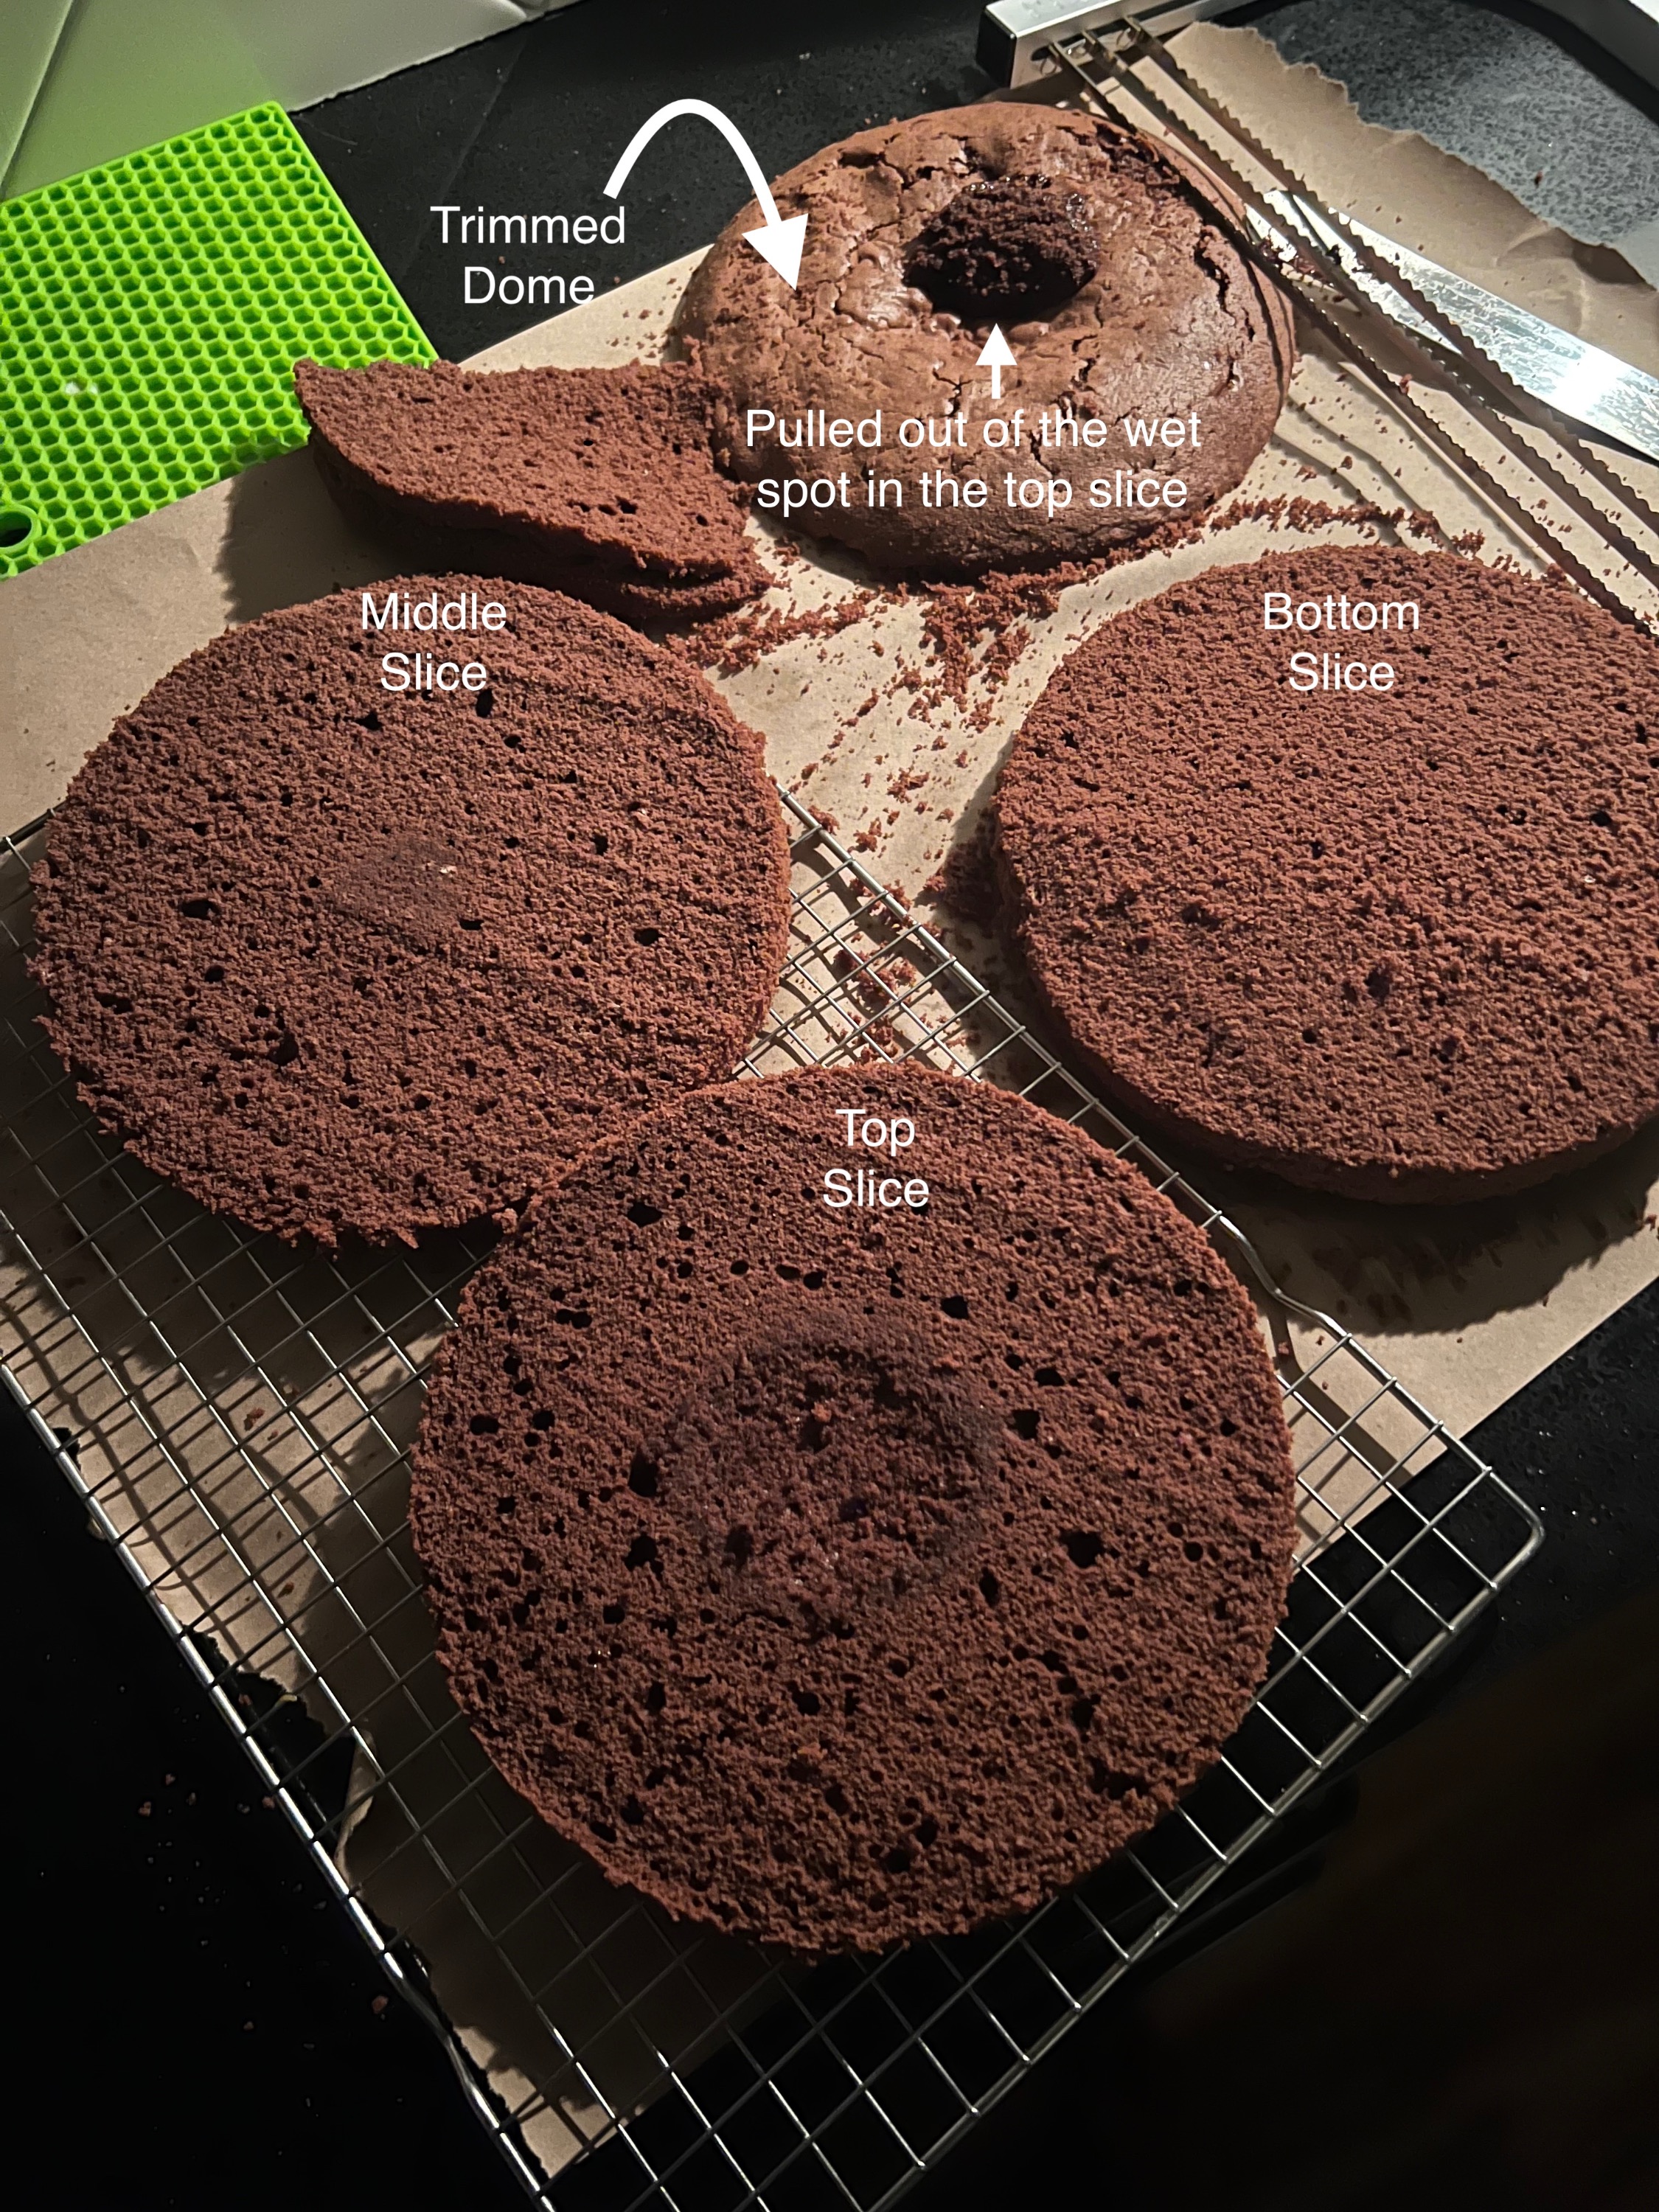
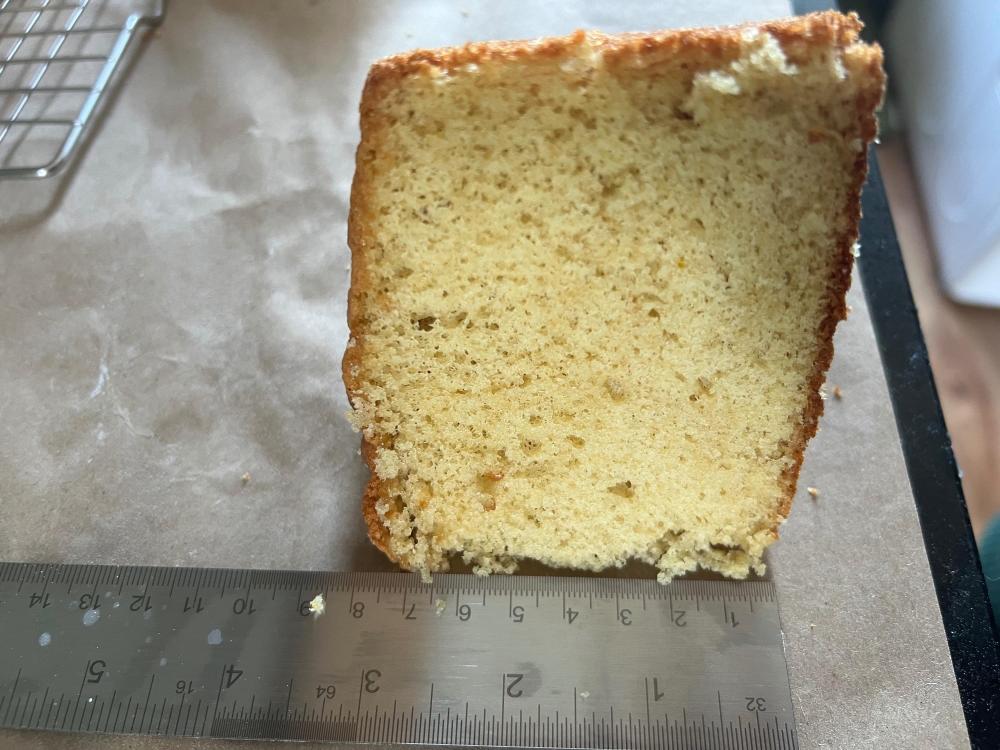
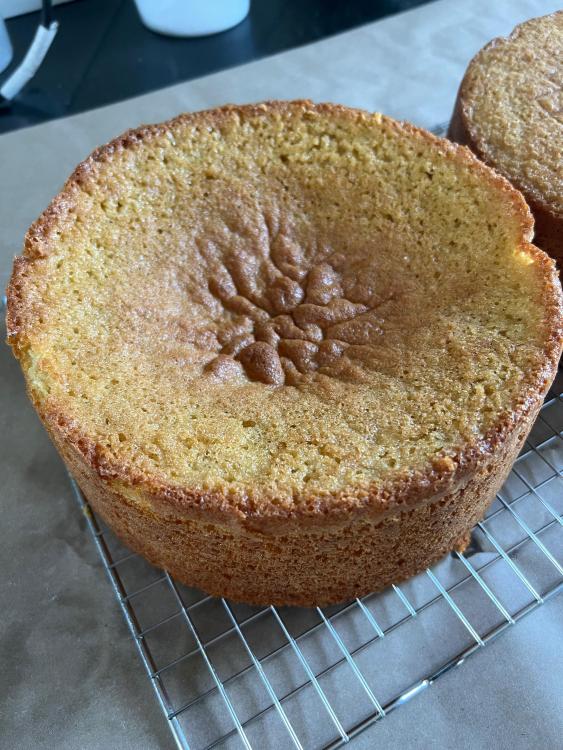
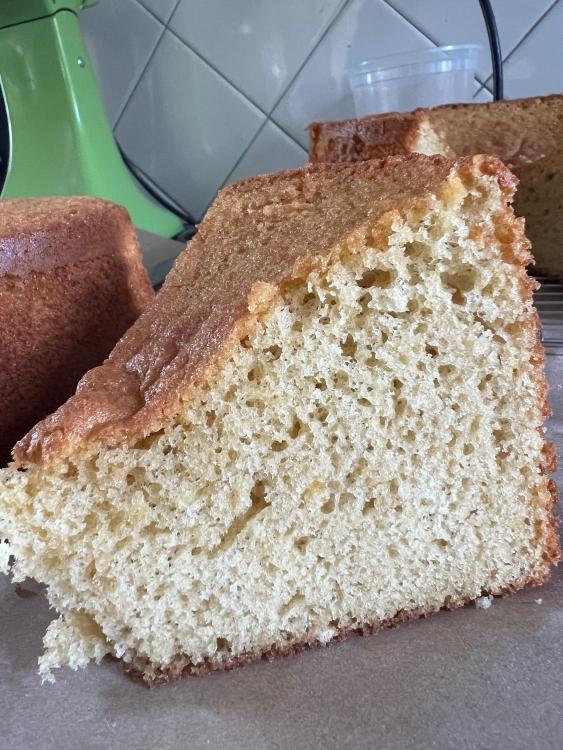
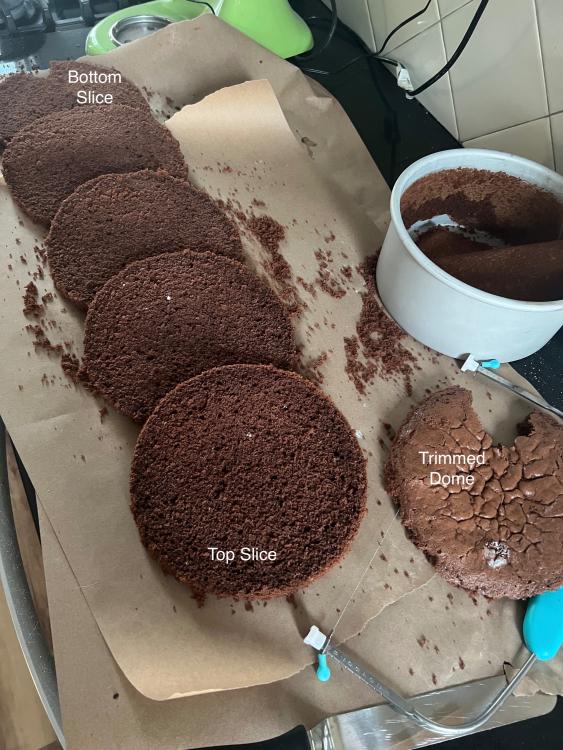
Working on my chocolate genoise recipe and running into an issue with my sponge. For reference, I am using an 8x4" aluminum cake pan. My genoise makes 3-4 layers. I baked my batter at 350˚F for 40 minutes, mostly based on visual cues. As you can see, the top slice had underdone batter that I was able to remove like a tumor. There's underdone batter in both the top slice and middle slice. However, the periphery of the middle slice, and the entire bottom slice, are overdone and dry. Does anyone have a fix for this? Specifically: - How to bake the sponge so that the bottom isn't overdone and the center isn't underdone - Bonus if you can help me get a flat top so that I can salvage a 4th slice from this recipe My recipe: 7 eggs (430g) 215g granulated sugar 43g cocoa powder 8g kosher salt 86g cornstarch 172g pastry flour 43g ghee, warmed 8g vanilla paste Add eggs, sugar, cocoa, and salt to mixer bowl and heat over double boiler while constantly whisking. Heat until hot to the touch, then remove from heat and whisk on high until doubled/tripled in volume. (I wasn't able to reach ribbon stage, probably because of the amount of cocoa, so I will be reducing the amount in the future.) Sift together cornstarch and flour, then fold into batter until nearly combined. Add ½-1 cup batter to the ghee along with vanilla paste. Mix vigorously until combined and smooth. Gently fold this portion back into the whole cake batter. Bake in preheated oven at 350˚ for 40 minutes. [UPDATE] Thank you for your suggestions! They were incredibly helpful, and because of your input, I was able to make a huge breakthrough. Please ignore the tunneling...I was in a bit of a time crunch and should have been more thorough. My two changes were: I mixed my cocoa powder with just enough hot water to make it into a homogenous paste. Once my eggs and sugar were at ribbon stage, I took a portion and folded in my chocolate paste, then poured that mixture back into the batter while it was mixing at low speed. I let the mixer run until the mixture was homogenous, then folded in my dry ingredients and ghee/vanilla like normal. Reduced the oven temperature to 325˚F and baked the cake for 50 minutes. Because of these changes, I got a sponge that was as moist on the top slice as it was on the bottom, however there was no underdone batter. The cake rose nicely and I was able to get 5 layers from i, which exceeded my expectations! Updated recipe below: My UPDATED recipe: 7 eggs (430g) 215g granulated sugar 43g cocoa powder 75g boiling water 8g kosher salt 86g cornstarch 172g pastry flour 43g ghee, warmed 8g vanilla paste Add eggs, sugar, and salt to mixer bowl and heat over double boiler while constantly whisking. Heat until hot to the touch, then remove from heat and whisk on high until the mixture reaches ribbon stage, 5-6 minutes. While the batter is mixing on high speed, dissolve the cocoa powder into boiling water and mix to a smooth paste. Turn the mixer speed down to medium-low. Take ½-1 cup of the batter and fold in the chocolate paste. Gradually add the chocolate batter to the main batter and allow mixture to mix until homogenous. Sift together cornstarch and flour, then fold into batter until nearly combined. Add ½-1 cup batter to the ghee along with vanilla paste. Mix vigorously until combined and smooth. Gently fold this portion back into the whole cake batter. Bake in preheated oven at 325˚ for 50 minutes.

-
Hello all, I am hoping to get feedback on a variation on chiffon cake that I have been pondering. I recently tried my chiffon recipe (listed below) again after leaving it alone for almost 2 years, and really liked the way it came out. I am wondering if, by adding buttermilk, I can get a little more moisture and a little more flavor out of the cake? Ultimately, the goal will be to substitute some of the cake flour for Dutch-process cocoa (to obviate the need for a neutralizing agent) and get a European style chiffon cake with a very American chocolate-and-buttermilk flavor. My basic chiffon recipe: 6 large eggs, yolks and whites separated 2g cream of tartar 237g sugar, divided 190g pastry flour 8g baking powder 3g salt 78g neutral oil 68g whole milk Preheat the oven to 325°F. Have ready 2 ungreased 8" cake pans lined with parchment. In a large mixing bowl, beat the egg whites with the cream of tartar until foamy. Gradually add about 80g of the sugar and continue beating until stiff and glossy. Set aside. Whisk or sift together the remaining sugar with the flour, baking powder and salt. In a separate bowl, beat the oil, milk, and egg yolks until pale yellow. Add the dry ingredients to the oil/milk/yolk mixture and beat until well blended. The mixture will appear stiff; this is normal. Gently fold in the whipped egg whites with whisk in 3 additions, then fully combine with rubber spatula. Be sure to scrape the bottom of the bowl so the batter is well-blended. Distribute between the two pans. Bake for 40 minutes at 325°F, then 6-8 minutes more at 350°F. Cool the cake upside down for 1/2 hour before removing it from the pan. From the variations of chiffon cake that I have found that use buttermilk, they do one of 3 things: Use a small amount of buttermilk and use a slightly lower ratio of yolks:whites Keep the ratio of yolks:whites equal and simply add a large volume of buttermilk Use a large amount of buttermilk + baking soda, and use a higher ratio of yolks:whites Truth be told, I'm most interested in trying the second method, particularly because it remains egg neutral (yolks:whites = 1:1), but I have my concerns. Adding such a large volume of acidic liquid to a batter that normally has pretty close to neutral pH, and then not adding in baking soda, I worry that will cause the cake to lose any potential rise. The only method that accounts for that acidity is the third method, but I don't want to sacrifice the use of the additional egg whites. The first method seems feasible, in that the buttermilk is added in a small quantity and seems more to be a flavor agent rather than a major component of the cake batter. I also wonder if the first method could be made egg-neutral without any additional modifications to the recipe. I would greatly appreciate anyone's thoughts on this. I am hoping to try out some recipes later this week so I look forward to hearing back from you all very soon. - Nn, M.D.
-
Hey, thanks for trying it out! I'm glad you liked it! I actually just made a huge batch of the salted chocolate flavor this past weekend and I have some thoughts: Regarding the sweetness, I have tried to lower the sugar content in the meringue to around 200g, but have found that the meringue did not have the same pillowy set at the lower sugar level. The original meringue recipe called for 300g, so I felt like 250g was a good compromise. But if you want to try a lower sugar level, be my guest. I might suggest if you were going to use less sugar that you go with a Swiss meringue instead of an Italian meringue. Without the additional water from a sugar syrup, the Swiss meringue may be a way to preserve the pillowy meringue and use less sugar. One minor edit I would like to make to the original recipe is that I now exclusively use half-and-half, and no longer add butter at the end to the custard. I have found that H/H gives me the best balance between richness and smoothness, where all milk would be smooth but not rich, and majority cream would be rich but not smooth. H/H has enough fat in it that I have found adding butter is not necessary. Also a technical change, I no longer aggressively add the meringue to the custard as I did in the written recipe. I have realized that I like the minimal amount of lift I get from having the meringue folded in in about 2-3 additions, so I have been more gentle with bringing the mixture together. If you like that denser gelato-esque texture, then continue to combine the custard and meringue as before. If you want something a little lighter, try folding in the meringue!
-
Hey eGullet community, I've got a question for you all. I'm considering making a...very unique tart, and I'm hoping to use nougat as the base on which to put some decorative toppings. From the recipes I've seen, the sugar and honey are typically cooked to hard crack (300˚F) before being added to the egg whites, which yields a chewy but still relatively firm texture. For a tart, I feel something a little softer and easier to cut through might be a better fit. I'm thinking something in the hard-ball stage (250-265˚) might be the way to go, but I worry that if my sugar is too cool then the meringue won't firm up enough. Does anyone have experience with a softer-set nougat?
-
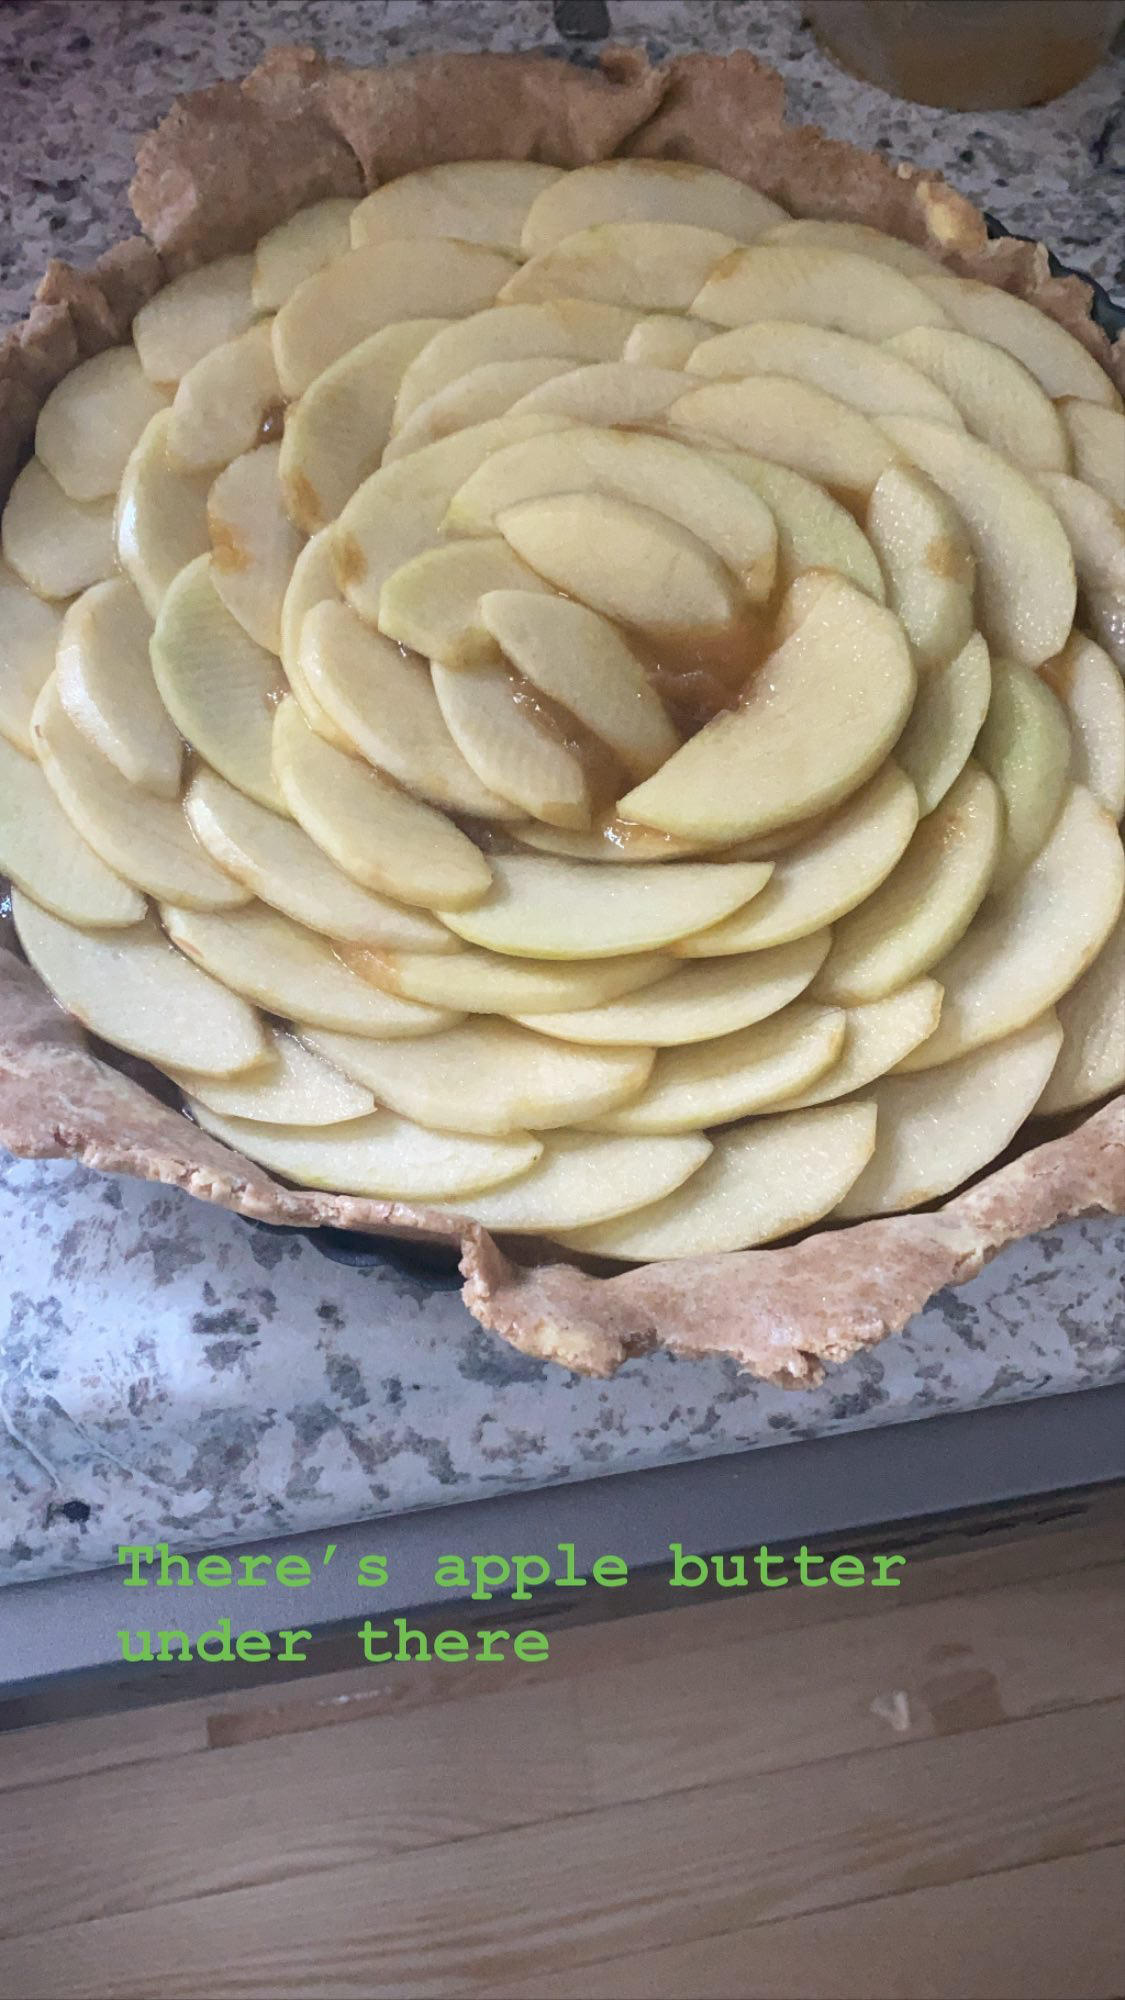
Thanks! The butter could be an applesauce if you stopped simmering earlier, but I wanted to limit the amount of moisture I was adding to the pie given that the sliced apples would be raw going in.
-
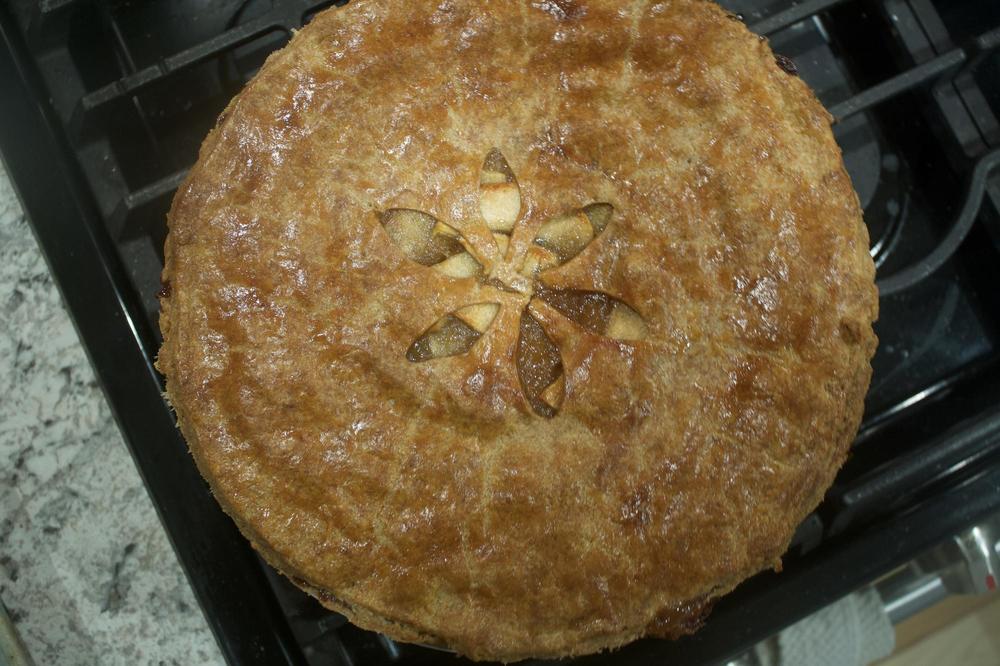
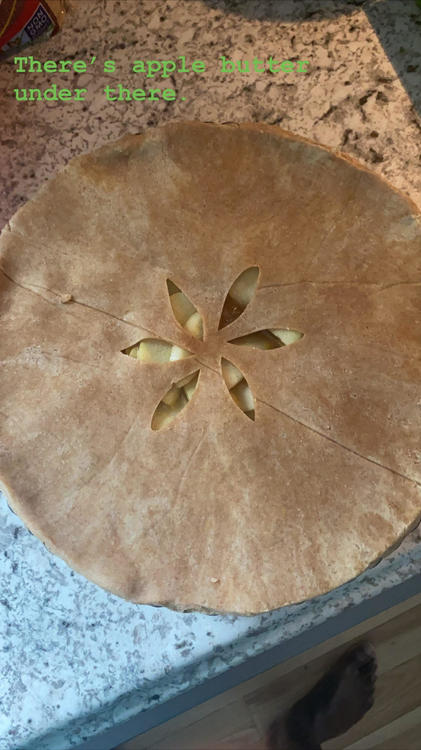
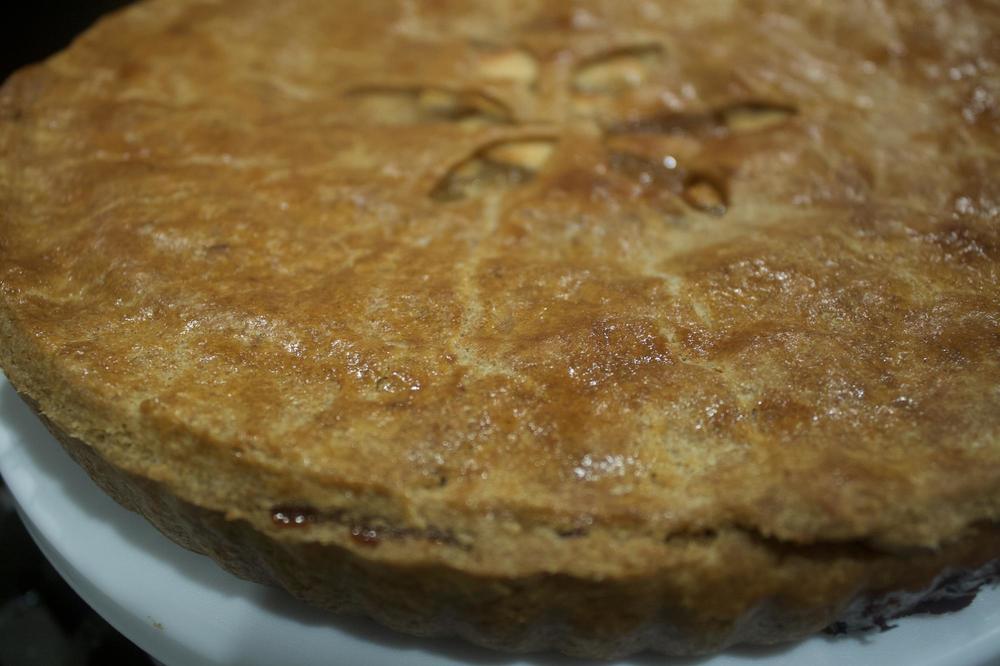
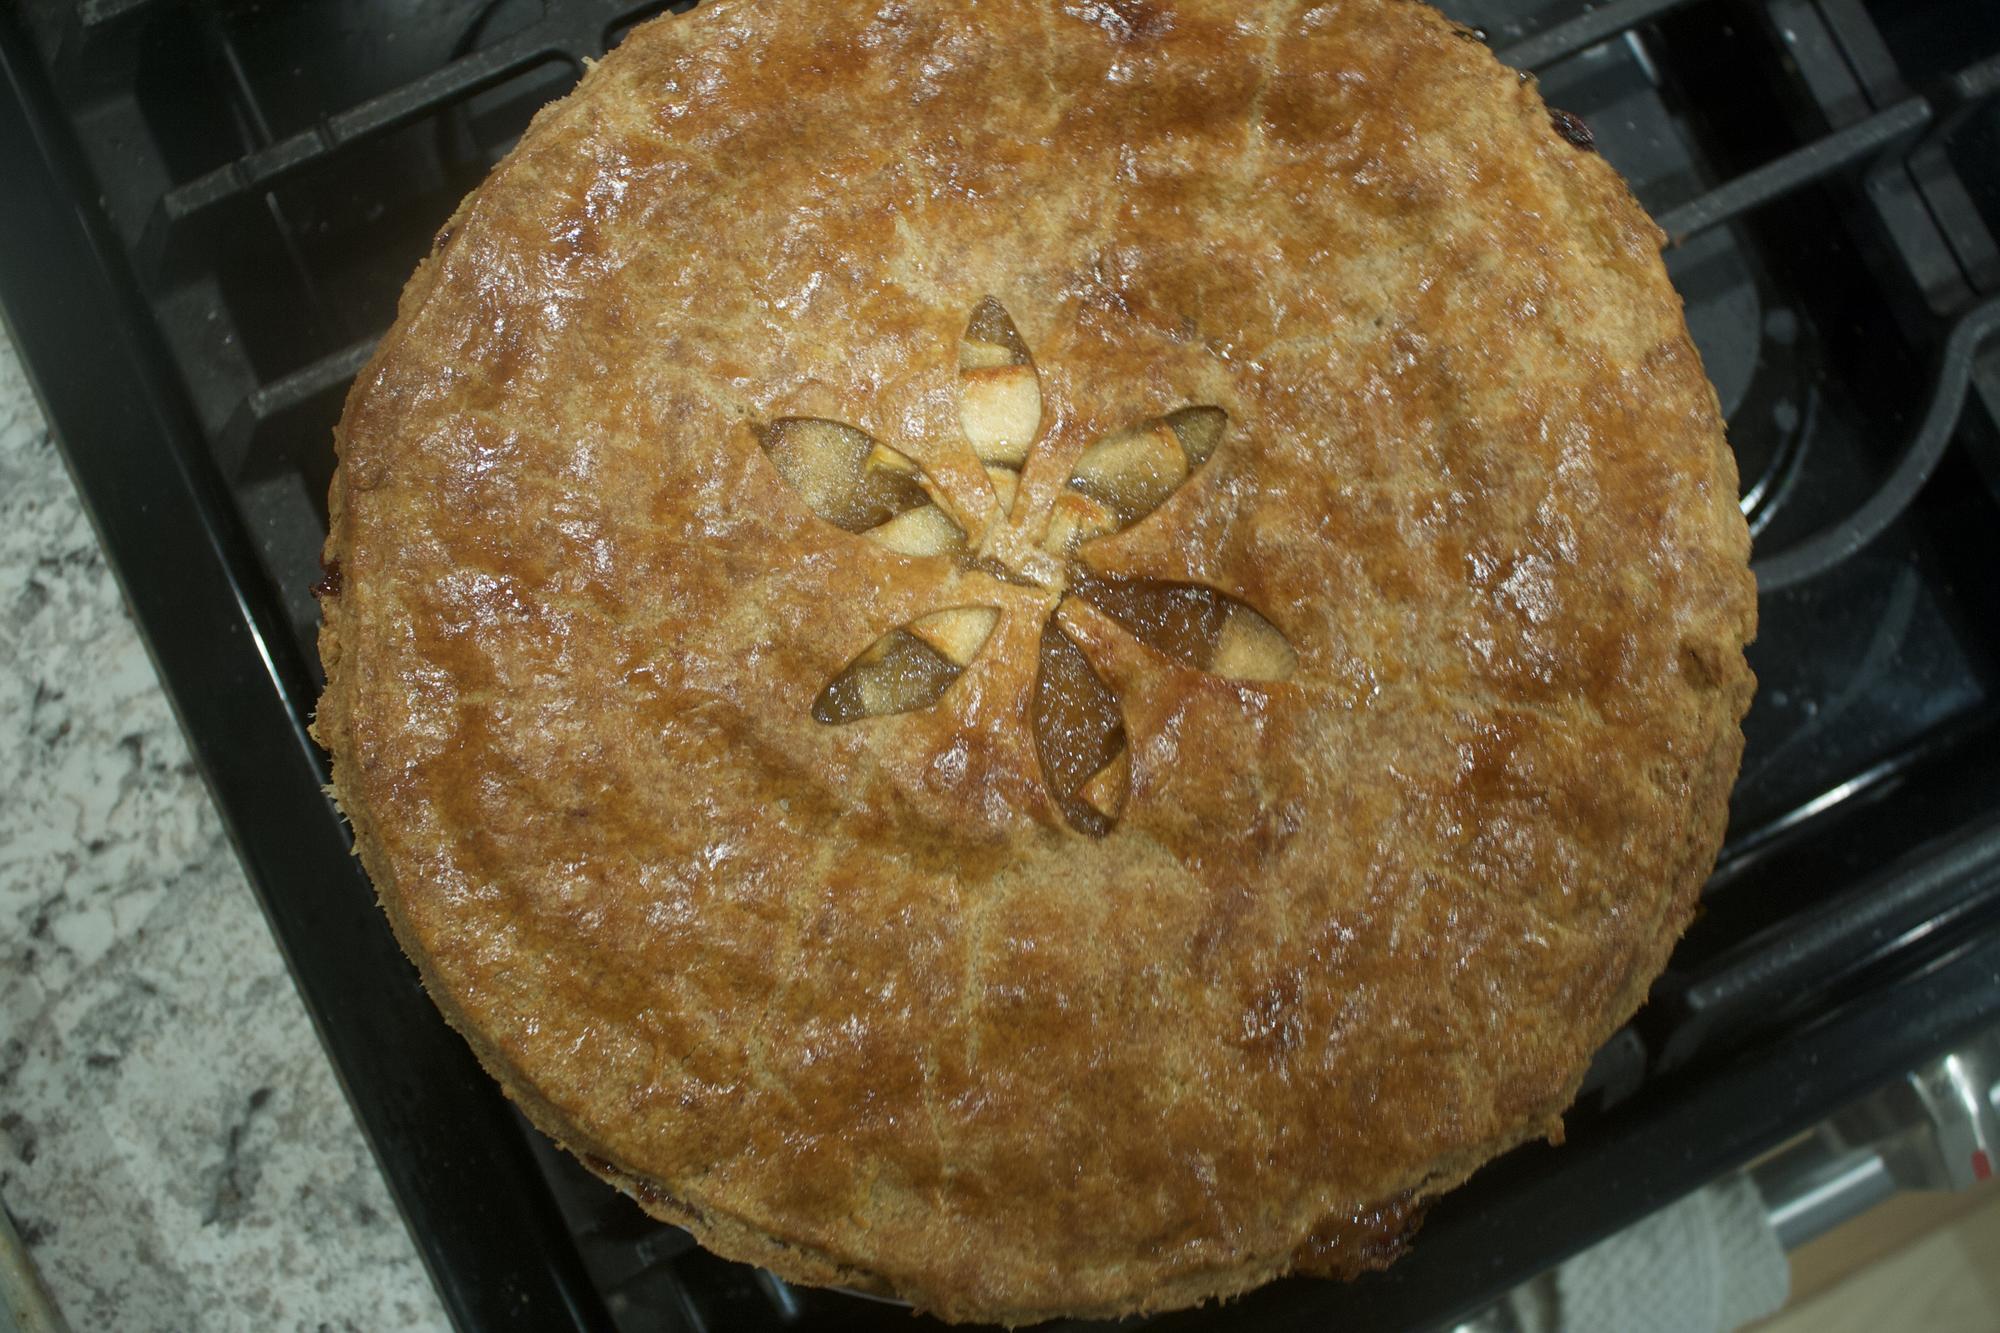
I always bake with whole grain flour, just a personal preference. The apple butter is the layer of mush underneath the apples. I left the peels on so that I could a nice color, and the peels naturally thicken the butter. In the instructions I say to peel the apples on the top layer of the pie, so the ones you see on top are peeled. I used Gala apples.
-
Mustard is an interesting thought, I like the idea of the sharpness and slight briny flavor. I'm not a huge fan of mustard myself so maybe you could do a version of this recipe with it and let me know how it goes!
-
I'm very excited to share with you all a recipe that I developed for a double crust apple pie. I had been inspired a few weeks ago to come up with a series of 3-ingredient recipes that would focus on technique and flavor but still be simple enough for the unseasoned chef. I decided to make an apple pie as a challenge to myself--never having made one before--and as a way to show those who might find pastry intimidating how easy and adaptable it can be. Basic Shortcrust Pastry Ingredients: - 300g flour - 227g salted butter, cold - 2 lemons, zested with juice reserved 1. Cut butter into small chunks. Beat butter, zest of the 2 lemons, and flour together with an electric mixer OR combine with pastry blender OR rub together with fingers OR blitz in a food processor until it resembles sand. 2. Add just enough water to bring the mix together into a dough (about 20g for me). You'll know your pastry is ready when you can press it together and it stays in one piece. 3. Divide dough in two and wrap tightly with plastic. Refrigerate for at least 2 hours, or overnight. 4. When ready to use, roll out each portion to 13 inches in diameter. (I do this between two sheets of parchment paper. Don't worry too much if the parchment sticks to the pastry. I periodically placed mine in the freezer to help keep everything cold, and the butter will separate from the parchment when frozen.) 5. Take 1 portion of rolled dough and place it in a 9-inch tart tin with a removable bottom. Gently press into the sides to ensure even coverage. Place in the freezer for 30 minutes. Freeze the other portion of dough in-between the parchment pieces. Apple Filling (and Assembly) - 1 kg apples (I used about 7 apples for this recipe.) - 220g dark brown sugar, divided - 1 egg, separated Making the apple butter: 1. Cut and core 500g of your apples, but do not peel. Add cut apples, juice of the one lemon, about 100g or so of water, and 170g of sugar to a large saucepan. 2. Bring to a boil over high heat, reduce to a simmer and cover. Let the apples cook for 20-30 minutes or until tender. 3. Remove from heat and blend until smooth. 4. Return puree to saucepan and simmer uncovered over low heat, stirring occasionally, for an hour. Color should deepen and the mixture should thicken slightly, but do not allow it to scorch. 5. Remove from heat and refrigerate until cool. Apple filling: 1. Peel, quarter, and core the remaining 500g of apples. Slice on a mandolin to about 1/8th inch thickness. Place sliced apples in a large bowl of cold water while slicing remaining apples. 2. Once apples are sliced, drain water and add the juice from the remaining lemon, as well as the remaining 50g of sugar, over the apples. Stir to coat. Assembly: 1. Remove pie base from the freezer. Dock with a fork and brush on egg white. Place back in the freezer and allow to set for for about 5-10 minutes. 2. Pour the entire recipe of apple butter into the pie base and even out with an offset spatula. 3. Arrange apple slices over the apple butter. 4. Remove remaining pie dough from the freezer and cut designs in while still cold. Transfer to the surface of the pie and seal overhanging edges. Trim excess dough. 5. Brush top pastry with egg yolk (beaten with any remaining egg white) and bake in a 365˚F oven for 60-70 minutes. Crust should be shiny and golden brown. 6. Remove from oven and allow to cool completely before removing from tin. Some notes: The reason for using salted butter is I think the flavor incorporates a little better into the mix than if I were to use unsalted butter and added salt. That being said, you could do that instead, though your recipe would then have 7 ingredients The addition of apple butter here takes the place of the normal apple pie filling, which is usually thickened with cornstarch and is typically quite sweet. By using the apple butter, I push the flavor of apple forward beyond what you would find in a typically apple pie. Also, the apple butter acts as a glue of sorts so that my slices are always clean, so no need to resort to adding thickeners or extra sweeteners. I'm always looking for a way around blind baking, and using an egg white seal has worked out very well for me. The egg white creates a water-tight layer between the crust and the filling, so no matter how wet my filling is, the crust will always bake crispy and won't get soggy for as long as the pie is around. Feel free to change this up as you see fit. Obviously you can spices to this (I recommend cinnamon, clove, and cardamom) but the beauty of this pie is that it's really not necessary. Although at first blush it may seem one-noted, the harmony between the flaky, almost savory crust and the bright and refreshing filling is one that doesn't need any help, in my honest opinion. So there you have it! My 6-ingredient apple pie, sure to become a go-to for me, and hopefully for you as well!