

JohnT
-
Posts
542 -
Joined
-
Last visited
Content Type
Profiles
Forums
Store
Help Articles
Everything posted by JohnT
-
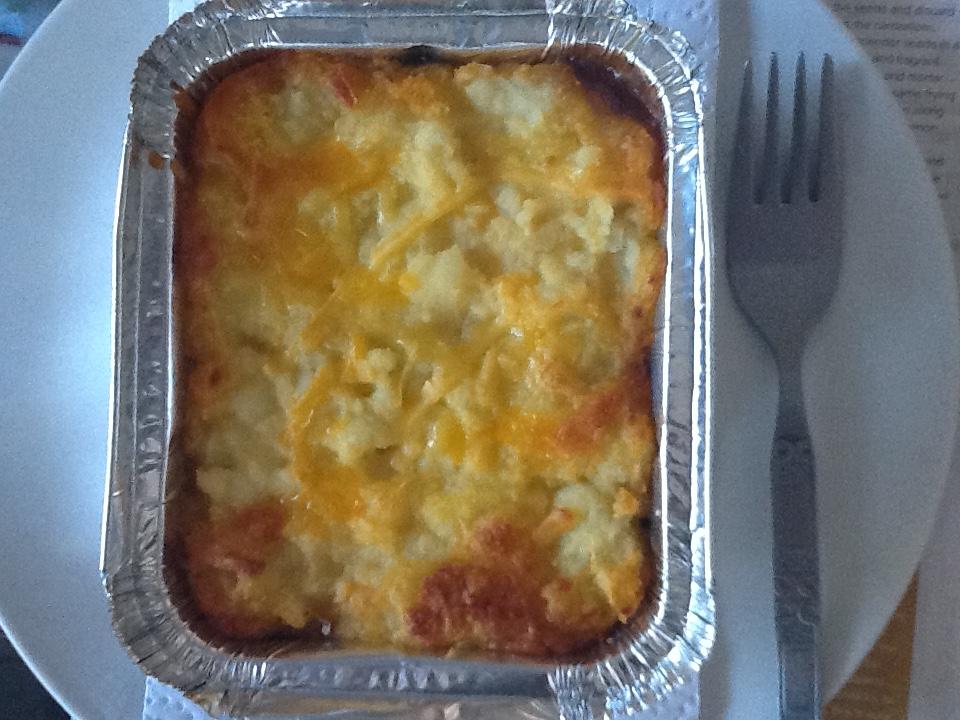
Reading the OP question and taking it a bit OT, I make a lot of dishes and freeze them in foil containers for my wife when I am away from home. One of them is Shepards Pie. I took a couple of them out the freezer earlier and that is what we are having for dinner tonight. Simple but comfort food.
-
Anna N, I think you are quite correct - a pot pie is simply chicken or meat cooked with vegetable chunks in a thickened gravy, placed in a pie dish and then normally only the top covered with a disk of pastry after the main ingredients are cooked, just to finish the pie to make it presentable. For instance, a Shepards Pie is similar but using ground beef and topped with mashed potato after the ground beef and vegetables are cooked. The tops are then baked until either puffed or the mash is browned.
-
Here is a different take on cooking scallops, which we used to do in the hotel I was at in the late 70's SCALLOP, BACON AND BANANA SATAY Ingredients: 8 large scallops, with roe (coral) 1 banana, peeled and cut into 8 chunks 8 rashes thin rindless streaky bacon, cut in half 1 courgette (baby marrow), cut into 8 pieces 8 button mushrooms 1 lemon, cut into 8 wedges 50g butter 15ml olive oil 15ml tomato paste 30ml chopped fresh basil leaves salt and milled black pepper Method: Set the oven at 220°C. Soak 8 bamboo skewers in water for a few minutes. Wrap scallops and banana pieces in the bacon. Thread onto the skewers with the courgettes and mushrooms, starting with a lemon wedge. Melt together the butter and olive oil in a small saucepan. Add the tomato paste and basil, season with salt and pepper and simmer gently for 3 minutes. Brush the skewers with the sauce and place on an oven tray and bake for 7 to 10 minutes, until the scallops are cooked and the bacon is crisp. Serve with yellow rice. Note: You can simply take a scallop and banana piece and wrap it in the bacon and hold it together with a toothpick - baste and cook 7 to 10 minutes as above. Makes a very tasty addition to a "finger food" platter.
-
kbjesq, I never said you had used it, I just asked "why would you want to?" To me, making my own bread is making proper, natural bread that is not chemically enhanced with chemicals or "extracts" that we know very little about. If I wanted bread conditioned with lecithin, I would just go and buy a loaf at my local supermarket. I too queried the use of lecithin in bread a few years ago as my wife was diagnosed with Alzheimer's and I read on the internet that lecithin and certain other oils from the east were supposed to help prevent the progression of the disease. Specialist doctors and researchers I consulted suggested I stay away from them as there was just no positive evidence that they would be beneficial. In fact, I was told that I should also stay away from using margarine containing lecithin as there were now indications that it was more harmful to the human body than using natural butter. Just because industrial bakers use certain additives to enhance shelf life etc. does not mean it is safe to do so. When making my home-made bread I use flour, water, yeast, salt and some melted butter to help give it an extra day or two of life - no chemicals of which I know very little. But, this said, you are always free to experiment or use what you want in your baking.
-
Why would you want to use lecithin in your bread?
-
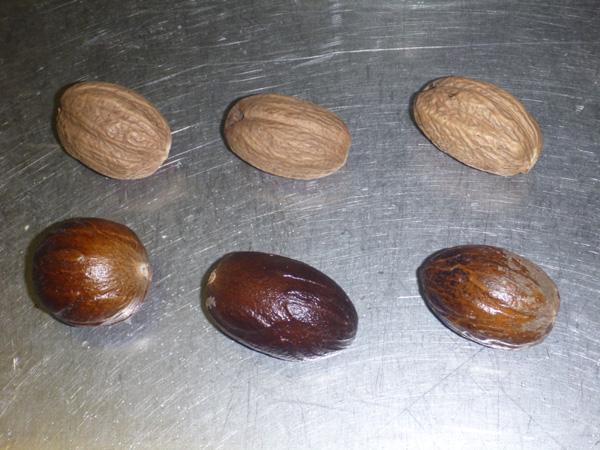
Smithy, your photo is raw on the tree. Below is one I just took of a few of them. The top three are without the shell and the bottom three are in the shell. Obviously, they have been dried. Shaking the shell-on ones, they do rattle, so I am presuming that the shell part is the mace and the inner the actual nutmeg, as Toliver describes. Now I just need to get a really fine grater or rasp and get experimenting. I have about 25 of each to keep me busy for the next year or two Imagine the amount of rum cocktails they can enhance!
-
So, I have returned to Cape Town from Grenada and managed to smuggle a few packets of "Whole Nutmeg" through our customs inspection. Nice!:) So, here is my question (normally I buy ground nutmeg from my spice merchant). One packet says "In Shell" and the other says "Without Shell". The in shell one looks exactly the same as the without shell pack, except they are a slightly darker brown nut. What are the two different ones used for? Sorry if this sounds dumb, but it is something I am not used to (whole nutmeg). John.
-
And, reporting live from Cape Town (just bought 4 heads) - $0.65 per head (around 750 g each - I should start an export business!) No brown bits or blemishes, so tonight it is pork bangers served with caramelised onion sauce on cauliflower mash. John.
-
Wow, cauliflower in South Africa at the moment is R12.50 per head, which equates to US 83c!!! Per head. To the OP, the black mark is usually where the head has been damaged and spreads to the lower extremities. Just trim and enjoy! So, this makes me want to get a few heads and curry/pickle them for later - something to do this coming week!
-
Yes, use cheap. And when looking for "cognac", rather look for "brandy".
-
Franci, I have the full tray size version of the Vollrath. It has been serving me well for the past 5 years and maintains a temperature between 3°C above and below the set temp. Mine is labeled an "Anvil" and is a 230V 50Hz version, but I do know that they make them for the U.S. market, operating on 120V at 60Hz. I have never used the half tray oven and do not know of anybody that has, so cannot pass comment on it. Do a search for Anvil COA 1004 and you will see it is the same oven as the Vollrath linked in your post. I have various other Anvil appliances that serve me well and have never given problems.
-
For those folk who have access to a fig tree or two, here is a recipe for Green Fig Preserve inherited from my fathers recipes. The resulting product is magic on buttered toast and with cheese. The figs must be picked before they ripen and soften. Whole Green Fig Preserve Ingredients: 100 green figs 2 tablespoons bicarbonate of soda (baking soda) 3.4 litres water Method: Scrub the figs and cut a cross into the end opposite the stalk. Mix the water and bicarbonate of soda and soak the figs overnight. Remove from the water and weigh the figs, recording the weight. Place into clean boiling water and boil for 15 minutes or until just soft. Drain and then dry the figs well, removing excess water. Syrup: For each 500g figs or part thereof, mix 500ml water with 500g sugar. Boil the syrup until it just starts to thicken. Add the figs and boil until the syrup is thick. Add 1 tablespoon lemon juice for each 250g figs and just bring to the boil again before removing from the heat and letting cool. Bottle the figs and cover with the syrup. Note 1: If the syrup froths whilst boiling, add a small lump of butter. Note 2: A small stick of ginger can be added during the boiling process to add a slightly different flavour.
-

Your Daily Sweets: What Are You Making and Baking? (2015)
JohnT replied to a topic in Pastry & Baking
For those folk who have access to a fig tree or two, here is a recipe for Green Fig Preserve inherited from my fathers recipes. The resulting product is magic on buttered toast and with cheese. The figs must be picked before they ripen and soften. Whole Green Fig Preserve Ingredients: 100 green figs 2 tablespoons bicarbonate of soda (baking soda) 3.4 litres water Method: Scrub the figs and cut a cross into the end opposite the stalk. Mix the water and bicarbonate of soda and soak the figs overnight. Remove from the water and weigh the figs, recording the weight. Place into clean boiling water and boil for 15 minutes or until just soft. Drain and then dry the figs well, removing excess water. Syrup: For each 500g figs or part thereof, mix 500ml water with 500g sugar. Boil the syrup until it just starts to thicken. Add the figs and boil until the syrup is thick. Add 1 tablespoon lemon juice for each 250g figs and just bring to the boil again before removing from the heat and letting cool. Bottle the figs and cover with the syrup. Note 1: If the syrup froths whilst boiling, add a small lump of butter. Note 2: A small stick of ginger can be added during the boiling process to add a slightly different flavour. -
I would skip the corn syrup. Take your cider and reduce it to about a quarter of its original quantity and then let it cool. Mix the resultant cider into the confectioners sugar until just at coating constancy then either dip your fritters or pour the glaze over them while on a rack over a pan. The glaze should harden but will be opaque and not clear as in your photo.
-
How about "Rainbow Cuisine" by Lannice Snyman. There are a few more, such as "Cook and Enjoy It" by SJA de Villiers and "Best of Cooking In South Africa" by Lynn Bedford Hall. The latter two are quite old but the "Rainbow Cuisine" book is more recent. You should be able to get them as used copies on the net.
-
Kerry and Anna, thanks for your daily updates and blog in general. I, and I guess many others on the forum, have thoroughly enjoyed my daily read of what you folk have been up to and what you are preparing in your small apartment. Have a safe journey back home!
-
Your Daily Sweets: What Are You Making and Baking? (2015)
JohnT replied to a topic in Pastry & Baking
kayb, interesting about being slightly overcooked after 45 minutes. Do you know how old the recipe is that you used and what type of oven did you bake in - conventional, fan assisted or convection? -
That leg of lamb looks gooooood! Not only is it full moon tonight, it is a rare Blue Moon.
-
Nice rich chocolate mousse?
-
Yes, it is a sweet bread but the raisins do impart some flavour as well.
-
Here is a recipe for a traditional Mosbolletjie loaf (actually, quite a few of them) from South Africa. Originally the "must" from wine making was used, but you can make it as detailed below. Mos = must and bolletjies = small balls in Afrikaans. Mosbolletjies (Must Buns or Balls) Raisin Yeast Prepare the yeast 3 to 4 days before the bread is made. 225g seedless raisins 750ml boiled water, cooled Wash and cut the raisins in half and place in a medium fruit jar. Add the lukewarm water, cover the container with cheesecloth and allow to ferment in a fairly warm place for approximately 3 to 4 days, or until the raisins float on top. Strain and use the liquid to make the sponge. Sponge Make the sponge in the afternoon so that it will have risen to double its volume by evening. Take sufficient flour from a 2.5kg bag of cake flour (AP flour in the US) to make a batter with the raisin yeast. Beat smooth with a wooden spoon, cover in a warm place and allow to ferment. Dough for Mosbolletjies Knead in the evening and allow the dough to rise overnight. 250ml scalded milk 250ml butter the remainder of the 2.5kg bag cake flour 1 tablespoon salt 375ml sugar 1 tablespoon aniseed all the sponge Method: Pour the scalded milk over the butter and allow it to cool to lukewarm. Sift the flour and salt into the kneading basin and add the sugar. Add the aniseed, the sponge and the lukewarm milk/butter mixture. Mix and knead well. The dough should not be too stiff. A little lukewarm water may be added if necessary. Brush with melted butter and cover. Leave in a warm place overnight. The dough should be well risen the following morning. Knead again thoroughly and cover. Let rise again to double the size. Rub a little butter on your hands and pinch off small balls of equal size - 40 to 50mm in diameter. Pack the balls into greased pans, at least 125mm deep. Hold the pan at a slight angle whilst putting in the balls, to ensure they are tightly packed. Brush with melted butter between the rows and on top. Allow to rise to double the size and bake in a hot oven, 200°C, for 45 to 55 minutes. Brush the baked buns with 1 teaspoon sugar dissolved in 1 tablespoon milk then bake for a further 5 minutes. Makes 8 to 10 dozen balls.
-
How about Jelly (Jello) Fluff with a twist? PINEAPPLE FLUFF Ingredients: 1 packet pineapple jelly 1 (410g) can evaporated milk, refrigerated overnight 1 can crushed pineapple, juice reserved boiling water Method: Pour the reserved pineapple juice into a measuring jug and make up to 300ml with boiling water. Add the jelly powder and stir until fully dissolved. Refrigerate until just turned syrupy. Beat the evaporated milk until stiff and fluffy. Beat in the jelly and then the crushed pineapple. Pour into individual glasses or a 23 x 33cm (9 x 13") serving tray (50mm / 2" wall). Cover with cling-wrap and refrigerate until well set. Garnish with a cherry segment.
-
Your Daily Sweets: What Are You Making and Baking? (2015)
JohnT replied to a topic in Pastry & Baking
Franci, those tortes are really a refreshing break from the cakes more common in the western hemisphere where the norm nowadays is to have a rich, sweet cake piled with rich, sweet and highly fattening gunk. This said, it has become common here at the southern pointy section of Africa as well to adopt such cakes. I tried, a time back, to re-introduce tortes, such as you are baking, at some local coffee shops. Not one proprietor was interested, telling me that their patrons want cakes slathered with buttercream - not a traditional European style torte with a light sprinkle of powdered sugar. I even gave a very popular coffee shop owner a couple of almond tortes for free to try on her patrons. Never worked out and only gunk cakes wanted. Pity, as there is nothing better, in my mind, than a nice slice of torte with a freshly brewed cup of tea or coffee. -
Nope, not at all a Canadian thing! We have had milk in a bag since the 60's, when the glass bottles disappeared and milk stopped being delivered. Now we get milk in a 5 litre, 3 litre, 2 litre 1 litre and 500ml plastic bottles, 2 litre, 1 litre and 500ml cartons and 1 litre plastic bags. The litre plastic bags are half the price of the milk in 1, 2 or 3 litre plastic bottles - about 50 to 55 US cents a litre, depending where bought.
-
Your Daily Sweets: What Are You Making and Baking? (2015)
JohnT replied to a topic in Pastry & Baking
The recipe would be greatly appreciated! When you do them in individual rings, what are the diameter of the rings you use - I already have about 100 rings each of 70mm and 60mm and these look like they would be great for classy functions.
