

Barrytm
-
Posts
146 -
Joined
-
Last visited
Content Type
Profiles
Forums
Store
Help Articles
Everything posted by Barrytm
-
Milling and Baking with Heritage and Ancient Grains: Bread and Beyond
Barrytm replied to a topic in Pastry & Baking
Rotuts, KA has it right, though I usually take the flakes, put them in a plastic bag, and go over them with a rolling pin to reduce them to dust. You can use a food processor, but it will be awfully loud. It makes it much easier to rehydrate. I have dried and frozen starter many times, usually stored in a vac seal bag, and sent them to others and have never had anyone report a problem with reviving it. I have never tried to freeze active starter, and since it is so easy to dry, and it takes up much less space, probably will never try. -
Milling and Baking with Heritage and Ancient Grains: Bread and Beyond
Barrytm replied to a topic in Pastry & Baking
Shelby, glad you liked the pizza. You said you were down to your last cup, but don't worry too much about running out of starter . While starters can be hard to create, they are pretty hard to kill, and the tiniest amount is all you need. In fact, if you completely emptied your jar, the residue in the jar would be more than enough to keep going. Just refresh at whatever rate you have been using 1: 1 : 1 ( weight of starter, water, flour ) is what I think you have been doing , and it will build back up quickly, and then pretty quickly you will have to go back to discarding some when you refresh. Also, it is a good idea to take a little starter after it has been refreshed, put it in a separate jar, and add more water to get it thin and runny, then spread it out very thinly on parchment or a silpat. Once it is dry, break it up into tiny pieces and wrap it up in plastic, label it , and store it in the freezer. It will last nearly forever, and if for some reason you run out of starter, you can just add water to it , and it will leap back to life. -
Milling and Baking with Heritage and Ancient Grains: Bread and Beyond
Barrytm replied to a topic in Pastry & Baking
Shelby, nice work. I love the phrase - " its like bread, only better" Definitely my experience as well. -
Milling and Baking with Heritage and Ancient Grains: Bread and Beyond
Barrytm replied to a topic in Pastry & Baking
Shelby, first congrats , that is a nice mill. Also, I think you are going to love the taste of bread made from home milled fresh wheat. You must really like diving into the deep end. Most people who make bread in something other than a bread machine use commercial yeast, the results are much more predictable. Also, most use commercial flour, using home milled 100% wheat is a bit harder - the window for proper fermentation and proper final proof is much smaller than with white flour, and even when you nail it , it is difficult if not impossible to get the same rise. As if those two challenges were not enough, you are throwing in ancient grains, which adds another layer of complexity. My suggestion is you stay with one flour for the first several bakes so you can iron out the issues with whatever recipe you decide to follow. I like winter white, though others prefer red spring. Again, the advice above is correct, for yeasted breads, you want gluten development which generally means avoid the soft wheat berries, though they are good for muffin breads, like banana bread, and I use 50% hard and 50% soft for pasta and like the results. As to the starter, the advice you have received is correct - it takes a few weeks for your starter to develop enough to make a good bread. The pineapple juice is a great trick in that it weeds out the bad stuff. If you know anyone near you that makes sourdough, I am sure they will give you some starter. If you need some, I , or others, will mail you dried starter. Once it is up and going, you will have more than you need. A scale is a must, and dive right into grams - once you get used to measuring in grams, it is dead simple to increase or decrease the size of a loaf or manipulate the ratios, unlike dealing in pounds and ounces. If you end up milling more than you need, store the leftovers in the freezer in a freezer bag, it stays very fresh. Although you have already made a major investment in the mill, you will also want to consider how to bake it. If you want sandwich loafs, then regular bread pans are fine. If you want a rustic loaf - boule or batard, you will want to look into what to proof the loaf in, and what to bake it. Many of us, especially those with gas ovens, try to bake in an enclosed container for part of the bake to keep in the steam and encourage good oven spring. Dutch ovens are a good option, so is a combo cooker, or even a metal bowl inverted over a baking stone. One of the cheapest investments, because it is free, is to start to spreadsheet your recipes and keep accurate notes - obviously you want to track the amount of each ingredient, but you also want to try the time and method of kneading, whether you did an autolyse, and temp in bulk ferment ( using straight sided containers, and a rubber band or post-it when you first put the dough in it will help you keep track of how much it increased in size during bulk ferment ) and time and temp in final proof. All of things impact the taste and texture of the bread. If you document each bake, and keep track of the changes in your process, it will go a long way towards letting you get consistent results. I am not familiar with the books you posted - but have read Vanessa Kambell's ebook on Sourdough when it showed up on Kindle at a great price. After a while if you decide you are really addicted to bread making, Bread by Jeffrey Hamelman is a must - there is very little on sourdough, but a ton on what it takes to make great bread, and many good recipes. Finally, don't get too caught up in the photos you see online. Most people only post a photo when the loaf comes out looking great. I have made very many loaves that were under proofed or over proofed, and so did not look ideal, but still tasted great . -
I usually go in a different direction. When I finish dusting with bread crumbs, I spray the top with a canned oil spray , like PAM, and then put that side down in a preheated pan, and while that side is browning, I spray the other side, then flip. It requires much less oil than oiling the pan, and still works well to brown the crumbs on both sides. It works best for smooth flat proteins, like boneless skinless chicken breasts, and would probably not work well for things like fried chicken
-
The Waring WCT704 It is $130 , but it has very long slots, so I can use it when slicing home made bread, and has a lever to lift up the toast a little higher than the regular return , and has worked flawlessly since I got it. The crumb tray is quite small, but that is the only downside I have found so far. https://www.webstaurantstore.com/waring-wct704-4-slice-commercial-toaster-nsf/929WCT704.html
-
Looks great, glad it tasted great as well.
-
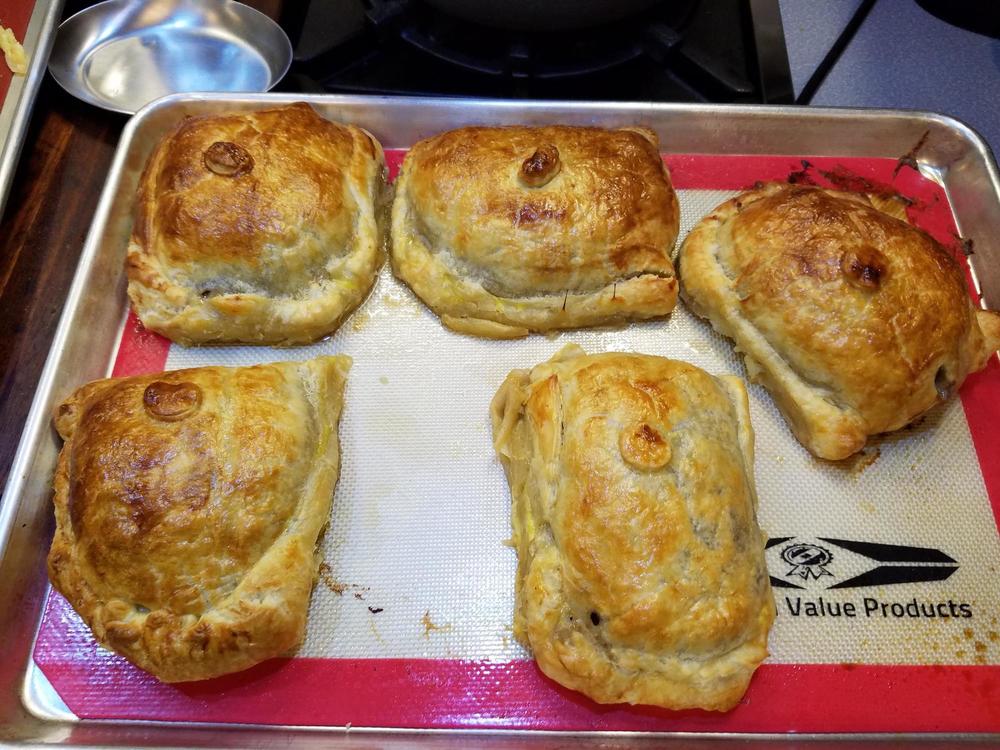
I made some for guests a few months ago. I went with 8 individual Beef Wellingtons, I followed this recipe mostly. https://skillet.lifehacker.com/will-it-sous-vide-a-most-glorious-beef-wellington-1790825718 The temps suggested worked out perfectly. I did it all one day, and did not do the refrigerator overnight option, though I may have let it rest slightly. I seared it with a torch before wrapping in the pastry and everyone was impressed with the appearance and getting them done just right. As you can see, I probably should have rotated them in the oven to get even browning.
-
I just made a turkey dinner for some friends on Saturday. Broke the turkey down, and SV the breasts following Serious Eats recipe and procedure. https://www.seriouseats.com/2014/11/food-lab-sous-vide-turkey-crisp-skin-sous-vide-101-thanksgiving.html . I actually smoked the turkey breasts at 145 for about 40 minutes before I started the SV - then SV at 145 for 2 1/2 hours, everyone said it was very moist and had a great flavor. The turkey legs and thighs were separated, and grilled on a lump charcoal grill around 375 for just over an hour to 180 IT - the thighs came out great, legs were okay. I had taken the skin off the turkey before cutting out the breasts, and spread that between two pans, with two pieces of parchment paper , per Serious Eats, and put in the oven for about 50 minutes ( I had planned for longer, but apps were done and guests were ready for the main course). When I took apart the pans, the skin was still not done, so I left off the top pan and parchment paper and put it pack into the oven and turned on the broiler - forgot that the bottom piece of parchment would not fair well under the broiler, but the good news is that the smoke detector only went off for a few minutes, and the guests could not have been more polite about it. A few areas of the skin came out nice and crispy, but the rest was under done. Could be that the oven had not preheated long enough, or that it just needed another 10 to 15 minutes. Obviously Rotus has that part down pat. I intended to add a few slices of breast, few slices of the leg and thigh, to each plate , then top with a piece of crispy skin like a pita wedge, but that didn't quite work out.
-
The listed price at Williams and Sonoma is $1,200, though they say it is on sale at $799. I think it is pretty pricey for a one trick pony. w & S say they will begin shipping Oct 9.
-
Question concerning the use of a European Gas Range Cooker in the USA
Barrytm replied to a topic in Kitchen Consumer
I am not familiar with your oven, but went here http://www.rangemaster.co.uk/media/332729/u109010.pdf and found a manual that says it is a dual fuel. If you have a dual fuel, that may present an issue, and you will likely need to have either electric or gas work done. In general, most outlets in US homes are 120 volt. 240 volt lines are run directly to certain appliances, like a dryer which will have a 240 volt outlet, and an hvac handler, which will be hard wired. It is not uncommon to see a 240 volt outlet in a kitchen, but that is for an electric oven, but usually, the space where the oven is located has either a 240 volt outlet for an electric range - oven, or a gas pipe, and a 120 volt outlet for a gas oven. ( Gas ovens use 120 volts to run the electronics ). If you have dual fuel, you will need both gas and 240, and again that is extremely unusual. As to gas, they don't use voltage numbers, but instead use pressure ratings. The manual says it uses 29 millibars of gas. According to this page, natural gas at the meter varies from .27 to .29 psi https://inspectapedia.com/plumbing/Gas_Pressures.php According to a gas calculator I just ran online, that is 19 millibars. I am no expert in this field, but you do want to have the pressure correct, so you will definitely want to do more investigation. As to the electric, the manual I referenced above says the electrical requirement is 230 v / 400 v at 50hz? Standard in the US is 240 volt 60 hz.. You should have a plate somewhere on the range that tells you the acceptable electrical requirements. -
Sorry to hear about your problems. I would think that it is either A) the sensor that is supposed to determine whether there is water has gone bad, or B the wire from the sensor to the computer, or C) the computer board that interprets the sensor signal. If there was a way to test the sensor, it should have been tested, though it is possible it is not easy to test, and instead they just sent a new sensor. By this point, they should have been able to determine what was wrong and replace that part. BTW, I have a combi with a water tank and love it. To be honest, I use it all the time even when I am not using the steam or combi mode , because for regular convection it heats up in a fraction of the time as my full sized oven, so it is more convenient to use.
-
Sorry to hear that they don't pay enough attention to you. Ask them to pay attention to Doug Baldwin and his book on sous vide, and control of pathogens http://www.douglasbaldwin.com/sous-vide.html#Safety_Summary Note also his section on chilling for later service.
-
sometimes when ignitors get wet, they won't work properly until they dry out - which is why Nyleve's approach to manual lighting works.
-
horseflesh, I timed it today - it took 18 minutes for the oven light to go off when set to 350 F . Some suggest that the oven be allowed to cycle off and on a time or two to settle in before baking, but I did not time that. I did adjust the oven dial the other day, and when set to 350 , it varied from 340 to 360, which I thought was pretty good for a gas oven. I am not a fan of the knobs - they are metal, but the attachment to the controls feels flimsy. I much preferred the knobs on the Viking, and the ones on the Wolf look substantial too.
-
horseflesh, the manual says it can take up to 1/2 hour to preheat. I have never timed it, but I wouldn't be surprised if it took 15 to 20 minutes. I have a combi, which preheats in about 5 minutes, so i use that more often.
-
I have the Bluestar RNB. As Gfweb says, is it a tank, very solidly built, and puts out a ton of heat. Years ago, the ignitors were not designed all that well, and could fail prematurely, but I think they have been redesigned and are much more robust. I did have one fail, but was a 10 minute job to replace, and the range came with a few replacements. As to simmer, the grids can be positioned in a high or low setting, by spinning them a quarter turn, so if the simmer burner is not low enough, you can just adjust the grate.
-
While many have suggested Indian foods, which can be vegan, my favorite, and many of your guests won't recognize it as vegan, is butternut squash, acorn squash, and sweet potatoes - chopped into 3/4 inch cubes, tossed with salt, pepper, and rosemary, balsamic vinegar, olive oil then roasted. I sometimes give the squashes a head start, because the sweet potatoes cook a little quicker.
-
Gfweb - I have a now discontinued Viking Combi oven. I bought it as it was being discontinued for around $1,500. It is about the same size as the Wolf, it is 240 volts, it is non plumbed, but that is fine with me. JoNorvelleWalker since I have a 2/3 size hotel pan, there is no silpat that fits it exactly, and I have read that you can't cut them and use them, because it will expose the fiberglass and destroy it. I originally bought some teflon liners, which can be cut to fit, and they work fine, though they are about as thick as parchment paper, but they have held up really well. Non-Stick Bakeware Liner 13 x 15.75 I later found these, they are much thicker, but again, they can be cut to size, are non stick, and the only downside is that they curl up when you store them. Atiyoc BBQ Grill Mat, Non-stick and Heat Resistant Mats for Charcoal, Electric and Gas Grill FDA-Approved, PFOA Free (5 Pack) weinoo - I don't have an eat in kitchen, or an island, but I do have a 12 foot long peninsula which comes in pretty handy when preparing food. It is a 60's ranch house, which originally had a small laundry room off the kitchen. I took that out, and reworked it into a pantry, and put the combi oven on the wall in the pantry. I will admit that when I originally bought it, I thought that steaming would make food more moist ( I should have done more research, but that was years ago, and long before I found out about SV ) and that it would really be helpful in baking bread. My version is not all that helpful for bread, I use a combo cooker, but I use the combi all the time, it preheats in about 5 minutes, my Bluestar takes closer to 30, and the reheat feature on the combi is great for reheating and not drying things out. BTW, when I bought my combi, you could get extra combi pans that fit the oven from Viking for some outrageous sum - $200 if memory serves me right - that is when I found Paderno pans on Amazon and bought a bunch.
-
I have a variety of stainless steel hotel pans, perforated for use in my combi oven, and non perforated for variety of uses, in heights of 1, 4 and 6 inches ( all 2/3 size, since that fits the oven). The deeper nonperforated are ideal for holding pork ribs or pork shoulder in the fridge overnight while covered in salt and dry rub . It also works great for shredding pork shoulders after they have been smoked. The 1 inch height are great for use in the oven for heating and reheating items. I bought the teflon grill matts and cut them to fit to make clean up easy.
-
As Lisa says, the thicker the viscosity, the more powerful the motor needs to be. Viscosity is usually measured by pouring an amount of fluid, at a set temperature, into a container of a certain size, with a specific sized hole on the bottom, and timing how long it takes to empty the container. The container is often called a viscosity or flow cup, and there are numerous different sizes depending on the type of fluid being measured. https://en.wikipedia.org/wiki/Flow_cups Ask the vendor if there is a particular measuring device that should be used to measure the viscosity of what you are making to be sure it fits within their specs.
-
I am jumping in on the statement that "cacio e pepe is easy". I can make a low fat, quick fettucine alfredo in my sleep, and make fresh pasta pretty regularly ( make it in batches and store it in the freezer ). I don't think I have ever been challenged as I was trying to make the cacio e pepe. ATK did a segment on it years ago, and the first half dozen times, ever single time it was a terrible fail - the cheese either clumped in the bottom of the bowl, or separated into strands, and the pasta water stayed as water. They suggested, IIRC, using fat to try to keep the cheese from separating by mixing it in oil first, then adding it, they also stressed boiling the pasta in as little water as possible so the pasta water would be concentrated. I have tried letting the pasta cool to avoid overheating the cheese, and decreasing the water in the pot, but out of a dozen attempts, I would guess it came out right maybe twice. So let me know you secret to Easy cacio e pepe. My secrets for making pasta are first, use the FP to knead the dough. Second get 3 hands, feeding into the machine, cranking, and catching all go on simultaneously. Or get the regular italian pasta makers ( Imperia, Atlas, etc. ) and one of the electric motor attachments, which are a little loud, but really help. Or if you get lucky, find a good big manual machine, I found a used R220 Imperia, it is a joy, - the rollers are about 8 1/2 inches long, so you can make very wide sheets, and it is so tall, you can actually use the feed shelf to rest the pasta on while it is feeding into the rollers. The process goes very quickly.
-
As they say, there is no set time or temp for cooking butt. I like to use the fork test, if you can insert it and twist it with little resistance, it is done. Sorry you didn't like the Memphis Dust - that is my go to rub - - did you salt it 12 hours in advance?
-
I agree with Btbyrd , I made St. Louis ribs pretty often, and short smoke, then sous vide, then smoke is much better than SV then Smoke or Smoke then SV.
-
No, keeping the grooves in the same place isn't humanly possible--the impressions quickly disappear. I'm speculating, but perhaps the Tutove imparts wavy (i.e., longer) layers than a flat pin does? Thanks for the quick reply. Wavy is a better way of describing it than I did, though since you went back and forth, my guess is that the waves are very tiny.


