

minas6907
-
Posts
897 -
Joined
-
Last visited
Content Type
Profiles
Forums
Store
Help Articles
Posts posted by minas6907
-
-
Reading this thread made me realize that I hate cutting caramels by hand, I'll probably join the rest of you with the silicone molds. The ones mentioned by @Tina C. Sweet and Cute may be on the larger side for me personally. I've always like the Silikomart Micro molds, that have nice shapes that are small enough for gummies and such. I'll likely pick up the Micro Rectangle mold, its not a bad mold, $13 for 56 cavities.
-
 1
1
-
-
1 hour ago, JordanB said:
I havent made any batches of Gellatin ones, I was trying to make Vegan Friendly ones using Agar Agar, honey, etc. but I found them to be too Jelly like and crumby
Oh ok that makes more sense. I'm sorry for not asking specifically before, but I think the comparison to Haribo just made me assume you were making gelatin gummies. In that case I wouldnt do anything with wax, I would coat the exterior with sugar. I also understand now when you asked about the sugar melting on the exterior. Agar sets up very easily, its fool proof, but its also easy to have too much liquid in there and not realize it until its too late, since the whole mixture is quite fluid. If you want a vegan product, look also into pectin jellies or pate de fruit. Just a side note, you mentioned vegan friendly jellies, honey isnt vegan friendly.
-
1 minute ago, JordanB said:
Oh okay I see, so if I am using silicone molds, do you recommend leaving them for like 12-24hrs in the mold then taking them out and putting them on a rack to dry for a week or rather leave them in the mold for a week? Also what do you place in the mold before putting the Gummy liquid, starch or oil?
I used to remove the gummies the next day and put on a rack to dry, but just sort of got into a habit of leaving them in the molds, it's just something I started to do. I think either way you'll be fine, but that extra drying time really benefits the gummies.
I don't out anything in the mold, no oil or starch, I just deposit the gummy right in.
Do you mind if I ask how many batches you've made so far?
-
15 hours ago, JordanB said:
Oh I see, thats really great thank you. You see I do plan to do quantities similar to you, more or less a few kilograms. it does matter slightly as I plan to sell them to a few local delis who are interested. The wax coating isnt something im fixated on if theres a better option Im open to one. Did you not find that coating them in sugar caused them to melt? Bear in mind I am looking for them to last as long as possible preferably more than a few months, not sure if the coating would help that
I will be using silicon moulds as it is what I have available however if it works I might consider starch moulds, are they much better for larger quantities of a few kilos?I'd say for the quantity that your doing, just stick with the oil, but I don't want to discourage you from trying the waxing process. When the gummies get coated in granulated sugar, they wont melt. Have you had that experience?
I think starch molding is great for very large quantities, I used to do it myself, but just got tired of the mess. I use silicone molds now, they take a little more time having to unmold each piece, but they give a clean shape and just more convenient then a starch tray. I have found that after depositing the gummies, I'll leave them in the mold on covered sheet pans for about 1 week, they seem to dry out pretty well during that time, giving you a gummy that won't sweat during storage.
-
What would your batch size be? Is this just for personal consumption, or something much larger? Also, are you molding in starch, or silicone molds? I do around 2.5kg batches. Just my opinion, I wouldn't mess with wax on gummies, I think It'll end up being more problematic then its worth if this is just something your messing around with yourself. However if your producing much larger batches for packaging, the wax coating will benefit the product. In Chocolates and Confections, Greweling lists vegetable oil for coating. The oils @Kerry Beal mentioned are ideal, they leave no flavor, and keep in mind, you dont need much oil to coat the gummies, a little goes a very long way.
Just for reference, heres what the book Confectionery Science and Technology says: "Most gummy, licorice and some jelly candies are coated with a layer of wax to provide a shiny appearance and to prevent pieces from sticking in the package. For example, gummy bears are typically coated with a thin layer of wax dissolved in oil to provide a shiny appearance. Fractionated fats, oils or waxes are applied to the surface of the candy as they tumble in a pan. Fats and oils used include mineral oil and fractionated coconut oil, among others. Beeswax and carnauba wax are commonly used waxes. Once the oiling layer has solidified, the candies are ready for packaging."
I just depends on what scale your making your gummies on. I used to coat with oil, but I started to favor tossing in sugar for the texture contrast.
Also, here is what Haribo lists (in the US) on the ingredients label for their gummies: GLUCOSE SYRUP (FROM WHEAT OR CORN), SUGAR, GELATIN, DEXTROSE (FROM WHEAT OR CORN), CONTAINS LESS THAN 2% OF: CITRIC ACID, ARTIFICIAL AND NATURAL FLAVORS, PALM OIL, PALM KERNEL OIL, CARNAUBA WAX, WHITE BEESWAX, YELLOW BEESWAX, YELLOW 5, RED 40, BLUE 1.
So there are two different oils listed, I'm sure there is a good reason for that, but they are both from palm.
-
52 minutes ago, Dan K said:
This is probably silly, but do you just keep them on the counter? Stored in a pantry cabinet? I’m trying to think about how everything will fit in my kitchen!
Not a silly question at all! I'm my apartment I have two 6 shelf wire racks, I keep everything related to the chocolate and sugar parked there. I have a shelf that's just for finished items, so at any given moment, there's usually around 4 it 5 sheet pans with plastic covers on there. I just stack them on top of each other. I like those plastic covers alot for when I would do candy tables at weddings. It was always a concern of mine having the bonbons crushed en route, but they made storage and transportation alot easier.
-
What you linked works for me. I store bonbons on parchment lined half sheet pans with plastic covers. I don't have a speed rack, but for my needs, it's what works. Really, I just can't recommend sheet pans and covers enough.
On refrigerating bonbons, I personal wouldn't unless your in a warm area where the heat could damage them.
-
I wanted to ask, on Instagram I come across loaves every now and then that have something that is, or like, a cracker wrapped around them. Is this a new trend in bread, or is it more like an old technique that has been gaining popularity?
Anyways, just wondering, thanks all
-
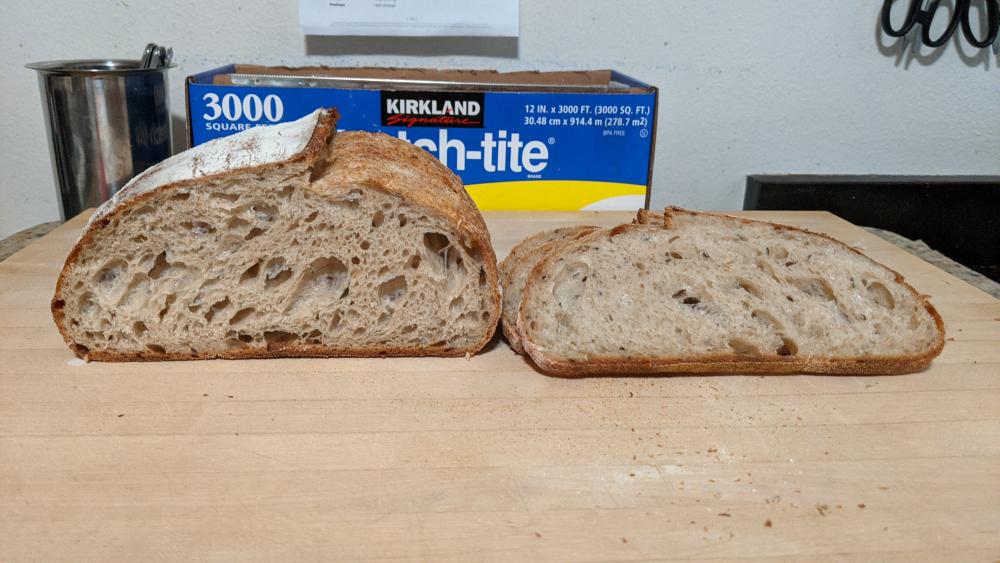
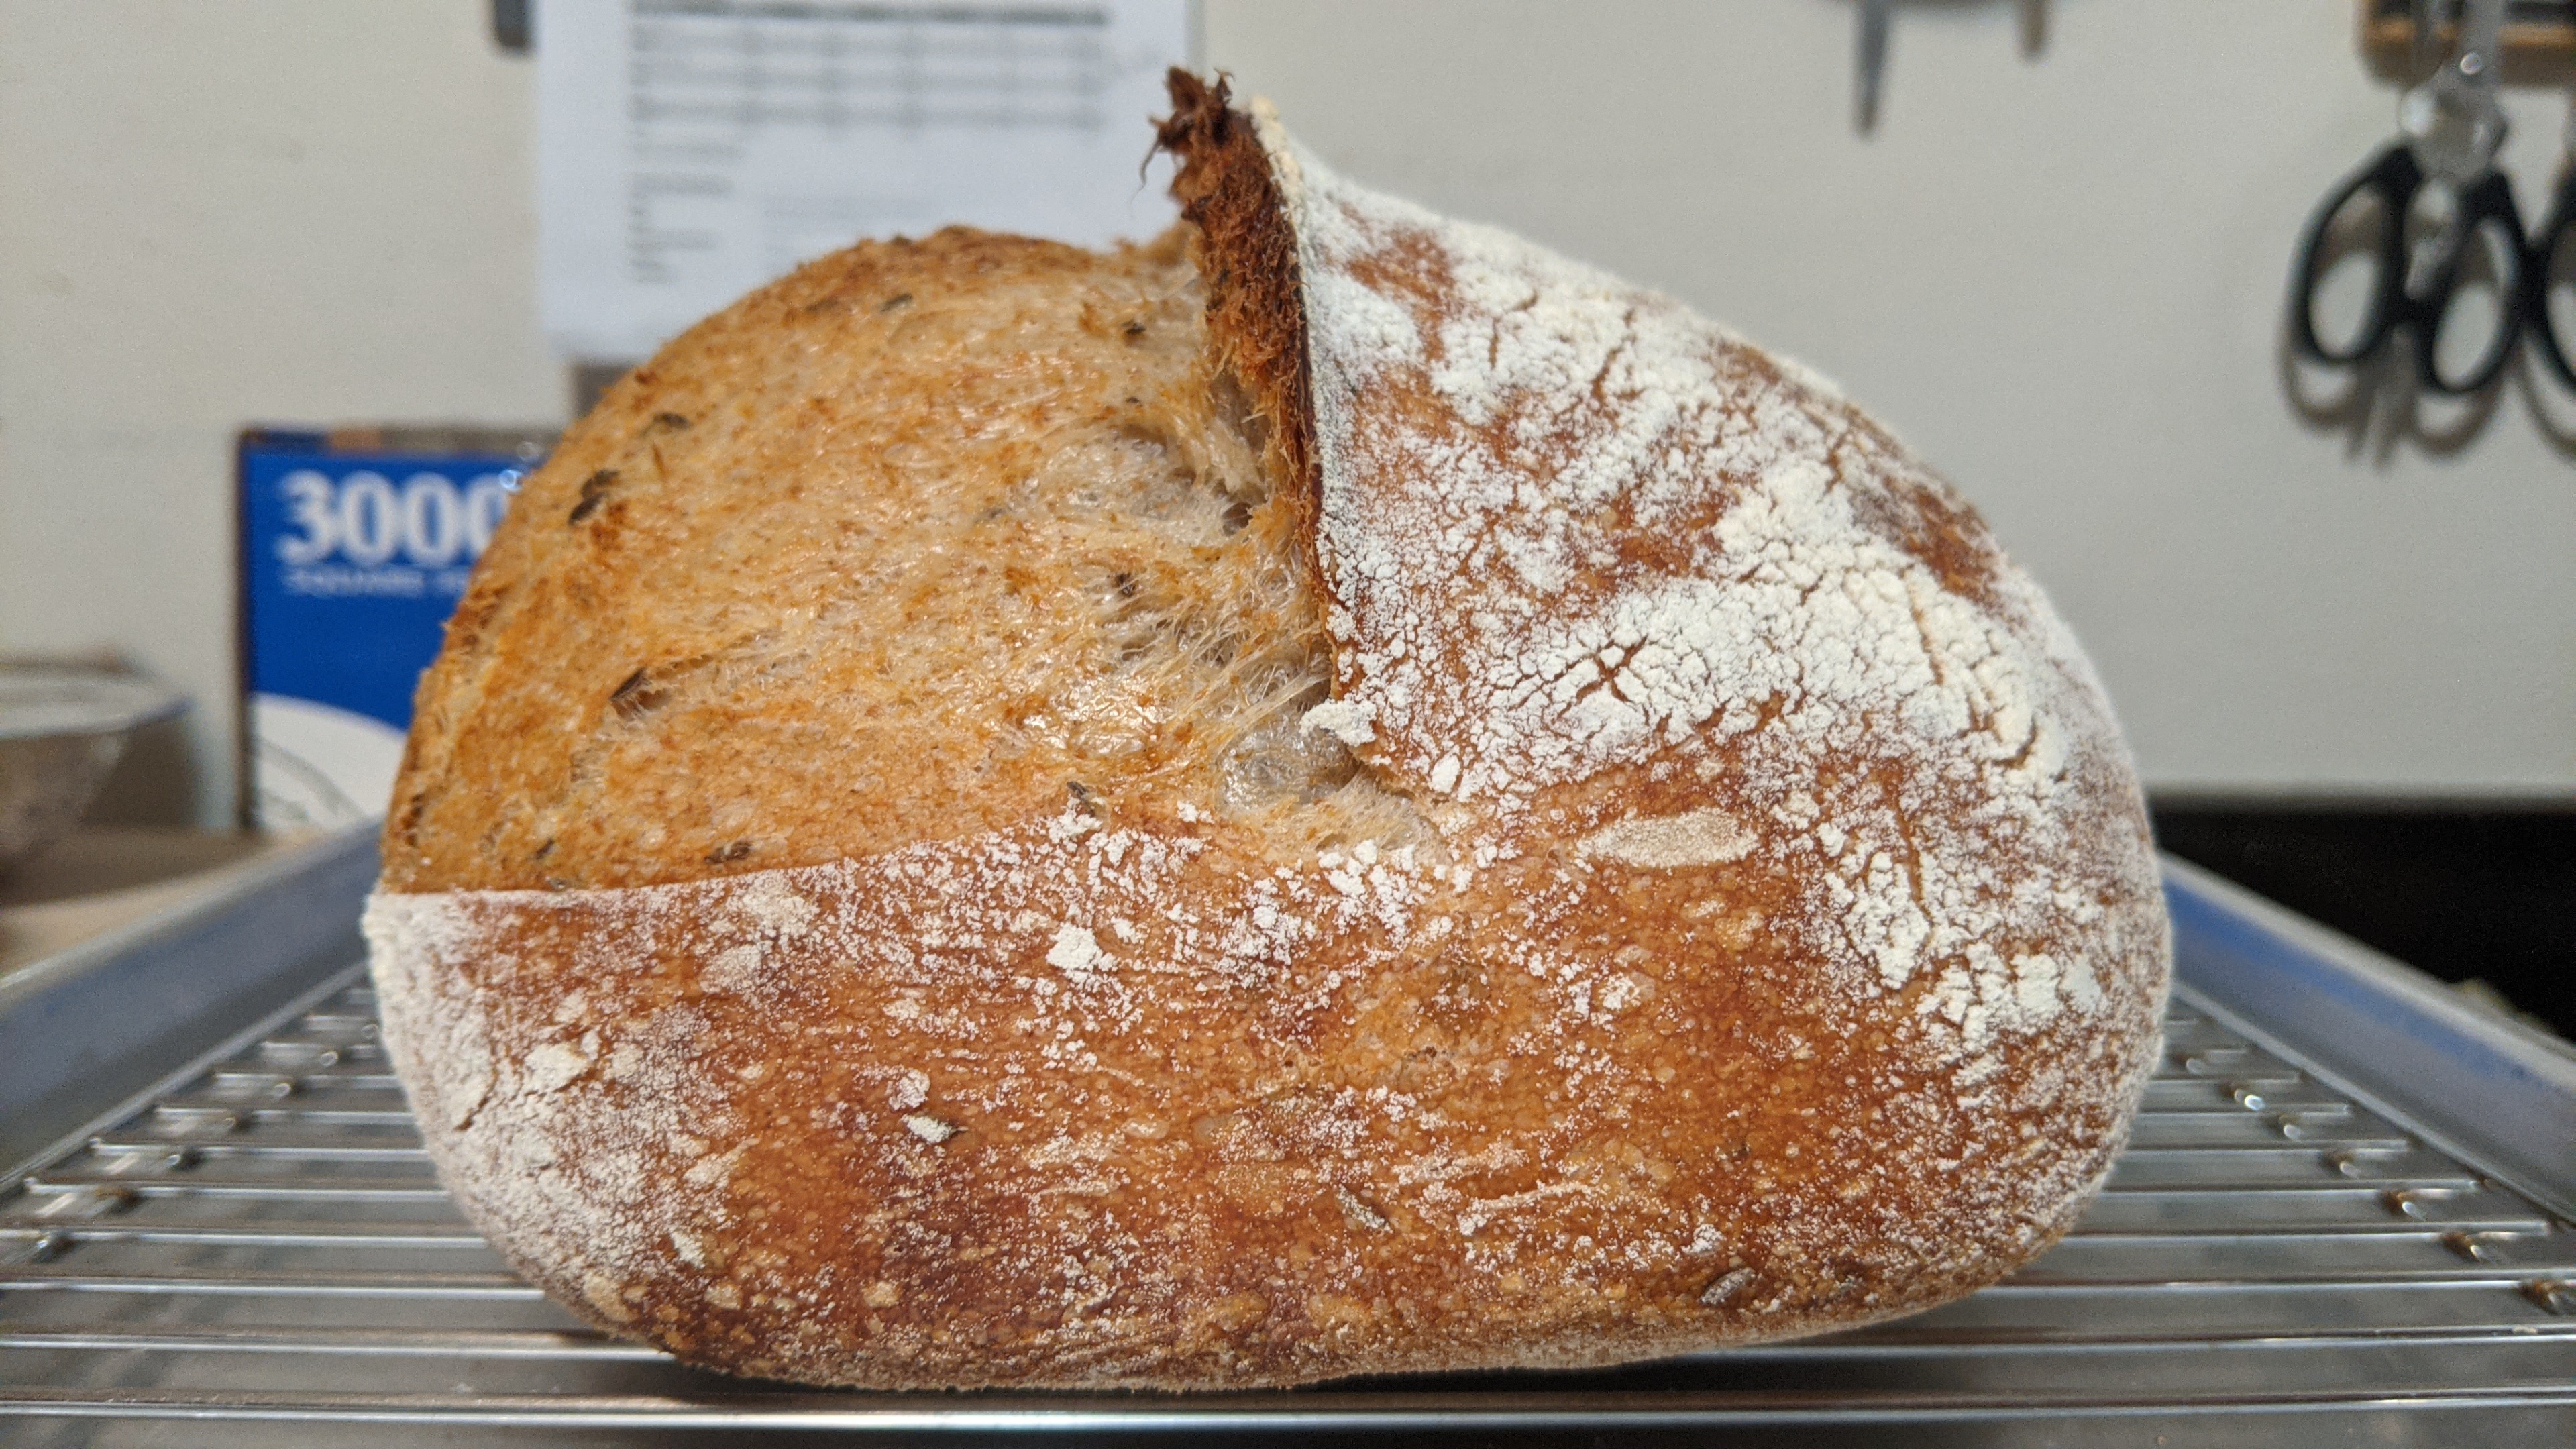
I cant recall if I've posted here, its possible, likely a very long time ago though. Lately I've been trying to really dial in my shaping, I've always wanted that ear on my loaves, and I finally got it! This is a 10% rye loaf with caraway seed. I've mostly used the tartine method, I think I finally got shaping down.

-
8
-
 2
2
-
-
I sort of get it where they are coming from, but that's because I work in a facility where we go above and beyond in every regard.
They say "melting chocolate is a thermal process (no control step). Chocolate melts at very low temperatures." You right that there is no difference if you do it at home or if you do it in a commercial environment. That language reminds me of corporate recipes that include Critical Control Points. If those CCP's aren't met (like cooking and holding temps), then the product is deemed unsafe to consume. Like @pastrygirlsaid, confectionery isn't well understood by those that make the rules. I would say that they have a superficial understanding and don't like to be proven wrong. They definitely aren't familiar with the smaller details of confectionery products and their makeup.
In my mind, I think they would deem chocolate to some extent to be unsafe because the melting and working temperatures are right in the danger zone. Hypothetically, if something were to fall in there, it could pose a risk because of being at danger zone temps. I'm sure they have situations they are able to point to where illness was linked to chocolate products, and it was probably by some moron who didnt know what they were doing or being careless.
Another factor to consider is that alot of these rules vary from state to state and county to county, and I think alot of them are up to interpretation.
-
1
-
-
11 hours ago, jmacnaughtan said:
I've seen that whole clementines normally take around a month, but that may just be for the very small ones. How do you approach the blanching step? The recipes I've read call for them to be brought to the boil, but all of the professionals I've seen (only via YouTube, sadly) have their fruit in water that isn't even simmering. I've browsed the various topics here, and collapse seems to be an issue - maybe the fruit loses too much of its structural integrity, either when blanching or overheating in the syrup
For the blanching, I would start in cold water and bring to a boil. Collapse is an issue, and you'll probably get at least some fruits that collapse on themselves regardless of how careful you are. I've seen that the whole citrus has a tendency to collapse if you try to increase the density too fast. Just take it nice and slow, which I doubt you'll have any issue doing. Also, I've found that it helps to make an incision with a thin pairing knife. When I do kumquats, I insert the tip of the pairing knife on the four sides of each fruit. It's time consuming, but I feel it aids with the penetration of the syrup, and the incisions aren't too obvious when the fruit is finished. For whole clementines I'd make incisions at regular intervals around the fruit. Also keep in mind that the clementines have alot of water, so for some time it'll look like nothing is really happening, but you'll get there 🙂
-
Those are beautiful. Everytime I candy fruit Im amazed at the transparency of the item. How long did those take? I have done whole clementines, I recall them taking about a month, but that was in my early days when I was less patient, I'd probably give them a little more time now. Those long term projects are pretty satisfying.
-
1
-
-
I do understand your frustration, it seems like there shouldn't be any inconsistency with these large pastry books. I looked in Grewelings Chocolates and Confections, and his chart says that a 55° brix syrup is 29.90 baume. I'm inclined believe that what Greweling has in print is pretty accurate. I really think this is just a matter of books rounding the numbers. I use a refractometer on a pretty regular basis, and can tell you that the difference between 55.2° brix and 54.54° brix is what I would consider insignificant. I think you could use any of those recipes to make your syrup and you'll be fine with the application. You can get a syrup density meter or a refractometer to measure the density and make any adjustment you need to with your syrup. I'd recommend getting a refractometer, it'll be more accurate and has advantages like not being delicate glass tube. Hope that helps.
-
1
-
-
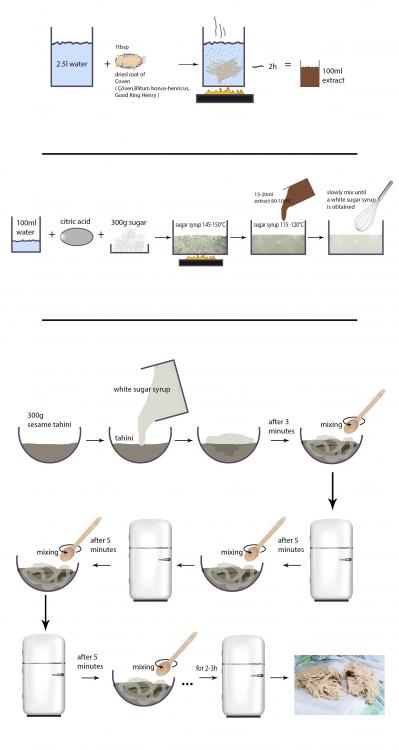
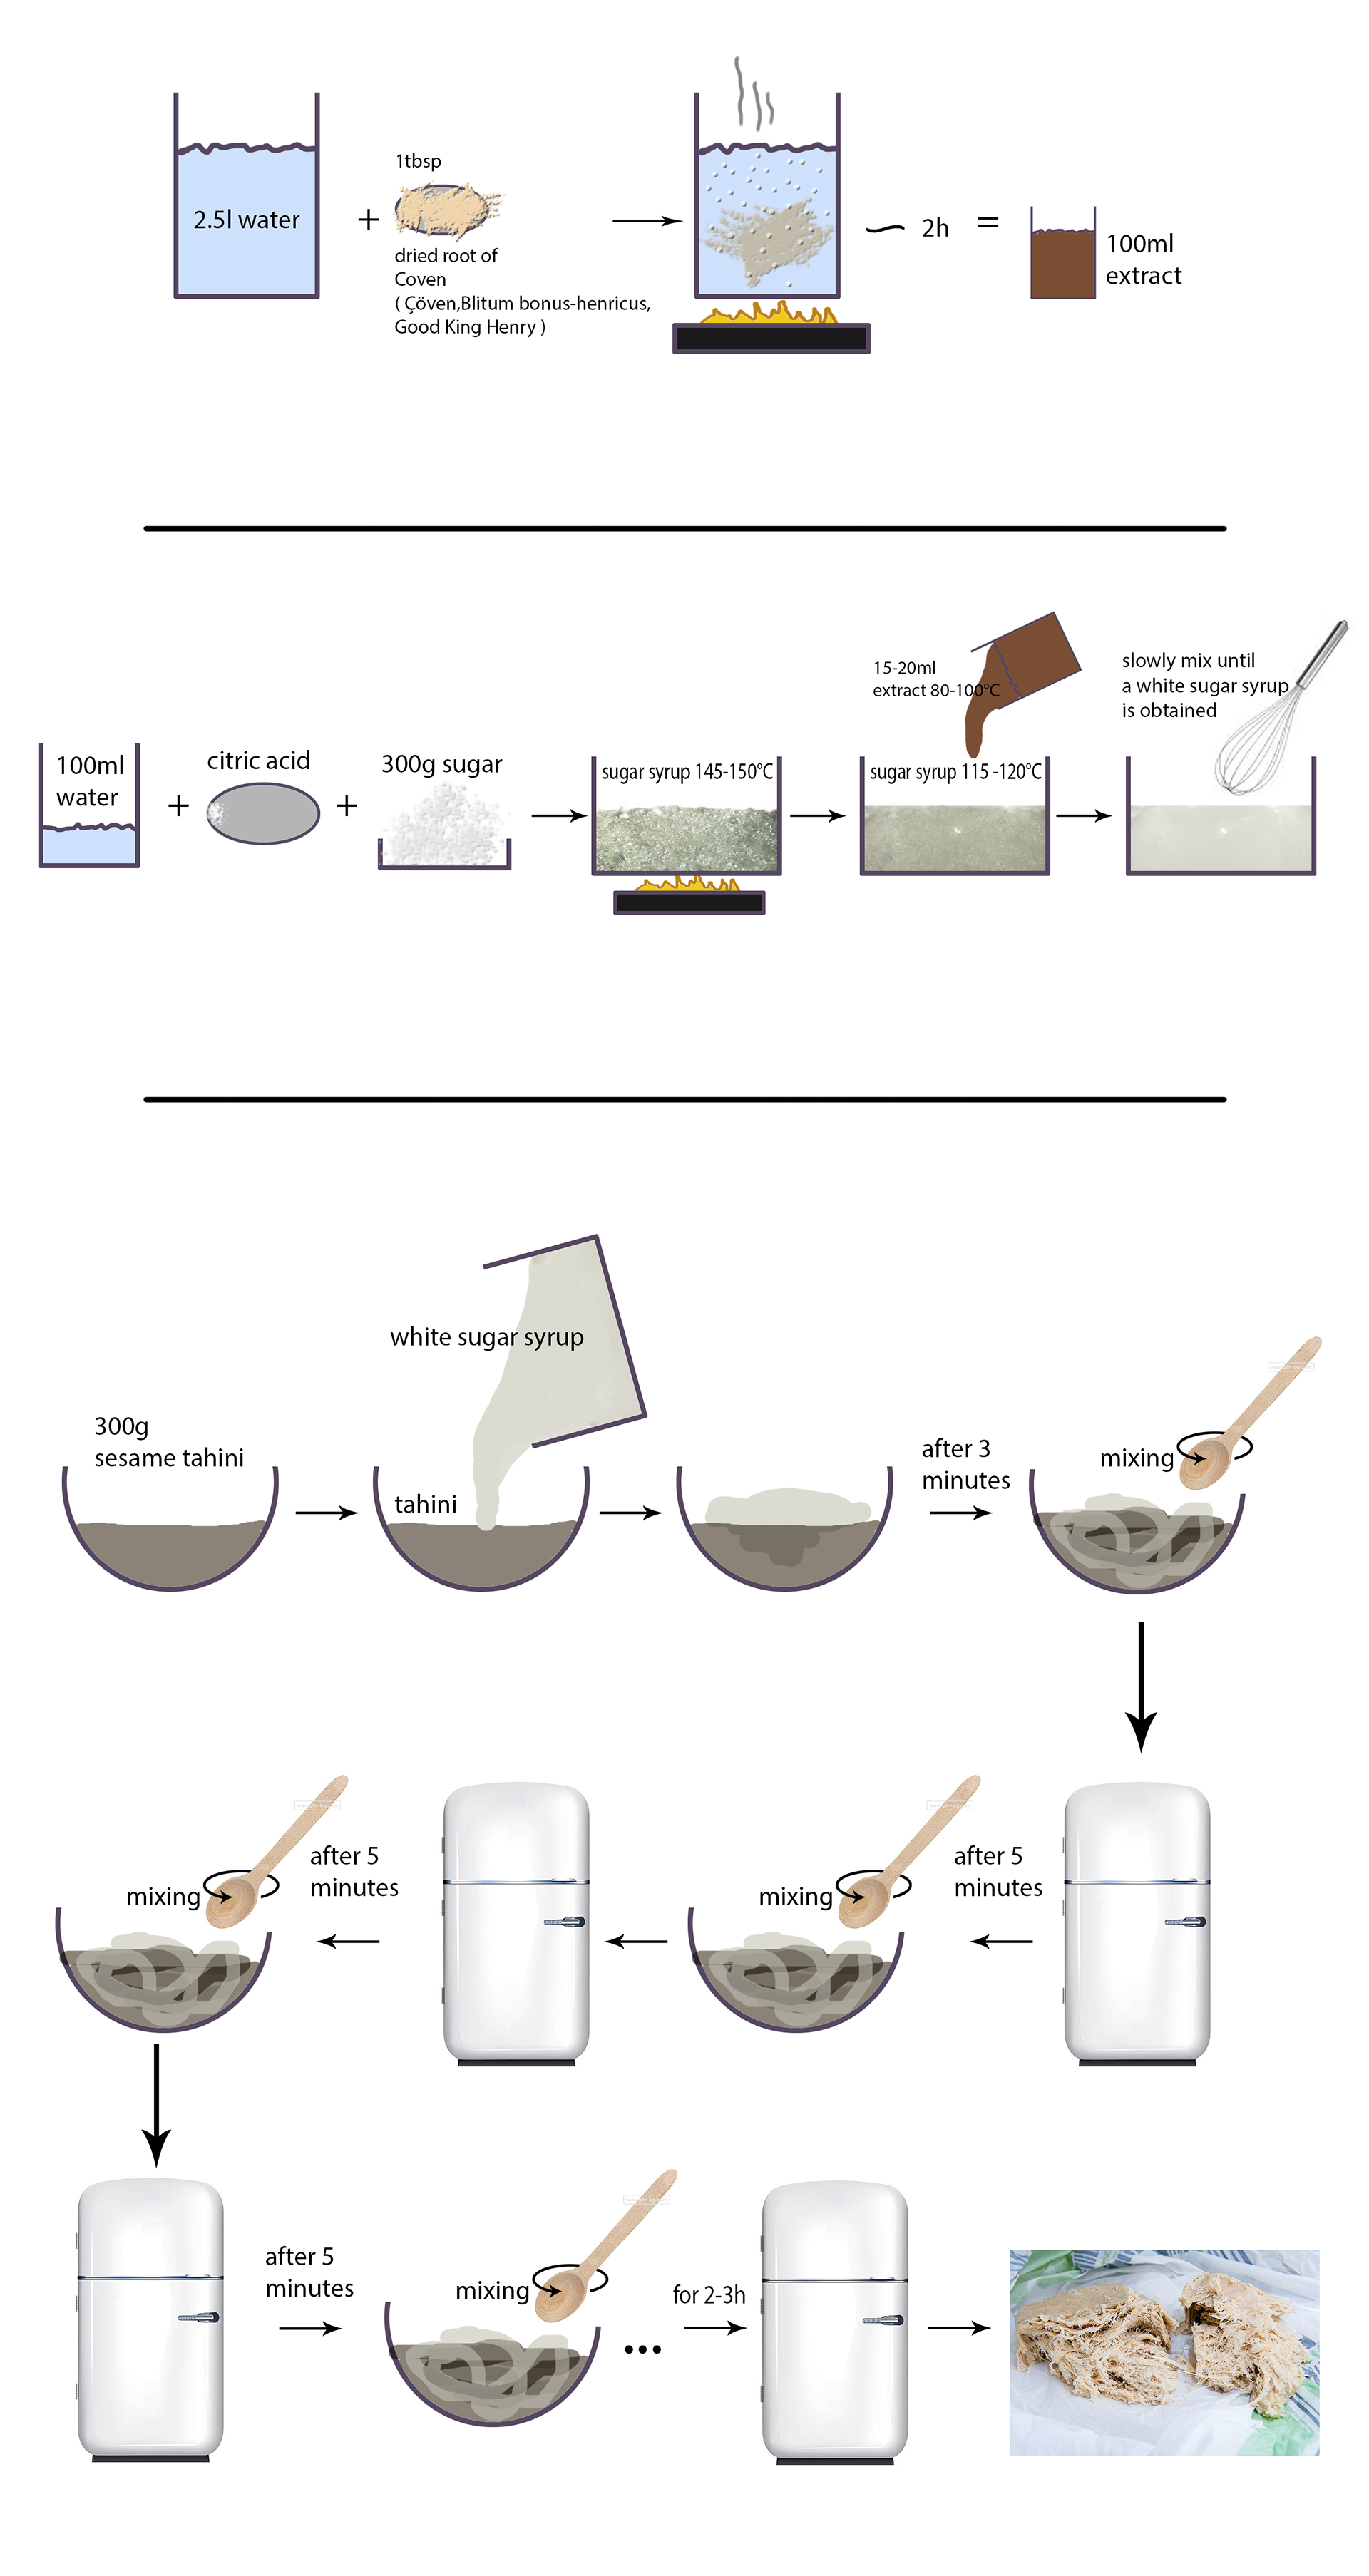
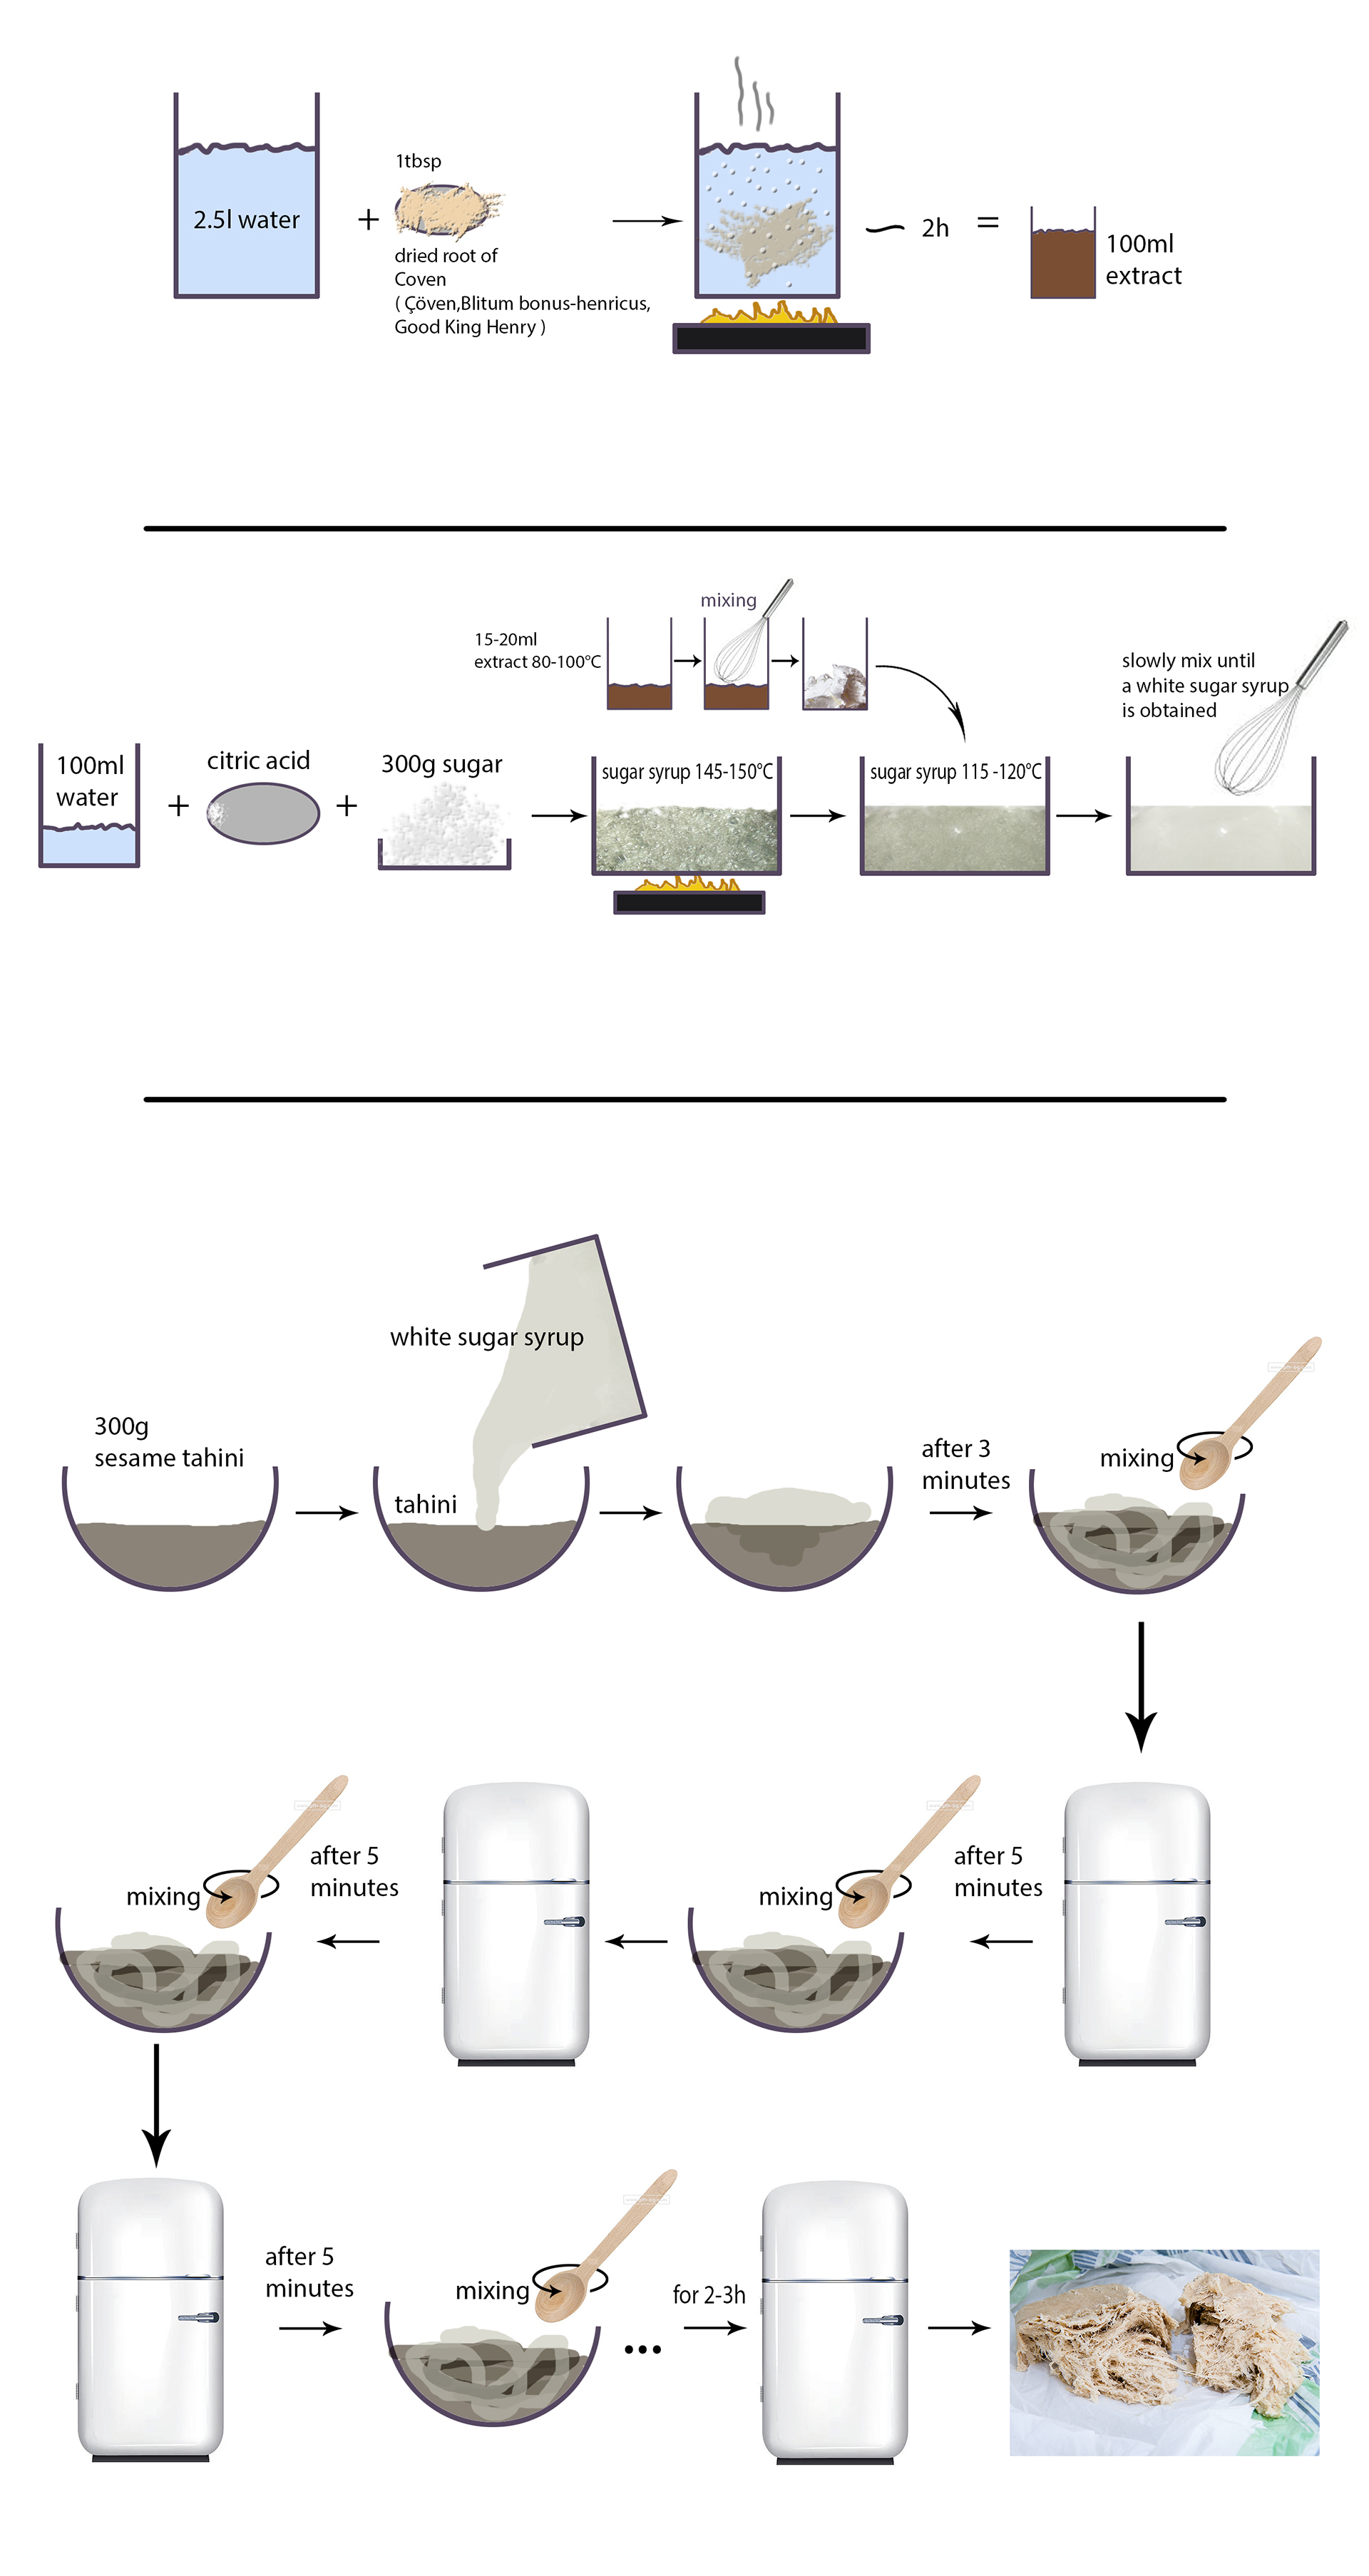
I just wanted to reply to this topic, I've been meaning to do so for so long. Kerrys recent halva recipe in the confections topic triggered my memory. Anyways, about two years some videos in my YouTube feed had been about making halva, and I had never been able to get it down. So I went and looked back at a topic I made on halva, here. I had posted a few links to youtube videos, which I took another look at, and started translating some of the comments from Greek because it they mentioned temperatures, and realized they may be on to something.
One of the videos that led me closer to what I was looking for was here:
I somehow was led to another video found here:
Long story short, I searched for the guys name, found his website, emailed him, then he sent me back another video as well as a recipe he uses, he was fine with me posting it here. There is another video where he has the recipe linked, but the images he sent me are attached. I slightly modified his recipe, since you apparently have to make an extract from Good King Henry, which is a type of herb. I'm not sure if this is for flavor or it aids with whipping, but I did follow his recipe and replaced the good king henry extract with 1/2 T water and 1/2 T powdered egg white. I mixed to hydrate. So the recipe I did is as follows:
1/2 T water
1/2 T powdered egg white
Mixed to hydrate.
100ml water (or 3.3fl oz)
Pinch citric acid
300g sugar
Boiled to 150c
Let cool to 120c
Added the hydrated egg white mixture and whipped in the pan by hand until aerated.
Added this mixture to
300g sesame tahini
Mixed with a metal spoon, then as the mixture cooled, I folded by hand. I did not put it in the refrigerator like he does in the recipe.
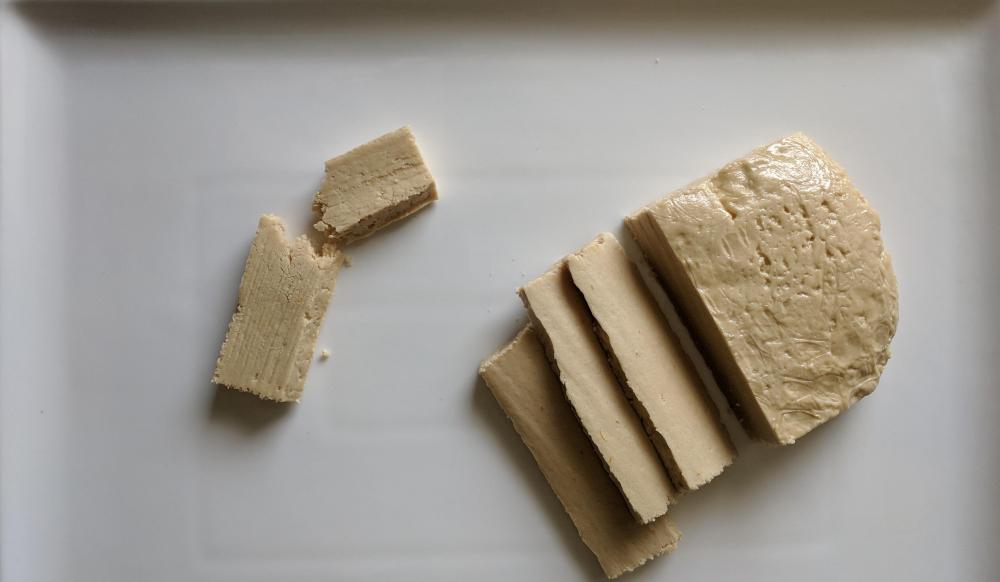
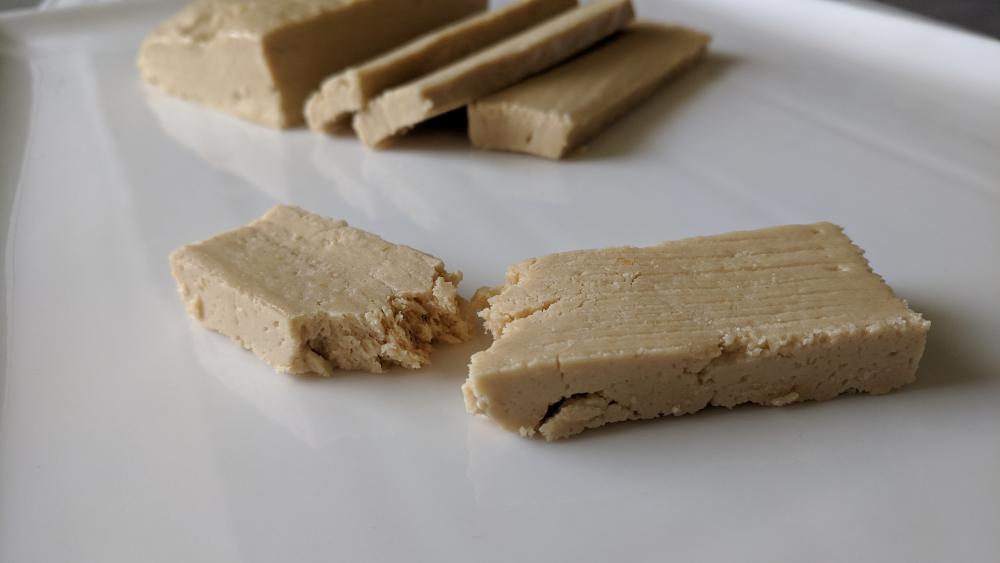
One thing that I found out is that halva is a crystallized candy, I didnt know that previously. Generally you purchase it in a square plastic container or round can. When the candy is warm, its obviously pliable, then its deposited into the container its sold in. After a few days at room temperature, it will crystallize, giving you a nice flaky halva.
Anyways, the stuff is delicious, I really enjoyed making it. Its been two years since I did this, I meant to post about this a long time ago, but just havent had the time. Now that I look back at this recipe, I'm fairly confident that you could get good results ignoring the egg white completely, I'll give that a try eventually. Hope someone find this useful.

-
7
-
-
21 minutes ago, jimb0 said:
if you don't need them perfect and shiny, one could also, i suppose, do it the harder way by hand in a bowl or pan with slow drips of chocolate. no cooler required, but you'll be at it a while (i've never done it personally ofc so it's easy to recommend :V)
I find myself doing this more and more with chocolate dragees, usually nuts, for me it is a much faster way to engross the items. I normally won't chill the centers to begin with, but after they have a thin layer of chocolate, they go into the fridge. Then I add pull them out, add chocolate, toss by hand, and then the chocolate sets up quite fast. Normally I'll do two of three coats like this, then give it some more time in the fridge. I'll keep building it to the desired size, then it goes into the pan for smoothing. That may be the next day or a later time, but just charge it with warm chocolate and they smooth out fine. I've seen that this (for my setup) is faster then engrossing in the pan. Most often they get coated with cocoa powder or confectioners sugar, so they don't have to be perfect, but I do sort of baby them during smoothing. Every now and then I'll polish with gum arabic or confectioners glaze, but that's not the norm for me.
-
5
-
-
Yep, cane sugar for all boiled confections.
Mostly wanted to chime in about the costco organic sugar. Personally I love it for coating pate de fruit. I don't like using regular granulated sugar for coating the jellies, and I tried sugar in the raw, but the crystal is a bit too large. The kirkland organic cane sugar has a grain size inbetween the two, personally I think the jellies look nice when coated with it.
-
And to add to Kerrys and Curls advice, one thing that helped me is piping chocolate on each cavity before tapping and scraping. In many videos people seem to add chocolate to one side of the mold, then scrape to carry that chocolate over to the rest of the cavities. Now I pipe just enough chocolate to cap, tap, and try for one clean scrape, maybe 2.
-
 1
1
-
-
On 10/29/2020 at 8:15 AM, Haley said:
Specifically, I am wondering what future equipment to plan for and the requirements I would need to accommodate for that now. I would love to someday upgrade to a tempering machine and enrobing line, so I know I need to consider electrical requirements for that, but also space.
Just a thought to keep in mind, there may be limits on how much you can modify a kitchen space with cottage food. It would depend on where you are, each state has different rules as well as each county within the state. Where I'm at, there are limits to prevent you from turning your home kitchen into a commercial space and still use the cottage food permit. Actually making the space into a commercial work space is a whole animal on its own. Cottage food in pretty cool, but sometimes it seems that they tie your hands is so many ways.
On 10/29/2020 at 8:15 AM, Haley said:I know marble is the classic material for tabling chocolate and other things, but does granite or other cheaper stone work as well? I do not temper my chocolate by tabling, but do occasionally use a stone for certain things (I've always just used my granite countertop in the past and it seemed to work fine). Since a traditional island will help the house feel more like a guest house and less like a commercial space, I figured I should make sure it adequately serves my chocolate purposes.
I'd go for granite 100%. Even if you dont table your chocolate, as you know, you often need a perfectly flat surface for ganache, caramels, etc. In time, marble will scuff and scratch, even with light use. I would recommend visiting a fabricator, often times they have granite scraps from kitchen top installations. The cutout from a double sink is quite large. Obviously I dont know the actual size of your kitchen (although I guess its sizable if your considering an enrobing line), but I think you'd have a few options. You could get a wire rack on wheels sort of like this (eG-friendly Amazon.com link) On top, you could put cheap cutting to level out the top, and a granite piece on top of that.
Alternatively, you can just get a table like this (eG-friendly Amazon.com link)
Theres all sort of sizes to those stainless tables, just you can just configure it to your needs, placing a granite cutout on one side and using the rest of the table however you need.
It may be that I'm not totally understanding what your looking for, because you seem to not want your kitchen space to feel totally commercial, and theres obviously a lot of personal preference, but when talk about an enrobing line, I think you'll find that your workspace becomes more commercial rather then guesthouse, just something to keep in mind.
On 10/29/2020 at 8:15 AM, Haley said:Another question is about rolling racks and stainless steel tables. Where do you buy them and what size tables would you recommend? I have found plenty of places online but was wondering if anyone has any good (or bad) experiences with anywhere in particular.
There are alot of places online, like pastrygirl said. WebstaurantStore is good, as well as bakedeco and cheftoys. Before ordering online, visit the restaurant supply locations in your area. Look for a Costco Business Center or a Restaurant Depot, or the many small supply houses. Even if you order online, its good to see the product beforehand, especially if its big. Also, metal wire racks will likely become your friend. Plan to have more shelving then you think you'll need.
-
1
-
-
On 8/28/2020 at 5:38 AM, Rajala said:
I've been trying like 10 times, and it always break for me. I'm using Greweling's recipe. 10 times is probably not much, but I never feel like I get close - so it's a bit annoying. But I guess I need to keep trying and trying.
That recipe is not really butterfingers, but the technique is the same. Leaf croquant. Do you know which recipe I'm talking about, if not - I'll get the book.

Hi @Rajala, that sounds like a really frustrating experience. Making the croquant 10 times does seem like alot, and that has been my experience with the Leaf Croquant recipe from Grewelings book. I made it once, and the proportions seemed off, it didnt feel right, and it came out terribly. The success I has with the butterfinger bar above was from using the recipe in Grewelings book for Peanut Butter Honeycomb (page 252). Read my post in this thread from April 9. There, I made the Peanut Butter Honeycomb recipe, but doubled the amount of peanut butter filling. Pour the hard candy on a silpat (careful, its foamy) fold it over to cool to the plastic consistency, add the filling, fold over to envelope, and fold the batch to make the layers. A heat lamp helps alot, but you can use an oven too. One note that is helpful, use a serrated knife to make your scores for the pieces. I sort of pressed the knife slowly, rocking back and forth a bit. It'll make sense when you actually do it. So make your scores across the whole slab, then set it aside to cool completely. It should break apart nicely at the seams. Also, its easy to cut the pieces and then realize they are too large. I'd cut them slightly smaller then you think they should be, then when they are enrobed they will look more like the size they should be for a candy bar.
Your extremely patient for trying the Leaf Croquant recipe 10 times. Try doing what I did above, I think you'll enjoy the result much more.
-
On 8/21/2020 at 1:43 PM, MokaPot said:
@minas6907, your Butterfinger recreation looks delicious and better than the original. It's interesting to get your take on the Bon Appetit Butterfinger video. In other videos involving chocolate, Claire (on the BA videos) never wanted to temper chocolate, so that was always suspect to me.
Hey thank you so much! I remember at first sort of enjoying the bon appetit videos, but the more I watched them I realized they sometime have no clue what they are talking about, it's really surprising from a channel like that. Reading the comments on the videos, many of the chefs there seem to really have a strong following. To me, they seem more like social media figures that look good in front of a camera.
On 8/25/2020 at 10:34 AM, Rajala said:I reached out to that university, but wasn't really the place for it. Hmm, I guess I gotta keep trying and trying more. Maybe I'll manage some day.
Do you mind if I ask you how many times you have tried? What recipe are you using? It's a unique candy that has a very satisfying end result, I'd be glad to help you out.
-
I recently saw these on Instagram, and was just wondering if anyone has used them or knew anything about them. They are obviously not making their own chocolate, and am a little surprised they are selling this with so many chocolates available, as well as their connections to well know pastry chefs, what they have sounds so generic. Anyways, I was just wondering if anyone knew who actually made the chocolate they are offering.
-
I do gummies and pulled sugar all the time, the sugar free candies, are you making those with isomalt? I've wondered many times if isomalt would work in place of sugar with a gummies, one of those things that is on the back burner. I haven't used any of the 'natural' colors, but when you mention them, is there a specific product you have in mind? I'm aware of Chef Rubber's 'natural cocoa butter' line, but haven't seen anything that could be mixed with sugar. Just an fyi, I have a love hate relationship with Chef Rubber. In the past, I've inquired multiple times about ingredients in colorants before purchase, and was told nothing, they just sort of danced around the question. I just had to order 1 of each color type to get the information I needed.
-
On 6/2/2020 at 7:09 AM, Darienne said:
Wonderful as ever, @minas6907. You truly are my confectionery hero. And if I ever get back to your hometown, I will make sure to meet you and try some of your excellent goodies.
Thank you very much for your kind words. Let me know anytime 🙂
On 6/2/2020 at 6:15 PM, jimb0 said:well if that ain't impressive as all get-out. inspiring.
Thank you! 🙂
21 hours ago, Rajala said:Bonbons with salty liquorice caramel. Most likely very few here would enjoy these?
That looks delicious! Any chance you'd share your formula?
-
1
-
-
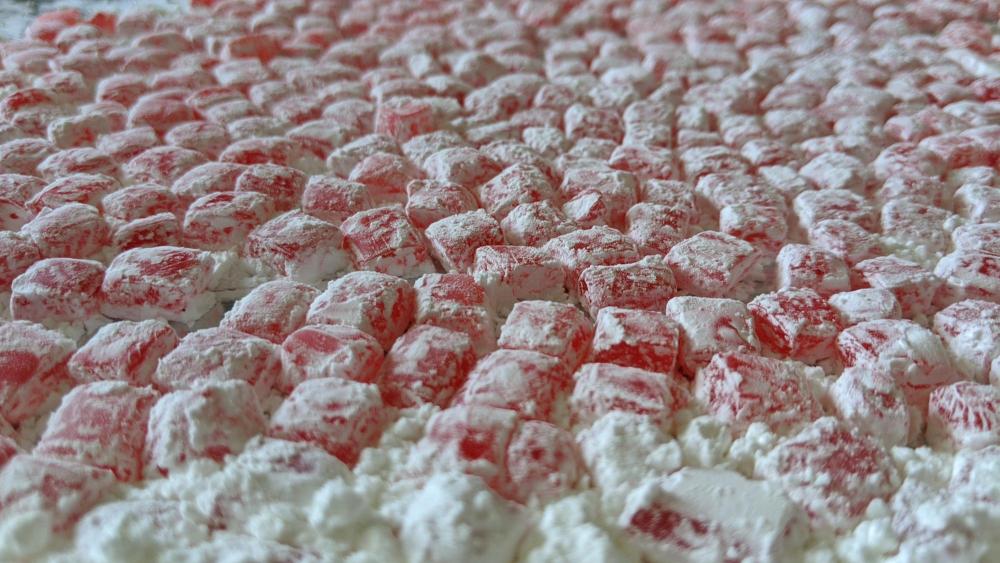
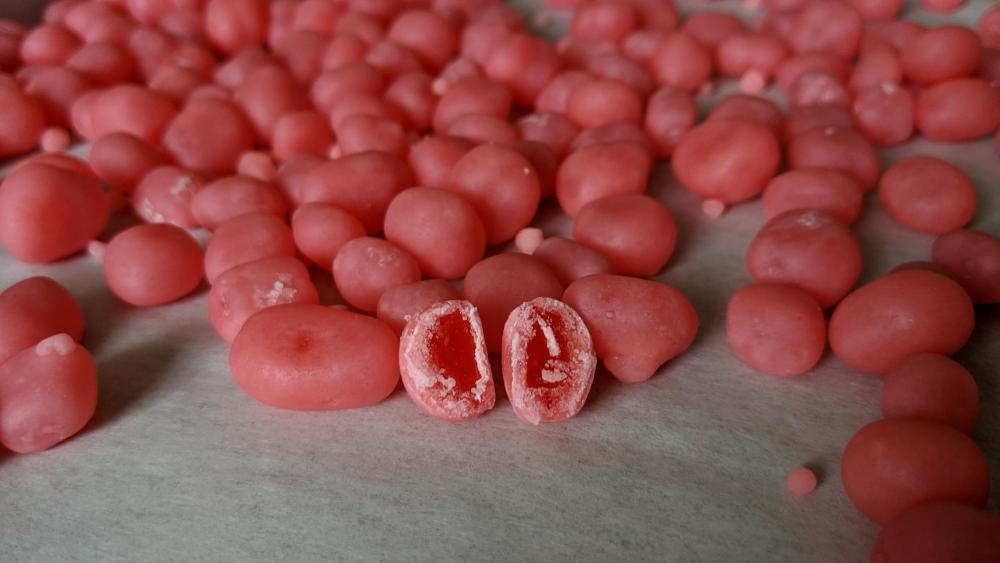
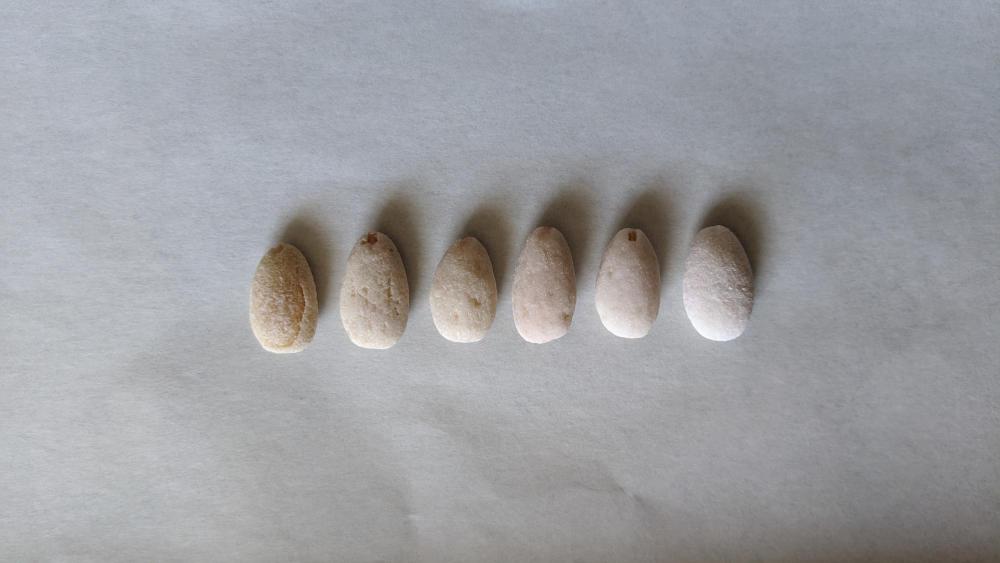
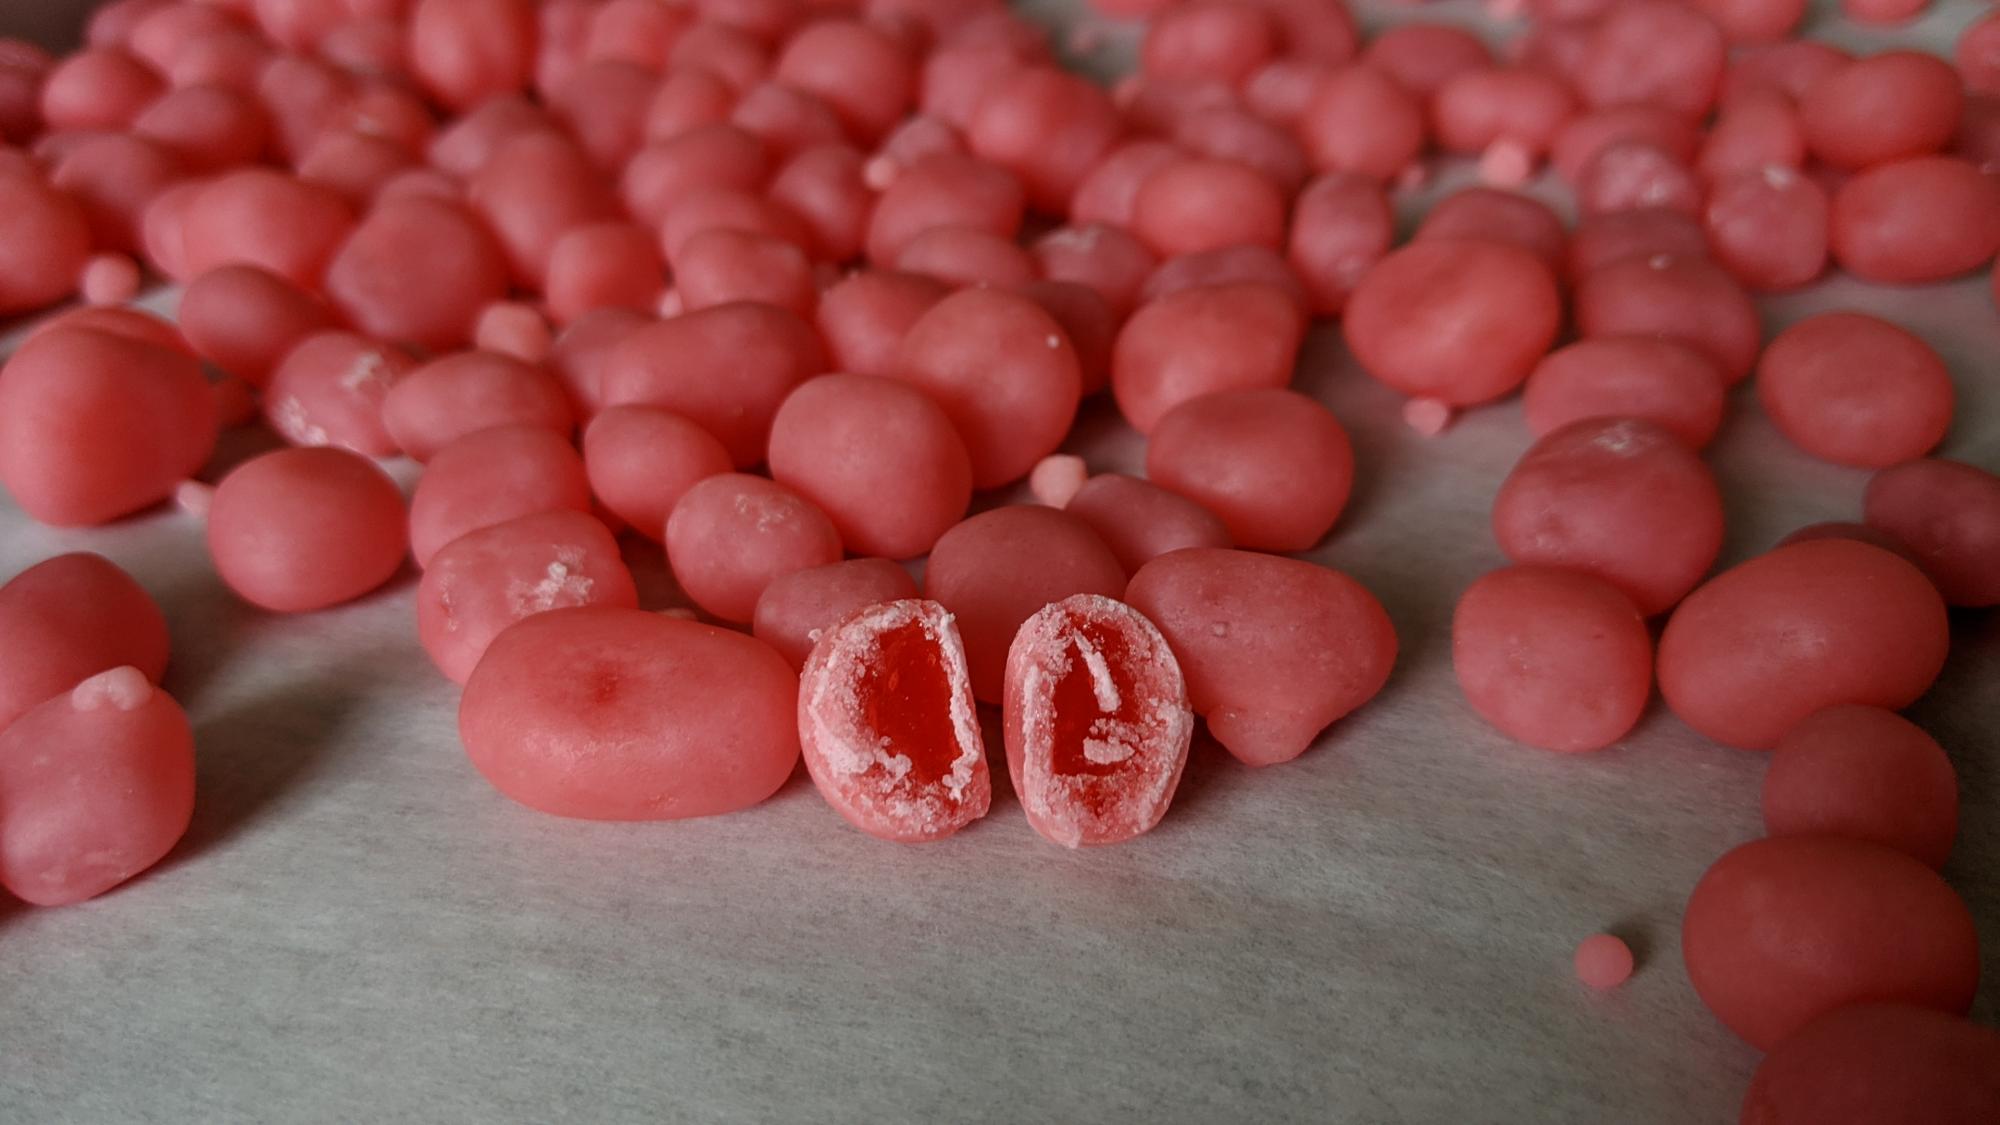
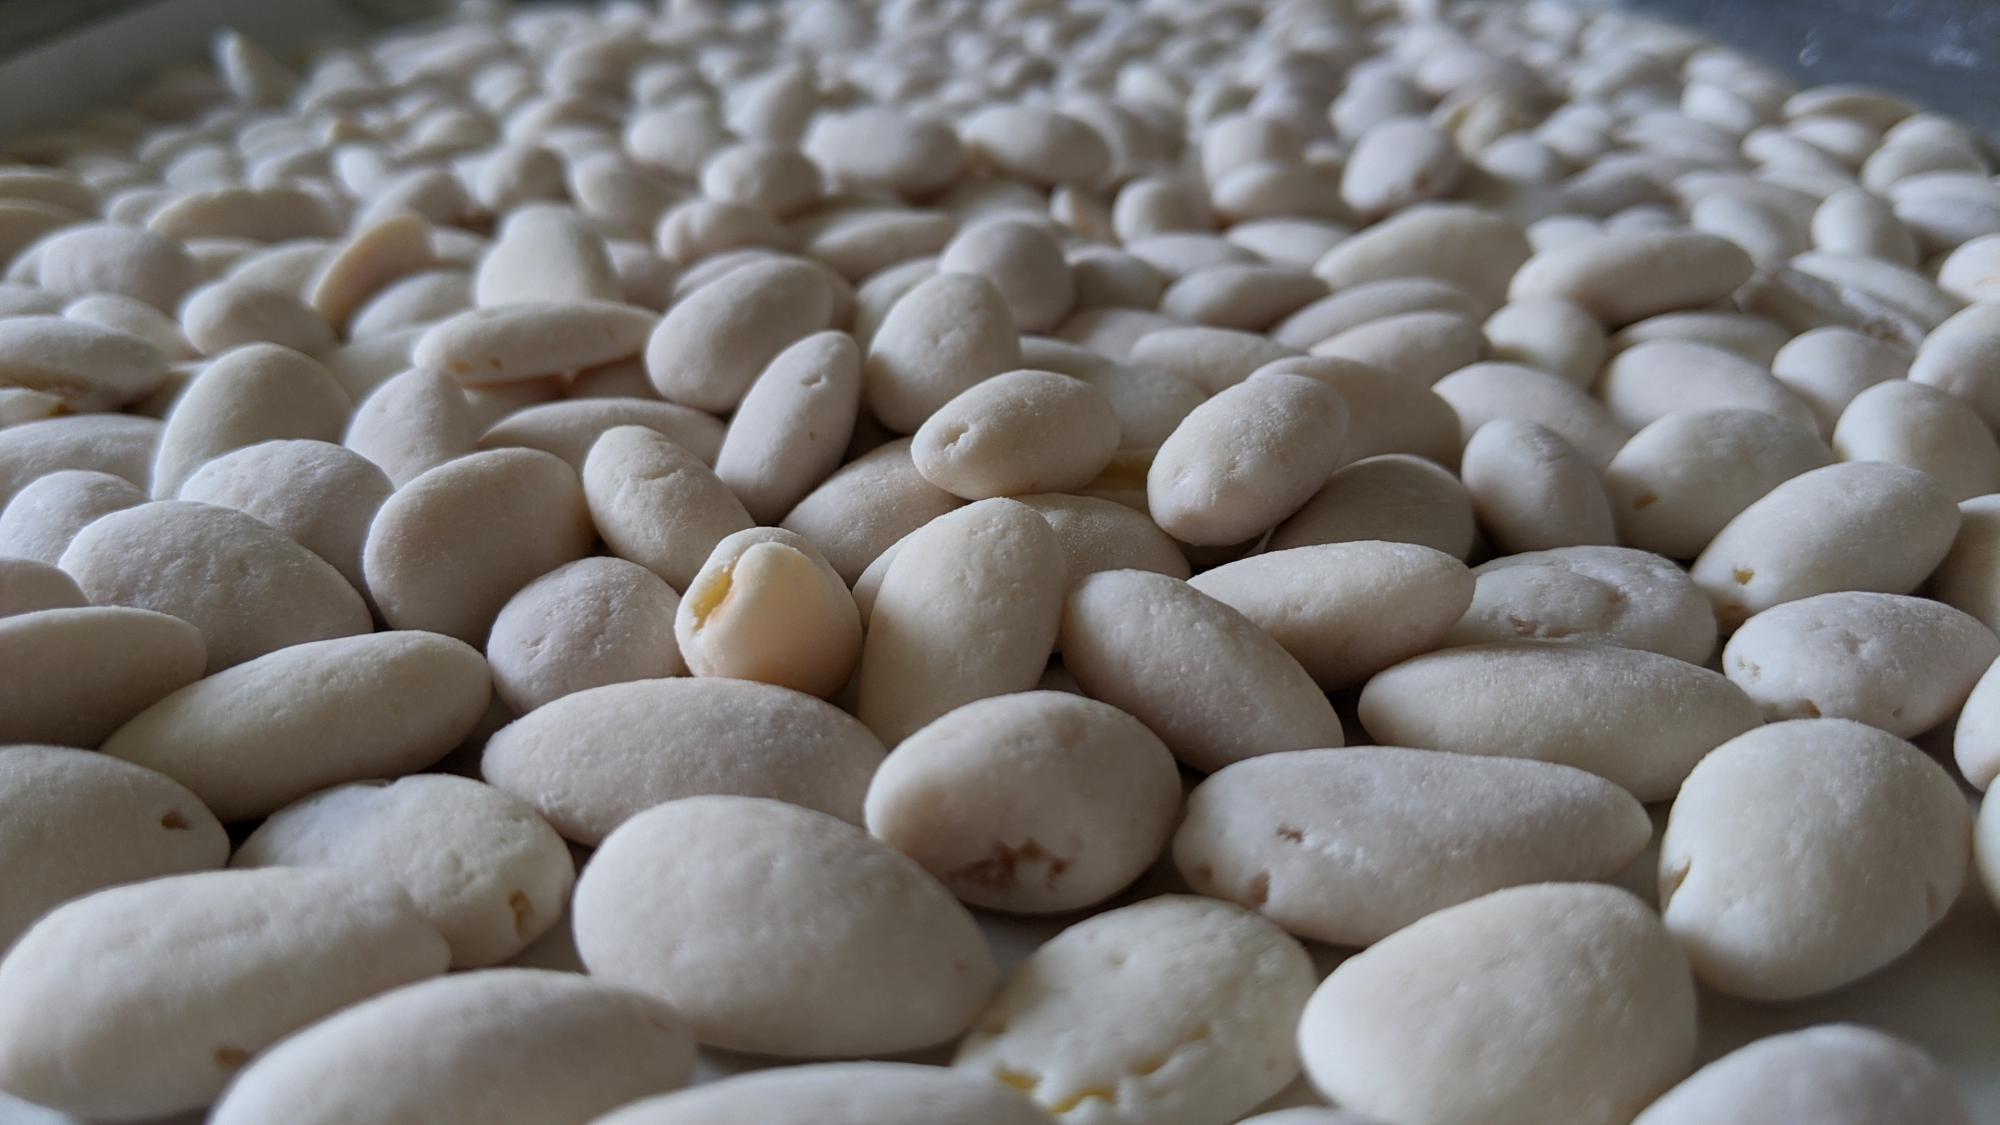
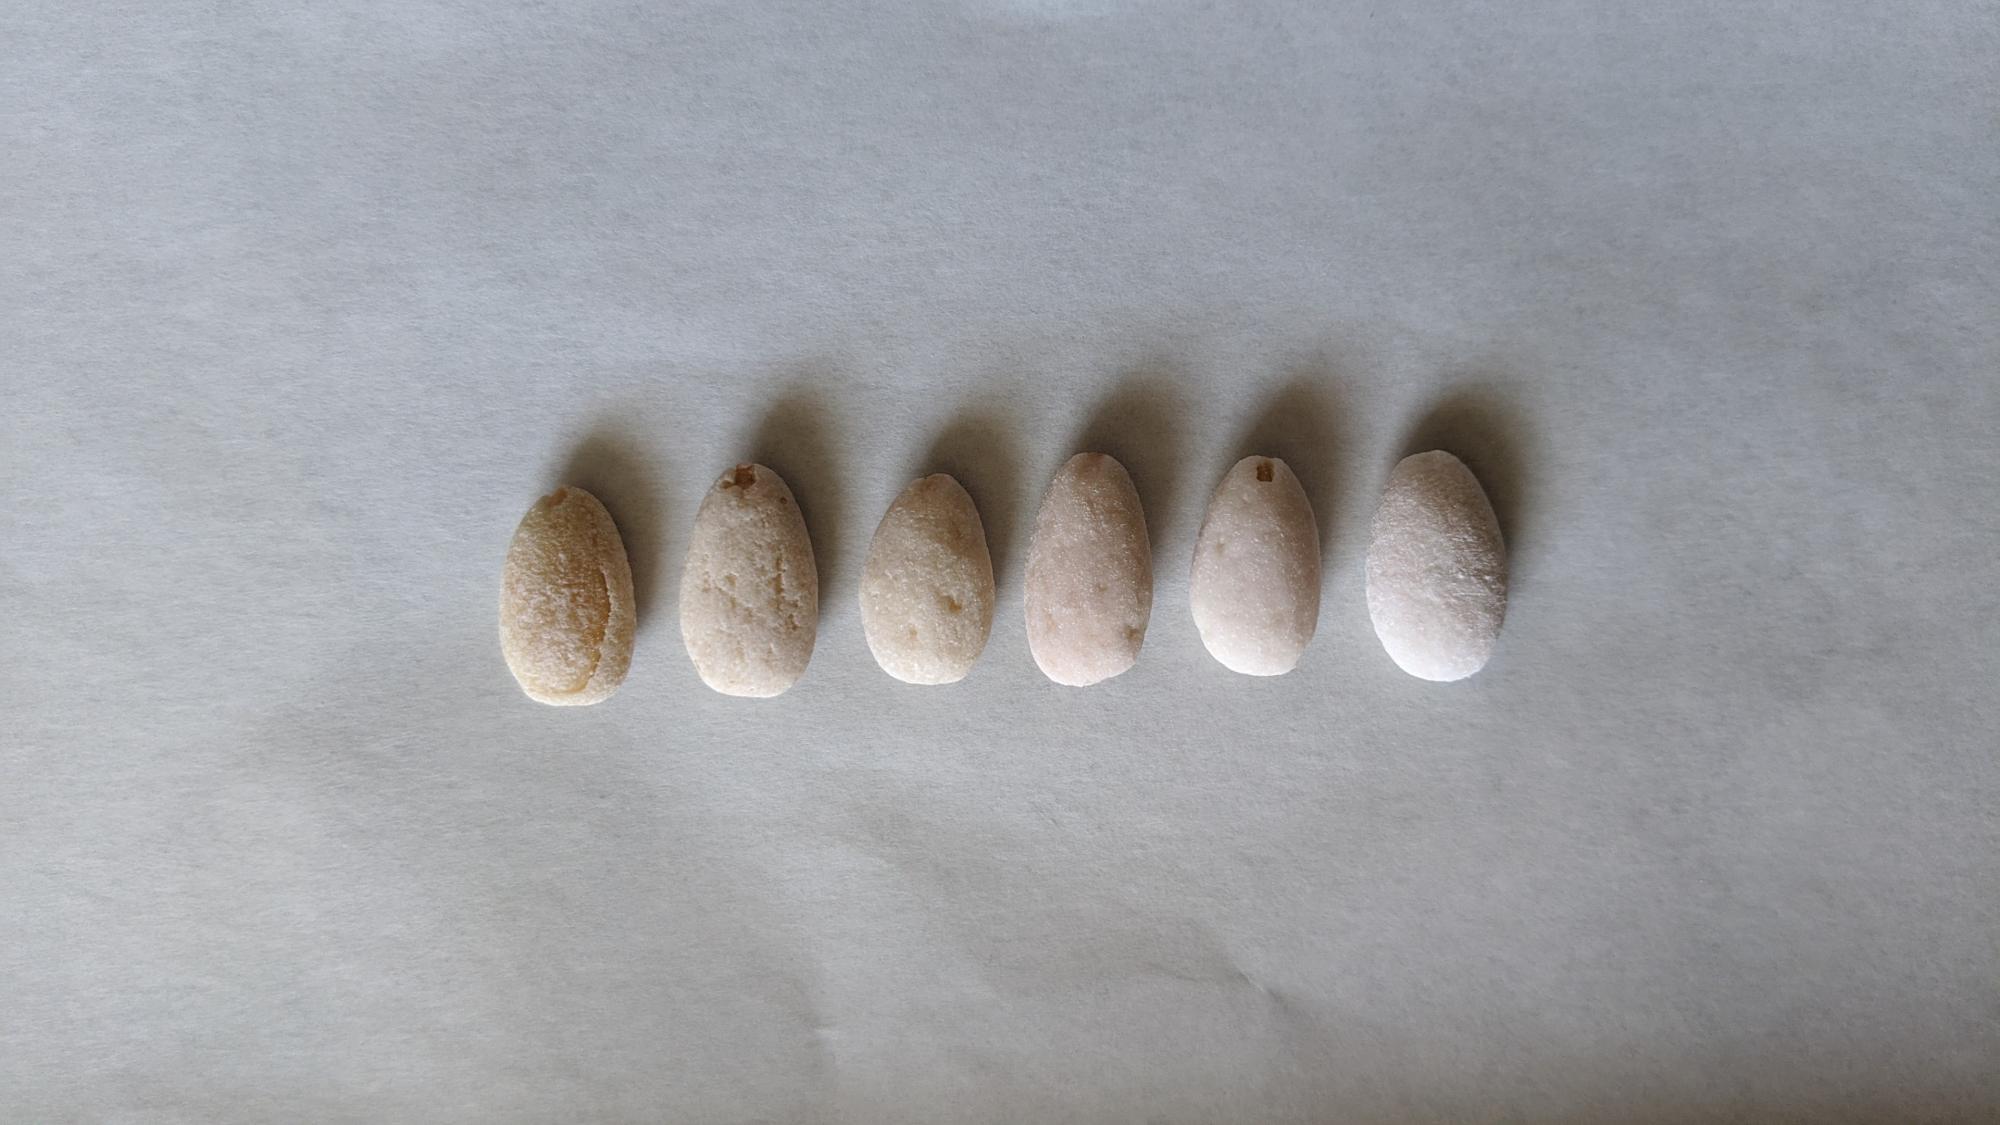
Just something I wanted to show, a work in progress. A few weeks ago, I got a copy of An Encyclopedia of Candy and Ice Cream Making by Simon Leon on ebay (theres still another copy listed for $42). Heres two items I've been long wanting to make. Jelly Beans and Jordan Almonds. I obviously cant mold the jelly beans into a starch bed (mixture too thick, needs a machine to deposit), so I dusted a half sheet pan with starch, spread the mixture out, covered with more starch, and into the oven to dry for a few days. After I cut into pieces, and back into the oven for a few days. The end result was quite firm, closer to a jelly bean then I thought I would get. They were then soft sugar panned. They dont look perfect, but not too bad for being homemade (and first try). Currently, I have some black anise flavored jelly beans (my favorite) awaiting panning, I'll post those when I get to finishing them. The Jordan almonds were made with a syrup that has gum arabic in it, that was the first time seeing them formulated like that. I just decided to go with it. A little syrup + a heat gun, that shell built up in about 1.5 hours. One drawback (at least in my apartment) the hard panning the almonds is loud, I was a little concerned about the noise. For the jordan almonds, I want to build up the coating more, I'm only about 1/2 way through that recipe, so we'll see how the final result looks. Next step is polishing with wax. Honestly not sure if I should go straight bees wax or mix bees wax and carnauba, thats still a in the research phase. Any suggestions are more then welcome.


-
9
-


Extending The Shelf Life of Dipped Caramels
in Pastry & Baking
Posted
I've made Grewelings condensed milk version of caramels a lot, you shouldn't have any concerns about shelf life, I know I've had those caramels for at least 6 weeks. In general, if wherever they are stored is warmer, they will crystalize faster, but realistically its been very very few times that I've had caramels crystalize on me. One time in particular comes to mind when I made a snickers type bar. The nougat was intentionally crystallized, it had confectioners sugar added to it so after a few days it would not be so chewy. I did notice that the caramel that was on top of the nougat started to crystalize from the bottom up, so after a few weeks, the caramel layer was no longer chewy. It was still fine, but it did have a texture change. With wrapped caramels or caramels enrobed in chocolate, you wont have those issues.
One thing that I would find a little more problematic is cutting them and leaving them on the pan for an excessive amount of time before wrapping or enrobing. If they aren't cooked high enough, or if its a particularly hot day, you could have issues with cold flow, I've experienced that many times myself, so generally I'll just leave the caramels in the frame until the day that I enrobe. All in all, you shouldn't have any major concerns about shelf life.