Kay
-
Posts
23 -
Joined
-
Last visited
Content Type
Profiles
Forums
Store
Help Articles
Everything posted by Kay
-
Mandy, not sure why the sugar would not dissolve. My fudge recipe, listed here just above, did came out very smooth, no graininess at all and it is pretty similiar to the one you used. My original recipe called for canned milk, but I just sub the half and half instead as I think the canned milk today is very different that what it used to be years ago, and this recipe is from the 60's, maybe earlier. But that is not probably what caused your graininess problem. Your mixture did come to a simmer and was still grainy? I think that for me, the very last of the graininess finally disappears after the first few minutes that it has been simmering. Maybe having some butter in the pot helps also. Was it a rainy or very humid weather when you tried the fudge? Weather has made a big difference for me. There is some sugar out there in stores that is beet sugar rather than cane sugar, not sure if that would make a difference or not. I have had some uncertain results using store brands etc for candy, so I really stick to national brands when I do the fudge. I think some years ago, I bought some Walmart brand sugar and it turned out to be beet sugar, and something or other didn't work out with using it, but I can't remember what it was now. Not sure if any of these thoughts might help. I had to work at finally getting my fudge to work out just right, practicing on small batches has helped me quite a lot.
-
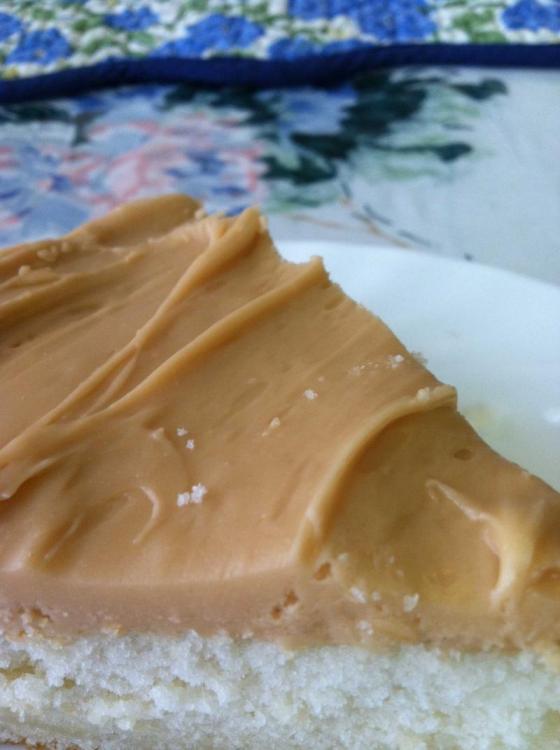
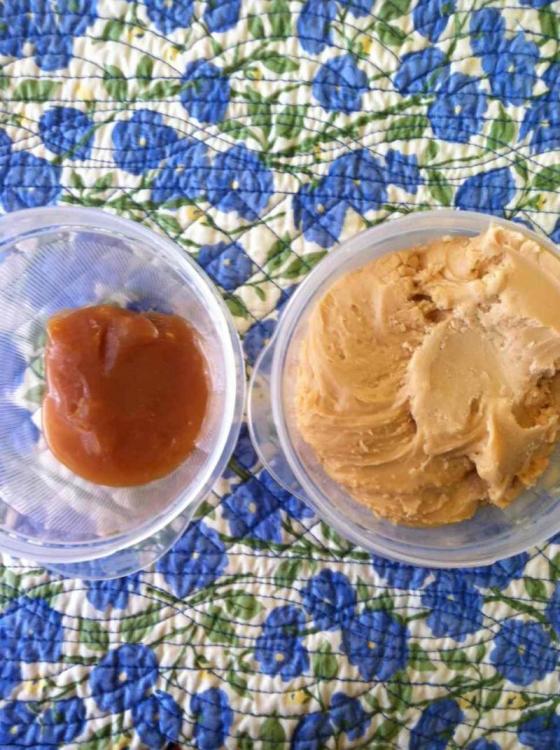
I thought that I would report back on the link I mentioned in my prior post. I have had some, well lots, of trouble with Caramel Cake in the past, but I think have found a winning combination so will mention a few things here in case it might be of some help to someone else. I have tried the Ann Cashion white cake recipe mentioned above and I actually really like the cake, but it does do a little better made with European butter, I believe. (I personally suspect that the butterfat content of national brand butters might be shrinking these days) I tested it with Presidente butter with delicious and velvety results, but texture when made with major brand butter, was not so good. I am thinking to try it again with regular butter and an added tablespoon or so of oil to see how that turns out. Also, the cake flour needs to be sifted right into the measuring cup, then leveled, to approximate the correct weight of flour. I could not get the caramel frosting from above Food and Wine link to work for me, but after trying it and several different recipes, some of them more than once, I think I found what I was looking for. Since, as others have said, caramel cake is all about the frosting, here is a phone photo of the frosting, and also of left over caramel, before and after beating. Here is what I did-- carmelize in one medium saucepan, ½ cup sugar with 1 T water, to nice amber color, then carefully add ½ cup hot water and stir to dissolve and simmer for 3-4 minutes. At the same time, in a different heavy pot, melt together 1 stick salted butter, 3 cups white sugar, 1 cup half and half (I actually used part half and half and part heavy whipping cream), and 1 T light corn syrup, stirring. When all dissolved and starts to boil, pour hot carmelized sugar syrup into butter mixture. Cook, stirring, not scraping sides, to early soft ball stage (test dribble into ice water, which can be formed into a slumpy lump, ie raised blob when set down on a plate) After reaching proper stage, pour hot caramel, no scraping, into a stainless mixing bowl, and carefully stir in 1 teaspoon vanilla. Beat with mixer till it cools to desired spreadable texture, somewhat starting to hold its shape. Much beating, as it cools, incorporates air and lightens the texture. (I speed things along with a frozen gel pack under the bowl, flip it over periodically, and a 9” fan on high right next to the bowl.) Have cake layers ready to go, frost quickly as will continue to firm up as cools. Frosting adapted from an online recipe, -- http://www.markballard.com/kitchen.html#caramel
-
I'm afraid that I won't be all that much help with this but I will mention my vague observations on the subject in chance that it might be useful. Hopefully someone else will have more specific answer to this question. Not all that many years ago, I went through my Rival-Crock-Pot-Collecting-Faze. I was only interested in the older models and picked them up at thrift stores, etc. when I saw them in great condition. At one time, I am sure that I had at least 5-6 of various ages, sizes, the early orange or gold or olive style, the later pastel colors in country chic design, one sophisticated version with ebony black crock. I also had crocks set aside for my young adult daughters should they want them. One afternoon, my husband came home to a kitchen lined with steaming Crock Pots, instant read thermometers, and pad and pencil for charting the temps on both low and high setting of each pot. ( So here is the vague part. My temp readings discarded long ago, I do recall that the really old crocks, ie 1970's orange or olive, were the lowest temperatures on both settings. Then there were the so called next generation, probably from the last half of the 1980's or so, on into the 90's and as I recall, they all ran rather hotter than the earliest models, but definately not as hot as the current models in stores today. So I would doubt that there has been one, single date when the temp on Rivals was increased. My vague feeling is that it has been a process through the years, and as they are made now, my experience is that they simmer on both low and high settings. I can't really see much difference between the 2 settings.
-
Thanks so much andiesenji and David. Beautiful stuff!! I love anything made with buttermilk, so the Devil's Food Cake is looking even better now.
-
Here is a link to another wonderful sounding, and looking, Caramel Cake. This was recently published in Food and Wine, a Caramel Cake by Chef Ann Cashion. Have not tried it yet, but hope to soon. (Not sure if I will be doing the link correctly, sorry.) This version is called Revalatory Caramel Cake. http://www.foodandwine.com/recipes/revelatory-caramel-cake
-
Thanks so much for this thread and these wonderful recipes and memories. I am planning to just start at the top and work my way through, baking each of the different cakes in the months to come. RobertM, do you have a recipe that you could share for your Mom's butterscotch cake and penuche icing. Would love to see it added here. David, I also deeply crave the recipe for your devils food cake and that gorgeous, creamy frosting. Andiesenji, I know you don't have a recipe for the coconut cake with the coconut-water syrup that you mentioned earlier, but just curious, I was wondering if you recall, was it a sponge type cake or maybe a butter cake that you had when growing up? Was there grated coconut in the cake batter or was the coconut rather in the filling and on top of the cake instead?
-
My old fashioned cake is one that I actually have yet to taste. This cake was baked in 1935/36 by my dad, then a high school student and farm son, required to take 6 weeks of Home Economics classes at his small town school. Of the rest of his month and a half of domestic training, he remembers nothing except for the beautiful and delicious, triple layer, reddish chocolate cake that he baked in class, his one and only cake baking experience, at least so far that is, he will be 91 in a few months. There was no coloring used in the recipe, but rather a reaction between some of the ingredients, including cocoa, together turned the cake a reddish brown. I suppose that is why it made such an impression on him. It would be so fun to find a vintage recipe that might be similar to the one he used, but I believe, from what I have read, that the color reaction would not be possible with modern ingredients, something to do with the cocoa, I think, and possibly soda and vinegar. My dad requested this cake recently for a special occasion. It was called Mahogany Cake, as also was Genkinaonna’s grandmothers cake above. When I could not find a way to duplicate my dad's 1930’s cake, I made an adapted version of a Red Velvet Cake instead, which was quite nice. My mother had a wonderful German Chocolate Cake that our family has loved for decades. The coconut/pecan frosting has chocolate in it and is cooked in a double boiler and is different than many recipes, I think. Looking forward to trying some of the delicious cakes above.
-
A raw egg. I whisk a raw egg into the cooking liquid (half water half milk) at the start when doing rolled oats and then just cook as usual, salt of course. Not much change in the flavor of the cereal to me anyway, but more creamy and custardy to be sure. My metabolism likes the extra protein in the morning. Then to eat, I stir in a little toasted wheat germ, for a nutty flavor, some butter and and maybe a little more milk. One could really go either sweet or savory with this. Sound strange? I love it this way.
-
Your pie looks utterly gorgeous. I am really wanting to try this but I would have to compromise on several of the ingredients. I may give it a go just the same. My dad was raised an Iowa farmboy, born 1920. His grandmother made her mincemeat with the so tender meat from a hogs head that had been boiled in a great, black kettle, over an open fire, outside of the house in the farm yard. If I cannot find suet or even decent lard, what would be the next best fat to use, possibly unsalted butter, oil, other?
-
The jerky looks so delicious. I have my very first bierocks in the oven at the moment, thanks to your inspiration. My Kansas, maker-of-bierocks MIL, made them for us years ago and I have always intended to make some myself and now finally have. She simmered beer in her meat and cabbage mixture, so I did as well, and then followed the rest of your ingredient list. I had always thought that the bier in bierocks referred to beer but now I am not sure. This has been such a fun blog to read. Many thanks!
-
I'm afraid that I have no experience with duck eggs, however I discovered by accident that possibly steamed chicken eggs are easier to peel than boiled. For some reason years ago, I started putting eggs in one of those electric steamer appliances, for hard boiled. I did it for years just because I could plug it in, set a timer for 30 minutes, and walk away. They always came out perfectly. Recently, for no particular reason, I went back to boiling and kept having trouble with the peeling. I finally made the connection, and decided to revisit the steaming again to see if it would make a difference. That batch peeled like a dream.
-
I'm so glad that the recipe worked out for you. It does sound very festive and delicious with the rum.
-
I am with Mark on this. I need some rugelach baking advice? What basic type of dough it this?—See the photo links below of the famous rugulach from Marzipan Bakery, Israel. There are close-ups of both the baked and unbaked versions and I am thinking that some Egullet bakers might be able to identify the basic type of dough that these elusive little tidbits might consist of. (I tried to insert the photos but that did not work. I am new at this.) Clues: From the master baker’s own lips, the dough is very rich, takes time, not quick. (One of the photos below is of rugelach, already shaped and to be baked the next day).From others, it is described as oily, tender, gooey, under-cooked, some yeast flavor, still tastes good days later, etc., (definitely not crisp or flakey, ) From some of the photos below, it appears that they do puff up a small amount when baked, as from possibly yeast, but definitely do look much richer, and sleeker than even something like a rich challah dough, I would think. ( I am pretty sure that it is definitely not the butter/cream cheese version for rugelach that is so often used.) I do believe that I have read that they are probably brushed with a simple syrup of some kind immediately after baking. One of the photos below seems to show such but can’t be sure. What are some of the very rich, yeast type pastry doughs that would look/behave similar to the photos below? These look, to me, to be even more rich/oily than croissants but maybe that is the effect of what ever is brushed on to the rugelach after baking. The Filling—Referred to as creamy, From the master baker’s own lips—a little oil, lots of cocoa, other natural ingredients, and some coconut. (Coconut flour? with cocoa, oil, sugar, etc. to make a nice paste) As seen from the photos, the filling bubbles but stays mostly intact, not melting and running out much at all. Coconut taste or texture is not really evident according to those who have eaten them. Photos after baking http://intoisrael.files.wordpress.com/2010/01/p1000415.jpg http://www.flickr.com/photos/mostlyforfun/3295033550/ Here are some shots before baking— http://www.flickr.com/photos/mostlyforfun/3295329842/in/set-72157614100223971/ http://www.flickr.com/photos/mostlyforfun/3295329842/in/photostream/ Be glad for any input and ideas on dough type or even a good lead on a recipe. Thanks!
-
Good luck with it. Be glad to hear how things turn out. The recipe is from one of those 'collections' of favorite recipes put out by groups/organizations.
-
I have never made this before but here is a recipe from an older cookbook that I have, maybe from the 1960’s or so. It is a bit vague, especially as to the size of can for the frozen juices. I have not bought frozen OJ for ages but we always had it growing up and it seems that the cans back then were smallish, maybe 6 ounces. Hope it helps. It would be pretty easy to scale down and experiment with, to achieve the taste that you remember. Hot Drink for the Holidays Heat— 4 cups water 2 cups sugar In a bag— 3 sticks cinnamon 1 dozen whole cloves 6 allspice Heat in syrup— 1 can frozen lemonade and 3 cans of water 2 cans frozen orange juice and 3 cans of water 2 quarts of brewed tea or apple cider Serve warm.
-
Romy, Thank you for sharing this apple pie recipe. It sounds delicious and your photo is wonderful. I want to try this pie for Christmas this year, but I will need to bake it at home and then freeze it for transport. Advice anyone?--What will freezing do to the filling of the above mentioned apple pie if frozen, thawed and then warmed gently on Christmas Day? Or maybe I should put the pie together and freeze it and then bake on Christmas. That would be possible, but only if absolutely necessary. My first experience with precooking a pie filling was years ago, recipe of Mrs. Knott’s Boysenberry Pie from the Knott’s Berry Farm 1976 cookbook. In that recipe, a simple syrup is made, (of water, sugar, dash salt, bit of corn syrup and lemon juice). This syrup is then thickened with slurry of cornstarch and water, one pound of boysenberries (still frozen in the recipe but fresh I imagine would be even better) is gently stirred into the hot syrup and the fruit/syrup mixture is immediately poured into the bottom crust, top crust added and baked at 400 F for 40 minutes. Made a delicious pie with no hollow under the crust. I really prefer flour as a thickener in fruit pies, so when I make this again, I will change out the CS for flour.
-
Toliver,I have had my struggles trying to replicate my moms fudge (recipe from the 1950's) based on sketchy measurments and directions. This year, I have finally succeeded. My sister had some of this years fudge at Thanksgiving and exclaimed that it was perfect. First time ever. I will post the recipe below in case it might be of some help. This version is what I typed up for myself, so it is a little bit detailed, sorry if it sounds wordy. The beating with a hand mixer at the end incorporates some air into the fudge so the texture is nice, a little different than typical fudge, I think. This recipe is not gigantic, so comes together quickly and is a nice size to practice on. Mom's Wonderful Fudge-Simplified Half Recipe Low humidity day only—never rainy day! Chop or grind 1 cup pecans and set aside, or a little more. Line pan with heavy duty foil and rub with Pam. The pan needed is about 6 x 8 or 8 x 8 or equalivant Prepare the 2 chocolates, marshmallows and vanilla, in stainless bowl, as stated below, and set aside. Electric mixer ready and maybe a cold gel pack to be used for the beating stage. Have also ready a large spoon to scoop out the hot fudge into the prepared pan. In very clean saucepan, combine— 2 ¾ cups sugar ¾ cup half and half 1 Tablespoon, 1 teaspoon butter, ¼ teaspoon salt Bring slowly to simmer, stirring constantly till dissolved and starts to simmer. Do not rake sides of pan. When simmers, clip warmed up candy thermometer to side of pan, not touch bottom. Then using clean dry spoon, stir occasionally, till candy thermometer reaches about 230 degrees. Remove from heat and quickly pour into stainless steel bowl which has been prepared with— 2 generous cups miniature marshmallows, 5 ounces milk chocolate bars, broken up, I used-- 4.65 oz, which is 3 bars 1 cup semi sweet chocolate chips, Toll House 1 teaspoon vanilla Beat with electric mixer till all melted. Then place stainless bowl on a towel covered, cold gel pack and beat till fudge is thick, wrinkles begin to form on surface of fudge as beating and just starts to loose its gloss. Crucial timing here. Want the fudge to be getting thick as is beaten, but one must get the nuts folded in before fudge really starts to set up. Happens very quickly. Have fudge pan ready, large spoon to scoop out, and nuts at room temp. Fold in nuts, quickly. Spread in prepared pan. Let fudge cool, uncovered, at room temp. Judge the time to cut into squares. Hopefully can cut without fracturing, and pieces will hold crisp shape at room temp.
-
Well, for what its worth, after having a little time to think about it, I thought that I might amend my previous post with a little more information, in comparing the Bunn with the Capresso auto drip. We actually really liked the Bunn and may well go back to using it someday. Pertaining to the temperature of the hot water at brewing, the Bunn was actually better than the Capresso, with water even a little hotter and closer to the ideal, than the Capresso, by 1 or 2 degrees, I think. This surprised us at the time, that issue being one reason that my husband bought a Capresso when he started roasting for us at home, several years ago. Throughout our Bunn years, we would hear the water heater come on in the Bunn right after brewing a pot, but then rarely hear it again between times unless the kitchen was cold, and even then, it was not often and of short duration, so we actually really liked the keep-water-hot feature and do not think that it used all that much extra power. That being said, with the Bunn, the speed that the water passes through the grounds is pretty darn fast, 3 minutes as stated above for a full pot. For the best extraction, one would definately have to experiment a little with a finer grind than one might choose for a different brewer, in order to compensate, which we did not take the time to do yet. We will probably do just that if we need to replace the Capresso as we really do sort of miss the speed and ease of the Bunn. We went through several Bunns during the many years that we used them, and we are thinking that they lasted on average about 10 years each, trouble free. Don't know if that would still be true today.
-
I have never tried the Technivorm but we have used both a Bunn (used them for almost 3 decades) and a Capresso auto drip. After using the Capresso for some time, we became curious just how its brew would compare with our old friend, the Bunn, which brews faster as mentioned above, and I think has a rather larger thermal carafe. Bunn was then hauled in from the garage. We were really pretty stunned at the difference in the results in comparing 2 identically prepared pots. Extraction was much better in the Capresso.
-
This is such a great tip! I have now baked a mini fruitcake, checked its temp when I would have normally thought it was done, and the temp was just under 180 deg. Back in the oven to 195, cooled it, brandied it, and cut it cold the next morning to check. It was definately cooked through, sturdy but moist, and sliced well cold. All that's left is to let time and more brandy do its work.
-
Thank you andiesenji, for the advice and link. I will use the thermometer test next time for sure.
-
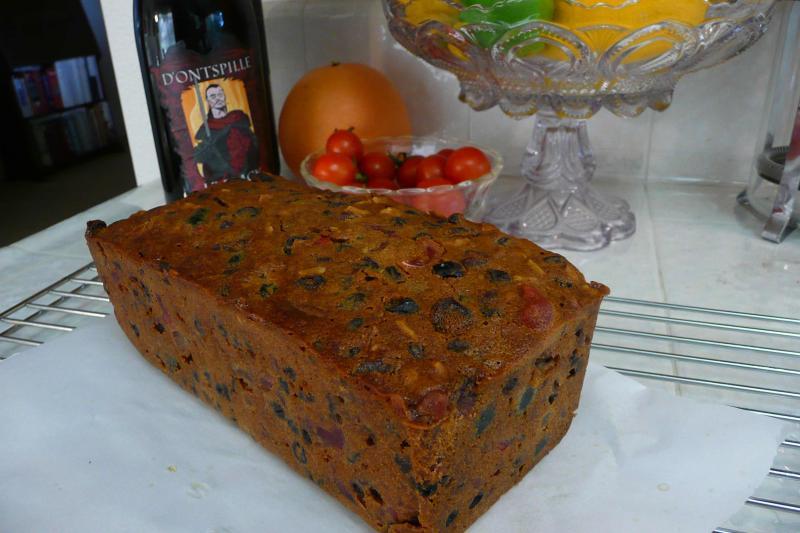
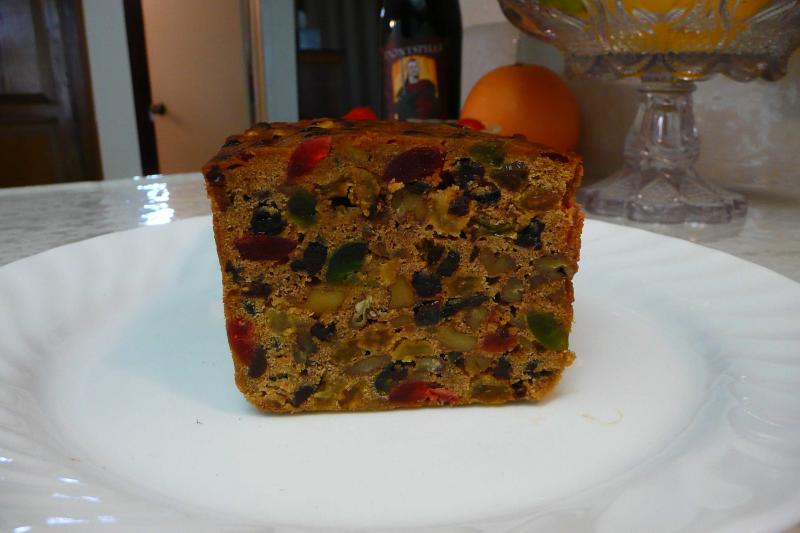
Does anyone have a tried and true method for knowing when a fruitcake is actually done. I have baked several smallish, 3.5 x 7.5" loafs, dark style, and really only one of them was baked through exactly right. There were evidently minor variations in the batter/fruit, among my various loaves, so my 300 oven for 90 minutes has not always been right. Skewer poke has not worked. My undercooked loaves look fine at first, have shallow cracks on top which later close as cooled, and loaves are cooled out of pan as soon as reasonable to remove. They don't fall or anything. They just later start to have a wet texture and don't soak up the brandy and taste a bit soggy. My one successful loaf was moist but not soggy in texture at all, and soaked up the brandy without being wet. I am holding off from aging a fruitcake, until I have more consistent results. All is not lost, my husband will eat anything so his afternoon coffee break is very festive these days and my practice fruitcake supply is staying well ahead of him. Any good tricks or ideas out there?
-
Hi, my name is Kay and I am brand new to Egullet and also to baking fruitcake. As a home baker with persistently checkered results, I really never thought that I would ever tackle the task of trying to reproduce my mother’s fruitcake of the early 60’s with really nothing to go on. Hers was dark, moist and I think she used apricot brandy, but I was a schoolgirl and not really paying attention. After enjoying this fruitcake discussion, I worked up my courage and pulled together several recipes that seemed close, with much from the Great Northern Rail recipe from David Ross. I scaled my recipe nice and small to try things out and after baking only the third small loaf, I am pretty content that I have the flavor and texture I was looking for. Thanks to everyone and to David for your contributions. So far there has been no more than 24 hours of ripening happening here. My first loaf had fruit in too large of pieces, so corrected that. The second loaf was baked in a different loaf pan and ended up being way undercooked so it had to go. Now that hopefully I have the basics under control, I will now bake several loaves, and then ripen till mid December or so. I am very excited. I will try to add a photo or 2 here if I can.