Robert Jueneman
-
Posts
411 -
Joined
-
Last visited
Content Type
Profiles
Forums
Store
Help Articles
Everything posted by Robert Jueneman
-
Isn't it interesting how different cuts of meat are or are not available in different parts of the country. I doubt that it is due to scarcity (all tri-tips going to CA), but just regional preferences. I cook a chuck steak for 24 hours at 131F, and could even go longer, I suppose. Tri-tip ought to be more tender than chuck, and so perhaps 24 hours would be too long, but on the other hand, I don't think it is going to turn into mush at that point, and there is also the convenience factor to consider.
-
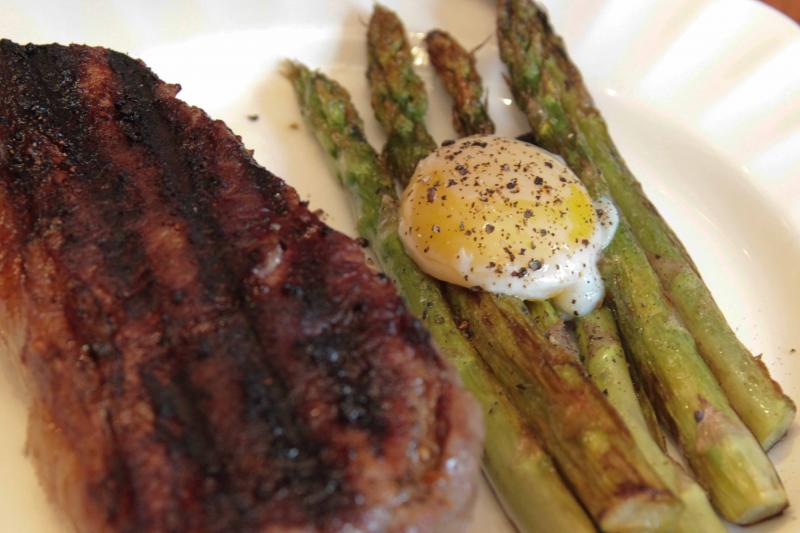
I didn't like the consistency of the whites at 75C. Maybe 85C for 3 minutes would be better? I think that depends on what you want. In my case, I wanted the yolk only, with no whites, and certainly not gibbery, snotty whites. So for me, 63C for 125 minutes was just right for the yolk, then cool, and then 3 minutes in gently boiling water (so as not to crack the egg) congealed the whites to the point where they adhered to the shell, and the yolk came out very cleanly. If you are trying to make a soft-boiled egg with whites, maybe to serve on toast, then perhaps a lower temperature would work. Fortunately, eggs are a lot less expensive than a pound of sirloin, much less a kilo of foie gras, so you can afford to experiment! Cook two or three, or maybe four, and pull them out at varying times, then try higher or lower temperatures.
-
My understanding was that transglutaminase will keep pretty well if you vacuum seal it and then freeze it, but I can't personally confirm that as yet. Because of the difficulty in vacuum sealing a powder, I think I would put it in a small Ziplock bag, squeeze as much air out as possible, and then perhaps poke a pinhole in the bag to let the air out dung the vacuum process. And I would do this with a mask and gloves on -- I don't need to seal up my lungs! I have some in the fridge that I've been meaning to subdivide, but I need to get a mask, first. Why Chef Rubber or WillPowder or even the ElBulli folks don't repackage it in small quantitates is beyond me -- seems like they could make a pretty good profit on it. I would doubt that even professional chefs would go through a kilo of the stuff before it begins to go bad.
-
My favorite trick is to seal some leftovers in my chamber vacuum, and then forget to take it out and put it in the fridge! I just threw away some tongue I had cooked sous vide. Getting older isn't helping!
-
I once had a similar experience with beef cheeks. The best guess anyone could come up with was lactic acid. I don't even know what a trotter is, so I'm not much help, but I suspect that offal is even more likely to receive poor handling that other, finer cuts, so pre-searing or briefly blanching the meat before cooking it sous vide might be a good idea. I did cook a beef tongue a couple of days, ago, following the recipe in the Big Fat Duck cookbook for Blumenthal's "Royal Beef". Brined it for 24 hours, then cooked it sous vide for 48 hours at 65C in 500 g of water. It was great -- very tender and pink.
-
I should have gone back to the book, rather than just looking at sigma's copy. Table 1 is for a cylinder of a fixed diameter but varying thickness (a round slab, in other words), while Table 2 is for something like a sausage of fixed length but different diameters. (That is the only "cylinder" table that makes any sense to me.) But comparing the times for a round slab that is 5 times the thickness, vs. a square slab that is 5 times the thickness in both directions, the times ought be approximately the same, or the round slab should take less time, so something is clearly screwed up. The errata for the 6cm column for Table 1 shows 3 h 32min for a 65C delta T. That would be 43 minutes for the 5cm to 6cm difference, as opposed to 35 minutes. Compared to the 44 minutes for the 4cm to 5 cm, that's at least in the ball park. But you are right -- someone ought to rerun the calculations again, and explain their assumptions. That ways, someone like Douglas Baldwin could rerun them as well. Right now, we have apples and oranges.
-
I wonder if they got the terms screwed up in the cylinder table. It doesn't make much sense to me to have a cylinder of a constant diameter, but varying thickness -- that's just a round slab. If however, the captions were reversed, and they were talking about a cylinder with a fixed 15cm/6 inch LENGTH, and variable DIAMETER, that would make a whole lot more sense! I know that the errata says that the 6cm column for all three pages of tables are wrong, but I don't recall seeing anything else. Nathan?
-
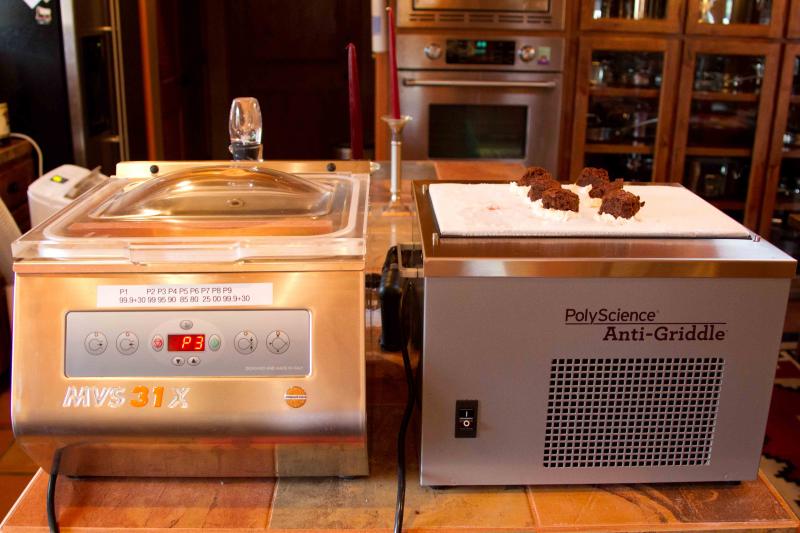
I just came across this thread, or I would have contributed earlier. After reading MC, and some extensive discussions with blackp and Douglas Baldwin, I opted for the Minipack MVS-31X. Although the Henkleman has some nice feature, including a soft-air feature, the Minipack seemed to have a better distribution and support system here in the US. I bought mine from Doug Care Equipment. Doug seems to be very knowledgable, and has lots of other stuff as well, including bags. But PolyScience and others also sell them. I ordered mine with dual 4mm seal bars, and no cut-off. But the seal bars are replaceable (although not cheap), so if you need a cut-off, you could easily switch back and forth. The Minipack allows you to program the amount of time used for the sealing. I recently bought some 7mm retort pouches in order to try "canning" in the bag using a pressure cooker, but the added thickness requires you to crank the seal time up to the maximum of 4 seconds. Those bags were 8" by 18", which is too long for my chamber (they are intended for fish fillets.) And no, they cannot be used outside the chamber vacuum -- I would have to use a FoodSaver bag with the crinkle finish for something that big. Yesterday I ordered the gas fill adapter from Doug Care. According to him, it shouldn't be too hard to upgrade the machine -- the holes are pre-drilled and the wiring just plugs in. Although blackp uses a mix of nitrogen and CO2 (which is apparently used by restaurants and bars for pressurizing beer kegs), I think I will probably opt for nitrogen only, and get a 40 cubic foot tank that can sit on the counter behind the chamber vacuum and the anti-griddle. I'm told that I need a regulator that will go down to 2 bar (30 psi) reliably. Because most tanks are pretty scuffed up, I may make some kind of a nice looking cover for them, and it might be a good idea to somehow anchor it to the counter top. The thought of dropping the unit and breaking off the regulator, and having a bottle with 2000 psi jetting around the room doesn't seem very smart! The intended use for this (other than experimentation) would be to preserve things like bread, cookies, bagels, chips, etc., without crushing them. By evacuating all of the air from the chamber, and then filling it with nitrogen before sealing, you can create a "pillow-pack" like that used for potato chips, and the lack of oxygen will retard the onset of staleness (I hope). Doug indicated that the more expensive 45X model has a soft-air feature, and he suggested that it might not be that hard to modify the air inlet port and put a constricting valve on it, so it wouldn't compress food quite so violently. When I take the covers off to add the gas fill adapter, I'll try to scope out what that would take. If anyone else has any thoughts or has done this, please post them, as the soft-air feature would certainly be nice to have.
-
Maxim, A couple of nights ago I cooked a tongue sous vide, a la Heston Blumenthal (a part of his Royal Beef recipe). Afterwards, I wanted to seal it up, and needed to chill it first. So I brought out a deep (4 qt?) All-Clad saute pan and filled it with ice cubes and a little water, added most of a box of sea salt, and put it on the Anti-Griddle. It very quickly dropped the temperature to -4C. i wanted to see whether that was due to the salt and ice cubes, so I moved it to the counter, whereupon the temperature went up to 0C. So after removing the tongue I put it back on the A-G and left it there for about 10 hours with the stainless steel lid on it. The room temperature was about 76F/24C. The next day, the salt water was frozen hard, and the temperature had dropped to -23C! There was about 2mm of frost on the A-G, and about 1 mm on the side of the pan, but none on the lid. (The humidity here is Taos is pretty low -- I'd hate to see what it would be like in St. Louis or D.C. these days!) So I turned it off, and it took nearly six hours to thaw, at which point I was able to see some of the original cylindrical "cubes." The temperature once it had reached the partially-thawed state (the triple-point) was about -2C, so obviously the brine was not nearly saturated. Next, I tried to create a Styrofoam box or lid by cutting up a bigger shipping carton, but I gave up -- too hard. Unfortunately, I didn't have a big enough box for the original pan, so I poured about half of the liquid into a smaller copper/tinned pan used for Potatoes Anna, put it on the AG, and covered it with an upside-down Styrofoam cooler ($3.99 end-of-summer sale). It just covered the griddle. Within a hour and a half, the temperature had dropped to -16C! So I think that with a little insulation, and a reasonable amount of chilling fluid, the Anti-Griddle can be very effective as a cook-chill ice bath. And if you have room in your freezer or refrigerator for a couple of big bottles of vodka or brine, so much the better. (I saw some cheap vodka at $11.95 for 1500 ml. I probably wouldn't want to drink it, except maybe in a Bloody Mary with lots of Worcestershire sauce and Tabasco, but a couple of bottles would make a pretty good chilling fluid, and it wouldn't leave salt spots everywhere.) Now, beyond that? I think that a mold is probably essential, unless you are soaking something where you actually WANT to absorb the vodka, like my experiments with watermelon "ice cubes." I recently bought, but haven't yet tried, three molds with varying sizes of half-spheres. So I don't know -- do we need popsicle molds, or something similar, which we can then immerse in either a brine or some vodka? I just can't figure out what to put IN the molds, other than perhaps a sorbet. As to the pure, clear ice cubes, I suspect that the first step is to boil the water to get rid of the dissolved air. If you do that, I think that you can make them just as easily in your freezer. As to the trade-offs, I would certainly agree that a couple of bucks worth of dry ice and a cookie sheet will do everything that an Anti Griddle will do, and probably faster and better, if less conveniently. If you want to speed it up some more, add some alcohol to chipped dry ice -- you should be able to reuse the alcohol later. Just be aware that alcohol that cold is VERY dangerous, almost as bad as liquid nitrogen -- don't spill it on anything, especially your Nike-clad feet! So yes, I would put a Thermomix, a chamber vacuum, and an immersion circulator, or at least a couple of Sous Vide Magic PID controllers and a large rice cooker, ahead of an Anti-Griddle on anyone's shopping list. A PacoJet? I'm not so sure. A rotovap or a Combi-oven, much less a centrifuge? Get thee behind me, Satan! Bob
-
Cola-Bear, you beat me to it! I was about to suggest the same thing. I first tried this technique with some mint leaves and some bourbon, and it made a great mint julep with no muddling. Then a couple of days ago I tried it with three Mexican vanilla beans from Whole Foods ($13!), which I slit lengthwise and then cut into one inch pieces. I put the pieces in an iSi GourmetWhip along with 500 ml of black Jack Daniels, and charged it with two nitrogen cream chargers. (I could have used the consumer-grade CreamWhipper, but it is harder to clean, not dishwasher safe, and the dispenser tip is a nuisance to use -- I much prefer the professional GourmetWhip , or the insulated ThermoWhip.) After an hour, I released the nitrogen straight up (not pointed down), as quickly as possible. The flavor was OK, but nothing to write home about. Then I remembered that nitrogen dissolves much better in a cold liquid, so I recharged the mixture with another two chargers, and put it in the refrigerator for 24 hours. That did the trick. This time the flavor was great, without being overwhelming. I'll probably use it in small quantitates, just to flavor a bourbon, or whenever I need some vanilla extract.
-
Maxim, you and I obviously have a lot in common besides a Thermomix, several sous vide machines, an AntiGriddle, and probably a chamber vacuum as well! And I would agree with many of the things you said. But perhaps if the two of us put our heads together, we can come up with something useful and interesting -- more than a just a lollipop or a reverse ice cream sandwich. I thought about buying some cheap vodka, but since you've already tried that, I think I'll start with a concentrated brine solution, and see if I can make something useful happen that way. But other than chilling Russian-style vodka shots, or maybe popsicles in a mold, not much is coming to mind. I guess I need to go back and read Alinea more carefully. As you observantly point out, the problem is not the surface temperature of the griddle, but rather the heat (cold) loss to the surrounding air that makes it difficult to chill anything that is more than a few millimeters thick. I have asked PolyScience about the possibility of obtaining a taller plexiglass cover, but so far they haven't responded. I guess I'll ping them again. But another inexpensive alternative might to be take an inexpensive Styrofoam cooler and cut off the bottom, so as to form a insulated "lid" that was perhaps 1 to 2 inches high. That might help to chill the air around whatever you are trying to cool, including a brine or alcohol bath in which something was submerged. The money spent is now a sunk cost. Let's see what we can do to make it more useful! Bob
-
Unfortunately, that was several months ago, and I don't really recall. I remember when I ordered the Buchner funnel that I ordered each of four different fineness filters. But when I looked around today, all I could find was the 101, the coarsest filter. I don't know what happened to the others -- probably buried somewhere on my desk. I would start with the 101, and if that isn't fine enough, move up to something finer. Bob
-
See my post in the Modernist Cuisine thread, at I don't want to have to bother with making my own pizza dough although I'm willing to concede that it might be better. But the secret to the best tasting pizza I have ever eaten was the simplest ingredients imaginable (a Boboli thin crust pizza shell), cooked in a cast iron pizza pan from Le Creuset (or you could use an upside-down cast iron skillet.) Heat the pan in oven to 550F for 30 minutes, and then turn on the Broiler on High for about 10 minutes before slipping the pizza in. In my case, according to my Fluke IR thermometer, the pan reached 640F, but that was just right for a perfect crust, while the broiler cooked the toppings perfectly. A second attempt, using my gas grill at 700F didn't work nearly as well -- the pizza crust was scorched before the toppings were ready. Next week, I'll do some more exact timings, and take some pictures. Bob
-
Sous Vide Pizza?! That got your attention, didn't it! This week I've tried a couple of variations on pizza a la MC, and per "Cooking for Geeks." The first attempt was the certainly the best pizza i have ever had, either at home or in a restaurant, but the second attempt was nearly a disaster. Although there is another thread on low-effort, low-mess pizza, the entire content of the thread seems to be focussed on how to make your own pizza dough. I wanted some thing much simpler. So I started with a run-of-the-mill Boboli thin crust pizza shell, which appears to have been par baked. I added a package of stock Boboli pizza sauce, some grocery-store shredded mozzarella, and the pre-sliced, too-thin pepperoni that was all that I could find. I did sprinkle some raw onion slices around on it . So far, it sounds like a pretty mediocre meal, right? Wrong! So here comes the magic. Following MC, I put my Le Creuset cast-iron pizza pan in the oven, and cranked it up to the maximum of 550F for about 30 minutes or so. Then I turned the oven to Broiler setting, on High, while I spread the toppings on the pizza shell. After about 10 minutes (I didn't time it exactly, but I will the next time) I slid the pizza onto the cast-iron pan, and watched it carefully. After about four to five minutes(?) it looked ready, so I pulled it out. The crust had puffed up gloriously, especially for a thin crust pizza, and was light, airy, and a little crackly -- perfect. And the toppings were nicely bubbling, the onions were done, and so was the pepperoni slices, though they were still too thin. Despite the imprecations of impending disaster from SWMBO, we both agreed that it was the best pizza we had ever eaten. The next day, my Fluke 561 IR thermometer arrived, so I fired up the oven again the same way, to see what temperature it reached -- 640F. Then last night, I decided to try it again, but this time using my gas BBQ grill. And instead of using Boboli sauce, I used some Paul Newman "Sockaroni" marinara sauce, some hand-cut Dietz and Watson pepperoni, and added a half an onion that I had sliced and cooked sous vide with butter for 45 minutes. (See, sous vide pizza!) With all four burners fired up and the lid closed, the temperature of the Le Creuset pan reached 700F. However, despite the intense heat, the toppings were barely ready after eight minutes, and by then the pizza shell was pretty scorched. it was still edible, but barely, and it took 15 minute to scrub the carbonized debris off the pan once it cooled down again. So the lesson to be learned is that it takes more than just high heat -- it takes radiant heat, from the broiler, in order to cook the toppings properly while not scorching the pizza shell. If someone has a wood fired brick oven pizza and they are very happy with the results it provides, I'd be very curious to know what the temperature of the brick floor is, vs. the temperature of the air, vs. the temperature of the top of the oven that is presumably radiating downwards. Next week I'll do this again, and also take some pictures and some better timings. Bob
-
"Modernist Cuisine" by Myhrvold, Young & Bilet (Part 3)
Robert Jueneman replied to a topic in Cookbooks & References
I have the first printing, originally ordered June 25, 2010! And I've now gone through a pad and a half of Post-It notes, updating the book with the errata for Volumes 1 - 5, and about to start on the KM. I only bothered to note the serious errors -- the grammatical and spelling errors would have taken two or perhaps three pads of notes. I do a lot of technical writing myself, and it is easy to understand how these kinds of errors creep in, sometimes caused by spell checkers automatically "correcting" my dyslexic fingers -- "yoke" for "yolk," for example. However, it is much harder to understand why a decent editor or technical writer wouldn't have caught most of these before they went to press. Similarly, the stupid errors in conversion between Celsius and Fahrenheit, and the scaling percentages, certainly should have been caught. A college freshman could have done it. I am seriously thinking about buying a second printing, just to clean up these mistakes, and trying to sell the first printing to a collector. Unfortunately, even that printing still doesn't contain a useful index to the Kitchen Manual -- you have to get it on-line. Sigh. Maybe in the third printing? Of course, the most egregious error in the entire set is the claim that when cooking eggs, only temperature, and not time, is all that matters. That wasn't a typo, but a fundamental lack of understanding and experimentation, as we now know from the "Culinary Biophysics: On the nature of the 6XC Egg," article by César Vega & Ruben Mercadé-Prieto. That hasn't even made it onto the errata list yet, but it certainly should. There is no question that the MC set is an awesome contribution, eclipsing Escoffier, Julia Child, and most others, and extending our knowledge into areas pioneered by Ferran Adria, Heston Blumenthal, and Grant Achatz. But cleaning up the errors is still a work in progress. -
iSi has a pretty good cookbook, with lots of interesting recipes. I recommend it.
-
Been there, done that, got the T-shirt. I started with a simple faucet aspirator, an Erlenmeyer flask with a vacuum port, and Buchner funnel. But it was using may too much water for the purpose, and my attempt to divert some of it to water the back yard reduced the pressure too much. So I bought a cheap ($40) pump of the type used to recirculate water in the "swamp cooler" air conditioners popular here in the dry Southwest, and put it in a big plastic tub along with some reducing bushings. So the water goes round and around, instead of going down the drain. If you can't find a pump like that up in the frozen northland, you could probably use a sump pump. It works, but not very quickly. I was trying to extract the pure essence of watermelon after getting nearly a liter of juice from my juicer, but the filter kept getting clogged, and I finally gave up. Maybe the vacuum just isn't strong enough -- I don't know. I need to try it again sometime, perhaps for something more serious.
-
This was certainly an entertaining post, but hardly the last word on how to cook an egg. For that, you need to understand some recent research that discusses the effect that both temperature and time have on an egg, and turns conventional thinking upside down. See http://blog.khymos.org/2011/04/23/perfect-egg-yolks-part-2/. Now, at last, we have a means of controlling the consistency of the egg yolk through a very simple means. Simply cook the eggs in a temperature-controlled water bath for the desired time and temperature, using something like the Sous Vide Magic controlling a rice cooker filled with water, or a high-end immersion circulator, or even a Styrofoam cooler and tea pot of hot water, and then either serve the egg immediately or chill it for future use. For example, picking 63°C for a reasonable trade-off between the precision of the graph and the cooking time, we can see that 50 minutes would yield a consistency of sweetened condensed milk, 80 minutes that of honey, 125 minutes that of cookie icing, and approximately 160 minutes that of Marmite. If those times are too long for your taste, pick a slightly higher temperature and adjust accordingly. OK, that gives us whatever consistency we want in terms of the yolk. But what about those snotty whites? Well, here we can go back to a much more basic cooking technique, simply boiling the eggs for a short period of time in order to set the white to the desired consistency, but not so long as to heat up the yolk; then chilling them back to room temperature before cooking the egg yolks to the desired consistency. The outer egg white (the thin albumin) that is in contact with the shell will set, while the inner white (the thicker albumin) that surrounds the yolk will not, and neither will the yolk itself. But when using this technique, it is important to cool the egg quickly after boiling it, so that the hot temperature does not diffuse to the center of the egg. According to several reports, the boiling step to set the egg white can be done either before or after cooking the egg yolk with equivalent results, so long as the egg is chilled back down to room temperature before cooking the yolk. But it should be noted that it is the interior of the yolk that needs to be chilled, and not just the whites, so the water should be cold, and the egg left in it for perhaps 30 minutes before cooking the yolk. In my experiments, pre-boiling the egg for two minutes left the white a little runnier than I would like for most applications, but three minutes was about right. (I should note that I live in Taos, NM at an altitude of 7000 ft or 2133 meters, where the boiling point of water is 99.9°C /199.3°F, neglecting barometric pressure fluctuations. If you are at sea level, a little less than three minutes might be required for the same results.) The eggs were pre-boiled for two and three minutes, respectively, directly from the fridge, then allowed to cool down to room temperature in a water bath. Then they were cooked in a precision water bath at 63°C/145°F for 60 minutes, 75 minutes, and 125 minutes, using two sous vide machines. Of the three different times, 63C for 125 minutes following a 3-minute pre-boil was clearly the best, at least from the standpoint of standing alone and looking “sexy.” A thin lining (1 or 2 mm) of egg white was left inside the shell, but the yolk with some white set around it separated cleanly. When the yolk was broken with a fork, the contents were somewhere between the consistency of honey and cookie icing — just like I wanted for my purposes, e.g., for serving the yolk on grilled asparagus, but maybe too thick for a poached egg on toast. Finally, a word of caution if you are using an immersion circulator, or a Fresh Meals Magic with a bubbler, or any other sous vide appliance with a built-in circulator. There is a non-trivial risk that an egg could crack during the cooking process, and especially so if they are bouncing around in the tank. If that happens, you are going to have a messy cleanup to deal with — particularly if any egg white coagulates inside the circulator. For that reason, I would recommend cooking the eggs in a Ziploc bag that is filled with hot water from the thermal bath to surround the eggs. You may want to suspend the bag from a skewer to facilitate filling it, as well as providing a means of fast and easy retrieval. The water in the bag will quickly equilibrate with the water in the sous vide container, but if an egg cracks or breaks it will be confined to the bag.

-
I completely agree. I've written up a six page blog, complete with pictures, showing the results with both a 2 minute and 3 minute pre-boil step, followed by chilling for 30 minutes to room temperature, then cooking for 60, 75, and 125 minutes at 63C. The blog has been posted on the Fresh Meals Solutions site (the makers of the Sous Vide Magic), but their new web site is still under construction, perhaps for the next week or so. Check www.freshmealssolutions.com periodically, and I'll post a note once it is available. But the 3 minute pre-boil followed by 125 minute yolk cooking was fantastic. The egg yolk held together very nicely, there was very little egg white around it (there was a thin coating that stuck to the egg shell which I didn't bother to scrape out, and the yolk itself had a consistency of honey -- not too runny, and not too firm. Perfect!

-
I'd vote for any wheat beer from Germany (e.g., Weihenstaphaner, Paulaner, Franziskaner), or any American wheat beer that bills itself as a hefeweizen/hefeweiss (tons of these, especially this time of year; Sierra Nevada's Kellerweiss should be readily available and relatively inexpensive). I'd avoid witbiers (e.g., Hoegarden, Allagash White, Blue Moon) on the first go, as they tend to have some tartness and added spices that may not fit in as well. I'd also steer clear of darker (dunkel) wheat beers simply for aesthetic reasons. TL;DR Get a German-style hefeweiss, or German or American origin. Regrettably, Taos is not the capital of auslander beer, except maybe for Tecate. All that i was able to find in two grocery stores was Blue Moon and Hoegarden, neither of which I found particularly enticing for drinking purposes. For reasons that are shameful and I won't go into, I need to repeat the experiment, but since the recipe only calls for 75ml of beer, I doubt that it make all that much difference. And despite the purists responses, I might go for Guinness after all, as a personal preference. TBD. Thanks, everybody!
-
Although I've skimmed all 43 pages of this thread, including a lot of the early ones about the Mac & Cheese, I don't recall any discussion of what "wheat beer" is best for the recipe. If I didn't have to go to the grocery store to get some aged Gouda, I would probably try my favorite, Guinness, but I might as well do it "right" the first time. What do people recommend?
-
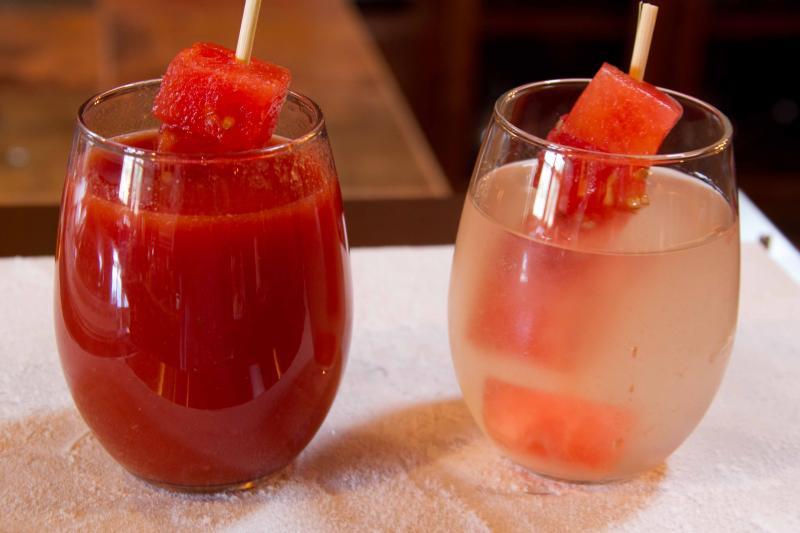
I haven't seen much, or in fact ANY discussion of the PolyScience Anti-Griddle and DIY alternatives on eGullet, unless I've missed some somewhere. So it seems appropriate to start a new thread, and hope that others will chime in with their observations and recipes. In the interest of full disclosure, I am yet another Chief Scientist/Amateur Chef. And I've only had my Anti-Griddle for two days now, so I'm hardly an expert yet. And finally, I don't work for or have any other connection with PolyScience, other than having bought a number of their products. But to kick things off, let me share with you what I do know, both from my still limited personal experience, and from watching the various videos on the PolyScience web site. First of all, cooling/chilling/freezing brings another dimension to our modern cuisine (and perhaps to drink-making), just as sous vide, foams, emulsions, and spherification has to more traditional cooking. Just to put things in perspective, most home or commercial freezers won't go much below -5F/-20C. The AntiGriddle operates at a nominal -30F/-34C. The DIY approach to the AntiGriddle, which involves a cookie sheet sitting on a block of dry ice, can approach temperatures of −78.5 °C (−109.3 °F). By contrast, liquid nitrogen boils at -196C; (-321°F). As in everything else, there is a cost/convenience tradeoff. Dry ice is available in many grocery stores for around $2 a pound plus the inconvenience of a trip to the store, whereas the PolyScience AntiGriddle costs $1200 plus shipping, but is ready within ten minutes after you switch it on. Liquid nitrogen, the darling of Ferran Adria and widely discussed in Nathan Myhrvold's Modernist Cuisine, requires a special Dewar container that costs on the order of $600 to $1400, plus liquid withdrawal or other devices that typically add another $700 or so to the overall cost, and then trying to convince an industrial gas supplier to make a stop at your home or restaurant. Finally, although you certainly don't want to lick the surface of the Anti-Griddle with your tongue, it is generally safe, while both dry ice and particularly liquid nitrogen can actually kill you (and whoever tries to rescue you), if it spills and stays in a concentrated amount near the floor, in addition to the risk of frost-bite. PolyScience recommends spraying the surface of the Anti-Griddle with olive oil as a release agent, and using nonmetallic tools to remove or flip the frozen items. So far, I haven't found either of those to be necessary. Here in Taos, NM, the humidity is pretty low most of the time. Nonetheless, the Anti-Griddle soon becomes coated with a thin layer of frost, and I've been able to slip a thin stainless-steel spatula under whatever I was chilling without any difficulty. (This frost effect seems to be considerably reduced if you leave the lid on prior to actually putting something on the Anti-Griddle.) Others have recommended covering the Anti-Griddle with a sheet of heavy-duty aluminum foil, to facilitate removing items. I could see how that might help if you were to make a large design and wanted to remove it -- you could remove the foil and then fold it away from the item to release it, but so far I haven't needed to do that. SOME RECIPES AND OTHER IDEAS: I've tried the Blue Cheese Foam Sequence with the port wine gell at http://www.molecularrecipes.com/anti-griddle-2/blue-cheese-foam-sequence-anti-griddle-recipe/. The first time I tried it, I used the DIY technique, which worked reasonably well. With the Anti-Griddle last night, it of course took longer for the blue cheese foam to solidify, and it thawed a bit faster than I might have liked. I probably should have put the serving plates in the freezer first. I also tried a funky drink idea I had. I sliced a seedless watermelon into 3/4" cubes, then put both the cubes and enough Bloody Mary mix to cover them in a bag and evacuated them in my chamber vacuum to infuse the Bloody Mary mix into the watermelon, effectively replacing the watermelon test. Then I removed the cubes, skewered several of them on a half of a long skewer (I perhaps could have used a toothpick), then put them on the AntiGriddle to freeze, before adding them to my Bloody Mary in lieu of a celery stick. My wife doesn't like tomato juice, so I did the same thing with just vodka, and made a watermelon martini. She loved it. For dessert, I tried using some small, store-bought chocolate brownies, and enrobing them in whipped cream dispensed onto the Anti-Griddle from an iSi CreamWhip. Let one dollop of cream smi-harden, put the brownie on it, let it harden some more, then add shipped cream on top and flip it over. Sort of an inside-out ice cream sandwich. Finally, I have an idea for sous vide cook/chill, but I haven't tried it yet. Fill a small roasting pan with a concentrated salt water brine which you keep in milk jug in the freezer (it won't freeze), and then put the roasting pan on the AntiGriddle to chill further. Now you can add whatever you cooked sous vide to the brine bath, and it should cool much faster than in an ordinary ice bath. You could also use ethylene glycol (antifreeze) or alcohol (e.g., Everclear, or even vodka), with equally good effect, although I'm not sure I want antifreeze in one of my roasting pans, and that much alcohol might be a fire hazard if it spilled.

-
Nathan, based on the date of that post, I assume that you have the older TM21 model -- the one that is pictured in MC. See for my calibration run of the TM31. It still isn't great, but this isn't sous vide -- what level of accuracy is really required for creme anglais, for example?
-
I've had the Thermomix TM31 for a couple of weeks now, and love it. I had to order it from Canada, and the price was around $1550, including shipping and customers duties and the Australian cookbook, but I think it is worth it. I don't do much in the way of pastry or baking, but so far, I've made the vegetable stock concentrate (very salty), mushroom risotto, beef stroganoff, hollandaise, and the meatloaf with mushroom sauce. The later was fantastic -- the meatloaf essentially steam cooked in the Varoma, with the mushroom sauce bubbling up underneath. I probably won't sell my Cuisienart -- the TMX won't cut french fries or julienne vegetables. LIkewise, I'll still keep my KitchenAid, in part for some of the accessories like the meat grinder and pasta maker. And I'll still use my VitaMix, in part because I like to be able to see what is going on while it's blending. But for making soups and other dishes that normally require constant stirring while heating, the Thermomix is certainly where it's at. I calibrated the temperature setting as best I could, but here in Taos at 7000 ft. there is no way it is every going to hit 100C, at least with water. I drilled a small hole in the disk of the TM31 spatula, so that I could insert a thermometer probe (A Sur le Table thermometer I had previous calibrated to within 0.1F with my reference grade thermometer.) According to the instructions, when the indicator light stops flashing, the TMX is up to temperature. Not quite so! What I found was that the light would turn solid at roughly 3C lower than called for, and then continue to climb until it was 3 to 4C higher than called for. Because I was fixing lunch at the time, I didn't always notice exactly when the light turned solid, hence some ambiguity at the lower end. Indicated Range 37 -> 33.9 50 -> 47.0-53.1 60 -> 58.6-63.0 70 -> ??-74.3 80 -> 80.0-84.1 90 -> ??-92.4 100 -> 92.7-93.1 (holding spatula to prevent steam from escaping) (The boiling point of water at 7000ft is 92.9C) I could repeat these measurements using oil for the higher temperatures, if anyone is sufficiently interested. I"m used to doing sous vide cooking with 0.1F accuracy and stability, and so this kind of variability came as rather a shock to me. On the other hand, they are having to measure the temperature of the container, as opposed to having a probe within the liquid itself. Nonetheless, for the cost of the TMX, I would have thought that they could have used a PID controller that would be much more accurate, and could be tuned to eliminate the overshoot. I guess my next task will be to calibrate the scale against several other scales I own, to see what kind of accuracy it has. One interesting OZ v. US terminology problem was that the cookbook repeatedly refers to "capsicum". I assume those are ordinary red or green bell peppers. Can someone "down under" confirm this? Bob
-
Yesterday afternoon my highly-anticipated PolyScience Anti-Griddle arrived. Fortunately or unfortunately, we attended a cooking class at Sipapu Ski Lodge outside of Taos that evening, so I haven't yet played with it much, except to check that yes indeed, it does go down to at least -29F. I have seen some interesting recipes elsewhere, such as the Anti-Griddle Blue Cheese Foam (http://www.molecularrecipes.com/anti-griddle-2/blue-cheese-foam-sequence-anti-griddle-recipe/). I tried that one with the dry ice and cookie sheet technique, and am looking forward to doing it "right" tonight, but I thought I'd look around on eGullet, as well as in MC, to see what other ideas were lying around. Surprise! The Anti-Griddle isn't even listed in the MC Index, although there is a photo of one in their lab/kitchen. So maybe it's no surprise that no one has mentioned one in this thread. Am I missing something? Is there another forum or thread that discusses it somewhere that I've overlooked? (Same question re the Thermomix, BTW.) If not, should I start a new thread, presumably in the Cooking forum, perhaps with a Modernist tag? Chris? Bob