paulraphael
-
Posts
5,173 -
Joined
-
Last visited
Content Type
Profiles
Forums
Store
Help Articles
Everything posted by paulraphael
-
The new 7qt KA is probably the burliest mixer they've ever made. It has a motor and gear box design that's closer to the non-KA hobarts in many ways. It uses electronic speed control like the other KA mixers, but is otherwise a completely new design. People who had trouble with big batches of low-hydration doughs with the old KAs have an easy time with this one. I've had great luck with my refurbished pro-600 over the last 5 years. I use it for big batches of cookie dough, medium sized batches of bread and pizza dough (high-hydration ... nothing terribly difficult), ice cream churning and meat grinding. It's loud, and the guts are not especially high precision, but it's been completely reliable. I'd recommend the 7qt to anyone doing lots of stiff bread dough.
-
I'm guessing a 3/8" thick steel pan would be more efficient (in terms of energy cost and preheat time) unless you're planning to cook a lot of pizzas back to back.
-
I looked into doing this, thinking the modernist steel looked a bit pricey. All the quotes I found from metal fabricators were much more expensive. I looked into 1/4" steel and 1/4 to 3/8" aluminum. I didn't look into stainless due to its high price and relatively poor conductivity (although it would still do better than the stone I have now).
-
I think the most critical issue in roasting a chicken is getting the temperatures right on both the white and dark meat. It's hard ... the white meat cooks lower but is thinner and more directly exposed to the heat. Smart spit roasters back in the day would selectively bard the bird. They'd cover the torso with strips of fat for part of the cooking, but leave the legs exposed. Aside from cooking bird parts separately, this still works better than anything I've tried. Instead of fat you can just use foil. I haven't found improvements with chickens from long cooking, so I roast hot. YMMV. At any rate, I cover the breasts with a doubled layer of foil for the first part of the cooking, and then uncover. It browns quickly. My ideal would be to get the breasts to 60°C and the thighs to 63°C. I have yet to achieve this on a perfectly browned bird, but I come pretty close. Usually after rising the meat is a few degrees higher than this in places. Not ideal, but still a lot juicier than I've had from other whole-bird techniques.
-

[Modernist Cuisine] Sous vide tenderizing stage and enzymatic activity
paulraphael replied to a topic in Cooking
Ok, I dug a little deeper. This study finds that calpains and cathespins break down proteins into smaller peptides. This increases tenderness and "mildness" but does not increase the beefy flavors we associate with aging. However, these new peptides are then broken down into smaller free amino acids by amino peptidases, in particular ones categorized as C, H, and P. These free amino acids are the flavor bombs. Another study finds alanyl and arginyl aminopeptidases (RAP) to be important flavor compound creators in dry-cured meats. I don't know if these enzymes are relevant or not to dry aging (or sous-vide "warm aging"). This study on dry cured ham (abstract only) found a correlation between bitterness and cathespin levels (bitterness also correlated with a lot of other factors). Lower bitterness levels correlated with higher amino peptidase levels. This study (based in part on Baldwin's work) sites a food science book that found prolonged cooking at 49°C to improve tenderness significantly, but that it introduces "somewhat undesirable flavors." This would be consistent with the study above. By 55°C, many of the enzymes are inactive, but collagenase keeps doing its thing. Here's what I've found, mostly by attempting to interpret biology papers that were tackling entirely unrelated questions (translation: don't trust this). Aminopeptidases C, H, and P C: maximum 40°C? H: maximum 60-70°C? P: maximum 80°C? alanyl and arginyl aminopeptidases (RAP) stable up to 45°C? most active -1°C to 19°C? Thoughts so far: -prolonged "warm aging" at 40°C may be a better bet than 50°C, because of the off-flavors reported by a few sources, and because it's in the range where more of the aminopeptides are active. Is there a biologist in the house who can comment? -
[Modernist Cuisine] Sous vide tenderizing stage and enzymatic activity
paulraphael replied to a topic in Cooking
Has anyone experimented much with this? I'm curious about the effect on flavors. I've been trying to research effects of enzymatic activity on dry aging flavor and have found surprisingly little ... most of the literature is about texture. One source I found suggests that enzyme activity at 60°C can actually encourage off-flavors in beef. But I don't know anything about the circumstances or methodology of the study. -
[Modernist Cuisine] Sous vide tenderizing stage and enzymatic activity
paulraphael replied to a topic in Cooking
The book doesn't mention anything about times in the 40-50C range. Any guidelines? Are any of the enzymes active in this range responsible for aged meat flavors? -
I have some of the chicago metalic sheet pans (aluminized steel), some heavy plain aluminum ones (Lincoln and others), and some lighter ones from the restaurant store (myster brands). They are very slightly different from each other in practice. The lightweight generic ones feel flmsiest and are more likely to warp, but cook the same as the heavy aluminum pans. The chicago pans are slightly less conductive than the aluminum pans, which means that all else being equal, they'll brown things on the bottom just a bit less. The difference is small, and whether it's a plus or a minus depends entirely on what you're doing. 90% of the time I use them all completely interchangeably. Which is why I'm hesitant to spend much on sheet pans. If I had to pick just one, it would be the Lincoln Wearevers. I forget the gauge, but it's the heaviest I've seen. You can definitely find them at online restaurant stores. The 1/4 sheet size is one of my favorite inventions. I have a few; they haven't gone in the oven, but are great for prep, chilling things in the fridge or freezer, etc..
-
The first things that come to mind are a chili, or Indian dishes based on lentils or chickpeas. A chana masala would be cheap, vegetarian, easy to make in giant pots, and packed with flavor. Bulk dessert is a bit of a challenge. Maybe a giant cobbler?
-
Ha. I didn't realize it could be set that low.
-
My starting point with herbal flavors is 7g herbs /L. I use leaves and stems, if the stems are flavorful. I assume with lilacs you'd use petals? Coarsely cut, and infuse first into the milk + trimoline. This helps disolve the syrup, and aromatic oils are more soluble in a sugar syrup than in plain water or a fatty emulsion.
-
Copper vs Stainless Steel Clad Cookware: Is it worth the $$$?
paulraphael replied to a topic in Kitchen Consumer
It's clear that a lot of us love our heavy coppy copper pans ... there's no arguing with that. The question I'm considering is if I'd recommend them to someone who'd tohave to buy them new. And I can only think of a couple of circumstances where I would. This is because the benefits are not going to make a major, quantifiable difference, and the costs are huge. I'd recommend them to someone with money to burn who just loves them for whatever reason. Or to someone serious about saucemaking. For this I'd recommend a single slope-sided or curve-sided saucepan, 1.5 to 2 liters. For just about everyone else, I'd suggest good cookware that costs half as much and that will do induction. Use the savings for an immersion circulator or two, a pressure cooker, and other things that will actually give new powers in the kitchen. -
This would be a welcome feature for a firmware update for version 1. They'd just need to set it so the circulator starts when you turn the unit on.
-
My first round of experiments with water and boxed stock were promising. Starting with stock enriched with 2% gelatin, I got a good, creamy texture with 0.2% lambda carrageenen (TIC gums Ticacell 750) and 0.1% xanthan gum (Bob's Red Mill from supermarket). These are cold-soluble with a stick blender, and have good clarity and excellent flavor release. And they're heat stable. The xanthan gives a bit of that jiggly cling. I may try dropping it down to 0.07%, but will have to try in a real jus / coulis first. For last-minute sauce thickening, I tried whisking in a 1.5 : 1 mix of arrowroot and lambda carrageenan. In the past I've used 5 :1 arrowroot and xanthan. The carrageenan gives a slightly nicer texture, but is harder to get into solution without lumps It's synergistic with starches, so you can use less starch. The downside is there's less starch to keep the gum from clumping. The upside is better flavor release. For the first time ever I sampled pure water thickened with these colloids. While I wasn't tempted to go back for seconds, I was pleased that there were no bad flavors, and barely any detectable flavor at all.
-
I've done that! works great for a couple of plates but not burly enough if you have more than a few guests. Once when I had a convection/toaster oven with a defective thermostat, I hung onto it after the replacement showed up, just so I could use it as a plate warmer at a big dinner. It's all it was good for it.
-
David, can you tell us what ratios and times/temps you were using?
-
Also regarding burgers: SV cooking time is around a half hour and would progress shortly after the patties are made. So cooking time would be longer than with conventional methods (although still relatively short). But total time between salting and the end of cooking would be lower than what I've done in the past. In other words, the only change I see that could increase curing is time spent while salted at temperatures approaching the cooked state.
-
Interesting, Enrique. I've generally stopped salting before SV cooking. I've seen evidence of cured flavors/textures/colors on long-cooked red meat that was pre-salted. And with a lot of things I like to use the bag juices in a sauce ... and they can become way too salty, especially if reduced. I may have to do a test on burgers. Salting before grinding is such a great convenience with ground meat. I've worked out salt levels pretty precisely by weight, and pre-salting is the easiest way to get decently even distribution. FWIW, I salt burgers at 0.7%, a bit less than the range you mentioned. Possibly this makes the curing effects less relevant.
-
Not usually. I generally make patties (loosely, by hand) and refrigerate. If they're for grilling, several hours might go by. For sous-vide I'll probably cook much sooner after grinding.
-
Burgers: the MC crew says that salting meat before grinding leaches out myocin and gives rubbery burgers. I have always salted before grinding, which allows me to season by weight and use the grinder to help mix it in. It allows me to not mix anything into the ground meat, which would definitely mess with the texture. My burgers have never been close to rubbery. Could this be a sous-vide phenomenon? could the myosin become a problem with the longer cooking time? Anyone tried? I'm inclined to think this advice was not based on experimental evidence, but would rather not be the guinee pig.
-
With vegetables, cooking is a matter of breaking down cell walls, which is roughly analogous to breaking down collagen in meat. We're not going for a level of temperature-determined doneness, but for a temperature/time-determined texture. Which means timing is important in a way that it's not with most SV proteins. I've only done a few vegetable experiments. So far I haven't achieved the carrot nirvana that some people talk about. I've had great asparagus, though. SV has been brilliant for in-season, fat stalks of it. Just prep them well (including peeling the bottom halves) and bag them with some salt and pepper and olive oil (or whatever) ... 85C for 15 minutes. Really beautiful flavor and texture. Not a total replacement for roasted asparagus (which I still prefer if the asparagus is less than great). But much prettier, and much more pure asparagus flavor. Next up is mashed potatoes ... the circulator is the perfect tool for retrograding the starch for a smooth puree.
-
The final price is low enough that I'm in no hurry. After they work out the kinks I'll decide if I need a #2 robot.
-
By "admit mistakes" I assume you mean "brag about awesome adventures."
-
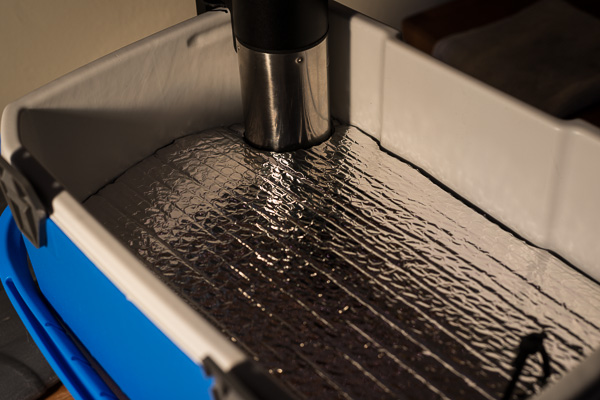
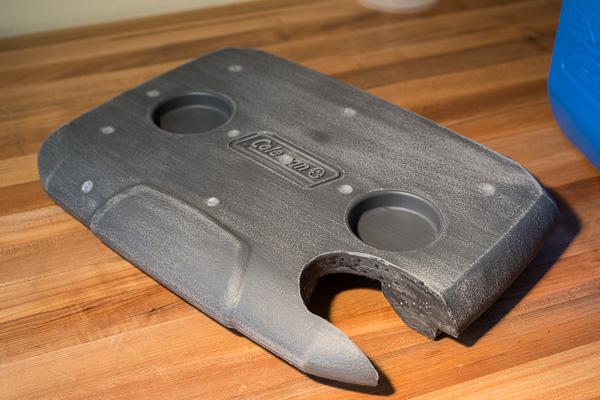
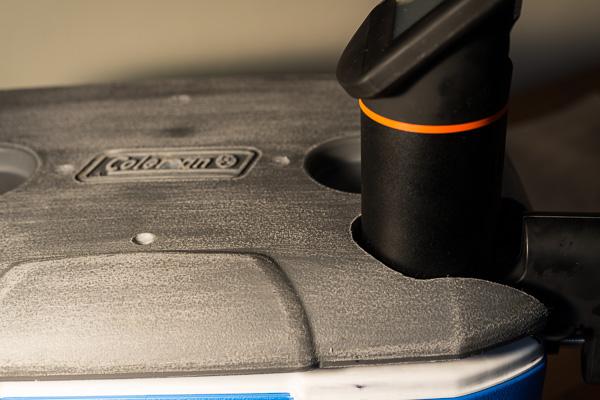
Fool's erand update: after a long time and plenty of toxic chemical exposure, this unnecessary (but pretty cool, if I may say so) monster is ready for some food. I think I'll enjoy using it, but must recommend against anyone doing it the same way. There's likely not enough to be gained (as some of you have suggested). And spray foam is nasty stuff. Here's the deal: spray foam requires exposure to air in order to foam up and cure. Once cured, it's relatively inert and stable polyurethane. But if you spray it into an enclosed piece of plastic, like a cooler lid, it will seal up its own hole, starving itself of air, and will remain liquid. This liquid is made largely of isocyanates, which you don't want in your lungs, on your skin, or anywhere near your sous-vide short ribs. Bad news if it ever finds a way out. I politely declined the advice of the chemist at the help desk (Get. That. Thing. Out. Of. Your. House.) and salvaged the lid by drilling many ventilation holes, and keeping them clear until all the liquid foamed up and cured. After an extra week, for good measure, I sanded the thing smooth, covered the circulator cutout with epoxy, and sealed the vent holes with silicone. Both the epoxy and the silicone are impervious to water and to the temperatures of any wet cooking method. It wouldn't be a terrible idea to use spray foam just to seal around the circulator cutout, to keep water out of the lid and to slightly improve your feng-shui. For this I'd recommend Dow Corning's Big Gap Filler. I first tried a low volume foam, which was not up to the task. you don't want low volume; you want low pressure. The Dow product will fill the 1+ inch of the lid and will cure better. If you just seal this small area, you could probably vent it with just a couple more holes and be done with the project quickly. Work outside, and leave the lid outside until it's fully cured. Helpfuly, nothing sticks very tenaciously to the HDPE of the cooler, so it's easy to clean off any spilled gunk. I also cut a piece of my reflectix to fit, to reduce evaporative losses even more, and in case there's a need to cook with the lid off for convenience. Note the loop of cord in the reflectix. This makes it easier to pull out of the way, especially if the bath is on the hot side (veggies, etc.)


-
Looks great. i love the bluetooth control. Looking forward to a more in-depth review of the software, including its customizeability, etc.