

culinary bear
-
Posts
857 -
Joined
-
Last visited
Content Type
Profiles
Forums
Store
Help Articles
Posts posted by culinary bear
-
-
commonly heard in the kitchen :
waiter - "compliments on table 52"
chef - "compliments don't buy beer".
McDonalds don't permit tipping on the basis that "tips destroy teamwork".
3910 hits may seem a lot, but that must represent a tiny minority of food establishments on the internet.
I'm not saying it can't be done, but that it's very much the exception rather than the rule - I'm sure a great many customers prefer to tip. Perhaps it's a class thing?
There's a great section in Andre Simon's Weekend Gourmet Book (published just after WW2) dealing with tipping as a desirable state of affairs. I shall go and find it.
Drinks sent into the kitchen probably help as well...Most chefs I know, in addition to tipping the waiting staff when they eat out, will send money specifically into the kitchen for a round of drinks for the kitchen staff... especially if they have any sort of acquaintance with anyone in the kitchen.
-
In many places in the UK leaving a tip is seen as low class, and the US tip culture is alien, strange and demeaning.
It means the staff is not being paid properly, and reduced to begging.
A reward for good service, or a complaint about bad service should be a written letter to the establishment. It is a management function to ensure the guests get good service, and motivate the staff, not the guest's duty. If they need to charge more for the meal in order to do this, then they should, rather than publish fake prices, where the "normal" price is 15% more...
Besides a gentleperson would not carry the requisite cash; the cost of their meal would be charged to their account and settled quarterly.
I can see your tongue residing in your cheek from here. :)
Hats off to such an establishment that puts their prices up by 15% and advertises the fact that the difference goes to the waiting staff as wages. Hats off to the next company to occupy the building after the first company has gone under in short order.
-
I know this in in the Texas forum, but I'm continually amazed by the propensity of peopl in the UK to leave no tip, and to think nothing of it. They tend not to see it as an exercise in voicing a complaint; just that a lot of people don't see the need to tip serving staff. Needless to say, most people get a rude shock when they visit the states and try that little trick.
I do agree though, you're right in saying that tipping a token amount is a far more effective tactic than leaving no tip if you lack a spine and wish to put your message across. Far better to have a tacit word with the management and try and be constructive about it.
-
Candy - fantastic! It's so good to know I've contributed to your making your first Tatin.
It looks really good - thank you. :)
-
Bruised fennel seeds go wonderfully in confit pork... I've used both collar and belly in the past and they worked really well...
-
on-topic post, I assure you. :)
Have you considered Gill Glover's Scotsman reviews as a source? She has a pretty high standing North of the border.
-
"Why, of COURSE! and do you have any of these little silver balls, and perhaps a couple of crystallised rose petals, and how about some sugar-coated almonds, too? Do you have any tater-tots that we can put around your roast, or some instant mash?"
I have a friend (of the rather forthright sort) who replied to a moderately similar question - of whether it would be okay to serve some cheap generic synthetic ice-cream with his grandmother's apple tart, which is, I can tell you, unparalleled in its beauty - with the phrase "yes, splendid idea... and while you're at it, why don't you just squat over the bowl and shit in it?"
I think his tact glands had been surgically removed just before puberty.
I can't believe the no doubt unintentional gall of the woman in wanting to put anything, never mind cool-whip, on top of the brownies; surely that's just arrogance in denying choice to the rest of the guests.
-
Excellent tutorial and wonderfully exact detail in the steps. Thanks for posting
 .
.By the way, what we used in school to smooth the surface of peeled apples and pears was an abrasive green scouring pad used for scrubbing dishes (new and never used for washing dishes, of course). Very fast and easy to "sand" off a perfectly smooth surface.
what a fantastic idea. :)
-
Thanks for the tutorial, I truly enjoyed the thread on duck confit and was wondering if there would be others. Also thanks for the spoon idea, I tuck the pastry under with my fingers but am never satisfied, now I'll do that.
Just twist your wrist and you'll find the spoon really does do a good job of getting the pastry tamed.
-
This is incredible, thanks so much for sharing. I'm interested in your use of Granny Smith's apples- I had always believed you would use Bramleys. Have you tried experimenting with other varieties?
thank you... I actually find writing this sort of thing a very good exercise in itself, too... so thanks for the encouragement. :)
Bramleys invariably turn to pap, with a texture akin to that of wallpaper paste. This is why they're so good for apple sauce and baked apples.
Russets and coxes are both good, and would be my personal choices, but granny smiths beat them for appearance.
Orleans Reinette make, to my mind, the best of all, but I know of only one tree, and you don't know where my friend lives. You may, possibly, be able to get seeds from Brogdale.
-
-
Thanks so much for making this tutorial with pictures, Allan. Tarte Tatin is my favorite apple dessert by far. With the method Ive used for Tarte Tatin, the apples are cooked together with the sugar and butter in a pan for quite a while, and then baked. This gives a very, very soft apple. I imagine that the apples in your recipe end up a little firmer in the end. Is that true? If so, do you prefer that firmer texture?
Again, thanks!
They're actually quite soft, despite the relatively short cooking time. They retain a very slight texture, whose rigidity ensures that they can survive being stored for 24-48h and then rebaked to order, and then inverted from the pan successfully every time. It wouldn't do to lose one for every one we managed to sell.
This method gives more control over the caramelisation, I feel, and gives more consistency when different people make it (i.e. on my days off).
-
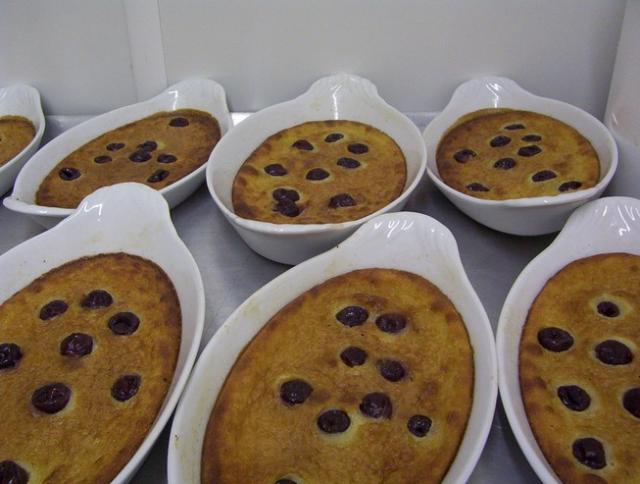
What is Griottine Cherry Clafoutis as opposed to regular cherry clafoutis?
Clafoutis made with griottine cherries instead of fresh. Griottines are semi-confit, i.e. half-cooked, and macerated in alcohol. They are extremely more-ish, which is unfortunate given the price.
Would you like to see a picture of that?
-
I've put my little photo-essay in a new thread... hope you enjoy; this is the first photo as a trailer.
-
Note, the title isn't "the technique for tarts Tatin" for the obvious reason that there are many out there, some a lot worse and no doubt some a lot better than mine. This is how we do it in the pastry kitchen where I work; the individual tartes to be (eventually) served with sultana and calvados ice cream and a caramel sauce.
This decision to post this came because of the positive response to my first photo essay, on confit duck, and because of Suzi's tatin thread, where a request was made for similar treatment of this topic.
So, on with the show. You will need the following :
8 tartlet moulds
6 granny smith apples (the ratio of apples to finished tarts is always 3:4, unless you eat the apple pieces as you go)
250g caster sugar
180g water
150g cold butter
sufficient puff paste for 8 discs 1mm thick, and 20mm larger in diameter than that of your moulds
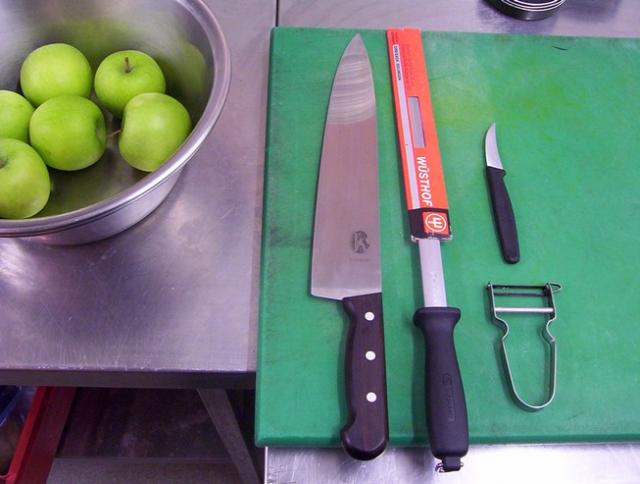
1) Assemble your kit. I use the following:
One green board
12" cooks' knife
turning knife
steel (keep your knives sharp or they will misbehave)
and a speed-peeler
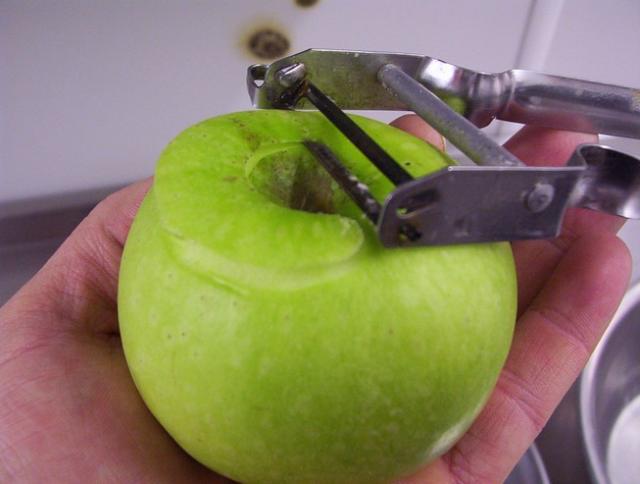
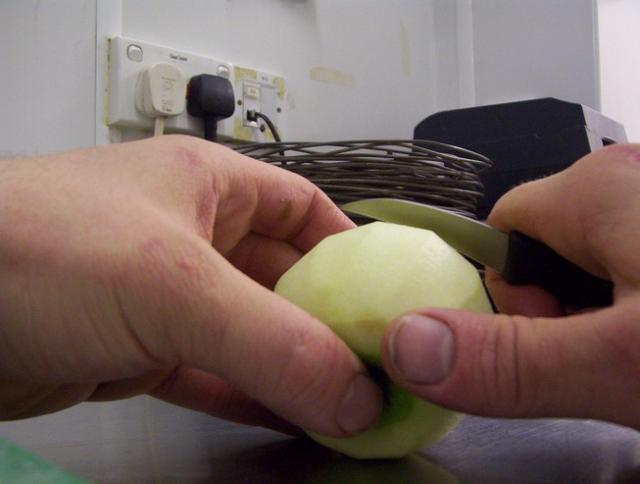
2) Using the speed-peeler, remove a narrow band of skin from the top of the apple. Don't dig in too deep. This is best achieved by holding the peeler static in your dominant hand and turning the apple with your other hand.
3) When you're finished, do the same to the bottom end.
4) Again using the speed-peeler, remove a wide strip of skin from the top band to the bottom band.
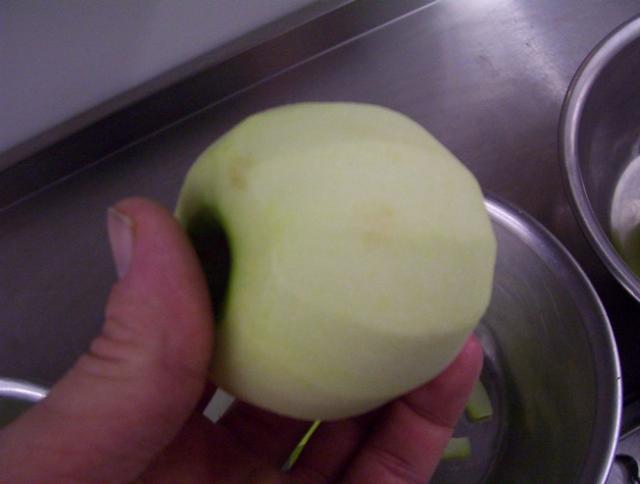
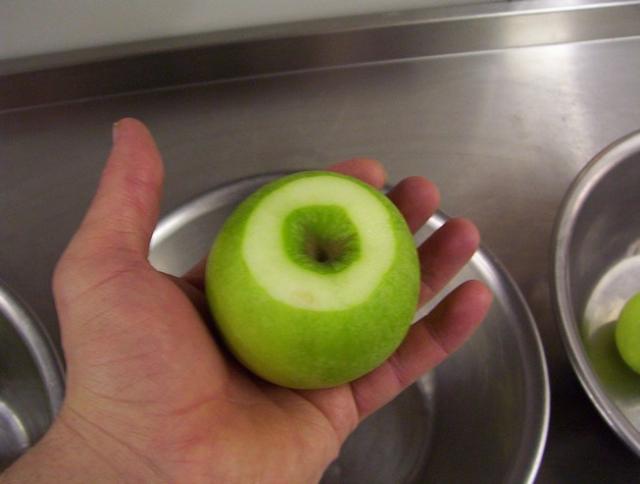
5) Work your way around until the apple looks like this (only slightly more in focus).
6) You'll notice that your apple will have lines. Ideally, you should remove them in order to give a more rounded polished appearance to the apple segments you're going to get. So, using the flat side of the blade of your turning knife, gently scrape at the sides of the apple until you get relative smoothness. Do the same to the edges you left when you took the rings of skin off the top and bottom of the apple. Don't dig in with the blade, rather use the flat edge of the blade as if you were descaling fish.
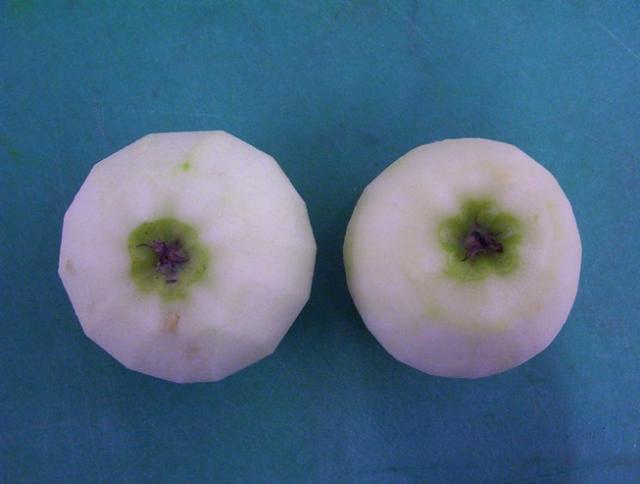
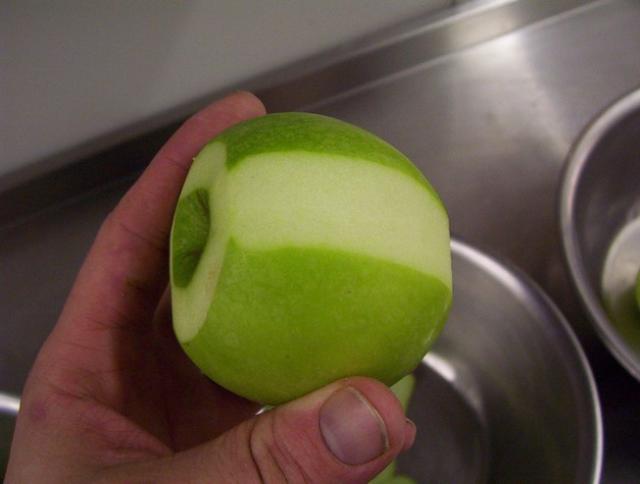
7) This shows the difference between a smoothed and an unsmoothed apple.
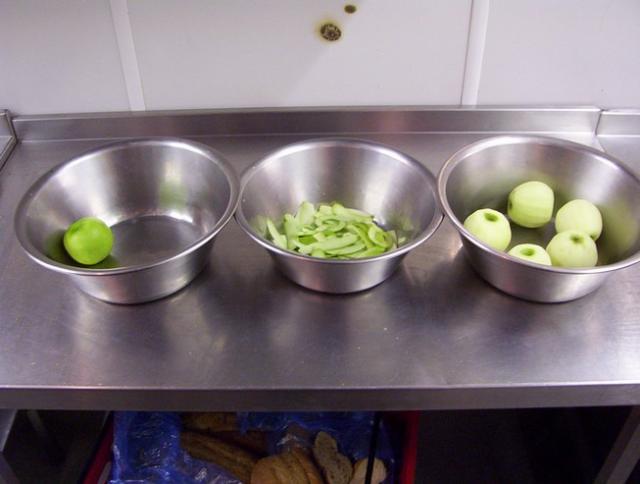
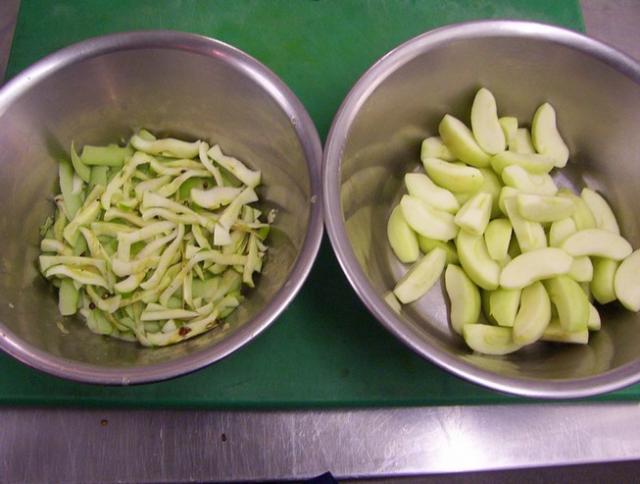
8) In the middle of the peeling process. This shows a principle I had drummed into me as a commis chef - you must always have something to work from (the left hand bowl), something to work in or on (in this case your hands above the middle bowl) and something to work into (the right hand bowl).
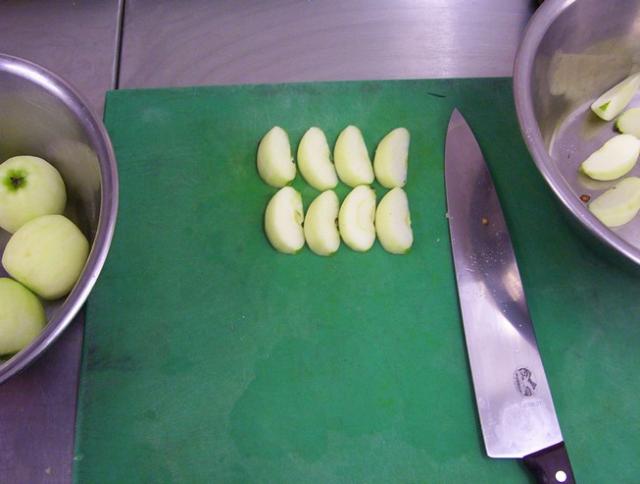
9) Cut your first apple into eight equal segments. Again you can see the above principle.
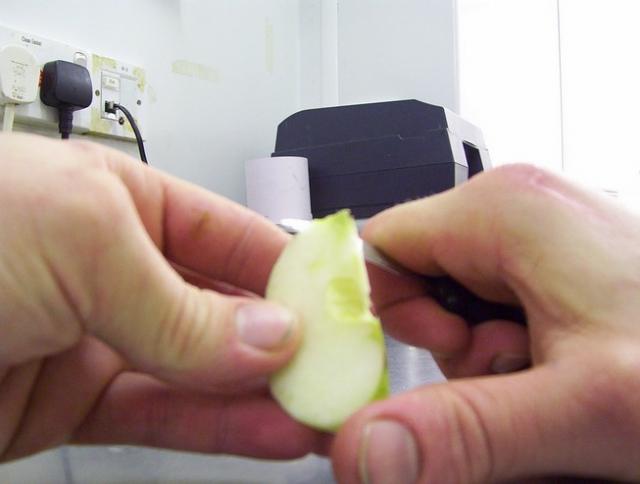
10) You need to remove the core of each segment, whilst at the same time removing the pieces of skin at the very top and very bottom of the segment. In the picture above, this is done by cutting a left to right curve, a right to left curve, and a left to right curve, more easily explained by looking at the result below.
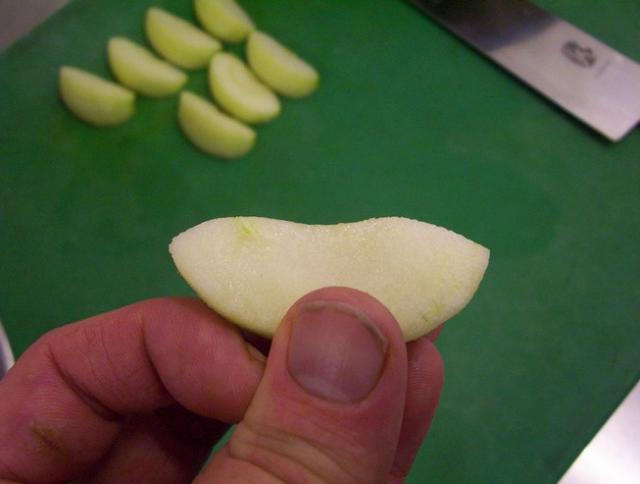
11) This is a finished segment.
12) Repeat, in this case forty seven times. The process becomes faster if :
a) you practise.
b) you have a overworked young commis to take care of such things.
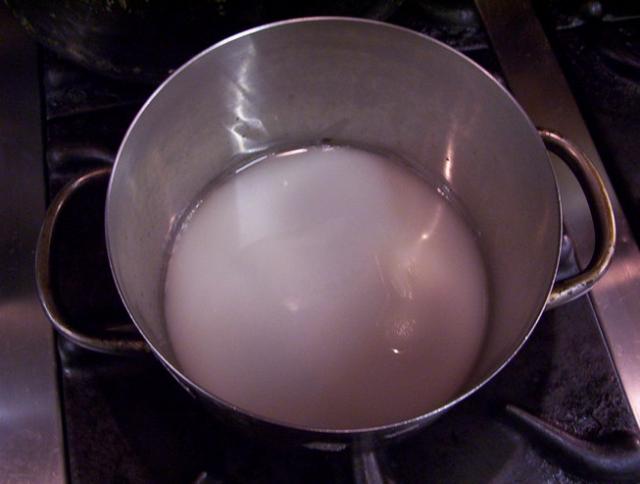
13) To make the caramel, place the sugar and 80g of the water in a heavy pan with deep sides, and ensure there are no lumps. Apply heat. due to the presence of the water, you can use a high heat from the beginning.
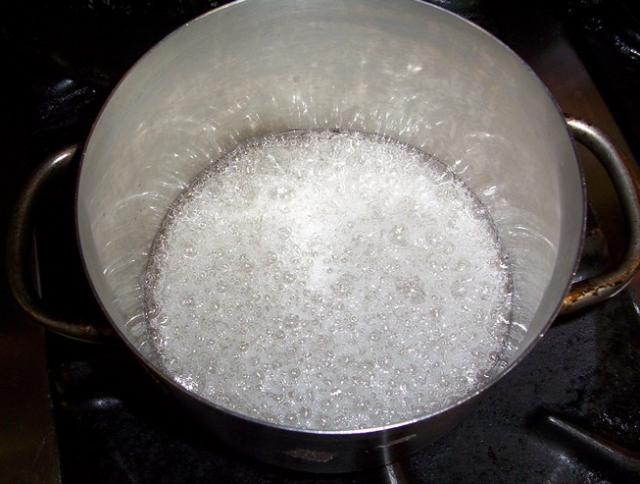
14) Bring the syrup to a boil.
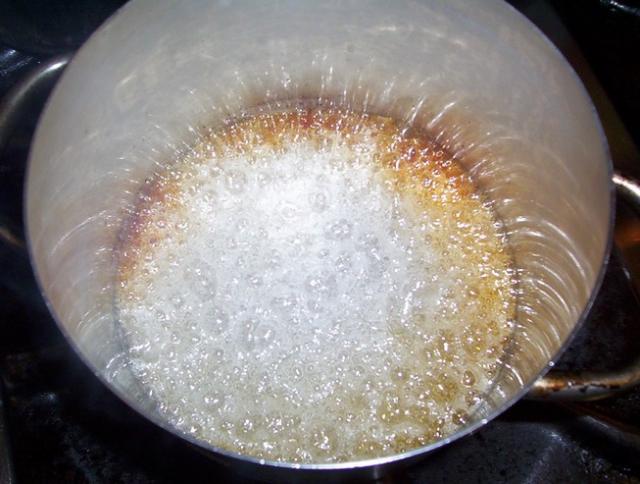
15) You'll almost certainly get patches where caramelisation ocurs first, either due to hotspots from your heat source, or variations in the bottom of your pan. No matter, just very gently swirl and shake the pan form time to time to even the colour out. Be careful. If you get molten sugar on your skin, you will scar, and permanently so.
16) You need courage here. You'll think it's burning. Your eyes will be stinging, and so they should. You must take the caramel to this stage of darkness, or the tartes will be insipid and bland, and not the lovely bittersweet things you want. There's nothing wrong with taking the pan off the heat to let the bubbles subside, givng you a better view of how far it's caramelising; just remember that it will continue to cook whilst you do this, so be quick, and careful.

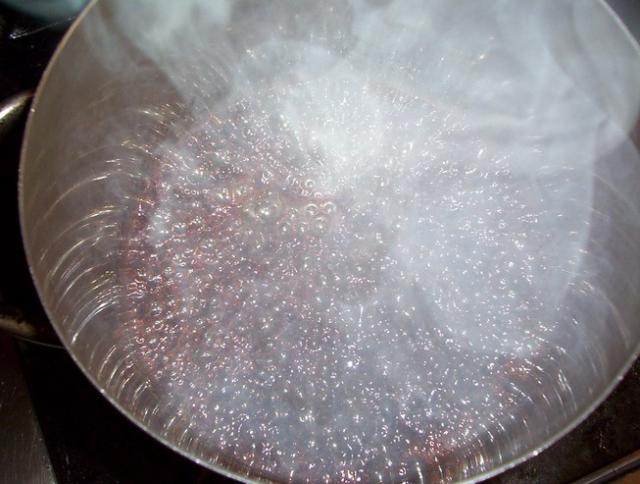
17) Remove the pan from the heat. Add the remaining 100ml water, which you will have close by in order to avoid burning your caramel while you fetch it from the far corner of the kitchen. Do this boldly, in one go, from a height of at least 50cm/18" above the surface of the sugar. This lets you avoid both potential splutterings from the pan, and the steam which will issue from the mixture (by adding it quickly your hand will be out of the way by the time the steam rises). Do not wear wooly gloves, oven mitts, or anything similar, because if you lose grip of your water container and it falls into the hot caramel, you'll be very aware of the splashes.
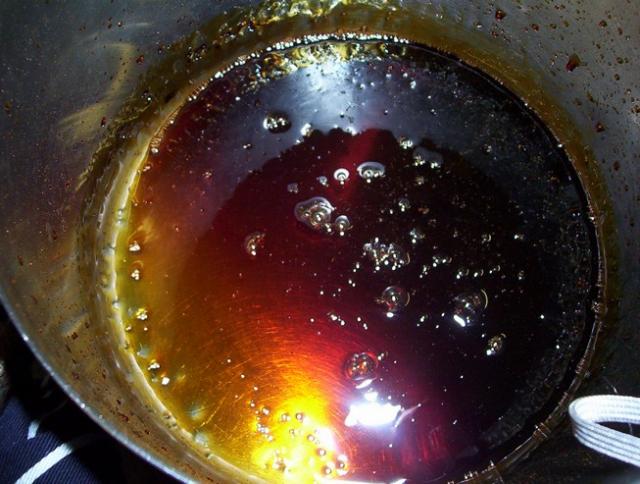
18) This is the finished caramel, before the butter is added. Note the dark reddish tinge. Quickly on to the next step, before the caramel cools too much.
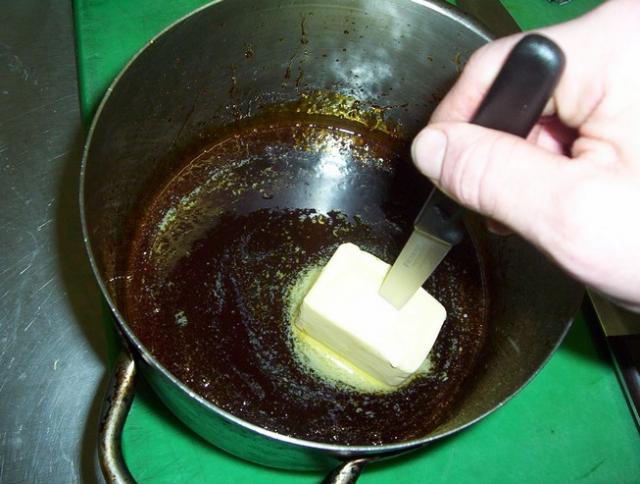
19) With the cold butter on the end of a knife, swirl it into the caramel. This process is much the same as mounting a savoury sauce with butter - as the butter melts it's gradually incorporated into the water-based sauce, resulting in a stable emulsion. It's important here to move the butter about quickly enough so that as it melts, the melted butter is quickly incorporated into the sauce. If you leave the butter to melt without moving it, your sauce will split. If the caramel is too hot, the sauce will split. If the caramel is too cold, you'll be standing there for ages waiting for the butter to melt.
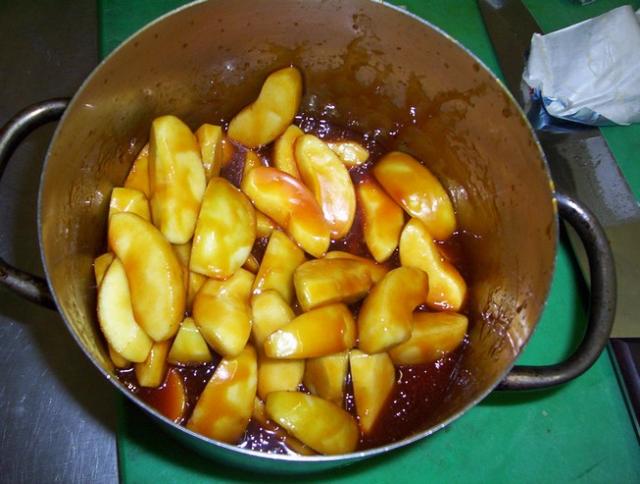
20) When all the butter is incorporated and the sauce thick and glossy, add the apple segments. At this stage you should be able to coat the segments with the sauce using your hands instead of a spoon, which will minimise the possibility of damaging the segments as you mix. If it's too hot, wait a little and try again.
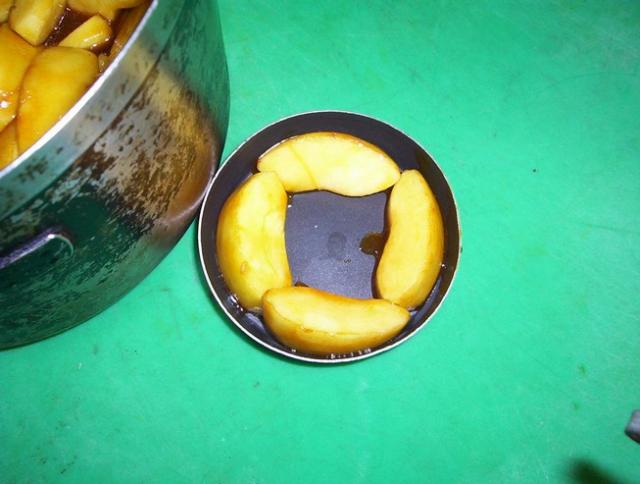
21) To pack the moulds, first place a ring of four smallish segments around the side as shown.
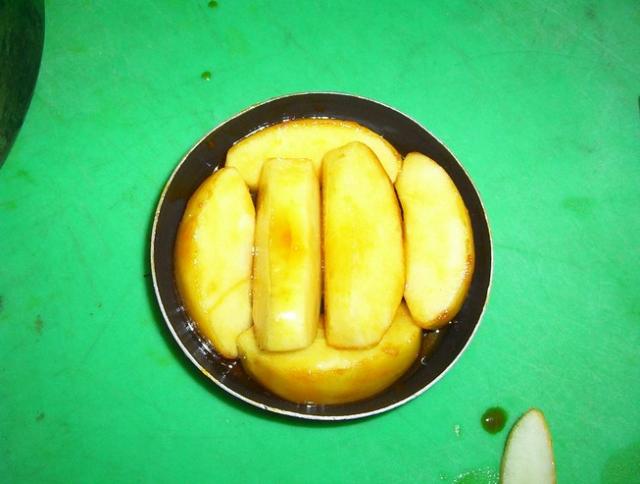
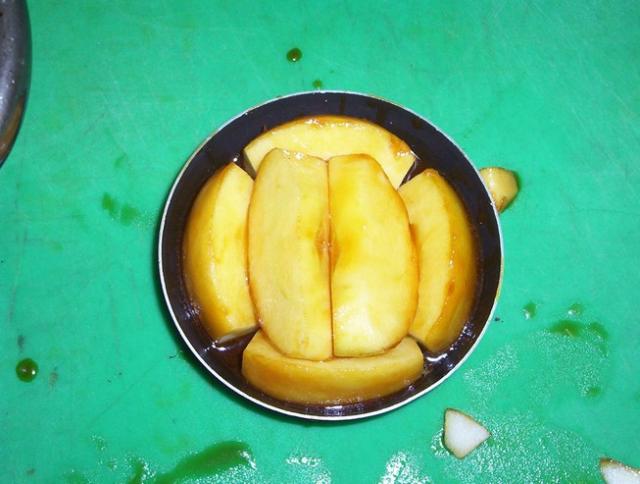
22) Hunt through the segments in the pot and find two larger ones. Place them in the middle as shown.
23) Especially if the apples were large to begin with, you can sometimes get a neater result by slightly trimming the ends of the outer segments as shown. When you're happy, drizzle a teaspoon of the caramel over the apples in the mould and let it setle in.
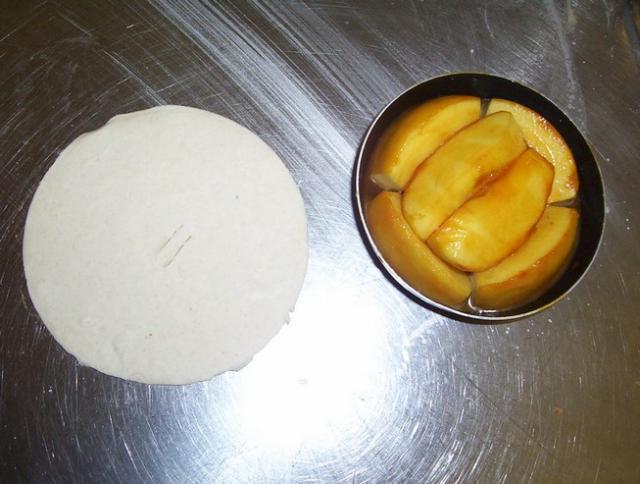
24) Take a puff paste disc and cut two very small slits in the centre. Fit the disc over the apples, making sure the edges are well tucked in. There will be some folds, don't worry. Don't try to stretch the pastry to fit.
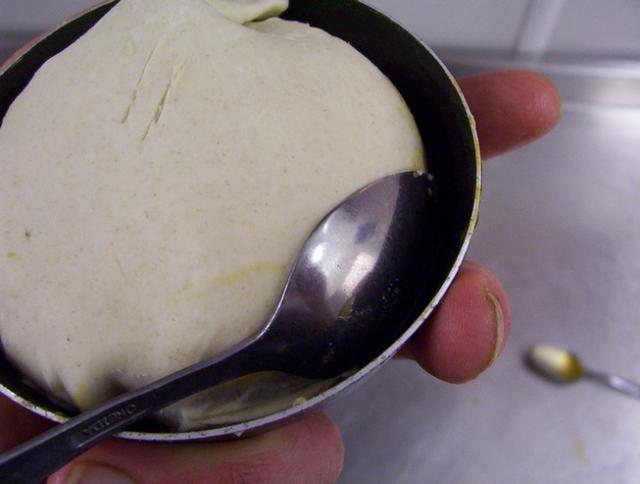
25) Use the edge of a spoon to tuck the edges right in next to the apple segments. You don't want the pastry to rise all the way off the apples and just sit there in contempt of your expertise and good efforts.
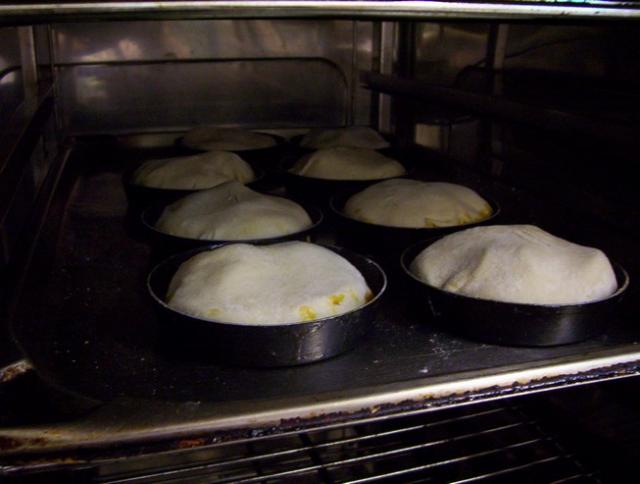
26) Place in an oven, (in this photo a fan-assisted electric oven) preheated to 200C, for 10 minutes. After this, reduce the temperature to 180C and cook for a further 20 minutes.
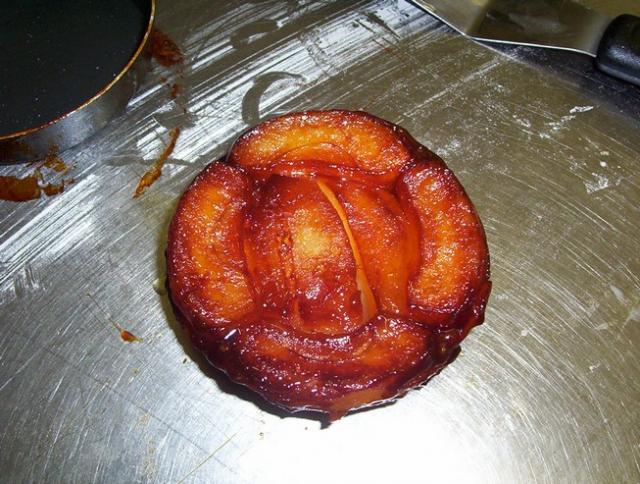
27) One of the finished tartes, unfortunately not the best-looking of the bunch but I was in a hurry; I still had a chocolate tart and some griottine cherry clafoutis to make before service. This also explains why some of the photographs are of less than stunning quality.

When I next serve one I'll take more photos and put them up.
I do hope people find this fun and informative, and perhaps encourage those who haven't tried to have a go.
-
Which French restaurant?
-
That's a fine-loking tatin...
We make individual tatins in the work kitchen... I'm afraid we cheat a little, and toss the apple pieces in a just-made (i.e. hot) butter caramel, which leaches some of the apple juices into the caramel before they're baked (it sits for half an hour to macerate in the caramel). I think it's a fair compromise.
I'll probably do a thread about the puff paste separately, but 'll more than likely have tatins to do tomorrow so I'll crack on with it then.
-
I wouldn't know (apart from the spelling of Campbelltown), but I can ask an old girlfriend of mine, who is a descendent of Burns and has his whisky glasses as an heirloom.
I wouldn't know (apart from the spelling of descendant).
Descendent is an adjective, descendant the noun.
We were both wrong, it's actually Campbeltown, with one 'l'. My error was typographical. Yours?
Glendronach is actually fairly hard to get hold of, certainly in England, though it's one of my favourites too. Ardbeg is extremely peaty, around 50ppm of phenols, which may account for it being too much for even hardened Islay enthusiasts. I recall reading somewhere that it used to be far more peaty than it is today.
Have you tried Brora?
-
Anthony Bourdain wrote in "A Cook's Tour" about a tobacco-infused custard prepared for him by Thomas Keller at the French Laundry; so it's certainly possible.
I doubt 'more than a pinch' qould be fatal - snuff takers regularly take several pinches over the course of a day and the mucous membranes in the nose are very permeable (hence the main route for cocaine uptake). I've no doubt there's an LD50 for ingested tobacco (certainly for nicotine), and I shall try to find it.
-
Neil, any idea if Trabilt's available in the UK?
-
I pay 10.32 UK pounds for a 2.5kg bag of pistoles.
-
This should answer most of your questions... thanks for this, by the way, I learned some interesting stuff through looking at that site.
-
I'd probably veer towards a 2:1 ratio of extract v espresso powder, but taste after the first tsp.
-
Tipping Outside of Restaurants
in Food Traditions & Culture
Posted
There is, of course, the pertinent point that a rise in prices of 15% allied to a ban on tipping is very unlikely to yield anything like a commensurate rise in the salary of the employee.
Skimming, taxation (at the moment in the UK all tips are liable to tax of 22% but in a properly run tronc system the normal NI contributions of 11% are waived) and bad management would no doubt contrive to deny the employee a great deal of that additional 15%.