

slkinsey
-
Posts
11,151 -
Joined
Content Type
Profiles
Forums
Store
Help Articles
Posts posted by slkinsey
-
-
That makes perfect sense to me! I have a much smaller burr grinder that I use for non-espresso coffee, and which I load/grind per batch of coffee. For espresso, I have the one blend that I use, and once I have that dialed into the machine, I don't want to fiddle around with readjusting the machine for different blends every other time. I figure I'm using at least a whole hopper's worth of beans before I might move on to a different blend (which I haven't done in around 5 years, being pretty happy with the blend I use now -- Sweet Maria's Espresso Monkey blent supplemented with 10% each of primo robusta and Monsooned Malabar).
-
I roast my own beans on a weekly basis. Never have beans that are more than about 8 days old. So there's not much profit in storing them anywhere other than the hopper.
-
Trust me, you do not want a manual ice crusher. Been there. Not going back.
What you want is a vintage Ice-O-Matic ice crusher by Rival, like this one. They can usually be found on eBay for a reasonable price. Just search for "ice crusher" and "rival." You want one of the deco-style ones.
-
But doesn't something with meat (i.e. fish, chicken, beef, etc) by definition already have umami in it? I'm curious if adding soy to a ribeye would somehow enhance the taste of the "meatiness." I doubt it.
Beef has by far the most free glutamate of any non-cured meat, at around 110 mg per 100 g (almost a factor of ten more than chicken or pork). Presumably aging naturally increases this amount, and one would expect to see some variability according to what the animal ate. This is nowhere near the amount found in, say, parmigiano reggiano, which is closer to 1,200 mg per 100 g.
-
Finally, I will point out that brisket is actually not that fatty. There is a thick fat cap on brisket, but if that is trimmed away the remaining meat is actually quite lean.
Just for the sake of completing Nathan's comments... we should mention that the foregoing is true of the first cut (aka "flat) part of the brisket, and not as much true of the second cut (aka "deckle") part of the brisket. The latter can be quite fatty throughout (which is why it is so delicious!).
-
Yes, I should have said "richer" rather than "sweeter."
-
Given the fact that one isn't using a ton of the stuff for cooking, I think "dry white wine" will suffice.
-
I've always used white.
-
Is it safe to say that the Sherrys called for in cocktails are always either Fino or Amontillado? (Unless specified of course).
Isn't "cocktail sherry" sweeter than that? Like an oloroso?
-
Did you get it here? Or, more importantly, for about $400?
Yea. I could have got something fairly similar for around half the price from Auber, but their kit uses the controller's on-off function to control the steam temperature and for some reason I wanted the PID to control the temperature. There are other reasons for the price difference. First, Auber is selling a kit with a PID that they manufacture themselves, so they're getting a cost savings right there. Also, the PID itself is far less expensive than the PID used in PIDKits implementation (Auber sells their SYL-1512A for 36 bucks; Watlow's Series 96 PID goes for a couple hundred bucks).
Ultimately though... yea, I paid double for a small upgrade in performance over the Auber kit. That's how I roll.
 And what does "fairly tricky" mean? What tools and skills did it require?
I am by no means an electronics expert, and the instructions are very detailed and clear. But there is some fiddly work that has to be done in very tight spaces. Several spade-type connectors need to be disconnected without damaging anything, which was especially tricky on my older machine as the connectors were very firm with a hair-trigger release, the old plastic was a bit brittle, and they were in difficult to reach spots. What makes installing the steam piece tricky is that you have to partially remove the front panel in order to access the steam switch (there is simply no room to get a finger in there while it connected). But there are plenty of wires that are connected, and need to stay connected to the front panel. So you have to be very careful and move the front panel in a very specific way (explained and illustrated in the instructions) in order to access the steam switch. So, it's doable for anyone who is reasonably coordinated and capable of reading and following instructions (which even remind you to save all the screws in a separate bowl). But it's... you know... tricky.
The only tools required are medium tip philips and flathead screwdrivers of reasonable length, a small flathead screwdriver, needlenose pliers and scissors. They also recommend a 7mm deep well socket for tightening the nut that holds down the SSR, but I was able to do it with my long/thin needlenose pliers. If you ask, they'll send you the socket to borrow.
-
Since the tea people have been posting interesting shots of their wares, I though it would be interesting to see what everyone is using for coffee. Should be an interesting contrast, since I expect coffee brewing setups to be more industrial and high tech whereas tea brewing setups tend to lean artisanal and low tech -- for the fanatics, anyway. The must obvious comparison would be a tricked out espresso machine versus a yixing teapot. This contrast is not universally true, of course. I'm sure there are some high tech tea brewing setups, and some coffee lovers use a simple cone filter. But it seems more or less accurate in a general sort of way.
Speaking of tricked out espresso setups, here is mine. Relatively humble compared to many other machines, but does the trick for me.
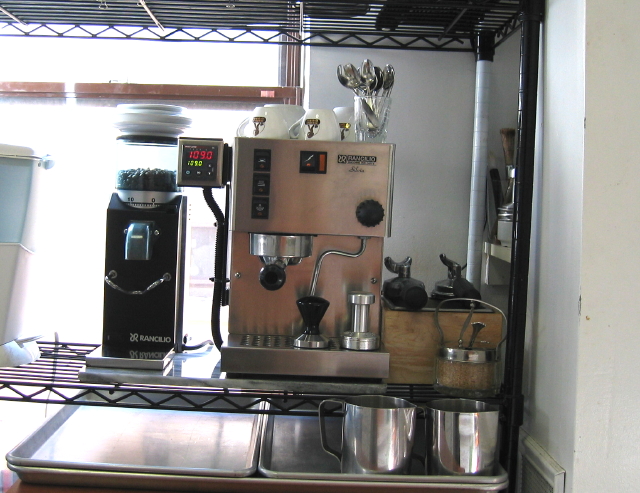
On the left is a Rancilio doserless Rocky grinder.
The machine is a Rancilio Silvia hacked with a dual-setpoint Watlow 96 PID controller that regulates both the brewing and steaming temperatures. This was fairly tricky to install, because you have to partially remove the front panel of the machine to gain access to the steam switch (you also have to remove the front and internal splashplates and the top and back panels, but that is not so tricky). Once installed, however, it's been sweet. All I have to do is turn on the steam switch like normal and the PID automatically kicks over to the higher setpoint for steaming. The other material modification I did on the machine is to replace the regular steam tip with a three-hole steam tip.
As it so happens, I have three portafilters. Overkill, I know, but I acquired them at different times. In the machine is a bottomless portafilter with a La Marzocco triple basket inside. That's what I use pretty much all the time. Over on top of the knock box is a regular (with bottom) double spout Rancilio pro portafilter. I got this when I first bought the machine, because it was considerably heavier than the stock portafilter. This was back before people were doing the bottomless portafilter thing. Also on the knock box is the stock portafilter, retrofitted with a single spout. I really never use this for its intended purpose, and keep it mostly fitted with a blank insert for backflushing.
On top are some Miscela D'Oro branded espresso and cappuccino cups. I have cups from a number of different brands, but I like the Miscela D'Oro ones the best because they are the thickest. Especially the espresso cups, which are the thickest I have ever found.
Down on the tray are my tampers. On the right is the Ergo-Packer from Espresso Vivace (aka "old busted") and on the left is my new C-Ripple tamper from Reg Barber (aka "new hotness").
As you can see, the whole thing is on some Metro Shelving, and I store some sheet pans underneath. This is really convenient when it comes to cleanup, because I can just sweep away any coffee grinds and the fall through onto the sheet pan, where they are easily dumped into the sink.
Who's next?
-
It's a mix-and-match system, where you specify the base and the handle separately.
The stainless steel base goes for around $39 (aluminum goes for $29, brass for $43 and copper for $49). The handle I wanted goes for $37, and almost all of the handles are right around this price. Some of the least expensive ones can be as low as $25, and there is one that goes for $110.
All prices Canadian
-
So... I thought I'd revive this long-dormant thread to post about my experience with tampers. As I posted upthread, I've long used the Ergo-Packer. This is from Espresso Vivace, which is the outfit of well-known espresso figure David Schomer. It's a 58mm curved tamper made of aluminum. One thing that I've liked about it is that the base is quite tall, so you can judge the evenness of the tamp by comparing the lines around the top of the base with the edge of the filter basket. The Ergo-Packer has served me well for many years.
Anyway... Now that I've pimped my Rancilio with a PID and have been using the La Marzocco triple basket with a bottomless portafilter, the old Erg-Packer was starting to look and feel a little nicked up. I also found that there was just a tiny bit of extra room around the outside of the tamper in the LM triple basket. This meant that I really had to do a little tap to get all the grounds into the basket, and had to use a nutating motion to get a firm seal all the way around after tapping. What I wanted was a tamper with a little more bite.
Although I've been skeptical of Reg Barber tampers in the past, I thought I'd check them out since you can order the tamper size down to a tenth of a millimeter, and I've been given to understand that 58.2 mm wits he LM triple basket like a glove. So I decided to take a look. As you can see, Reg Barber offers a number of different base styles. I like a curved base, because I think it makes a good seal around the edge of the puck. Also, the Rancilio Silvia has a rounded screw holding on the dispersion screen, and since one would like to avoid fouling the tamp with the screwhead, it is nice to have the puck a little lower in the middle. Reg Barber offers two curved bases with different degrees of curvature. He also offers what he calls a "C-Flat" tamper. This has a curve around the outside (the more pronounced of the two curves) and is flat in the center. I thought this might be an even better solution, since I could get the strong edge seal of a rounded tamper but a more even puck overall. Then I saw that he was making a cool-looking new design with a rippled base, and I knew I was sold. I had to have the C-Ripple tamper.
Luckily, my wife had pity on me and bought me a stainless steel 58.2 mm C-Ripple tamper with a short handle of solid aluminum with an anodized black finish. Woohoo! It felt really cool out of the base. Much heavier than the Ergo-Packer. I tamped straight down lightly and withdrew the tamper. This is where I'd usually have to tap away some remaining grounds that didn't make it into the puck before going back down for the real pressure tamp. Nope. The extra 0.2 mm bit well enough that there was minimal leftover. I tamped straight down and applied my usual pressure (I am a heavy tamper). A slight polish at the end felt so smooth I had to do it again. Nice. And it left a really cool-looking ripple pattern on the top of the puck. But... would it make a difference?
In a word: yes. One nice thing about using a bottomless portafilter is that you can see exactly how, where and when the coffee extracts. This time, the black "whiskers" of coffee appeared simultaneously in a ring around the outside of the filter basket, and quickly and evenly contracted to the center at which time the coffee went to a nicely brown and gold tiger stripe and proceeded through the rest of the extraction. I had got some nice-looking initial extractions before, but never quite like this one -- and every extraction thereafter has gone just the same way. Of course I may be suffering from bias, but I'd swear that my extractions have been better with the new C-Ripple compared to the Ergo-Packer. Certainly they have been more consistent.
-
I will also say that it's getting harder and harder to find tequila bargains anymore.
I don't think there ever has been, or ever will be a bargain-priced 100% agave tequila. It's not likely we'll be seeing a "Rittenhouse bonded" of tequila, and there are some very good reasons why.
Have a look at something like Rittennouse and consider what it takes to make is from the ground up: Figure it takes maybe 5-6 months from the time the rye is planted until it's harvested, distilled and into the barrel. Add six years of aging, and you're ready to bottle the stuff. Figure that end-to-end it's probably a 6.5 year production cycle. Around 6 months of that, when the rye is still in the ground, is the high risk part where Mother Nature could make something go drastically wrong. That said, it's unlikely that Heaven Hill owns the rye fields, so the risk isn't even theirs. If one field fails, it doesn't impact them because they buy their grain on the open market.
Consider a 100% agave blanco tequila, on the other hand: The agave plants need to grow for an average of 8 to 10 years before the piñas can be harvested. This is a long risk period where things can go wrong, and it's more likely that the producer owns the plantation since the growing period is so long. So, figure that the end-to-end- time for 100% agave tequila is more like 8.5 to 10.5 years -- that's two to four years longer in total than it is for Rittenhouse, and the risk period is 8 to 10 years longer.
This, among other reasons, is why Herradura silver costs around $25/liter and Rittenhouse bonded costs only around $21/liter (calculated from a 750ml price of $16). It's interesting to consider that it takes around 30% longer to make Herradura than it does to make Rittenhouse, but it's only around 20% more expensive.
-
I would say that those three ryes (I don't care for Jim Beam) are all pretty different.
I've always thought it was pronounced bull-ite.
-
Sure. You can sub applejack or cognac or even gin for rye whiskey in a drink if you like. But it won't be the same. Bourbon will be closer than some of these other choices, of course. But there will still be a difference.
Bourbon is overall sweeter and less spicy than rye whiskey. This is especially true of a bourbon like Maker's Mark, because it is a wheated bourbon and contains no rye grain whatsoever (many bourbons do contain some rye).
In related news... it's funny how you come back to things. I've been using so much Rittenhouse bonded over the last several years that I'd forgotten about Old Overholt a bit until a friend brought over a bottle. There is a really distinctive, almost "woody" quality that I really like about Old Overholt. Oh, how I wish they would release a 100 proof bottling.
-
Tell your friend that the corned beef sushi at Katz's is excellent. It's Jewish sushi, though, so they use rye bread instead of rice.
-
As for thickness there's also traditional recipes for serving the entire shank, slow roasted or braised.
That would normally go under the appellation stinco di [animal].
-
Nicely done. I've so far made two recipes from Under Pressure:
The "Puree of Sunchoke Soup with Arugula Pudding and Pickled Radishes" is amazing. I've done that twice. Really the only use of SV in this recipe is for pickling the radishes (they're bagged with some sugar, water and champagne vinegar and then cooked at 85C for around 20 minutes).
"Caramelized Fennel, Marcona Almonds, Navel Orange Confit, Caraway Seeds, and Fennel Puree" was also very nice, although it required an obscene amount of time with the chinois (this was before I had the Vita Prep 3) for the almond puree and the fennel puree. Everyone loved it, and I'd definitely make it again for a dinner party.
-
The holes are exactly what you want!
Contributors to an open crumb like that are: high hydration, limited kneading, low gluten dough, gluten degradation by acid, and baking from a cold dough. These are all tricky to finesse, especially with a sourdough, because these doughs can be quite delicate and easily deflate.
Could you talk a little bit about how to achieve each of these?
Sure!
I usually knead dough until it passes the windowpane test. When you say "limited kneading," would that mean the dough does not pass the windowpane test?
Yes, that means not kneading until the dough passes the windowpane test. When you fully knead a dough, you are making sure that the gluten is developed and interlinked as fully and evenly as possible. This equals a regular crumb.
If you knead substantially less than that, and I sometimes knead only until the dough seems fully mixed, there will be some places where the gluten is more fully developed and interlinked than others. In addition, there is some development and interlinkage of gluten that happens purely by chemical means with no kneading needed (this is how "no knead" bread dough works). All these things lead to a more irregular crumb.
Low gluten dough: would you suggest using AP flour, rather than bread flour, to limit the protein and gluten?
Yes. I also prefer the flavor of AP flour over bread flour.
What do you mean by "gluten degradation by acid"?
Acid actually breaks down the gluten. This is why a sourdough that has been fermented too long will simply break apart: because the gluten has been degraded to the point where it is not able to hold the dough together. This is also why, the longer a sourdough is fermented, the more delicate the dough is. It is the central challenge of sourdough baking, because longer fermentation equals more flavor but it also equals a weaker dough -- so you're always playing a game, trying to push the fermentation as long as you can but still having a dough strong enough to produce an open crumb instead of a doorstop.
Some information on this phenomenon may be found in this paper: Effects of Acid-Soluble and Acid-Insoluble Gluten Proteins on the Rheological and Baking Properties of Wheat Flours. Preston et al. CChem 57:314 (1980)
Gluten, isolated from a hard red spring wheat flour, was fractionated into acid-soluble and acid-insoluble protein fractions. The effects of adding increasing levels of these fractions and of unfractionated and reconstituted gluten upon the rheological and baking properties of two base flours varying in baking quality were investigated. Results with the mixograph and farinograph suggested that the dough-strengthening effects obtained when gluten proteins were added to the base flours were mainly due to proteins present in the acid-soluble gluten fraction, whereas the acid-insoluble gluten proteins at higher levels had a slight dough-weakening effect. Addition of increasing levels of gluten to the base flours significantly increased loaf volume with both the Grain Research Laboratory's Chorleywood and remix baking procedures. Similar increases in loaf volume were also obtained by addition of the acid-soluble gluten proteins. Addition of acid-insoluble gluten proteins significantly reduced loaf volumes.More or less what this is saying is that the part of gluten that is responsible for loaf volume is also the part that can be degraded by acid.
I haven't had much success baking a cold dough - this is the only step in jackal10's lesson that I don't follow. When I bake directly out of the fridge, the final loaf tends to bulge out on one side. So I usually leave the dough out for about 2 hours prior to baking.
Try larger slashes in the dough.
-
Understand that (1) they are undoubtedly playing up the drinking for effect; (2) that there's a good chance some of these guys would have been high-functioning alcoholics (think about how much cocaine use we'd be seeing in a mid 1980s Mad Men); (3) these wouldn't have been 7 ounce drinks of 100 proof spirits.
-
The holes are exactly what you want!
Contributors to an open crumb like that are: high hydration, limited kneading, low gluten dough, gluten degradation by acid, and baking from a cold dough. These are all tricky to finesse, especially with a sourdough, because these doughs can be quite delicate and easily deflate.
-
Peter: How long is the blade? And, does it still have a single handle in the middle? Any online pointers to something similar in size?
-
Much discussion on that topic to be found here.
New Noilly Prat
in Spirits & Cocktails
Posted
I wouldn't say that the "new" NP is sweeter than the "old." Perhaps the opposite.