

jedovaty
-
Posts
435 -
Joined
-
Last visited
Content Type
Profiles
Forums
Store
Help Articles
Posts posted by jedovaty
-
-
Cool, okay! These have all been helpful suggestions, thank you all!
-
Thanks for the suggestion! These are paste tomatoes which are pretty dry and I did not care for them fresh, however, when cooked up they are unbelievably delicious. Sadly it's a determinate that's done, I just cut the last of its tomatoes and I'm making pizza with family in a couple weeks.
Also, for clarification, "temp" in the title means temporary not temperature.
-
Hi: My garden tomatoes are ripe but I want to use them in about 2 weeks for sauce. What's the recommended way to preserve them? Fridge the whole tomatoes and cross fingers? Peel/sauce/freeze? Peel/sauce/can?
Thank you!
-
22 hours ago, DianaB said:
Has anyone tried adding praline paste to a NC spun treat? Not sure what to call the results yet, perhaps a generic “ice” will do. Would it be better to stir some praline into the processed “ice” by hand?
What @andrewk512 wrote. As a mix-in, no issue. For blending straight up, won't guess the reasons why, however, FWIW, I made a peanut butter version of the modernist cuisine pistachio gelato. The recipe uses a nut butter, and has it at about 0.75:1 ratio to sugar (not quite praline numbers, but close), then that mix about 1:1.75 to water. It works great!
-
 2
2
-
-
Thanks @andrewk512. After I posted, I did a search and found this article: https://www.sciencedirect.com/science/article/pii/S2772502222000269 which has some interesting results.
I think I am going to skip the pea protein just for the flavor alone. When I read up on it last year for another project, I think it's just ground up dried peas... I tasted a few shakes made with it and they were awful. Somehow, the Bruster's ice cream was able to completely conceal that flavor in their ice creams.
Will post back later this week when I try a few more variations.
-
1
-
-
A few pages back on this post I asked about adding body to oatmilk-based ice cream. @andrewk512 responded with a suggestion of 4% inulin. I have not had a chance to try this yet.
Meantime, I happened to be looking over ingredients for Bruster's oat-milk based ice creams, and in addition to a few other oils and creative ingredients, they add pea protein powder. Could this be a way to add body as well? I've had pea protein powder and it is quite strongly flavored and puts a very dry, powdery, mealy texture into any drink or food product. They must be using very little, so perhaps this idea is not quite right. It does appear towards the end of the base ingredients list before getting to the salts, gums, etc. while the rapeseed/canola oil is ahead of both it and dextrose. Hmm, maybe it's the oil or a combination of both the oil and protein. Link here as an example, click the "nutrition info & allergens" for the pdf.
-
1 hour ago, weinoo said:
Japanese chicken curry - subbed in celeriac for the classic potatoes, and it was very good.
Celeriac is a very underappreciated food. Awesome
")
-
2
-
-
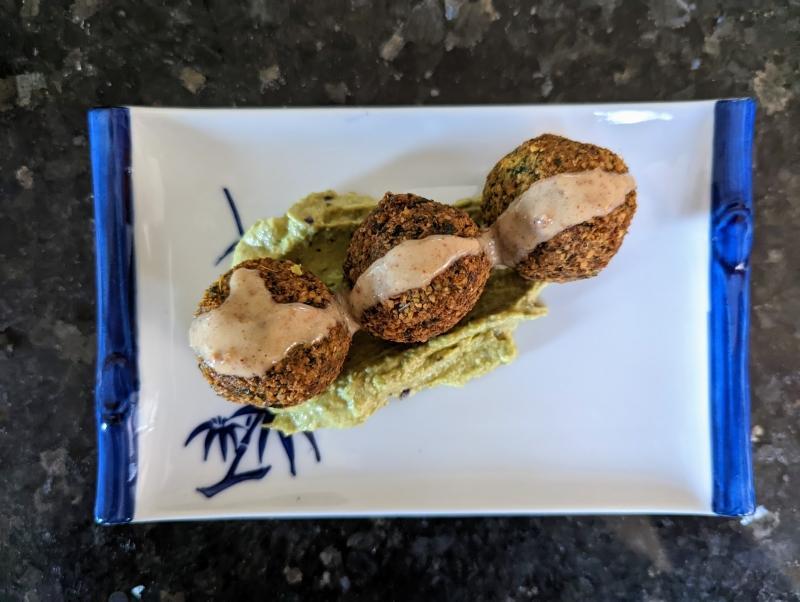
The most epic bastardized falafel made from kitchen remnants over eggplant/avocado dip and topped with not-tahini sauce. I've never made falafel before, can't believe it, so easy!
-
12
-
 2
2
-
-
1 hour ago, liamsaunt said:
Eggplant curry. It does not look great but has a lot of flavor.
I'm growing eggplant in my bucket garden first time and am about to have a ton to harvest.. any tips on making eggplant curry, or is it as simple as a saute with spices and aromatics, then stew a bit in some variation of milk product?
-
Gotcha, thanks @andrewk512. It was definitely not that. Best analogy I can think of: dilute some milk in water, it'll taste like milk but be missing that creaminess, which I'd characterize as missing body. It was thin, but not sloshy/melty.
-
1
-
-
1 hour ago, andrewk512 said:
Assuming its lack of body and not thinness due to high freezing point depression, add more solids, you can use 4% inulin by weight. I have no evidence for this but I've found that hydrating the inulin can help it work a bit better. Remove the corn syrup and use more powdered sugars, like more dextrose.
Got it! Can you describe with "thinness due to high freezing point depression" is? I know what freezing point depression is, but I don't understand the "thinness due to high" that precedes it.
-
1
-
-
2 hours ago, mgaretz said:
Get some coconut oil powder. I use this: https://amzn.to/3BBcIyQ Has no discernable coconut flavor and doesn't add any liquid to the base. I use 22 grams per creami pint (I use 12 ozs of plain oat milk and along with flavoring and sugars it makes 16 ozs).
Powdered oil? That is so bizarre wow! Very interesting reading up on the topic, too, wasn't aware it was a thing, thanks for that
Unfortunately, the intended recipient is allergic to casein (hence no dairy) and this product has sodium caseinate which after some research looks like the specific product would be a problem. Drat. I'll try finding similar products now that I know what to look for, or maybe I'll try adding a neutral oil, or maybe an avocado and see what happens. Or maybe I can get my hands on some ice cream bean fruits somewhere, hmmm.
-
I made dairy-free cookies and cream this weekend and it had good taste and sweetness, but no body. I used mostly oat milk with a spoon of vegan cream chesee (trader joe's brand has the most neutral taste of them). I used sugar, dextrose, and corn syrup in a 3-2-1 ratio, and also added a tablespoon of inulin. Sine I've no idea what I'm doing and it was late, I didn't track exact measurements. Suspect there wasn't enough fat? I made another similar batch adding coconut creme, great body but the coconut was too strong and overpowered the oreos. Egg allergy, so cannot add eggs.
Any suggestions? Pour some oil into it, more inulin or?

-
I think the baking is part of the flavor.. the cheese does brown a little bit, and I wanted to try it. I've been roasting whatever leftover tomatoes I have with herbs, OO, etc as an easy sauce base for years, family taught me the technique. I recently read an older post on this forum where someone posted the technique a few years back
-
3
-
-
I read a super simple recipe someplace on the interwebs: bake feta with cherry tomatoes, garlic, and olive oil, then stir in noodles with a little cooking water and basil. Tastes great, but texture was a little grainy.

-
14
-
2
-
-
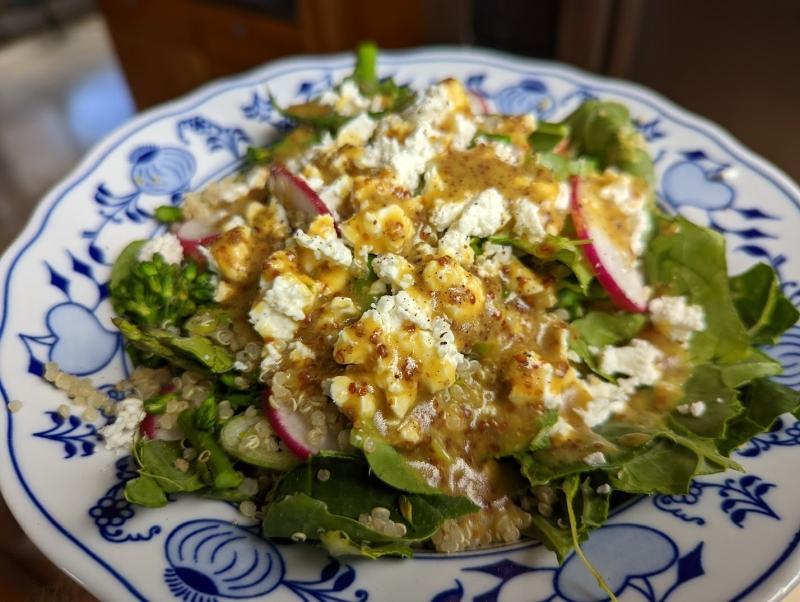
Leftover fridge stuff salad with honey mustard dressing.
-
6
-
1
-
-
Whoops, sorry, didn't click with me that you did not have a vitamix, hopefully the aldi-branded blender can handle berries. I don't see why it wouldn't. Good luck
-
1
-
-
Hi:
First a tip: if you use the vitamix (or any fast-home mill for that matter), it helps to keep your berries in the freezer, you'll end up both preventing bugs in the long term and keep the flour from overheating. Many people on the internet recommend not overheating the flour since apparently it'll lose its nutritional component, because, you know, it's not like it'll get baked in the oven at a higher temperature later 🙄
I used the vitamix to grind wheat berries for a long time (5200 model from 2010), and it was great. A friend had a mockmill and, we compared the results of baked bread afterwards (did not compare the flour itself, decided to use the flour for our tests). There was no noticeable difference, and our conclusion to why get a dedicated machine: first and foremost, get one if you want one; second it is nice having a mill size via setting and just pushing a button to go vs setting a timer with the vitamix; and third to have a nice appliance to look at. Again, slight differences in flour consistency, grind size, etc, did not make a difference for us home bakers.
So try before you buy. You will need to experiment with timing first.
Now some fun stuff.
Also, if you like the end results from the vitamix, you might decide to investigate their dry container. I have both thanks to costco bundle, and a few years ago compared the two side by side grinding 1 cup (~175g) frozen berries for 45 seconds, then sifting from a 40-mesh sieve from breadtopia. I should have used a larger quantity, but I typically only need less than 1 cup whole wheats. I lost the photo I took of the results, but here was the difference:
- Dry container: flour measured 85F temp, and sifting revealed incomplete grind, leaving 57g in the sifter (68% extraction)
- Regular container: flour measured 96F temp, and sifting revealed much finer, more complete grind, leaving 24g in the sifter (86% extraction); there was still an errant berry or two. Funny coincidence with the flipped numbers.The dry container would probably yield similar results if we let it run longer, and certainly had the option to do so since the temperature was lower. I will also guess that it would perform better with a bit more quantity, as it sent the berries flying in the container vs. the vortex of the regular one. The dry container creates an "inverse vortex" and I think this design is meant to keep temperature lower, let you grind more quantity and longer, and thus achieve a more uniform particle size. We concluded the dry container is not a required purchase unless you use the vitamix often for other purposes and don't want to wait for it to dry or clean between uses.
The dry container is is nice luxury to have if you have the space for it and use the blender on a regular basis. Before I got a wet grinder, I also used the dry container to make nut butters, results were same as standard container but was slightly easier to get the goods out due to orientation of the blades.
And even more fun stuff:
I also have an ek43 coffee grinder (don't judge me). I stopped drinking coffee and, not wanting to sell this grinder, decided to try it with wheat berries. It grinds up small quantities faster than the vitamix and appeals to my inner lazy because I don't have to time to get my desired grind size. Naturally, this became my current flour mill. And more FWIW, I had an opportunity to test out Maelkoenig's flour burrs, and didn't find any material differences compared to the coffee burrs for the small quantities I mill.
If you've read this far, here's one more thing. One day I accidentally bumped the grind size setting on the ek43 so it was set to fairly coarse when I milled the wheat. I baked with the flour anyway, and I really enjoyed the result.. the texture of the resulting bread was excellent, a bit moister than if the flour were finely ground.
Anyway, I may not have a blast chamber or chamber vac sealer or a centrifuge or homogenizer or whatever else gadgets everyone here has, but I still feel like I belong because I'm using a >$3,000 grinder to mill flour for my bread. So there. 😝
-
2
-
 3
3
-
-
5 hours ago, ElsieD said:
I call it "quality control ".
My term is poison detection.
-
2
-
-
5 hours ago, Kerry Beal said:
Aww dag nabbit! I bought last time and got the 5 button version, now they have the 7 button version for $10 more. Bah. Oh, well.
-
2
-
-
I tried adding WPI long ago to some home-made healthy crackers and found it did not bake up well at all; also, at the time, I had almost no experience with baking. You have interesting questions, if you decide to try, please follow up. I'd be especially curious about angel food cake option.
Have you looked into pea protein? That seems to be a pretty popular product lately, although, I think it's just ground up dried peas and would probably taste rather vile.. actually, thinking it through, I want to say the vegetable proteins might give better results with certain baked goods, but there's no science or theory behind this, just pure conjecture.
-
Any of you have a tasty, dairy and egg free vanilla base recipe for the creami? I found a few on the creami recipe website, and there are several on the interwebs, none jump out and I'm getting too many options.
-
Hmm...
8 hours ago, paulraphael said:I personally don't understand the point of a small chef's knife. The western chef's knife is for cutting with power, and for being crazy-versatile. A small one is neither burly nor versatile. If you want something for precise tasks, there are many choices that make more sense.
To each his/her/its own. I tend to reach for the shorter knives, they feel better, but would prefer if they had deeper bellies so I don't end up rapping my knuckles like Kim's husband. As long as the knife is sharp, it'll do me good.
-
I always forget the process when making fermented cucumber pickles.. is the salt based on water weight only, or water weight + cucumber weight?
I tried a small batch, 2.5% salt of water + cucumber, and the pickles were way too salty after a couple weeks when I tasted them. Something seems off, internet suggests people go 3-4% with cucumbers and I can't imagine that would taste good

Preserving tomatoes
in Cooking
Posted
Hey, original poster here, got a follow up question.
Once sauced (i.e. peeled and chopped or processed), is the purpose of cooking the tomato to get rid of the oxidation flavor before freezing, kind of like roasting the stone fruits that was briefly discussed in the ninja cream-i thread? If not, why cook before freezing?