

jedovaty
-
Posts
445 -
Joined
-
Last visited
Content Type
Profiles
Forums
Store
Help Articles
Everything posted by jedovaty
-
PLANNING: eGullet Chocolate and Confectionery Workshop 2020
jedovaty replied to a topic in Pastry & Baking
Cool, I would like to go, and will be able to confirm by second week in March if there's still room. -
PLANNING: eGullet Chocolate and Confectionery Workshop 2020
jedovaty replied to a topic in Pastry & Baking
Sooo... what's the experience level requirement for something like this? Intended audience? In another thread I mentioned I was going to look into classes offered nearby, however, after review, they are not for me. I may have a reason to be on other coast soon, timing would work out well. I've been eating chocolate bars that I make from scratch for nearly 4 years, have made dipped treats a couple times, and bon bons once 😁 -
@Jim D. I think you just helped solve the biggest workflow challenges for me, thank you! The rest will only improve with more practice and experience.
-
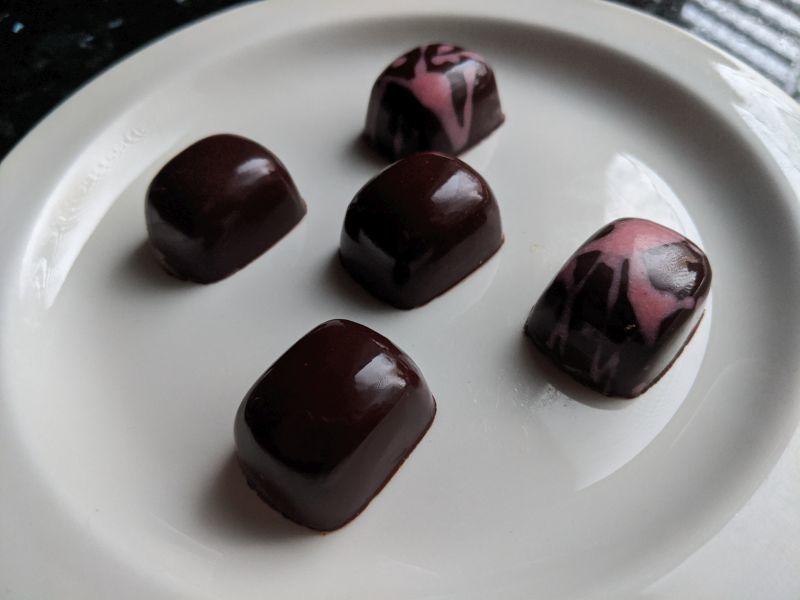
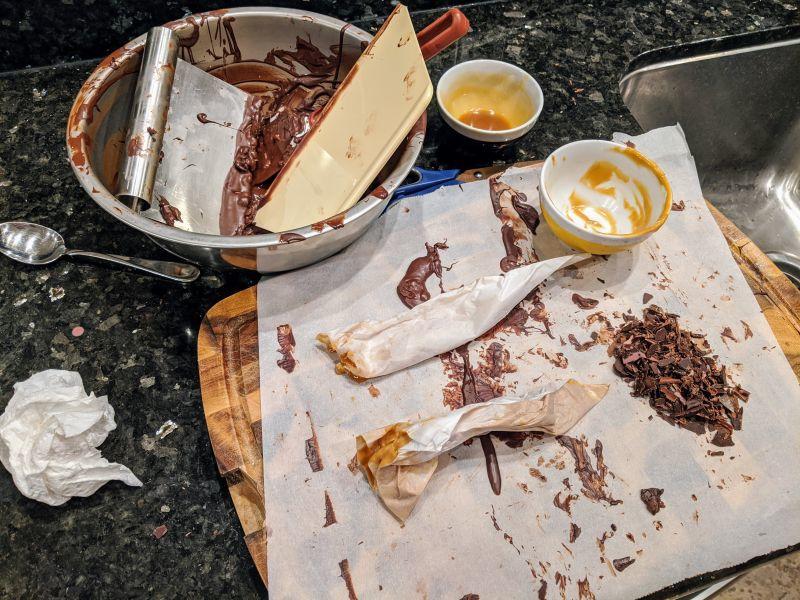
Success. However, holy cow it was messy. Part of it is that my mold is larger than my bowl so chocolate got everywhere, and then I'm also pretty new to piping so the filling kept squishing out the top and getting all over. Also, the mold isn't very good, it's a non-proline from Tomric, with this lip around the bottom edge and slightly flimsier than the better stuff - # on the mold is g-205. Not sure where or when I got it, have had it for a long time unused. I wanted to try this out with what I had on hand Hardest part was tempering, and I gave up trying to keep the chocolate warm in tempered state. Still lots to learn, although, I was jumping around like an idiot after seeing the shine on these 😁. There's a pastry/confection store near my work, they offer classes, I think I'll go check them out - generally, I like to learn on my own, but I think being able to repeat multiple times over course of a day or two will give me a jump start on the learning curve here. In case you're curious, fillings got mixed up, but they are hazelnut praline butter, or dulce de coconut (can of sweetened condensed coconut run in pressure cooker for 20 minutes.. my goodness this stuff is amazing). Second hardest part was trying to keep myself from licking and tasting everything. Nothing's being shared yet, don't worry. It does give to palette fatigue, though, by the end, I was sick from the sugar 😝
-
I'm using molds, not dipping, so only the flat bottom is accessible.. can I just put the salt there? Might make more sense since the tongue is there and would touch the salt first, kind of like the salted side of a pringle crisp
-
Replying to myself, what if I heat the salt in the oven? This might bring in enough residual heat and melt/stick to the top. Of course, this won't work with other decorations, but for now, this'll work. Or maybe molded bon bons just weren't made for topping decorations?
-
Great, I think I have the workflow and strategy mapped out in my head. The challenging part is figuring out how to work with such a small batch, keep things tempered, and minimize "leftovers". Tempering will likely be most difficult, as I have very little experience - I really struggled with it in the beginning with my chocolate bars, and before really getting any experience doing it, silk just made everything so easy. Perhaps I shoudn't use my own chocolate and practice with the purchased stuff until I figure it out. Also, how do I get salt or other decorations on top of the bon bon mold? I'm concerned heating up just the top tip will screw up the tempering. Hmmm.
-
Hi there. I'm hoping you all would be kind enough to provide some tips and tricks for very very low-volume, molded bon-bons (think 1 tray mold). I've been making my own 3-ingredient ~73% chocolate (1-2 lbs at a time every few months, just to break off a square after dinner for tasting, instead of cheese). Never made candy but for a couple experiments in the past (both dipped, with visual results analogous to that of a pre-skooler drawing itself in front of a mountain and sun). This thread is full of amazing results, which eventually I'd like to try, but for now, sticking to something simple. Having watched many videos of the process, the mess and waste give me the frights, and finding an efficient way to keep the tempered chocolate liquid, tempered, and warm while the shells chill in the fridge for a few minutes eludes me. Thanks for any motivation, pep-talk, tips, and tricks. I'm going to start easy, of course.

-
Right, I'm not questioning that (wood barrels and all). My vanilla tastes like raw bark/wood. Not only does that sound incorrect, I'm not sure I like it. Go outside, pick up a stick of mulch bark and chew on it. Do you like it? Actually, don't do that, might be toxic, I'm saying it to illustrate the point I'm here looking to see if others have this wood flavor - I have not seen that mentioned in this thread. It's definitely from the pod/sheath. Is it because it's only 2 months old, is this normal, or did I just not use good beans? This random internet user wants to know.
-
Hmm.. I don't drink, so that's a new one. This tasted like both vanilla and biting/tasting bark. Based on history of this thread (which I only recently discovered), seems people favor leaving the soak to occur longer than 2 months, maybe it'll get overpowered by vanilla later? I'll try making something with a little now, and then more later, and see if the bark/wood is perceptible. This was mostly a test before I try with snootier ingredients.
-
My vanilla extract is two months old. It smells like vanilla, and tastes like vanilla, but, has a strong "wood" taste to it, definitely coming from the pod (which I've tasted in the past). Is this right? I haven't used any extract in a long time, using only whole bean. Liquid was a clean vodka (ocean organic) and some grade b beans from amazon - not the least and not the most expensive ones*. The pods still had some suppleness. I scrapped out the caviar and chopped the pods up. I used 12-14 pods to 400-500ml vodka. Gave the bottle a good shake maybe once or twice a week. * I saw the other thread where someone has identified reduced vanilla prices, oh goody goody
-
They were awesome deep fried!
-
Dude, @Norm Matthews, almond paste is easy to make, that goes for marzipan, too. But I know all too well what happens when you have your mind set to go get something that should technically be right there in aisle 5b. @Kim Shook, wow, awesome! I recall you weren't the biggest fan of them, so it was nice to see that you liked them! If you make them again, consider brushing the egg wash on top of a few cookies, and sprinkle with the coarse sugar/salt when the cookies are almost done baking (so the sugar wouldn't melt). I tried this when I couldn't get the sugar on the perimeter to be as pronounced/crunchy. The result was an interesting cookie
-
First couple kouign amann bakes with active yeast were mostly successful (good layers, crispy carmelized exterior, tender crumb, lightweight feel), however, I am still confused and don't know what's going on with fermentation due to my inexperience with commercial yeast. I think I have a way to get there, though, perhaps if we overlay the pastry from mix to bake with my workflow for sourdough bread: add leaven to dough, wait for 50-70% rise, shape, put in fridge for at least 8 hours, then bake. Sometimes I skip the fridge, and bake 30 minutes to 3 hours, depending on several factors. Based on this, where in the timeline - relative to my sourdough bread - does one begin the lamination, where does the lamination end, and then where in the process does the bake occur? Hope this question makes sense. Thanks for your time!
-
Butter on top of inverse puff pastry? 😲 Fantastic idea! Thank you all for the ideas! I am going to try rolling up into a log next time. Meantime, I wanted to see what would happen if they were deep fried. There was some deliberation into pan frying kind of like an english muffin, but, I was worried the insides might not cook. My goodness, these things are ridiculous. So light and tender, delicate crisp. Cutting one open proved more challenging than expected, they just disintegrate. Here's an idea: cut into small 1/4" pieces, then fried, they could be little poofs used as a topping on smooth desserts for a textural contrast. Flavor is quite mild, which should be taken into consideration.
-
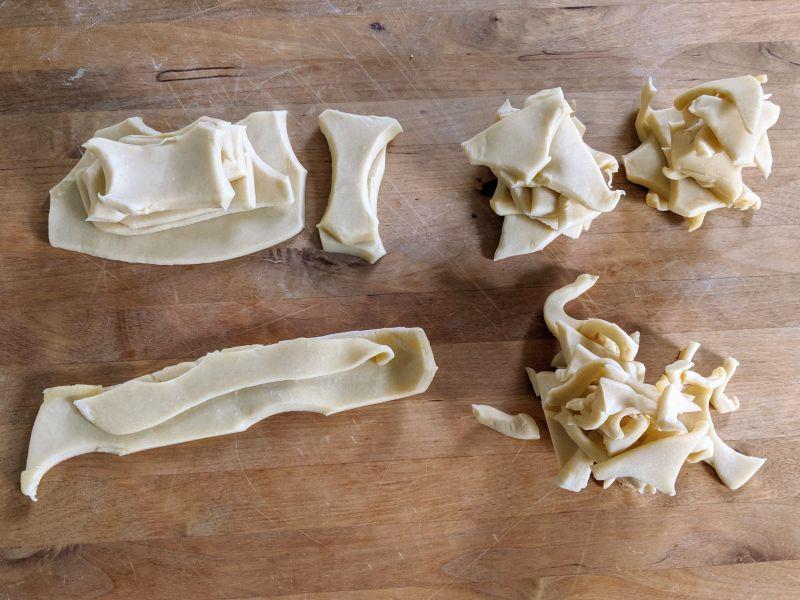
(Note: This topic was split from the Monkey Bread topic, to keep both discussions focused and relevant to the question at hand.) I made inverse puff pastry last week for "chasson aux pommes" (apple turnovers). Never made puff pastry before. Beginner's luck, turned out beyond expectations, super layers, butter, crisp exterior, tender honeycomb inerior (even without yeast!!), lightly sweet, slightly tart, it took every bit of will power not to eat them before taking them to work. Based on all the suggestions, I saved the scraps, and additionally separated them by size and shape. Seems like I can make something called "monkey bread", but I have no clue what that actually is. I've researched it, and it seems I should just bunch it up with sugar and bake... but these aren't yeasted, sooooo wouldn't bunching these up screw up the layers and make more of a pie dough squishy thing? Reading the forums, with puff pastry I can make little cookies or crackers or other things. But I'm not quite sure how to do this? They are kind of small to twist into sticks or roll into arlettes? Help please and thank you??? 🤝 For now, I've put scraps in the freezer.
-
That's generally what I did, just lower quantity of vinegar and sugar - my apples were on the sweet side. I did add a few cups of water instead of cider in the first boil, and the slow-cooker part took about 24 hours to reduce because of that. I got another idea what to do - I'll mix with a bit of horseradish and try with some turkey. Growing up, we would eat turkey meat from soup that was accompanied by an apple/horseradish mix - and, we'd sneak some ketchup, too, as dad did NOT approve of ketchup in the household..!
-
Nearly 5lbs of apples cooked down to just under 2 pints (I think pints.. the second-to-smallest ball jars, filled up 3.5 of them). It's not much at all.. except... 5lbs of farmer's market apples. @heidih, I'll try a little bit with more sweetener, @teonzo I'll try with baking soda, and in both cases we'll see what happens. @Tri2Cook, good idea, thank you! I'll give it a go - maybe combine the sweet and pork ideas, I enjoy a little honey on pork, so perhaps some honey and this ketchapple/apptchup/kepple/appupp butter. Looking up uses for apple butter, I see some people turn it into a bbq sauce. This might work, too. Apple ketchup is not my thing, kind of like raisins in chocolate chip cookies. Dip apples into ketchup and that's almost what this tastes like 🤢 Thanks for the ideas and help!
-
Hi: Long story short, adding any amount of apple cider vinegar to apple butter recipe is a bad idea. I now have something that smells and tastes like apple ketchup. Is it possible to save somehow? Everything tasted fantastic until the last ~30 minutes of the reduction, pretty much at the moment the apples went from sauce to the thick caramel butter consistency it became ketchup. UGH. Such a waste of delicious apples Thank you for any help.
-
Have any of you tried Ferrarini brand butter for pastries? My so-cal costco only carries salted Kerry Gold and this Ferrarini unsalted. It's cheap there, but quite pricey in regular grocery stores. Tastes more like cream to me, rather than butter, I do enjoy it as a change for straight up eating once in a while (I haven't used it for anything else).
-
I plead the 5th... There's something about a thick cut slice of cold butter on bread that does it for me.
-
Consider the logistics: the carrots, celery, and onions will turn sort of into a mush, and will probably require you to stop frequently to scrape and dig in to rearrange the mush around the blades - these veges don't have a lot of moisture to begin with so I don't think they will blend up on their own. That'd be a pain. Well, adding liquid such as water will help so you don't need to start/stop (smoothie!), but then you've introduced water into your smoothie and I'm not sure whether you can get an effective saute from that, it'll be boiling instead. Since you mentioned a ragu, technically you could just blend with tomatoes directly (v8 smoothie!), but you'll still have the problem that you cannot saute. This brings up the question: would you notice a flavor difference between sauteed vs boiled mirepoix? Maybe try it one day Pulsing a large proportion of water to the veges will roughly chop to your desired size, and let you keep closer to your standard technique. Actually, revising suggested technique: when pulsing, don't go to max, just rotate knob between 0 and about 50% power a few times to roughly chop the large pieces, then, put to a lower speed and let it run until you get desired chop. The whirlpool will keep the pieces moving. I was answering the question You are of course probably right, knife could be quicker with cleanup, etc, but not necessarily for everyone; consider one-armed people, or those with hand issues like arthritis, or accident prone like me a few weeks ago I stabbed myself and couldn't use my left hand effectively, etc. My own experience with cauliflower rice (not mirepoix of course): using a box grater was rather messy, bits of cauliflower went everywhere so cleanup was (much) longer.
-
OH I was wondering what that person was trying to accomplish. It should be possible, try to float the veggies in lots of water when doing this to help distribute everything between the pulses. Same idea as making cauliflower rice.
-
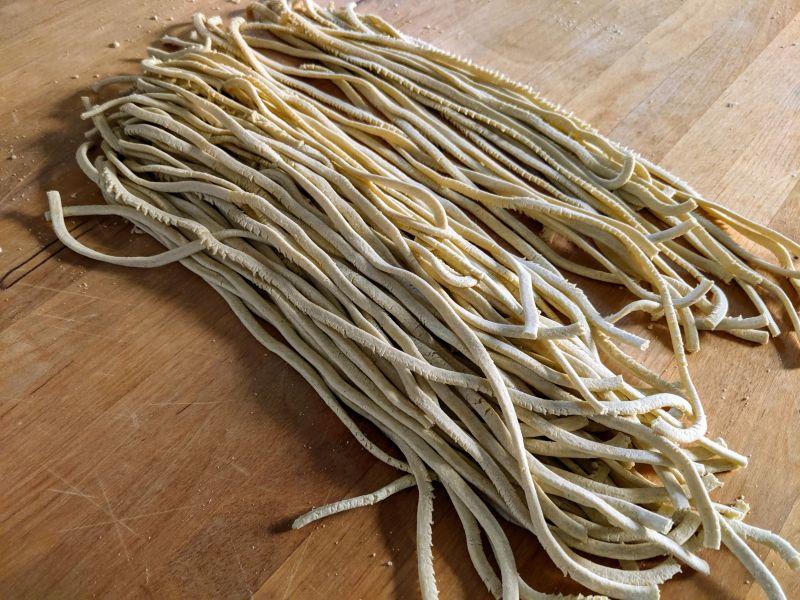
Hi! I'm a little late to this. Finally got a chance to try something I've been wanting to do for a while Check out my fresh hot noods! 125g fresh milled durum wheat (bolted, roughly 80% extraction) 125g caputo 00 flour (I was out of everything else) 45g not ripe yet but just barely soft avocado 50g locally sourced tap water Blitz in food processor to distribute avocado. Then run through my noodle extractor (it's like a motorized playdoh machine). I tossed them left over sous vide chicken, some veggies from the farmer's market, and left over starchy boiling water + some sort of hard cheese I had at the back of my fridge. Totally forgot to add the calabrian chilies from my office aerogarden. DRAT! Verdict? They smelled like bananas when forced through the extractor. They were a little mushy after boiling in water. Taste.. well, they tasted like noodles. I was hoping they'd be a little more yellow or slightly green, but, I guess it's all in the name of having fun! Would I do it again? Hmmmm. I dunno. If so, I might try more avocado and less water, and, I might also want to try with a ripe avocado, since this one didn't have much flavor. I tried searching and searching, but couldn't find anyone else that's done this. I wonder if anyone will give it a try, too. Now I have to wash the food processor. Oh, bother.

- 134 replies
-
- 1
-

-
- Mexican
- Vegetarian
- (and 1 more)
-
It can be, steam can build up and cause liquid to burst out. Happened to my mom once (she has one, too), and she got burns on her arms - fortunately, she was looking away and avoided getting splashed in the face, shielded by her hair! There are vents in the lid and lid cap, however, sometimes the steam buildup can be faster and the pressure goes POP. Not recommended: I have removed the cap after the blend gets going. The recommendations in that link are good. Just be careful!

