

Jim D.
-
Posts
2,415 -
Joined
-
Last visited
Content Type
Profiles
Forums
Store
Help Articles
Everything posted by Jim D.
-
This is what I do for a PDF with Pomona's. I am in the process of converting the directions to weight rather than volume measurements, but with purées differing so much in weight, I haven't gotten that far. So the sugar measurements are in grams, but the others are still in volume. Begin by weighing the pot in which the PDF will be cooked. Measure 4 cups fruit purée (Note: If it is a fruit that also comes in dried form, such as apricot or cherry, I chop about 1/4 of the final volume very finely, making sure it is fairly soft. Then I fill to the 4-cup mark with purée and heat the fruit and purée slowly so as to soften the fruit more). Add 2 tsp. calcium water and 1/4 cup lemon juice to the purée and heat to the boiling point. If you are using fruit juice with no added fruit, Pomona's calls for doubling the amount of calcium water. Meanwhile in a bowl mix the first amount of sugar (400g) and 3 tsp. Pomona's pectin. If you are using fruit juice with no added fruit, Pomona's says to double the amount of pectin. Whisking constantly, add the sugar and pectin mixture to the purée mixture and cook until the mixture returns to a full boil. Remove from heat. Add the second amount of sugar (280g) and 120g glucose. Weigh the pot with its contents, subtract the initial weight of the pot, then calculate 5% of the weight of the PDF. Add that amount by weight of powdered sorbitol. Return the pot to the heat, whisking to make sure the sugar and sorbitol are completely dissolved. Bring back to the boil. The next part of the process can vary somewhat: If you are looking for a fairly loose final result, you can stop at this point. If you will add more flavoring, such as a liqueur, to the PDF, boil it an additional minute to take the liquid into account. If you are seeking a thicker consistency (like a traditional PDF) or if you are using fruit juice without added fruit, cook the PDF a little longer. You can test the PDF's final consistency by putting a dab on a chilled plate to see how it looks. The helpful thing about this kind of pectin is that if the texture when cooled is not what you want, you can simply heat it up again and cook it a bit longer or you can add a little water or liquor to thin it out. There are other hints on how to fix things on the Pomona's site. Final notes: The sugar must be added in two amounts because apparently Pomona's doesn't jell properly with too much sugar at first, but more can be added later. I wanted to reduce the second amount, but it turned out that it is this extra sugar and the sorbitol that reduce the water activity (Aw of 0.59 for both apricot and cherry). Pomona's recommends using lemon juice only for certain fruits that might be dangerous to can because of their low acidity (such as blueberries), but I have found that it really helps counteract the sugar and perk up the flavor and so always use it; supposedly the added acid also helps with safe shelf life.
-
Tri2Cook, I am not an expert in the traditional PDF, but I would say that the recipe you included is in that style (mainly in cooking the mixture to 225F/107C). It is a bit unusual, though, in having more purée than sweetener (sucrose + glucose). All the traditional PDF recipes I have seen have more sweetener than fruit. That should make the Fat Duck recipe taste better. I don't know what its water activity reading would be (with the slightly reduced amount of sweetener), but traditional PDFs have fairly low readings My reason for moving to Pomona's is that I didn't like the cooked taste of traditional PDFs. Reaching 225/107 takes longer than one might think, and the fruit flavor (IMHO, of course) gets muted. With Pomona's you bring the mixture to boiling and then take it off the heat. That makes for a high Aw reading, but I use sorbitol to bring the water activity down dramatically. In the thread on PDF, @Bentley, who experimented with making a traditional PDF and then using a food processor to make it pipeable, nearly ruined his processor doing so. In that thread, @gap mentioned adding some alcohol to avoid this issue.
-
An excellent suggestion. Thanks. And I have some lavender in the cabinet that I can use for experiments.
-
Of course you are correct, it would decrease the reading--I had it backwards (this occurred to me after I had posted and gone to bed last night).
-
Bentley, I'm glad to hear from you. We had been discussing how to achieve Kate Weiser's pipeable PDF, but since I didn't get any feedback to my attempts to use Pomona's pectin, I never bothered to complete the description of my experimentation. For the cherry PDF in the cherry-coconut recipe, I used Pomona's. It thickens but does not get firm (because, after consulting with the Pomona's people, I used less pectin than a person making jelly would use), so it remains pipeable. I tested the water activity reading, and it was 0.59--quite respectable; I also used Pomona's optional lemon juice, which not only cuts the sweetness but increases [edit: should be "decreases"] the pH reading and thus lifespan of the PDF. With the minimal cooking and reduced amount of sugar, the flavor was--if I do say so myself--delicious (I'm going to have the rest of the cherry PDF on my toast tomorrow!). The next attempt will be with apricot, though I'm still pondering what to pair it with. Once the weather in Texas gets to the point where Kate begins shipping her product again, I plan to order some of her bonbons that include PDF to see if the flavors are as spectacular as the colors are. Jim
-
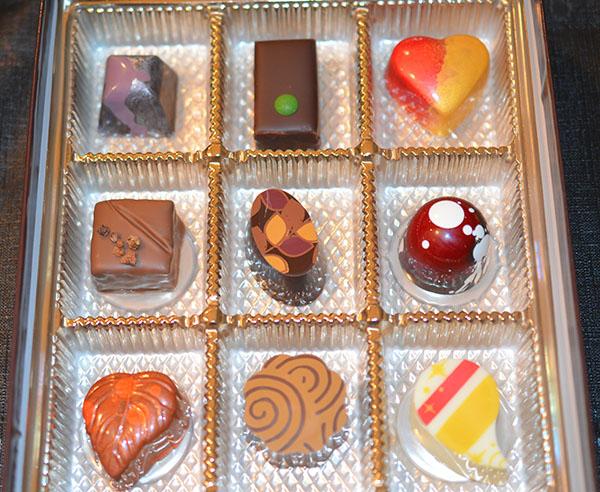
My first effort since the summer hiatus from chocolate-making: Top row: (1) Fig with port and anise, molded in dark chocolate. (2) Fresh mint and lemon ganache, molded in dark chocolate. (3) Passion fruit ganache, molded in white chocolate. Middle row: (1) Crispy hazelnut gianduja, dipped in milk chocolate, topped with caramelized cocoa nibs. (2) Toasted pecan caramel, molded in dark chocolate. (3) Layers of Morello cherry pâte de fruit and coconut cream, molded in dark chocolate. Bottom row: (1) Milk chocolate mousse flavored with orange blossom water, molded in milk chocolate. (2) Mocha latte ganache (Kahlúa and cream), molded in milk chocolate. (3) Pink grapefruit ganache flavored with Angostura bitters, molded in white chocolate.
-
I trust that--particularly on this forum--you were not using the word "obsessive" in a negative way!
-
Bentley, Alas, I am not the creator of that beautiful chocolate, but I can probably answer your question. As you already know, you can get close to what you want if you run the food processor a long, long time, but it's not possible to make completely smooth hazelnut paste in a home processor. I understand that there are stone grinders (from India, I think) that can do it. But if you don't want to go to that length, L'Epicérie in NYC carries various sizes of Cacao Barry hazelnut paste and hazelnut praline paste, and I think they are delicious. Recently I have discovered that I prefer gianduja made with 1/2 hazelnut paste and 1/2 dark chocolate--you don't get the added sugar of the praline paste. If you should order either of these items, be aware that L'Epicérie also carries a paste that is not completely smooth.
-
If you saw what I wrote about my July 4 experience, you have duplicated that in your kitchen. It isn't a question about whether the chocolate is still in temper. It can have all the Type V crystals in the world, but it can't cope with a warm environment. My guess is the best you can do is to take them out of the regular fridge in the coolest part of the day, unmold them, seal them as close to airtight as you can get, then rush them into the wine fridge, and leave them there--until it's time to eat them!
-
Here are the first 3 links on Google--from NY Times, Wikipedia, and a site that ranks various brands of calvados. And no, it's not a brand. http://www.nytimes.com/2011/11/02/dining/calvados-a-taste-of-apples-and-fall-the-pour.html?_r=0 https://en.wikipedia.org/wiki/Calvados http://gearpatrol.com/2015/11/05/calvados-buying-guide-cocktail-recipes/
-
I gather you are making solid pieces, not chocolate shells to be filled later. I don't do this kind of chocolate molding, but I think they should be ready to unmold after 10-15 minutes. I might leave them a little bit longer just to be sure. You can always test to see how readily they come out of the mold and leave them longer if necessary. I also pop chocolates in the freezer for a few minutes if they are stubborn in unmolding. Maybe somebody with experience making solid chocolates will chime in with more advice.
-
After you fill the mold, the chocolate is very wet looking. When it begins to crystallize, it loses that wet look and acquires a matte, not-so-shiny look; it usually starts from the outside of each cavity. It's the same look you would have gotten when you were testing for temper with a knife. I put the molds in the fridge when a majority of the cavities show this sign. Kerry suggested earlier in this thread that 10-15 minutes should do it. I sometimes leave the molds longer without ill effect.
-
You do not mention putting the molds in the (regular) refrigerator as soon as the chocolate shows signs of setting. I had similar issues until I started doing that. Do you have a friend with a cooler kitchen than yours? Trying the process there would eliminate the factor of ambient heat.
-
I think you are misunderstanding a little about the seed method. It is explained on the website of your chocolate manufacturer. You don't need to go down to 86F or to any temperature lower than the final working temp. As the Santa Barbara website states: "Add 4oz of unmelted coins to the fluid chocolate, stir until all pieces are melted and the temperature of the chocolate has reduced to 89°F or 86°F depending on which chocolate you are working with." So all you have to do for dark choc. is to go from the melting point down to 89 (86 is for milk choc.). It doesn't do any harm to go lower, then back up, but you are wasting time.
-
I'm sorry but at 78F chocolate is probably going to soften--and will certainly lose its sheen and snap. I took chocolates to a July 4 party packed in a cooler with lots of ice, and they were fine...until they had sat out for 15 minutes on a warm and very humid Virginia day. They tasted fine but had a dull look and felt a bit tacky to the touch.
-
I should have added to what I said above: I think most people recommend adding seed to chocolate as soon as it reaches its max temperature because it helps to cool the choc. down faster, but it doesn't really help with tempering until it reaches the magic temp when Type V crystals form. Or at least that's my understanding of what is ultimately a mysterious and sometimes unpredictable process.
-
Do you mind telling us what brand of chocolate you are using? What Pastrygirl says is crucial about the seed: above 93F or so, all (of most) of its crystals are melting and just becoming an additional part of the pool of untempered chocolate. Seed begins to "count" when you are getting at the maximum for Type V crystals (approximately 92.8F). Actually I wait to add seed until the choc. is around 95 and don't have to add so much that way and also don't have to worry as much about getting it all melted because there is less of it. The aforementioned Kerry can explain the latent heat of crystallization better than I, but until she shows up: You have to give the crystallizing chocolate a way to release the heat that is given off or it can get trapped in the mold and throw the chocolate out of temper. Most experts say to let it sit at room temp until it shows signs of crystallizing (it gets that telltale matte rather than wet look), then put it in the (real) fridge for at least 5 minutes. You may have to use your wine fridge as a substitute for the room-temp period of time. Your room does seem too warm, but the wine fridge may be able to counteract some of that issue, but from what I have read, the choc. needs to cool off rather quickly to let that latent heat dissipate.
-

EZtemper - The Help You Need to Achieve Perfectly Tempered Chocolate FAST!
Jim D. replied to a topic in Pastry & Baking
I have learned that overcrystallization can be delayed by cutting the amount of silk in half (that is, using .5% rather than 1%). As the directions say, I wait until the temp is down to about 92.3F/33.5C before adding it; by the time the temp is down to 90F/32C, the chocolate tests as in temper. -
Spraying Chocolate: Equipment, Materials, and Techniques
Jim D. replied to a topic in Pastry & Baking
Chris, But you are using a higher-power spray gun rather than a typical airbrush, correct? That might require more power. I too have the Iwata SmartJet and don't find the pressure is the problem, at least with my Paasche airbrush. The issue is more with having the cocoa butter come out in a steady spray. Mine sprays fine for a few cavities, then I have to stop and heat everything and shake the bottle. It's as if something gets stuck in the siphon, then gets dislodged. I have even wondered if the glittery cocoa butter is the culprit (Chef Rubber's "Jewel" product), but the issue sometimes occurs with regular c.b. -
Thanks for posting the recipes. I am quite puzzled by the added water. Why would one wish to reduce the shelf life? Most us seek just the opposite. I appreciate the details about the types of cheese and port (now to the challenge of finding the proper cheese). What is meant by "plain chocolate"? I assume it's not unsweetened, but dark chocolate. Correct?
-
Pastrygirl, Very interesting information and good of you to share it. If you have more time with Melissa and the subject of shelf life comes up, perhaps you could inquire as to what effect adding alcohol to a filling has and whether it is quantifiable in any way. This is being discussed in the thread about cheese fillings for chocolates. I had read from the eGullet workshop in Las Vegas a couple of years back that shelf life did not appear to be one of her great concerns. Jim
-
I received nothing. Did you send it in a PM? According to my understanding of eGullet rules, it's OK to post ingredient lists (as they cannot be copyrighted), but instructions have to be paraphrased.
-
Ruth, That is really low. Are you making mostly caramels, toffees, etc.? I can't see how you do that with cream ganache. Any secrets? Jim
-
Yes, there is something called an Aw (activity of water) meter. You put a small amount of the substance to be tested (such as ganache) in a small cup and fit the meter over it (or insert the cup into the meter for the more expensive models). In a couple of minutes the machine beeps and gives you a reading somewhere between 0 and 1 (why scientists chose such a narrow range escapes me). According to Wybauw, a reading greater than 0.85 means the filling can be kept for a maximum of 3 weeks, a reading between 0.70 and 0.85 = max. of 3 months, between 0.65 and 0.70 = 6-9 months. I test all my recipes at least once, and if the reading is above 0.85, I reformulate or (if there is purée involved) reduce it more. In my recent experimentation (discussed elsewhere) with pâte de fruit made with Pomona's pectin (and much less sugar than usual) I tested repeatedly because I did not believe the low readings at first. I would never sell (or give away) anything with a reading in the 0.90 range. Next you are going to ask how much an Aw meter costs. I have what I think is the least expensive one that has a good reputation, the Pawkit by Decagon Devices. New it cost me $2,260 with shipping and a lot of supplies included. It is the meter that some others on eGullet have (Kerry Beal and Ruth of Chocolot, I think), and I have read that Kerry got hers used for a lot less money (she seems to have a genius for finding such bargains all the time!). As I said in this thread, everyone says that alcohol increases the shelf life of a ganache, but I don't know of any way of calculating this (perhaps someone else on eGullet will know). Wybauw says that adding 15% alcohol to the moisture quantity of a ganache increases its shelf life. I fully expect the Aw reading of the Stilton filling to be high, but we'll see how much port it contains.
-
I would also like to have the recipes that you offered. At first I found the idea totally repulsive, but Stilton and port in dark chocolate is intriguing. If you post that recipe, I'll give it a try and see what the water activity is (although the port will make a difference in shelf life that is, as far as I know, not measurable). Do you use an aged Stilton with a strong aroma or something less so? Tawny port or dark (purple)?
