Jim D.
-
Posts
2,415 -
Joined
-
Last visited
Content Type
Profiles
Forums
Store
Help Articles
Everything posted by Jim D.
-
190g of raspberry purée is combined with 50g sugar and 30g glucose and brought to a boil. Combine 9g pectin and 15g sugar, then add to the purée, then 1g lemon juice. Then the directions differ a little from the usual PDF (no temp is mentioned): Boil for 3 minutes or "until the mixture coats the back of a spatula." Cool and then pipe into molds. I have found that 3 minutes is far too long and produces a firm substance that cannot be piped. Do you see any clues in the recipe that would account for the very high Aw reading? It is, of course, possible that I made an error in taking the reading, but I was so startled by the 0.93 reading that I have shied away from the recipe (though the combination of the raspberry layer with an orange-infused dark chocolate layer is delicious).
-
I'm glad you brought that up. Recently I was making a Notter recipe that calls for a layer of raspberry piped into a mold, then another layer of orange-flavored dark chocolate. The raspberry isn't quite the firm texture of a PDF (Notter calls it a coulis--which is not exactly accurate), but the method is the same and quite a bit of sugar is involved. I have an Aw meter and tested the two fillings. I was startled to see a 0.93 reading for the coulis--.07 higher and it would have been all water! I am not sure what to conclude from this. Perhaps the high amount of sugar in a PDF preserves it in spite of the high water content? I checked books from Wybauw, who is fanatical about shelf life. Surely, I thought, he won't include any PDFs in his chocolates. But in fact he does, though interestingly he does not ordinarily include the Aw reading for these. Maybe water activity is irrelevant for PDFs?
-
Just to correct the record: Kerry Beal's EZtemper machine does not directly temper chocolate (or make ice cream). The user places solid cocoa butter in it, and the machine creates a semi-melted product (called "cocoa butter silk") and holds it at a set temperature practically forever. The silk can be used to temper chocolate quickly and with less mess than when using small already-tempered pieces of chocolate and has other uses, such as tempering/crystallizing gianduja, meltaways, and ganaches. It speeds up the production of chocolates quite noticeably and especially makes the crystallization of slabbed ganaches faster and more reliable.
-
Good point. I had not thought of that. I might experiment this summer by using Pomona's in a PDF and keeping it for a while to see what happens.
-
In regard to using PDF as a filling for chocolates: Instead of trying to get the PDF into a mold, you could (after the PDF has set and cooled) cut it into pieces and dip them in chocolate. To deal with the sweetness, you could use a quite dark chocolate. And to make it more interesting you could add a complementary layer, e.g., passion fruit PDF paired with lemon or vanilla ganache; mango PDF paired with lime ganache; cherry PDF paired with almond gianduja. A propos the sweetness issue: I don't use PDFs often because of the excessive sweetness mentioned previously. A couple of times I tried Pomona's pectin, which calls for considerably less sugar (and less cooking, which helps with retaining the fruit flavor). I'm not sure why chocolatiers/confectioners don't use it more often and would be interested in others' views on that subject.
-

Your Daily Sweets: What Are You Making and Baking? (2015 – 2016)
Jim D. replied to a topic in Pastry & Baking
I'm assuming the nibs (or nuts) would not stay crisp in a cream ganache. I did discover recently that toasted pistachios are OK in a ganache--but pistachios are never all that crisp to start with. -
Your Daily Sweets: What Are You Making and Baking? (2015 – 2016)
Jim D. replied to a topic in Pastry & Baking
Pastrygirl, That looks like a fantastic dessert, beautiful to look at. How do you candy cocoa nibs? Sounds intriguing. Jim -
I use recipes from Greweling, Notter, and Shotts that use more or less the same technique. I grind the coffee coarsely, steep it in the warm cream for about 15 minutes, then strain it out (the coarse grind makes it easier), pressing on the grounds (if a little finely ground coffee gets through, that's even better). Finally I add enough additional cream to reach the original weight of cream. I think a coffee layer is great paired with a vanilla one or a caramel one (including dulce de leche, as in Greweling).
-
Although I was not a participant in the workshop, I would like to comment on this question: I have used the PCB transfer sheets (made in France and available in the US from Qzina and Bakedeco, probably other places as well) and have recently purchased some from Chocotransfersheets. I have not used the Chef Rubber product and do not know whether they make their own or use another brand. The PCB items are beautifully photographed and work very well, with little melting in the process of cutting and placing them, but I have found that some of them do not live up to the image online (one of them had very different colors and in others the color has seemed less vibrant than pictured--obviously they employ a gifted photographer). In addition, many of the designs are large, so that when applied to an individual chocolate the overall design is mostly lost. I realized this after I had purchased quite a few. They would be great for use on something larger, such as a cake. It seems to me that Chocotransfersheets has quite a lot of smaller designs that work very well with chocolates, and I have been very pleased with the vibrant colors. They also sell smaller packages, which is great for the small producer. There is an issue, however, with their tendency to melt more quickly when I am working with them--even when I wear gloves. In viewing sheets online, I also think that Chef Rubber has many small designs that would work well with chocolates. My universal complaint (though it's something that is unavoidable) is that it is quite difficult to choose colors that work with dark or milk chocolate. A beautiful red will turn to brown every time. Yellow and white work quite well, green is not too bad. I know that one can spray them with white cocoa butter, but I did not find that successful the one time I tried it. I would certainly be a customer for transfer sheets that feature opaque colors.
-
In a previous discussion of making a stripe, one person mentioned that she had found a food-safe adhesive and used it successfully for this effect: I mentioned in my reply that I was unable to find this food-safe adhesive (I was hoping she would reply with where to locate it), but there were no more postings in that thread.
-
Curls, Any chance Morato revealed how he got that perfect thin stripe on the dome (second photo down in the post on Morato)? You know, the perfect stripe so many of us have tried to achieve?
-
L'Epicerie in NYC has several different types of pistachio paste. Go to the site and do a search for "pistachio paste." I use the Agrimontana brand from Sicily (they have two varieties: one completely smooth and the other with some texture).
-
I vacuum-seal and freeze leftover caramel all the time. As gfron1 said, it doesn't usually freeze completely solid. Once I take it out and heat it, it always appears and tastes fine to me. With a vacuum seal, it doesn't pick up any moisture. You can also mix it with a new batch with no problems. As also said previously, it probably isn't necessary to freeze caramel, but if you have the space, why not?
-
The question of whether colored cocoa butter needs tempering (in any traditional sense) has been debated on eGullet at some length. Many experts say the act of finger-painting or spraying tempers the c.b. I am not totally convinced this is true: If all the Type V crystals are melted out (easy to do in the microwave, I have learned), will simply lowering the temp and agitating the c.b. temper it? I have had enough failures with decorating molds and then having trouble getting the chocolates out that I have recently begun testing the c.b. each time. And if it is out of temper, I just add a little cocoa butter silk (from the EZtemper) to whatever container I am using, stir vigorously, then test. It has always tested as being in temper with this method. As I say, this may be overdoing it (and who can argue with some of the beautiful results from those who do not temper?) but it cannot hurt. When using c.b. from a bottle that is still solid, I use the method mentioned by Kerry--but in that case Type V crystals are being introduced from the unmelted c.b.
-
My question about using glucose was whether I should proportion the amount of sugar in the recipe to (approx.) 75% of the sugar called for + 25% glucose. I know sugar and glucose don't have the same degree of sweetening, but, roughly speaking, if I split the sugar into sugar + glucose, this is not adding any sugar to the recipe. Greweling doesn't mention using a "doctor" in this specific recipe, but he refers to his basic dry caramel method, in which he calls for some sort of doctor but doesn't give an amount. I'm making the basic assumption in the walnut recipe that he is taking into account the additional sweetness of the fondant and the almond paste.
-
A further question: If I switch to the wet caramel method for the walnut recipe, what amount of glucose would be recommended? A typical caramel recipe might call for 4:1 sugar to glucose. Greweling specifies 110g of sugar (no glucose mentioned). Should I assume the amount of sugar should be adjusted downward to account for 1/4 glucose? As I mentioned previously, the addition of fondant and almond paste (both of which contain sugar) complicates matters.
-
pastryani, "In my experience dry caramel can be pretty tricky and you have to be super fast - you could try repeating the recipe but with a wet caramel for a little added insurance." As I gave the issue more thought after posting, this was my conclusion as well. As for the process, I think the sugar was all melted and was a rather light color (which I was aiming for). To support your diagnosis, I was making a very small amount of the Greweling recipe, so the sugar went from white to brown quite quickly.
-
My question seems to go under this general topic, though it's been a long time since the topic had any comments. Today I tried Peter Greweling's walnut bon bons. He calls for a "dry caramel." I did that, using a bit of glucose as a "doctor," then added the heated cream and right away added the almond paste and fondant, then the toasted walnuts. He does not call for any cooking beyond the initial caramelizing of the sugar. Once the mixture cooled a little, I tasted it, and it was delicious. But later, when the mixture had solidified, it had become almost too firm to eat. I might have been able to pipe it into molds at an earlier point, but it would have made for a rough eating experience once it was completely cool. My question is what to do to keep it pliable. Since there is no cooking of the caramel (as in the case of a "wet caramel"), I don't see how I can cook it less. I thought of using a wet caramel instead, but the adding of almond paste and fondant make getting the measurements a little tricky--obviously the fondant contributes some sweetness that is not in the usual caramel. It almost seems as if the recipe doesn't call for enough cream (amounts are 240g cream, 110g sugar, 190g fondant, 230g almond paste). Any suggestions would be welcome.
-
You might find this thread useful:
-
pastryani, Very nice decorations on the eggs. Were the background colors done with an airbrush? Could you tell me what mold you are using and approximately how long the cavities are?
-
I think the company selling those molds still has some--they are $8 each plus shipping. If you want the link, I can PM it to you. The luster dust can be found here.
-
"can you describe your decorating technique for the mint ganache bon bon and the lime cream?" Thanks for your kind remarks. For the mint: This is a new (to me) mold I got at 1/3 price from a company getting rid of many of them. I first splattered green cocoa butter, then brushed the mold with gold luster dust, then cast it in dark chocolate. I must add that the real pain of this decoration is cleaning the mold afterward. I still haven't gotten all the gold and green out of the corners of the cavities--and, of course, having square corners does not help. For the lime: I airbrushed about 2/3 of the leaf mold first with green, then the other third with gold, then cast in white chocolate.
-
Ruth Wells: The Aw reading for the peanut butter "mousse" was 0.43--very low. Actually it is a meltaway (based on Greweling's recipe), using coconut oil and milk chocolate; I used the word "mousse" because I didn't think most people would have heard of the actual term. I tried another truer mousse recently, actually a butter ganache that I whipped (based on a Wybauw recipe), and its Aw was 0.52. I cannot attest to the long-term shelf life of these products, but, in theory at least, they should be fine with those low water activity readings. They tasted fine for as long as I had any around (probably around 3 weeks).
-
You can find basic price information on these websites: for chocolate: www.chocosphere.com for Boiron purées: https://www.markys.com/Tea-Desserts-and-Jams/fruit-puree/ These are prices for the general public; there may well be discounts for business customers, but those would probably not be posted.
-
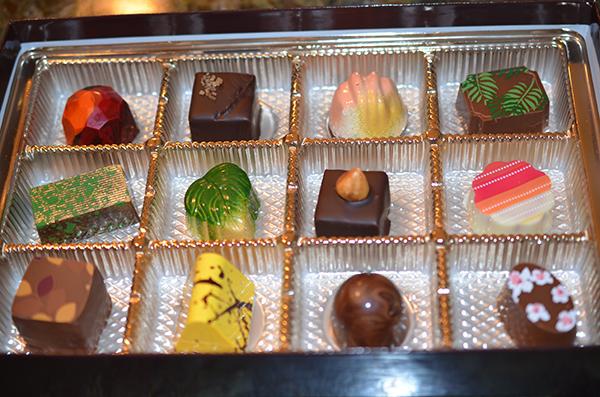
My Easter 2016 collection: top row: (1) layers of blood orange ganache and salted caramel, molded in dark chocolate, (2) gingerbread-flavored ganache, dipped in dark chocolate, topped with muscovado sugar, (3) layers of apricot preserves and marzipan, molded in dark chocolate, (4) toasted pinenut ganache with anise, molded in milk chocolate middle row: (1) mint ganache, molded in dark chocolate, (2) lime cream, molded in white chocolate, (3) layers of coffee ganache and hazelnut gianduja, dipped in dark chocolate, topped with a toasted hazelnut, (4) strawberry cream, molded in white chocolate bottom row: (1) layers of black currant ganache and crispy hazelnut gianduja, dipped in milk chocolate, (2) banana coconut cream with coconut rum, molded in white chocolate, (3) layers of raspberry preserves and peanut butter mousse, molded in milk chocolate, (4) apple caramel, molded in milk chocolate