

Jim D.
-
Posts
2,415 -
Joined
-
Last visited
Content Type
Profiles
Forums
Store
Help Articles
Everything posted by Jim D.
-
I think that is the same tape that@pastrygirl said Melissa Coppel was using. I bought it under the Martha Stewart brand, and in the thread linked to below demonstrated that I could not make it work. So please tell us exactly what you did.
-

Spraying Chocolate: Equipment, Materials, and Techniques
Jim D. replied to a topic in Pastry & Baking
I'm not sure why you find that a problem. Does the PSI on yours drop to zero just before the motor turns on to refill the tank? Mine drops until the PSI reaches a certain set point, when it comes on, but during that process, there is still enough PSI to continue working. The small compressors (such as the Iwata Studio series) provide compressed air on demand, and so don't require a tank for storage. The downside, of course, is that their PSI is low (and, in the case of the Iwata that I have, their price is relatively high). -
Is it the same as the Chocolate World #1673 mold? Called a quenelle by some people. I bought 6 of these and was not thrilled. They are rather long, but don't hold a lot of filling. They are probably better with two fitted together (and they have the holes to help with that).
-
I have the Aqualab Pawkit, used by several on this forum. Aqualab has now become Meter Group, but I think the Pawkit is still sold, though they are emphasizing more expensive equipment now (the Pawkit is labeled a "legacy" product). I am happy with it. It's accurate to within + or -0.02 (which is enough for me). Warning: it is not inexpensive.
-
Definitely true. There is a drying out and shrinking of the ganache that happens as well as a fading of the flavor.
-
To add to what I said above: If a shelf life of 3 weeks sounds like a "no problem" situation, it isn't. I talked to someone a couple of days ago who received a box of my chocolates as a Christmas gift. She proudly announced that she is still (this was on Feb. 10) enjoying them, one piece per day! That is the sort of information that keeps me vigilant and led me to purchase a water activity meter. No one has any control over what the recipient does with the bonbon. And that is why I would never produce a bonbon such as the crème brûlée one sold by a famous NYC chocolatier (who, I have read, tells customers to consume it within a day or so). And finally, it is why I purchased food insurance.
-
Yes, it is. Or at least knowing the water activity can provide an estimate of shelf life (about the only indicator there is, aside from just keeping ganache for a while and checking it for spoilage from time to time). Jean-Pierre Wybauw gives the following guide for how long a ganache can be safely kept: for an Aw greater than 0.85: maximum of 3 weeks for an Aw between 0.70 and 0.85: maximum of 3 months for an Aw between 0.65 and 0.70: maximum of 9 months for an Aw below 0.65: "the ganache is microbially stable" (I'm assuming that basically means "forever") I operate on the general principle that the Aw must always be below 0.85, with the goal of getting it as low as possible. In the U.S. some states have specific regulations that nothing at 0.85 or higher can legally be sold.
-
When you refer to "cookie butter gianduja," you are referring to the paste + choc slab? This method would have the flavor, but I'm not sure how much crunch there would still be after the shortbread has been reduced to a paste.
-
That sounds entirely too easy! Thanks for the idea.
-
I remain pleased with the inclusion of a shortbread cookie in a bonbon and have refined the logistics of getting it in the shell successfully. Now I would like to find a way to include those same cookies in a truffle. I make a chocolate chip cookie truffle by creating a ganache with Dulcey, cream, and molasses, then add coarsely chopped dark chocolate and pecans, and roll the mixture into balls, which I dip in dark chocolate (milk also works) and decorate with either more chopped pecans or cocoa nibs. I think adding pieces of the shortbread cookie would contribute a great deal toward reaching the taste of an actual chocolate chip cookie, but of course there is the issue that a ganache will soften the cookie bits (in my current use of the cookies, they are surrounded with gianduja, so no problem). I can't make this as a bonbon because the pecan and dark chocolate pieces cannot be piped successfully. But I'm stuck with how to protect the cookies in a ganache. I've had a couple of thoughts: (1) Turn the base mixture into a gianduja with Dulcey and some sort of nut paste (pecan probably). But that leaves out the molasses taste (which is meant to suggest brown sugar), and in my experience giandujas tend to get very firm--and regulating the final texture is nearly impossible because nut pastes vary so much in viscosity (you don't know how they will turn out until it's too late). (2) My other thought would involve the kind of detailed work that only a few (not mentioning any names ) would undertake: bake the shortbread cookies not as 1" rounds but as small squares, which could be dipped in chocolate to protect them from the effects of the cream and molasses. These would be substituted for the chopped chocolate and would still suggest chocolate chips--with the bonus of the buttery cookie flavor from the shortbread bits. If anyone has other ideas, I would love to hear them before I begin experimenting.
-
I thought she used the Fuji for that. Or are you referring to the "aim the airbrush at a stick so that the cocoa butter will ricochet onto the mold" technique? I had forgotten about the latter. I had success with it one time. I used a metal spatula for that, but the c.b. crystallized too quickly on the metal, and I haven't found a wooden tongue depressor (or wide craft stick).
-
Regarding the Salvatore Martone snipped ballpoint pen technique from earlier in this thread: The pens I have don't have the apparent taper shown in his video, so they end up being a straight hollow tube. For me, it wasn't so easy a process as he makes it look. First, some of the ink got out of the pen onto my hands (wear gloves next time!). The tube was a bit too large to fit into the Grex airbrush, so I basically had to hold it in place while airbrushing. I noticed that Martone also holds the tube, but his fits into the nozzle and so is more secure. The good news: The arrangement does produce splatter. I'm not sure why lengthening the path of the cocoa butter creates splatter, but it does. The bad news: The splatter isn't reliable in size, and as soon as the tube gets some crystallized c.b. in it, the output is greatly reduced. I think technique would improve with lots of practice, and it certainly is the least messy way of producing splatter with a regular airbrush.
-
Mine was done by splattering copper and green cocoa butter, then molding in milk chocolate. I have never been happy with the various brushes I have used; this was done with a Mr. Clean dish brush--rather thick bristles, but basically too large (there is a huge amount of "overbrushing"). Toothbrushes have produced rather large blobs that make the c.b. look like a bad case of measles. I am not going to use the airbrush-while-dripping-from-a-cocoa-butter-bottle technique. I don't mind messy, but that is a whole new level of mess.
-
Thanks. I wasn't consciously imitating a recent one of yours, but it is similar--when you used tobacco in the filling.
-
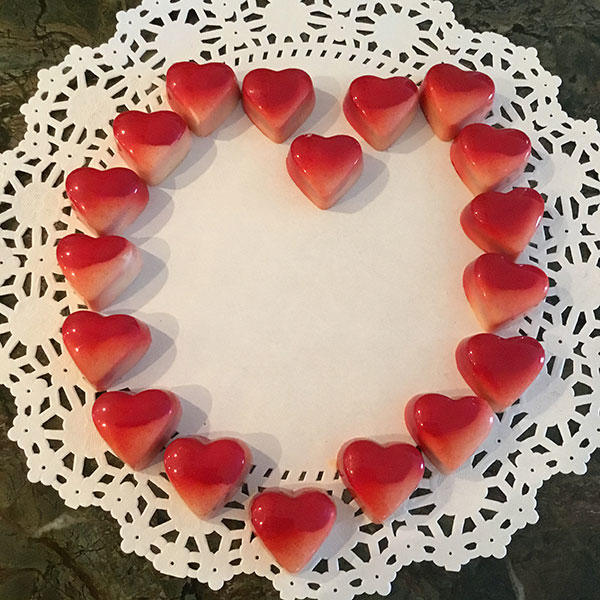
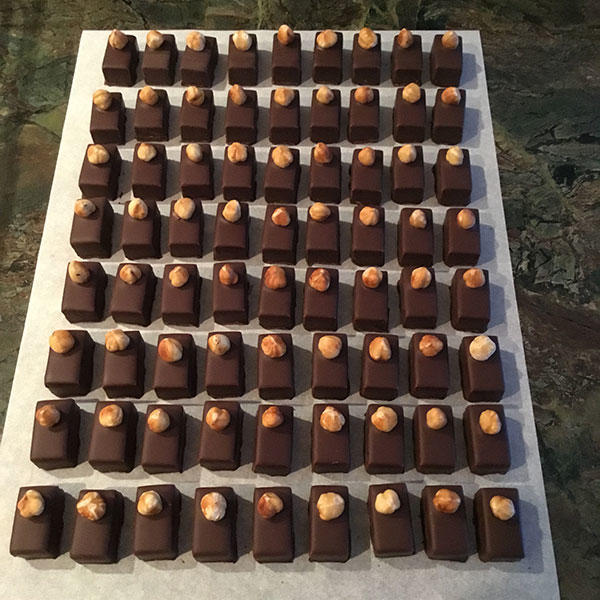
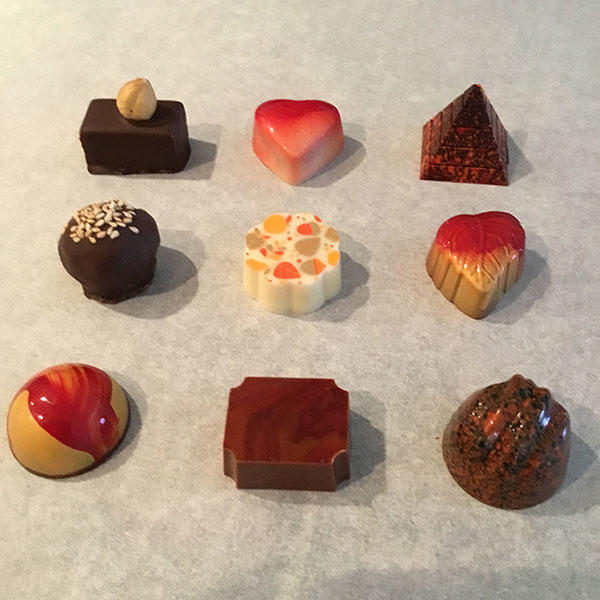
Photos from Valentine's 2018: The mold of choice for Valentine's? Hearts, of course, these filled with strawberry pâte de fruit plus Meyer lemon ganache. A squadron of hazelnut latte bars ready to be boxed: coffee ganache with Kahlúa plus hazelnut ganache with Frangelico, dipped in Maracaibo dark chocolate and topped with a toasted hazelnut. The assortment. Top row: hazelnut latte, strawberry pâte de fruit & Meyer lemon ganache, dark caramel with Maldon sea salt. Middle row: sesame truffle, citrus (orange, lemon, lime) ganache, apple caramel. Bottom row: toasted almond & cherry gianduja, chocolate mousse with orange, pecan shortbread & caramel. I have to add that, for all the hype I used in the description, the hazelnut latte was a disappointment. Yes, I know the recipe comes from the person probably at the top of the pantheon of chocolate gods, Peter Greweling, but the hazelnut part just doesn't have much flavor. It's white chocolate with a small amount of hazelnut praline paste emulsified with cream and some Frangelico. There is not enough praline paste, but more would mean this already-soft ganache would never set enough to cut. I'm thinking next time I will make a gianduja containing only white chocolate and hazelnut praline paste for a stronger hazelnut flavor.
-
Spraying Chocolate: Equipment, Materials, and Techniques
Jim D. replied to a topic in Pastry & Baking
I do exactly what @pastrygirl described. If you do a second spray too soon, it blows the still-wet cocoa butter around and you can get bare spots. I try not to make the final result too thick, but for full coverage you really have to spray more than a single time--unless you intend the color of the underlying chocolate to be part of the design (as in pastrygirl's hearts, seen earlier in this thread). If you need a backing layer of white (as when you don't want the underlying chocolate color to show), then it's more difficult because the white can easily get too thick as you aim for full coverage (and you also get that offputting taste of titanium dioxide in the white cocoa butter). -
Spraying Chocolate: Equipment, Materials, and Techniques
Jim D. replied to a topic in Pastry & Baking
Not to belabor the issue too much, but you are working with a 1/5 HP compressor (correct?). That's what I had with the previous Paasche external-mix airbrush. For me, it's been a night and day difference in airbrush output since getting more HP. But IIRC you aren't working for a chef any longer. I belong to a different school of thought: Having shiny stainless doesn't necessarily mean it is sanitized stainless! -
Spraying Chocolate: Equipment, Materials, and Techniques
Jim D. replied to a topic in Pastry & Baking
I think isopropyl evaporates almost immediately (some people use it to clean their molds), so I don't see any harm. I am curious, though, as to why your airbrush was so "gunked up." Was it more than hardened cocoa butter? It seems to me that if you go to all the trouble of getting the brush as clean as you can, isn't it at mostly the same situation the moment you start blowing cocoa butter through it? If you are, for example, spraying red, then, after cleaning the reservoir of leftover red (which will take time), pour some yellow into the cup, the airbrush is going to be filled with quickly hardening red, which has to be melted out before the output turns from red to orange to yellow. -
Spraying Chocolate: Equipment, Materials, and Techniques
Jim D. replied to a topic in Pastry & Baking
See the post from @pastrygirl a few posts above yours for her method. I leave the cocoa butter in the airbrush and melt it out the next time. You should definitely not use soap or solvent to clean it. I'm not sure what good would come from the use of oil. -
You could stop using Himalayan salt and see if the taste improves. I once sprinkled pink Himalayan salt on some caramels dipped in chocolate, and it came close to ruining them--overwhelming salty taste.
-
@RobertM answered your questions. I would just add that most people do not temper cocoa butter--at least not in any traditional way (the way I see most often is partially melting the bottle contents, then shaking the bottle and assuming the c.b. is in temper)--but obviously Bob tempers his and I do as well. If I overheat it in the melting process, I use a dab of cocoa butter silk from the EZtemper. I always test the c.b. for temper. This may seem extreme, but I figure that if I do all I can and the c.b. still sticks in the mold, then at least it isn't because I skipped a step that I could have easily taken. As to your question about "being sure," oh that certainty were a possibility. Yesterday I unmolded 21 pieces decorated with red and gold c.b.: 20 chocolates fell out of the inverted mold with no effort whatever; after considerable banging on the counter, the 21st came out, leaving bits of red and gold c.b. behind. It does seem to me that certain shapes can sometimes be more difficult, such as domes, but that may be my imagination. All sorts of theories have been proposed as to the cause of sticking c.b. (you didn't notice but you touched the mold with a warm finger in a certain place and the chocolate in that spot stuck, or c.b. in the airbrush got too warm), but I think all of us know of cases that disprove such theories. My "solution": Always make more bonbons than you need and try to relax about the failures. Another actual solution: Use magnetic molds with transfer sheets--which never stick. But where's the challenge with that?
-
Bought the Martha Stewart tape, cut a strip of the 1/4", and placed it in a demisphere mold (I can't imagine doing this in one that is more "enclosed," such as a dome). The first time I added colored cocoa butter with a finger. It got under the tape everywhere, total mess. Second time: On the second try I pressed the tape as firmly against the polycarbonate as I could, pressed it again, then sprayed with airbrush. It's the closest I have ever come to success with striping, but obviously, not good enough. The cocoa butter seems to bond together so much that it comes off in chunks (as paint does sometimes). Perhaps the tape should be removed when the c.b. is still a bit wet? If it weren't obvious already, I am not Melissa Coppel.
-
Spraying Chocolate: Equipment, Materials, and Techniques
Jim D. replied to a topic in Pastry & Baking
@Rajala, I am very pleased with my compressor and the Grex airbrush with the 0.7mm nozzle. It's not perfect, but it's better than my previous setup. I would love to have the Fuji spray gun system, but I saw it in action last year and it would be overkill for my production. Do I think I might someday want something more? No, I don't. If I ever changed my mind, it would be to get the Fuji (don't look at their website--you'll end up moving to a larger apartment to make room for it). If I were doing velveting, I would probably buy an inexpensive paint sprayer. Compressors fill with air with the maximum noise (the California Air Tool one I have is not loud at all, especially after you get used to it), then shut off while you continue to use the air until the pressure drops to a preset point, then the motor switches on again and compresses more air. The 2010 compressor motor, with its smaller tank, would have to run more often. I would estimate in my setup the compressor maintains usable PSI for several minutes (not just a few seconds) before the motor kicks in again--but during the whole process there is always a supply of compressed air for the airbrush and I never have to wait for it to get back up to usable PSI. I have uploaded the diagram (note that it was provided by Grex and so uses their part numbers) to my website: http://www.jamesdutton.net/chocolates/airbrush_setup_diagram.pdf -
Spraying Chocolate: Equipment, Materials, and Techniques
Jim D. replied to a topic in Pastry & Baking
@Rajala, I looked up the specs on 3 California Air Tools compressors and took the prices from Amazon: The 4620, the one I actually got: 2HP maximum PSI of 125 holds 4.6 gal. 2 tanks runs at 70 decibels costs $280.60 The 4610, the one I originally ordered: 1HP maximum PSI of 120 holds 4.6 gal. 2 tanks runs at 60 decibels costs $197.50 The 2010 that you mentioned: 1HP maximum PSI of 90 holds 2 gal. 1 tank runs at 60 decibels costs $165 I was told that the advantage of two air tanks is that any moisture drains from the top one to the bottom, dissipating on the way down to where the release value is located. With an added moisture trap, I don't think that is a big issue (just my opinion). As you would be seeking max pressure of around 60 PSI, any of the three will easily accomplish that. I think the 2010 is less expensive because it has only one tank, reaches a lower PSI than the others, and holds 2 gal. (meaning it would take longer to fill each time the pressure diminishes). The 4620 is a bit louder. If space is a major consideration, then the 2010, with only one tank, would be less tall, though I think it occupies the same floor space as the others. Yes, I did the research, but I knew absolutely nothing about air compressors when I started and got all this information from the web, eGullet, and Grex support staff. I am "mechanically challenged," to put it gently and would be embarrassed if anyone saw the length of the email chain between me and Grex. Please feel to ask any more questions, and I will answer if I can. -
Spraying Chocolate: Equipment, Materials, and Techniques
Jim D. replied to a topic in Pastry & Baking
Grex recommends a 1HP compressor for use with its airbrush with a 0.5 or 0.7mm nozzle (0.7 is the largest they make). When I ordered my setup, they were out of the 1HP and so I got a 2HP for the same price. The compressor was a California Air Tools compressor (model 4620), rebranded by Grex. I don't know where you are located, so don't know what is available to you. This compressor is advertised as unusually quiet (the company has a video demonstrating its sound level). It's not huge, but it is considerably larger than my earlier compressor. If you do go with a larger compressor, then yes, you should probably add a moisture trap (these are very inexpensive), especially if you are in a climate that has high humidity. If you get to that point, I have a very helpful diagram that the support person at Grex sent me showing how the whole system fits together and what to buy to make it work. But on reading your restated numbers (two molds at a time) and considering your space and noise limitations, I think you may have to settle for something on a smaller scale. As for using one device for both applications (bon bon decorating and velvet spraying), unless you really thin out chocolate with a lot of cocoa butter, I think chocolate is more viscous than cocoa butter by itself, so I doubt that an airbrush would do the velvet spray you want, but I have never tried that. Every video I have seen shows a sprayer type machine in use (such as one of the Krea sprayers or a regular paint gun). High-volume chocolatiers use a sprayer for decorating their molds, but the reservoirs on those hold a lot of cocoa butter, so you could use a sprayer for both applications, but, for chocolates, you would need a (probably prohibitively) large amount of cocoa butter.

