

Jim D.
-
Posts
2,415 -
Joined
-
Last visited
Content Type
Profiles
Forums
Store
Help Articles
Everything posted by Jim D.
-
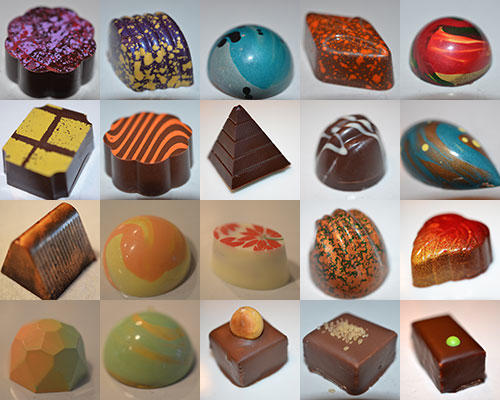
Now that there are a few minutes to relax, here is a photo of the Christmas 2017 selection (there were two assortments of 12 each, with some overlap): 1st row: walnut caramel, fig with port & anise, dark chocolate with absinthe, marshmallow & peanut butter gianduja, cherry pâte de fruit & pistachio gianduja. 2nd row: banana & passion fruit caramel, spiced pumpkin ganache, dark caramel with Maldon sea salt, hazelnut praline ganache, coffee ganache with cardamom. 3rd row: crème brûlée, apricot pâte de fruit & almond gianduja, cranberry ganache, layers of caramel, pecan gianduja & shortbread, apple caramel. 4th row: mango pâte de fruit & mango ganache, pear pâte de fruit & almond cream, black currant ganache & crispy hazelnut gianduja, gingerbread, lemon mint bar.
- 52 replies
-
- 11
-

-

Molded and Filled Chocolates: Troubleshooting and Techniques
Jim D. replied to a topic in Pastry & Baking
I found a piece with the shell made from dark chocolate. It was difficult to tell how deep the crack went, but I think I could see dark chocolate in the crack, meaning it went all the way through the cocoa butter decoration down to the couverture. I wonder if it's significant at all (reaching for straws here, when I know the final answer is going to be "who knows why things happen to chocolate?"), but both cracked shells held pâte de fruit as the bottom layer of the finished piece. In one case it was quite firm, in the other, it was softer, so that probably is not a factor. -
@dhardy123, very nice assortment, beautiful decoration. How did you do the decoration on the raspberry orange? Were the decorations done with your new Grex airbrush? How is that going?
-
Molded and Filled Chocolates: Troubleshooting and Techniques
Jim D. replied to a topic in Pastry & Baking
The shells weren't all that thin. I was using white chocolate that was crystallizing as fast as I could deal with that issue. And these are new molds that are shallower than I am used to. I was dealing with the fact that shells made in shallow cavities want to come out of the mold prematurely. I had to watch them very carefully to make sure they were still in place and level, so they definitely weren't sticking. With other molds (especially domes. which tend to stick for me) I have had the problem you describe when banging them on the counter. -
Molded and Filled Chocolates: Troubleshooting and Techniques
Jim D. replied to a topic in Pastry & Baking
That's a good idea. I didn't check, but I will next time. -
Molded and Filled Chocolates: Troubleshooting and Techniques
Jim D. replied to a topic in Pastry & Baking
Yes, they did. In the case of the Easter eggs I referred to, some had hairline cracks when they came out of the molds, some appeared to develop them later. -
For Edelweiss, AUI Fine Foods carries the discs, as does The Chocolate Man.
-
Molded and Filled Chocolates: Troubleshooting and Techniques
Jim D. replied to a topic in Pastry & Baking
Good question. In this case the couverture is white chocolate, so when I cut the bonbon open completely, it was not possible to answer your question (white c.b. blended into white couverture). I'll see if I can find one where the underlying chocolate is dark. I don't know if it's significant, but the decorated mold was sitting for a few days before the shell was made. I don't think that would make a difference. -
Molded and Filled Chocolates: Troubleshooting and Techniques
Jim D. replied to a topic in Pastry & Baking
Unfortunately I need to contribute to this topic. In the chocolate below, notice the crack running across the shell. This happened to several pieces at various places in the shell. In trying to determine what was happening, I thought of another time I had a similar crack, and that was in the Easter eggs I made earlier this year. That time some of the cracks developed over time as the eggs sat. I thought it might have something to do with the larger size of the piece or with the filling (it occurred with several ganaches). The filling in the bonbon above is a layer of apricot pâte de fruit (on top, immediately under the dome) with a layer of almond gianduja below it. What the eggs and the bonbon above have in common is that the coloring contains a large amount of white cocoa butter. In this case I mixed the apricot color from red, orange, yellow, and a lot of white, and the yellow marbled with it is yellow c.b. with a substantial amount of white. In the case of the eggs, I backed the outside colors with a lot of white to make the decoration opaque. Could white cocoa butter cause something like this? This would be one more strike against it, adding to the obnoxious aroma and taste it has. Of course, any explanation begs the question of why the defect didn't occur with the bonbon immediately next to it in the mold.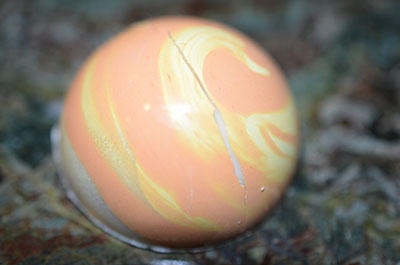
-
Don't you love the taste of that Felchlin milk chocolate? And it so easy to work with. I recently bought some of the new Fortunato milk chocolate (which is also made by Felchlin but not actually one of their products), and while it is quite delicious, it does not have the ease of use that Maracaibo has (such as lasting for a long time without getting over-crystallized).
-
You might check on packagingsupplies.com and gogopak.com.
-
Molded and Filled Chocolates: Troubleshooting and Techniques
Jim D. replied to a topic in Pastry & Baking
Without a thermometer? I don't know how you do it. I use mine constantly. For checking chocolate I use an infrared, which is quick and easy and well worth the investment. Actually I have found that tempered chocolate is more forgiving than one might think in terms of temperature. All the tips in this thread are helpful. I was just thinking of this issue yesterday as I finished some chocolates and, in spite of thorough checking of the ganache level, looking several times, checking again, had some pieces that resembled yours. A quick (and not completely reliable) fix when you really need all the chocolates to be usable is to spread a little tempered chocolate over the bad places and put a small piece of acetate over it. The bottom may be a little uneven, but it often works. If you drag a small bit of chocolate out of the mold as you scrape, it is easy to add a few drops of chocolate to that spot and tap the mold on the table to level it. Thicker ganaches are the worst culprits since tapping the molds on the table doesn't work to level them. I take the time to trim off the ganache that may be protruding because if there is a place where it protrudes, the chocolate will inevitably make it show. -
I could be wrong, but it looks as if there is milk chocolate behind your gold. That happens to me (with that same cocoa butter) when there isn't something else behind it--such as white chocolate or white cocoa butter. A dark or milk chocolate behind the gold subdues its color.
-
@curls, you can find some of what @andiesenji recently wrote about candied fruit in this thread:
-
I realize that is technically correct (and the Chocolate Alchemist, for one, emphasizes that all the crystals are melted by then), but why do most people go higher, most tempering machines go considerably higher, and all packages of chocolate I have seen call for going even higher (for its Maracaibo dark, Felchlin specifies 118F/48C)? I always assumed it was just to be absolutely certain, and that assumption was based on the experience of (1) having tempered chocolate accidentally go several degrees above 93.2F/34C and still test as in temper, or (2) having some reserved chocolate I wanted to be definitely out of temper to use for diluting over-tempered chocolate, but it still tested as in temper.
-
I thought I should report on my first attempt to include a cookie in a bonbon. I used Ina Garten's recipe for shortbread cookies, rolling the dough between 1/4 and 1/2" thick and cutting circles about 1" in diameter (the smallest cutter I have); I baked them until they were crisp and just starting to brown. I then created a dark chocolate shell (a deep cavity). I piped in a little salted caramel. On top of that, I piped in almond gianduja, making sure the caramel was totally covered. I left quite a bit of space above the almond. I dropped one of the cookies on top, then covered each with more almond. I capped the bonbons and just finished eating one. It is definitely something I will make again. Because the cookie is surrounded by gianduja, it is still crisp--and should stay crisp--though that is something I will watch. I did not cover the caramel with cocoa butter to keep it from softening the cookie, but that might be necessary if its moisture migrates to the cookie. I made several different thicknesses of cookie. The best ones were the thinnest, so in the future I will cut the individual pieces 1" in diameter and about 1/4" in height, then flatten them a bit so that they will come closer to filling the cavity side to side (this would depend on what diameter your cavities are). I think it's important to pipe the gianduja two times, as otherwise the cookie will probably leave gaps, and it is my understanding that air spaces in bonbons are not good. Final bit of information: I tested the free water activity of the cookie (see earlier in this thread for a warning I had received about this issue), and it was only 0.20. For those unfamiliar with such readings, that is very low.
-
I will post a report on the white cocoa butter from Chocotransfersheets.com. As I thought more about this discussion and the fact that respected people said there must be something wrong with "smelly" cocoa butter, I was beginning to think I was losing my mind (or my nose in this case). Then I remembered that I ordered a box of Kate Weiser's chocolates earlier this year. These are highly decorated, and many colors are backed in white. When I opened the box, the aroma of c.b. (as distinct from chocolate) was unmistakable. As pastryani implied, it might just be my palate/nose. No customers have ever mentioned the issue. Sometimes I think Europeans have the right idea--most of the chocolates I have seen are not decorated with colored cocoa butter.
-
That number of videos is certainly high enough that I will give Savour a try. (See, I didn't write "Savor" -- and I like an Australian accent--just wish all your actors didn't work so hard to get rid of it.)
-
My experience has been different from what keychris says. I can always taste colored cocoa butter, even from a brand-new bottle. And especially white (with titanium dioxide) has a strong odor. There is a thread on The Chocolate Life about this topic (started by someone other than me). I mentioned this issue to the owner of Chocotransfersheets, and he was going to send me a sample of his white to see if it was different. I never got that but recently ordered a bottle to check it out. I don't think there is any way around the titanium dioxide to create white. All that being said, however, I can also taste plain cocoa butter and am not fond of its aroma. To check what I just wrote, I went to my supply and opened a brand-new bottle of Chef Rubber colored cocoa butter. There is definitely an odor--mostly cocoa butter, but more than that.
-
Thanks for that information. The price is certainly low enough that it is worth trying.
-
Spraying Chocolate: Equipment, Materials, and Techniques
Jim D. replied to a topic in Pastry & Baking
It was easier than I anticipated (I fully expected the compressor to blow up any minute), but I could not have done it without Grex tech support and the aforementioned photo. The difficulty was the info that knowledgeable people assume (such as using teflon tape) and that is not mentioned explicitly anywhere. But setup took a very short time and went without a hitch. I must confess that I had my very knowledgeable nephew in attendance watching things, but I think I could have done it without him. He is the kind of person who just pulls the emergency pressure release to see what happens! On my own I later found a far less noisy way to release the pressure and allow any moisture to drain out. -
Spraying Chocolate: Equipment, Materials, and Techniques
Jim D. replied to a topic in Pastry & Baking
Well, if you have some experience with compressors, it would probably be easy. As I stated previously, I am a mechanical novice. I watched some videos online about setting up a compressor., but it was Danny, the guy at Grex tech support who went above and beyond--he took that photo showing the connections (he must have taken over all the space in the tech support area that day) and gave me a list of all the connectors I would need, which ones Grex makes, which ones I needed to buy elsewhere. He also explained teflon tape (I said I was a novice) and which connectors needed it. I have the link to that photo and will send it to you via an eG PM. -
Thanks for the examples. There are lot of non-bonbon items, and whereas I find them interesting, that's not what I am looking for. So I guess my last question to you is whether the percentage of bonbon material is enough to make it worthwhile.
-
I did not know they offered online learning. I guess when I saw "Australia," I immediately gave up. So you think the lessons are worth the money and time? Can one follow at his or her own pace, or how does it work?
-
From what I have seen on eGullet, the school's graduates learned impressive skills there. Too bad there is not a U.S. branch.
