EvillyChic
-
Posts
19 -
Joined
-
Last visited
Recent Profile Visitors
1,378 profile views


-
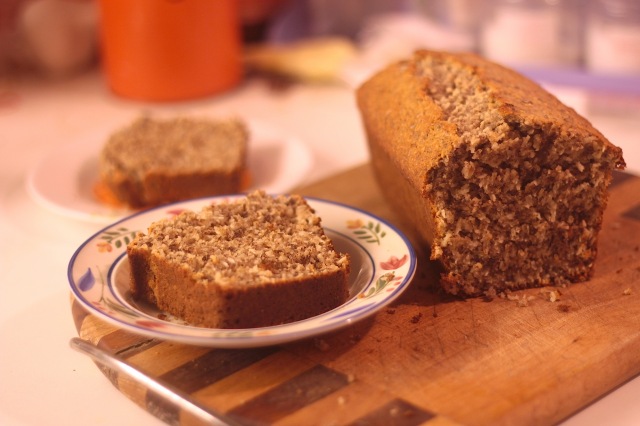
Hi everyone, I have a question. Have anyone try Bill's famous coconut quick bread recipe somewhere? Here is my version of Bill’s Famous Coconut “Quick Bread” (It is confusing, isn't it?) Ingredients (for 1 loaf of 23x7cm) Dry mixture 200g all-purpose flour 75g grounded flaxseed (if you don’t have this in hands, just omit it and replace by the same amount of flour, so in total of 275g flour) 150g dried coconut flakes 1 cup = 201g white granulated white sugar 2 tsp. baking powder 2 tsp. cinnamon powder Wet Mixture 2 eggs 300ml milk 1 tsp. vanilla extract 75g melted butter —————————————– Instruction Step 1: preheat your oven to 180 degree Celsius. Line a 23x7x7cm baking tray with parchment paper. Step 2: Now weight all the dry ingredients listed above into a big mixing bowl. Mix well. Step 3: Now weight all the wet ingredients in another bowl. Mix well, too. Step 4: Now slowly pour the wet mix into the dry mix bowl while constantly whisking using a hand whisk. Continue whisking just until all ingredients combined and lump-free. Stop your whisking right away when you reach this stage. No more or your loaf will be dense. Step 5: Pour the batter into the prepared pan. Even it out by gently “slamming” the pan against the kitchen counter a couple of times. Step 6: Put the loaf on the lowest rack, in my case because my upper heat is stronger than my lower heat and this quick bread does take long to bake. Step 7: Bake the loaf for approximately 50 minutes or more until the skew sticks inside the loaf coming out clear. After 30 minutes, your kitchen will start to smell heavenly amazing. The combination of coconut, cinnamon and vanilla is irresistible. If your loaf browned on the top too much while the inside is still not done, simply take the loaf out, cover the top with aluminum foil, and continue your baking until the skew test is achieved. Step 8: When your loaf is done, let it sit on the counter for 20 minutes. 20 minutes are up. Now flip your loaf out of the pan. Slice and serve. I am a bit confused? Is it a bread or is it a cake? Could some one define it for me please?) Rose,

-
Hi Panaderia, Thank you for trying out this recipe. I hope to hear more from your oven. Rose,
-
Hi Fred, Please do try this recipe. It has had great results in my oven. The vitamin C is quite vital in making Banh Mi because acid ascobic (chemical name of vitamin C) is a great dough enhancer, it increases the strength of the gluten, help the structure of the loaves more stable, hence bigger volume, hence lighter crumb. About the crispy crust, it depends very much on your steaming. Hope to hear more from your kitchen Fred, Rose,
-
Hi DianaM, Hope to hear more from your oven. I am very excited that you are willing to help me trying this croissant recipe. I have never tried Julia Child croissant recipe before, I will, soon. Rose,
-
Hi everyone, I would like to ask you for a favor and try a croissant recipe, please. I want to hear more from others' oven. Here is the ingredient list for recipe: Dough: 200g (preferably bread) flour 7g fresh yeast 120 ml cold milk 15g sugar 4g of salt (3g if you use salted butter in the dough) 20g unsalted butter, at room temperature Butter: 112g cold unsalted butter Egg wash: ½ egg 1 tbsp. water Recipes Cold ingredients. Mix all and knead to medium gluten development No bulk fermentation, flat the dough out and chill in the fridge for 2 hours while plasticize the butter. Use the English butter lock-in method, not the usual French one. Perform a double fold, then chill for 1 hour. Perform a single fold, then chill over night. Next morning, roll the dough out and shaping. Proof for 2 hours. Oven preheated at 220 degree C. Bake at 200 degree C for 20 minutes. I have worked on it for some times now with good results, but this recipe does seem unsual. Feedback and suggestions are highly appreciated. Many thanks in advance, Rose,
-
Hi, Apple snail is a very common edible freshwater snail in Vietnam. We Vietnamese use them in cooking. For more info of it, here is: http://en.wikipedia.org/wiki/Ampullariidae. Because it is a bit uncommon in other countries, I am afraid that if you are familiar with eating it and it will make your stomach uneasy because of food intolerance or you may have some allergy symtoms reaction to strange protein. That's the entail for my caution. But if you have tried apple snail before and are ok with that, then I would recommend using it in the recipe. Hope my answer your question, Rose,
-
Hi, I love cooking with eggplant. Today, I want to share of my completely irresistible “signature” dishes of eggplant. Hope you guys enjoy! Ingredients (Serving 3) 2 medium size eggplants (about 500g) 300g pork (cut of your choice, recommended with medium high fat ratio) 100g apple snail meat (Optional, it is not poisonous and delicious in my opinion but if you are not used to eating seafood, simply leave it out, since it has distinct taste and smell, and sometimes weird reaction with your stomach. Warning: consume with caution) 200g firm tofu 2 medium size tomatoes 3 cloves of garlic ½ bulb of onion 5 shiso leaves (Encouraged, it does create a distinct smell for this dish, but if you cannot find it, just take it easy. Both green and purple is acceptable.) Some spring onion for garnish (optional) Condiments 2 tsp. salt 1 ½ tbsp. sugar 3 tbsp. fish sauce (More or less to your own taste) 1 tsp. ground black pepper ½ tsp. turmeric powder (Please take some time to look for these in Asian markets, it’s the specialty of this dish) Instructions Preparations Step 1: Cut the pork into bite size. Marinate them with 1 tsp. of salt, 1 tsp. grounded black pepper, ½ tbsp. sugar, and 1 tbsp. of fish sauce. Marinate the apple snail meat with ½ tsp. of turmeric powder and ½ tsp. of salt. Step 2: Cut the eggplant into bite size. Submerge them into light salty water to prevent them from being oxidized and browning up. Step 3: Crush and chop the garlic finely. Slice onion into thin rings. Slice the tomatoes. Picture shows below. Step 4: Slice tofu into cubes like this. Fried them in preheated pan with canola oil until both sides are golden. Get them out, and leave cool on the counter. Real cooking Step 5: Start cooking this dish by adding about 2 tbsp. of oil into a preheating pot of at least 2 liters. Add the prepared garlic and onion, stir constantly on medium high heat until they start to be aromatic, about 4 minutes. Step 6: Add the marinated pork in, stir well for 2 minutes. Step 7: Add the marinated snail meat, stir well for another minute. Step 8: Strain the sliced eggplant. Put them all into the pot. At first, it will look like the pot is so full, like this. Give it some stir and then cover the pot with its lit. Keep the heat to medium high. Don’t worry, It won’t burn out. Raw eggplant is filled with water, by heating them up on high heat with lit covered, you are giving a chance for water to come out of the eggplant, reducing its volume visibly. Here is my pot after 10 minutes. The volume decreases to sufficient level, and there is lots of stock water in the pot. Step 9: Add the sliced tomatoes and fried tofu into the pot. Stir well but gently, you don’t want to smash the delicate soften eggplant in your pot right now. Now keep the lit away from the pot. Let it cooked on medium high heat and evaporate some of the stock water, for approximately 20 minutes. Step 10: Now you can see that the water level in the pot has been reduced like in this picture, simply taste it and adjust the savor to your own taste. In my pot, I add 1 tsp. salt, 1tbsp. sugar, and 2 tbsp. fish sauce. Step 11: Chop shiso leaves into very fine strip. Chop the scallion. Add them into the pot, and stir well. Take the pot off the heat. Step 12: Scoop them onto a serving plate together with warm cooked rice. This image has been resized. Click this bar to view the full image. The original image is sized %1%2. Enjoy! What about you? what is your favorite way to cook eggplant? Rose,
-
Hi Minas, Thank you for your suggestion. It is very tempting. Hope to hear more from your kitchen when you bake these babes. Rose,
-
Hi Jmolinari, Thank you for your kind words. I hope to hear more from your kitchen about this recipe. And yes, you should break the boiled eggs and remove all the hard shell before consuming it. I totally forgot to include that to the recipe.I don't know if this answer your question? Rose,
-
Hi everyone, I have something to show you today, a rather quick and easy recipe, suitable for serving as an Asian fusion salad or with cooked rice: Vietnamese Roasted Eggplant. Ingredients (serving 4, with white rice) 1 large eggplant, washed 2 eggs 2 tbsp. canola oil Chopped green part from 2 scallions (only green part needed for this recipe, but keep the white for other use, because they are the most aromatic part of the scallions) Fish sauce mix 2 tbsp. Fish sauce + ½ tbsp. water 1 ½ tbsp. sugar 1 tbsp. sweet sour chili sauce (optional, can be replaced by 1 tsp. of lime juice and ¼ finely chopped chili. But beware, its hotness and spiciness depends on different kinds of chili you use, so use with caution.) Instructions Step 1: Prepare a hot, fill half with water baking pan on the bottom of your oven. Place your rack on the next lowest level. Put the eggplant with skin on the rack, like mine. Turn the oven to 300 degree Celsius (or yours’ highest temperature). Leave the eggplant in the oven for 30 to 45 minutes; check at 30 minutes and then at 5-minute-regular level. Don’t worry; it won’t get burn because of the water pan at the bottom of the oven. It creates enough steam to keep the temperature stable and even everywhere the whole oven, rather than focusing on burning the top of our precious eggplant. In Vietnam, we usually make this eggplant dish in BBQ style, meaning roasting eggplant on rack heated by burning coals underneath (open fire). This style will bring out the most flavor of the eggplant, in addition to giving them a smoky edge to bring them to the next level of wonderfulness. If you have the chance, try it. Step 2: while your eggplant are being roasted in the oven. Let’s make soft boiled eggs. I used to have lots of problems with boiling eggs; can you believe it? But now, I have learned to boil eggs to exactly how I want them to be, by using a timer. To use my method, first put medium-size eggs in cool-water-filled pot, heat them up until they start to boil. Then start counting. (Remember; only count when the water starts to boil) The fun starts now! If you want soft-boiled eggs (the white cooked, but the york is just heated to warm, not cooked), count for 5 minutes. Then take them out of the heat immediately, submerge them into ice-cold water for 2 more minutes to prevent any further cooking. If you want medium-boiled eggs (the white cooked, outer part of the york is cooked, but the center remained runny), count 7 minutes. Then use the ice water to quickly cool them down. If you want firm-boiled (both white and york are fully cooked through) eggs count 12 minutes. Then again, the ice water rapid cooling method is used. My method is for standard for medium size commercial eggs, regularly sold in supermarket. If using different sizes of eggs, kindly adjust accordingly. Step 3: is the making of the fish sauce mix. It is super duper easy. Just mix all of the ingredients listed above into a bowl, stir well until all dissolved. Pour it into the halved boiled eggs. Like this. Leave them there to help the egg absorb the savor of the fish sauce mix. Also, the runny york will enrich the fish sauce. Uhhm, nom nom. Step 4: Put the chopped scallion into a heatproof glass bowl or a baking ramekin. Prepare the scallion infused oil by heating 2 tbsp. of canola oil in a pan until very hot, pour it into the chopped scallion bowl. Leave until further use. Step 5: By now, your eggplant should be ready. Check the readiness of your eggplant by its softness. The eggplant is ready when it is very soft, the size of the eggplant also decreases by very visible amount, and the skin is wrinkled up. Like in this picture. Take it out of the oven. Leave it on a plate and let cool down a bit until able to touch. Step 6: Now your eggplant is still warm but easy to the touch. Rip the skin all out and discard. Like Lovely demonstrated in this picture. If your eggplant skin do not come out very easily, put it back in the heated oven and roast for another 5 minutes. Step 7: Tear up the eggplant into thin strips. Then cut the strips vertically into bite size. Like this. Step 8: Spoon oil-scallion mix onto the prepared eggplant. Pour the egg – fish sauces mix all over. Serve warm. Enjoy! Rose,
-
Hi all, Today, I want to bake some cookies: Something sweet, buttery, super crunchy, and something cat-like… I still have some egg whites left from yesterday baking. Eureka! I know what I should bake today! I will bake langue de chat cookies (French for cat’s tongue). So why do they called them cat’s tongue cookies. No one knows. I have a funny theory. They have that name because they have shape like real cat tongue, and they also have rough surface after baked, just like real cat tongue. So that should explain the name. It is a very easy to bake and easy to eat-up-all-of-them-at-once cookies. It only contains only 5 basic ingredients for baking. This is a recipe that I recommended for beginners to enter the wonder world of baking. Ingredients 120g butter at room temperature. 120g granulated white sugar 100g egg whites (approximately 3 egg whites from regular size eggs) 130g all-purpose flour ½ tsp. vanilla extract ¼ tsp. salt The original recipe that I used to work with does not use salt. But one thing that I learn from my baking experience is that contrary is the key for dynamic flavor, like in Indian curry, you adding sugar to make the your dish more spicy. By adding a very small amount of salt, you are actually enhancing the sweetness and complexity flavor in your baking. So, what the harm? Instructions Step 1: Preheat your oven to 200 degree Celsius. Put sugar and butter into your mixing bowl. Cream them up with the paddle attachment of the stand mixer. Or use the whisks of the hand mixers. Start at low speed to incorporate the sugar into the butter. At first, they will look grainy and they butter color is yellow. Keep beating at high speed. Be patient. After 5 minutes of creaming, they should look like this. The butter color is now pale yellow, almost white and it has gained some volume too since this step is to introduce air into the mixture. Like below. Step 2: Add egg whites into the mixture, one by one, with stirring by paddle attachment every time. After adding the 3rd egg whites, your mixture might look like everything is not well combined, almost like egg or tofu curds. It is totally normal. Don’t worry, mine are like that too, look. Step 3: Now add 1/3 of the flour, vanilla extract, and salt in. Mix well just until incorporated. Add another 1/3, mix again, and repeat one last time. You don’t want to add all the flour in at once, it might cause lumps in your batter. As I said, be patient and delicate. After 3 times adding and mixing flour in, you should have a very thick batter like this. Step 4: Put the batter into a big piping bag. I usually put mine into a big tall glass, open it up and the scoop my batter in. That way, the batter is more manageable and you will have less cleaning to do after. Step 5: Prepare your cookie trays (recommended 2) with baking papers. Pipe the batter out from the bag in form of small long cigarettes of 1cm wide, 5 cm long, each 3cm away from each other. DO NOT pipe them any closer to each other than 2cm. Be generous, these cookies do know how to spread. Step 6: Bake that cookie tray in the middle rank of your oven for 10 to 11 minutes, just until the edge have light brown color. At first the cookies are soft and bendable. But they will crisp up very quickly after 3 minutes. And they should come out of the tray very easily. Do stay near the oven and watch those little cookies, because once they brown up, they brown up real fast. Here is how I arrange these cookies baking. When I put the 1st tray into the oven, I start piping batter out on the 2nd tray. When the 1st tray is ready, I take it out and put the 2nd tray in. I then let the 1st tray cool down a bit, let’s say 5 minutes, take all the cookies out, and pipe another batch on (while CAREFULLY watch the 2nd batch in the oven). The batter may spread a bit on the 1st tray because it’s till a bit hot and that’s OK, they still perform the same inside the oven. Step 7: Let the cookies cool down for 10 minutes. In the meanwhile, prepare yourself a cup of rose tea. And then, enjoy! Happy Baking!
-
Hi rickster, I have heard many myths about Banh Mi, too, some of them including using rice flour in the recipe. But the Vietnamese bakery that I used to work for does not use any rice flour in their recipe (and they have worked in the business for more than 10 years). So I just assume that maybe it can be excluded. And I have had stable successes with the one I posted in here. I think the secret of Vietnamese bakeries is on using vitamin C and bread improver (sadly), and how they shape the loaf. Rose,
-
Hello every one, Today, I want to share one of my favorite pastry recently: Portuguese Egg Tart. I first knew about this tart from KFC. One time, I went to our favorite KFC spot in HCMC when they were promoting these. They asked if I wanted to try. It looked so irresistible, so why not? Since then, I have been in love with this pastry. But it’s so expensive buying them from the shops, comparing to its easy-to-find ingredients and easy-to-make nature; especially now I are studying in Finland. I decide to make them myself. So here is how I make Portuguese Egg Tart. (12 mini tarts) Ingredients Tart crust 500g store-bought puff pastry Filling 150g heavy whipping cream 200g whole milk ¼ tsp. vanilla extract 60g granulated white sugar 2 whole egg + 2 egg yolk Instructions Step 1: My puff pastry is already cut into rectangles like this, 125g per, so I use 4. Roll them in to tight cylinders. Stick layers of dough up at the end of the roll using a bit of water. Step 2: Cut each cylinder into 3 smaller ones. 3 multiplies by 4 is 12, that’s how I divide mine. If yours comes in bigger or smaller size, divide them accordingly to have 12 even balls of puff pastry. Step 3: Dip every ball into a dish of flour generously. Then roll them out into a thin round sheet with the cycle side facing up, like this. Here is where my mistake happened. I should have roll these a bit thin toward the edge, leave the inner thicker because the filling will make the puff pastry crust wet while baking and make the tart more fragile that usual egg tart. Step 4: Prepare your tart pans by grease the with melted butter, or put some cupcake paper cups in, like me. This is very important because if you don’t, the tart will stick heavily to your pan. Then adjust all the crust into your tart pan, in my case, cupcake pan. Step 5: Preheat your oven to 200 degree Celsius. Prepare a rack on the last level. Step 6: Separate your eggs. Put eggs and yolks into one bowl with all the sugar. Beat them lightly with your whisk until there is no string of egg white left. Step 7: Add heavy whipping cream and milk into the egg mixture above, whisk until everything combined. Add the vanilla extract. And you are done. Originally, the filling must be made by double boiling method, meaning the egg mixture must be cooked on a heatproof bowl that stay on top of a boiling pan, until it thicken up. Then let cool to room temperature for about almost 1 hour. I decide to go shortcut on this since Bear was OK with that the last time and I do not wish to prolong my baking time further. It totally depends on you to choice how you want to do in this situation. Step 8: Pour the filling into the prepared tart pans, through a strainer. Step 8: Put the tarts into the preheated oven, last rack. Step 9: Bake them for 25 to 30 minutes or until the top of the custard caramelize a bit. During the baking time, I see my tart fillings popping up like balloons. I just did a little sneak and my egg custard like of crack on the surface. Step 10: Take the tarts out of the pan. You can enjoy them now, as they are warm, some forks prefer that. Personally, I enjoy them cool, because by then, the crust will be settled and less fragile, and the filling is more enjoyable. If you prefer mine, put them in the fridge for 30 minutes before serving. Eating these tarts are like having a Fandango dance on your tongue. The buttery flavor of puff pastry combines with the soft, rich custard. Uhhmm. My limited vocabulary cannot fully explain this. Hope you enjoy the recipe. I have some problems this time, for instant, my filling pop like balloons while being baked. Then it cracked on the surface, and my crust seem a bit too fragile after being bake. Here is its innards . How could I avoid these problems? Thank you so much in advance. Anyhow, Happy Baking! Rose,
-
Hi, I am glad that I could be helpful. rotuts: it does take time and practices to have the perfect slashes. And I am still working on mine, too. Let's make some Banh Mi and practice our slashing skill. ElsieD: You are very welcome. This Banh Mi used to be a myth for me too. But after creating and using this recipe. I start to believe that it is hard, but still achievable for home bakers like us. Please do try this recipes. I am new to all these online cooking and baking communities so I highly appreciate constructive comments and feedbacks. Rose,
-
Hi everyone, I am Rose, a Vietnamese student from Finland. Today, I want to share a Vietnamese dish that is so easy to make, yet super tasty, and almost foolproof: my version of (Southern) Vietnamese Quick Braised Pork Belly in Fish Sauce. (Fear not the fishy smell of the Vietnamese traditional fish sauce; it’s perfectly complimented with this dish thanks to the roasted garlic and black pepper) I don't know how to add picture in this post so if you want an extra detailed instruction with photos in every step. Kindly refer to my blog post here: http://simplyafoodblog.wordpress.com/2012/04/29/vietnamese-quick-braised-pork-belly/ Ingredients 500g of pork belly with skin still on 2 tbsp. fish sauce 3 tbsp. granulated white sugar 1 tbsp. water 2 garlic cloves, crushed and finely chopped ½ tsp. grounded black pepper (freshly grounded is best) Instructions Step 1: Wash the belly with salty water and dry it with kitchen towel. Slide pork belly into thin rectangular vertically. Step 2: Get a clean small bowl and mix fish sauce + sugar + water together. It does not need to be completely dissolved. Step 3: Place the slices of pork belly on a small non-stick frying pan. Step 4: Put the pan onto the stove, turn the heat on high. Without adding any excess oil. Leave the pan there for 3 minutes. After 3 minutes, you can see the steam coming out from your pan, that’s totally normal and not a sign of burning. Step 5: Now you can starting hearing the fat coming out of the pork belly sizzling on the pan. Let the pan sit on heated stove for 3 more minutes, until the under of the belly slides start to turn golden. Flip all over, like this. Step 6: Wait for 5 more minutes until the other sides turn golden too. Put all the garlic in; give it another stir until the garlic start to be aromatic. Step 7: Then pour all the fish sauce mixture into the pan. Give it a quick and even stir. At first you can see the water in the fish sauce mix boil and evaporate very quickly while the sugar start to caramelize. Step 8: Wait for 5 more minutes or more with flipping the pork belly from side to side for even browning, until you achieve this: golden brown shiny slices of pork belly slices. The water should almost all evaporated, just a little sauce left, enough to coat the outside of every slices. Step 9: Sprinkle grounded black pepper on top. You can now enjoy the most wonderful aroma in Vietnamese cuisine: the mixed heaven in your nose of roasted garlic, caramelized sugar, freshly grounded black pepper, and fish sauce. Try a slice now. Chew. Uhhhmmm. I know! Hey, let’s resist trying another, because if you continue, who knows if there is anything left for real serving, LOL. Step 10: Serve warm with cooked white rice. And dig in! Challenge your chopstick handling skill! This is a super easy Vietnamese dish to try if you are new to our cuisine. So fear not, and hold up your fish sauce bottle. Rose, __________________