PedroG
-
Posts
518 -
Joined
-
Last visited
Content Type
Profiles
Forums
Store
Help Articles
Everything posted by PedroG
-
I just encountered a nice idea as a supplement to my sous vide thickness ruler on Jason Logsdons souvidecooking.com: use a sewing gauge as a sliding measure. Even better but more expensive would be an X-Ray Thickness Caliper.
-
Douglas' tables are for any number of eggs, if your water bath is not very small. 8 eggs may be about 500g. In my PID tuning experiment (last post in the old SV topic), throwing an ice-brick of 560g/-20°C into a 15L water bath at 55°C resulted in a temperature drop of just 0.2°C for less than 2 minutes, so the temperature drop from 8 eggs (500g/5°C) will be negligible, at least with a well tuned system.
-
PID Tuning Guide Release 2 Finally, the new version of the PID tuning guide (authored by Frank Hsu, Peter Black, Robert Jueneman and Peter Gruber aka PedroG) is available for download. It contains new chapters: Ar: Integral Limit aka Anti – reset windup Output power Limit % Autotuning percentage Impact of Thermodynamic Properties of a cooker on PID-Tuning It is copyright protected by FreshMealsSolutions, but Frank Hsu of FreshMealsSolutions explicitly gave permission to make the guide available for download in the eGullet forum, but not for publication on other websites (except his own of course) or otherwise. PID-tuning-guide_R2_V006.pdf
-
Multiple program steps may be useful for turbo-aging, see my post of 24 December 2010. I did this with my very first SousVideMagic model 1500A 6-steps-programmable which is to my knowledge no longer sold by FMS; now I use the SVM 1500D which is easier to handle and more accurate. The same procedure can be done by setting an alarm clock and changing the set point manually. If you absolutely insist on 6-steps-programmability, there seems to be the Programmable Bradley Smoker Controller Model WS-1200CPH (similar to SousVideMagic model 1500A 6-steps-programmable) still available from Auber instruments, but it is 12 amps only and rather tedious to set the programs, and temperature can be set in 1°-steps only (I used to operate my 1500A in Fahrenheit mode to be able to set temperature in 0.5°C steps). A built-in timer is of no value, as you may not spend your time in the same room as your SV rig. A simple kitchen timer does the job and you can take it with you. Wattage higher than 1500W is unnecessary. Should you once in a lifetime want to cook SV in a bath tub or whirl-pool with a steady state consumption of more than 1500W, you can still provide basic heat supply with a bucket heater connected directly to a wall outlet in another room (i.e. separate circuit to avoid blowing the fuse) and let your PID/FMM deliver the difference needed to stabilize the temperature. Computer interface: do you really want to turn your SV controller into a "flying supersonic Swiss army knife"?
-
Ossobuco sous vide with marrow bones Ingredients For 2 servings 2 large slices of veal shank 4 marrowbones 2 spring onions 3 celery stalks 1 carrot (optional) 160g of Piquillos (grilled peeled red bell peppers) 1 spoon of tomatoe paste 2 dl veal stock with 0.5 dl Sherry 2.5 dl vegetable bouillon Salt, pepper, 1 tbl.spoon of parsley, condiment (in Switzerland we use "Aromat" by Knorr, which contains sodium chloride, sodium glutamate, lactose, starch, yeast extract, vegetable fats, onions, spices, E552) olive oil for sautéing, rice bran oil for searing cream as desired (optional) SV-cooking Marinate and bag the veal shanks (after incising the surrounding fascia to avoid cupping), SV 24-36 hrs. at 58.5°C / 137°F for medium (alternatively 6-12 hrs. at 77°C / 173°F for well-done) Mise en place cut the spring onions not too fine (place the first cut below your tongue to avoid tearing during cutting), cut their stalks into fine slices cut the celery stalks into 3-4mm thick slices cut the optional carrot in small cubes about 4mm cut the Piquillos into pieces about 1cm place a deep skillet (1) with a little olive oil on the stove place a large heavy skillet (2) with rice bran oil on the stove Cooking in skillet 1, sauté the onions until lightly caramelized, add the celery and onion stalks and optional carrot cubes, continue sautéing, add Piquillos and parsely and spices, deglaze with veal stock, reduce, add tomato paste and vegetable bouillon, continue reducing. add the marrowbones and baste them with sauce, cover and simmer for 1-2 hrs. add more Sherry as needed, at the end add some cream if desired heat skillet 2 with rice bran oil until just smoking, take the veal shanks from the bag, dab dry with paper towel, sear in smoking hot rice bran oil, place them in skillet 1 on top of the sauce after taking out the marrowbones Serving Serve the marrowbones first with bread and fleur de sel (or coarse sea salt). Serve the veal shanks on a hot dish with the sauce aside, optionally with risotto or polenta. Variations Maillard products in the sauce The sauce in sous vide variations of traditional braise recipes is missing the Maillard products from pre-searing the meat. This may be overcome by searing a small amount of ground meat mixed with some flour (and eventually condiment) before sautéing the onions and other ingredients. Substituting veal shank The above recipe tastes equally well with other tough cuts of meat, e.g. brisket or short ribs. Don't forget a glass of good Italian red wine!
-
Sealing liquids or leftovers using an edge sealer Modernist Cuisine 2•219 describes a trick to fill liquids into a vacuum bag, about like this: (in Nathan's picture the size of bag and container are more congruent) I have described earlier how to seal liquids using an edge sealer. Here is a video showing the trick: Using a large bag and flattening the contents minimizes chilling / freezing / thawing / heating times: @Borgstrom: The Weston Pro-2300 edge vacuum sealer seems to lack an auxiliary port for evacuating rigid containers; this makes sealing liquids a lot more tricky. Suppose you want the liquid in the bag to rise no more than 50mm, this is 50mm water column or 3.68mmHg or 0.0049 bar or roughly 0.5% vacuum. Edge sealers usually pull 80% vacuum, and I doubt you can set the vacuum limit as low as 0.5%. I am glad you found an alternative trick.
-
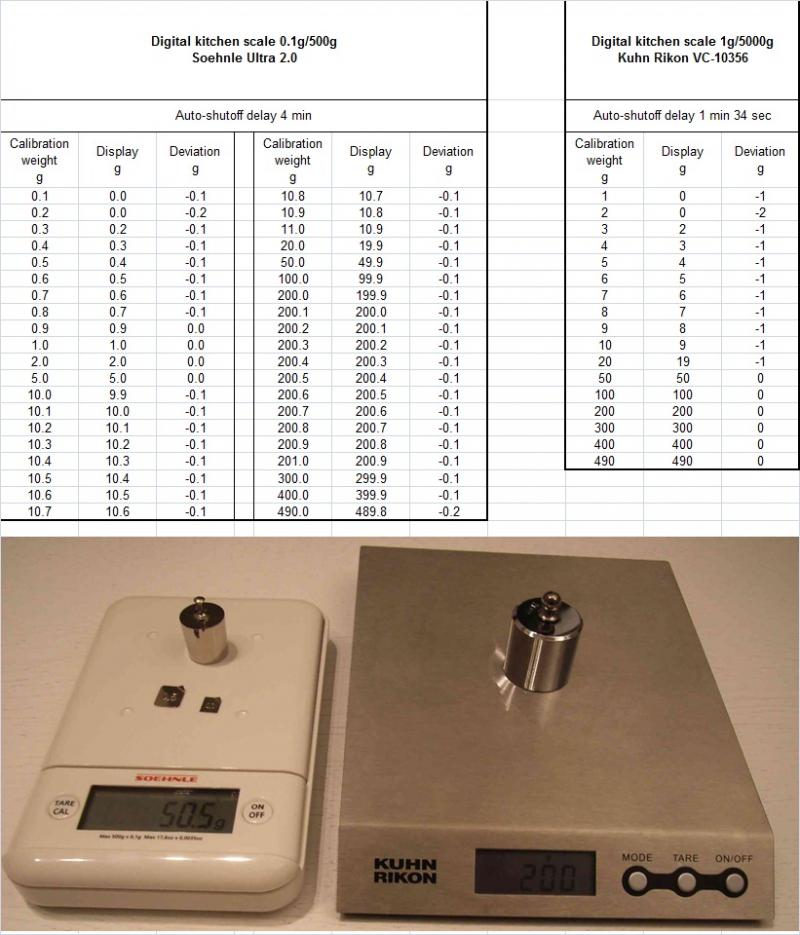
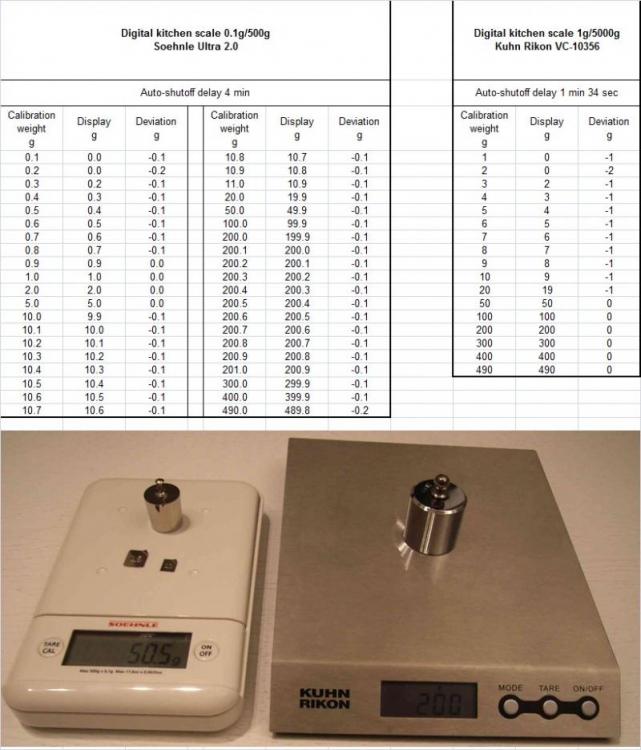
I finally bought a new 0.1g/500g kitchen scale: Soehnle Ultra 2.0. It comes with a 200g calibration weight and features an auto-calibration function. With my old 1g/5000g Kuhn Rikon VC-10356 auto shut-off (1½ min) is a nuisance. The Soehnle Ultra 2.0 stays on for 4 minutes. Below are the calibration results. With the 1g/5000g scale weighing just a few grams was virtually impossible.
-
That's just at the limit of ovalbumin denaturation. After trying you will know. We should appreciate your report with photos.
-
It might be OK as long as you won't cook on the edge of safety. Temperature swings inside the food are attenuated by the slow heat transfer, see http://egullet.org/p1756373 and http://egullet.org/p1755780; these experiments were done in an oven, i.e. in air, but heat transfer from water to food is much faster than from air to food or from air to a pot of water. So someone with a four-channel-data-logger (mine is only two channels) could do the following experiment: Vacuum-seal a 5cm pile of wet rags (see www.wiki.egullet.org/index.php?title=Core_temperature_development_in_frozen_versus_refrigerated_meat_cooked_sous_vide) to simulate meat, place logger probes at the surface of the pile, at the center of the pile, half way between surface and center, and one probe in the water bath near the sensor of the PID controller. With a SVM, set P=0 (i.e. bang-bang control), set HY (hysteresis) to different values (e.g. 1°C, 2°C, 3°C), and take heating curves from 5°C to 55°C for every value of HY and for a stable water bath with optimal PID settings.
-
LOL! Seriously, there is no need for different final meat temperatures. Why? The S-shaped form of the heating curve is always the same. In the same time that starting from 5°C in a 55°C water bath will arrive at 54.5°C, it will arrive at 44.6°C in a 45.0°C bath or at 64.4°C in a 65.0°C bath, an irrelevant difference. But wont the pasteurization times be different for different temps, therefore requiring different values on the chart? You're right, but space is limitied, so I had to prioritize. Right, of course, but my point was that one cannot just assume the S-shaped heating curve b/c that wouldn't take into account the pasteurization times. I was referring to heating times. Of course pasteurizing times are different for different bath temperatures, but there is no room left to incorporate 33 columns for all the pasteurization times. I'll try to squeeze in one more column when Douglas will have calculated the heating times for frozen fish. I recommend you copy all the tables from Douglas' guide, paste them together on 2 or 3 sheets and glue them to your kitchen door.
-
You might try 63°C/50', cool, plus 80°C or 75°C for a time you have to find out to set the white without making it rubbery.
-
LOL! Seriously, there is no need for different final meat temperatures. Why? The S-shaped form of the heating curve is always the same. In the same time that starting from 5°C in a 55°C water bath will arrive at 54.5°C, it will arrive at 44.6°C in a 45.0°C bath or at 64.4°C in a 65.0°C bath, an irrelevant difference. But wont the pasteurization times be different for different temps, therefore requiring different values on the chart? You're right, but space is limitied, so I had to prioritize.
-
To answer the initial question of the electrical cost of SV cooking, actual power measurements are not necessary, it can be calculated easiliy: Multiply the steady state consumption by the hours of cooking, and add the energy to bring the water from ambient to cooking temperature. Examples: FreshMealsMagic uninsulated, about 100W for 48 hours makes 4.8kWh. Heating 15L water from 20°C to 55°C costs 15kg * 35°C * 1.163 Wh/kg/°C = 0.593 kWh. Total about 5.4kWh. Tiger rice cooker 12L (10.5L water), about 26W * 48h = 1.25kWh, plus 10.5kg * 35°C * 1.163 Wh/kg/°C = 0.43kWh, totalling to about 1.7kWh. For the price difference between a rice cooker and an FMM (or a stock pot BTW), you can cook many thousand hours with an FMM or a stock pot. The table is from my earlier post.
-
LOL! Seriously, there is no need for different final meat temperatures. Why? The S-shaped form of the heating curve is always the same. In the same time that starting from 5°C in a 55°C water bath will arrive at 54.5°C, it will arrive at 44.6°C in a 45.0°C bath or at 64.4°C in a 65.0°C bath, an irrelevant difference. Thanks for the flowers which I pass on to Douglas Baldwin for his new tables!
-
New sous vide thickness ruler with new tables from Douglas Baldwin's Practical Guide You may have noticed that on 18 June 2011 Douglas has published a new version 0.4i of his Practical Guide: he updated the food safety chapter and most of the heating, cooling, and pasteurization tables. Heating times are now defined from 5°C/41°F to 0.5°C/1°F less than the water bath’s temperature, valid for target temperatures from 45°C/110°F to 80°C/175°F, and heating times for different shapes are included. Beef pasteurization times now take E.coli into account besides Salmonella and Listeria. So I adapted the thickness ruler to the new tables. Suggestions for improvement are welcome, as I plan to make a new thickness ruler as soon as Douglas will publish a heating time table for frozen fish. Thickness ruler_v4_0.4i_2.pdf
-
Temperature tolerance tighter than ±0.5°C may make no difference in organoleptic outcome. But I strongly disagree allowing a ±1°C tolerance for LTLT cooking at 55°C and for pasteurizing. 54.5°C instead of 55.0°C increases pasteurizing time from 89min to 110min, see my article "Importance of temperature control on pasteurizing times" in wikiGullet. Forced circulation is necessary for even temperature distribution in whatever cooker (bottom heater or side heater), as natural circulation at steady state (with power as low as 30-50W) is nearly nul, see my post in the SV topic on 22 June 2011. I agree that claiming ±0.1°C stability and accuracy or better is bragging, or fun for geeks. So my summary is: ±0.5°C or better (±0.25°C desirable) for eggs, for pasteurizing, and for LTLT cooking at 55°C, ±1°C for everything else.
-
Does anyone have experience with the American Weigh AMW-2000 Digital Bench Jewelry Food Kitchen Scale 2000 gram x 0.1g? 9V battery, optional AC. Platform 6x6". Auto shut off might be a nuisance, but no customer review specified the auto shut off delay. Definitely not as accurate as my antique model, but faster!
-
Interesting idea! You might compare the temperature profile cooling from 55°C to frozen in brine with crushed ice (maybe -10°C) or in brine on the Anti-Griddle at -34°C, using the wet rag method, and stirring your ice bath for best surface heat transfer. Looking forward to your diagrams!
-
rotuts: Before changing I (Integral) and D (Derivative) values, you should rule out a too narrow P (Proportional band), so you might set I=0 and D=0 and check whether you have oscillation, see here. If there is no oscillation in P-mode, too strong I and D may cause oscillation. Before changing I, try reducing Ar (Anti reset windup) from the factory-set 50% to maybe 25% or 30%, this often helps. In the new version of the PID-tuning guide (which will be published soon, hopefully) there will be a chapter on Ar: Ar: Integral Limit (0-100%) aka Anti - reset windup “Integral” is used synonymously with “reset”. What is Integral windup (= reset windup) ? The integral function adds up (integrates) temperature deviation from SP as the area under the curve. With increasing integral, the integral function adds more output to the output allowed by the proportional function to help in counteracting negative offset. As long as the temperature is below the proportional band (e.g. during ramping up from ambient temperature to SP), the proportional function allows 100% output, and the integral function increases output to more than 100%, but more than 100% output is physically not possible and temperature rise cannot get faster as intended by the integral function. So the integral term gets larger and larger (it winds up), and when SP has been reached and the output by the proportional term would be zero, the integral term still creates output, leading to temperature overshoot, until the integral term has been unwound. How is Integral windup avoided? Modern PID-controllers shut off integral action as long as the temperature is outside the proportional band. This is called “Ar” or “Anti - reset windup” or “Anti - integral windup”. Despite this Ar function, integral windup may happen even at temperatures within the proportional band if integral time is set very short (strong integral action) and/or if derivative action adds additional output during disturbance (e.g. by adding a pouch with cold food). The SousVideMagic 1500D has an advanced Ar function which allows to restrict integral action to the upper range of the proportional band, thus obviating the need to make otherwise adequate integral and/or derivative weaker. For example: SP=55°C P=10°C I=900sec D=100sec So the proportional band would be 45-55°C. With Ar=100%, integral action would be active between 45-55°C. With Ar=30%, integral action would be allowed only in the upper 30% of the P-band, i.e. between 52-55°C. What is the advantage of reducing Ar below 100% ? The ex-factory default setting is Ar=50% . This allows for strong integral and derivative settings for fast disturbance recovery without having to accept overshoot after ramping up or after a disturbance load (adding cold food). Summary Sometimes with an “I” value that adequately compensates for negative offset, “I” action may be too strong especially in response to a disturbance (temperature drop) and lead to overshoot and eventually oscillation. Instead of making “I” weaker (increasing integral time), “Ar” can be set to a value lower than 100%, thus restricting the integration of negative offset to the upper range of the proportional band, e.g. setting “Ar” = 30% with a P-band of 10°C and SP=55°C would allow integration of negative offset only between 52-55°C instead of 45-55°C, i.e. the upper 30% of the P-band. In the lower range of the P-Band, output power allowed by the proportional function may be sufficient to counteract disturbance without the help of the integral function, but in the upper range of the P-band, the proportional function reduces output so much that additional output power must be contributed by the integral function.
-
@rotuts: I wonder whether your Kill-a-watt will be able to measure the output of your SousVideMagic correctly. During ramping up at full power it may be OK, but at steady state with very short "blinks" it might fail as my Brennenstuhl PM230 energy cost monitor did, see my post in the old sous vide topic. @dmg: Your 8L pot with 100W at steady state compares with a FreshMealsMagic in its uninsulated 18L polycarbonate container, see ibid. A customer review of the Kill-a-watt says: So I wonder if the Kill-a-watt would give correct measurements with a PID controller, but I don't know if immersion circulators like the SVP have sophisticated controllers with solid state relays like the SVM, or rather bang-bang-control. In fact, energy consumption of sous vide cooking is not of much concern, but if you do mind, you might insulate your pot, e.g. with bubble wrap, cutting steady state consumption by a factor 2-4.
-
72 hours is what Modernist Cuisine recommends. But liquid loss increases with time (and also with temperature). I could not find any scientific paper quantifying the relation between time and liquid loss, time and enzymatic conversion of collagen to gelatin, temperature and liquid loss, temperature and enzymatic conversion of collagen to gelatin. This would answer the question whether it is better to increase cooking time or cooking temperature (in the range from 55°C to 60°C) for increased collagen gelatinization with minimal increase of liquid loss. Who will do the experiment?
-
Hi Mark, thank you for reporting your experiment! Temperature: 130°F/54.4°C is at the edge of microbiological safety and not recommended if you did not calibrate your Sous Vide Supreme against a calibrated reference thermometer, and it is very low from an enzymatic point of view. I did brisket 55°C/48h so far, but lately I experienced somewhat disappointing tenderness, so I plan to go 1-2°C higher in the future. See also the sous vide page in wikiGullet. Fat: Buying extremely lean meat is buying tasteless meat, and trimming the residual fat away is trimming the last bit of taste away. Why low fat, I think you prefer low carb? Fat as a lubricant enhances taste and felt juiciness, see MC 3•18. Juiciness and tenderness: juiciness at first bite comes from the water contained in the meat, but juiciness on continued chewing comes from the saliva provoked by spices, marinades, sauces, fat and Maillard reaction products. Brisket loses about 20% liquid during 48h cooking (maybe 10% in dry aged meat); this liquid is for the sauce, not for the sink. I almost always marinate my meat with acid marinade for more taste and tenderness and microbiological safety (pH<4.1). Note that thick tendons may not be gelatinized by collagenase as collagenase sits in the sarcoplasm (the cytoplasm of muscle cells) and has a long way to travel into thick tendons. Searing: heat transfer is quickest and most even in a screaming hot skillet with smoking rice bran oil (smoke point around 247°C) or other high smoke point oil, e.g. grape seed oil. I cut brisket either into individual portions or into cubes before searing, exposing more surface to the Maillard reaction for taste. With relish Pedro
-
An aquarium bubbler is a good option; use the air-stone as a weight, but cut a lateral hole in the silicon tube just above the air-stone; the larger bubbles will rise faster (more vigorous circulation) and cause less cooling and less sprinkling on the surface.
-
They don't specify the water volume and the dimensions of the bath, and there is no contact form or e-mail address, and no address at all (phone number must be Massachusetts). 110V only. USA only.
-
Reference Thermometers and Calibration Methods for Cooking Sous Vide
PedroG replied to a topic in Kitchen Consumer
The Maverick ET-73 has a successor: Maverick ET-732 dual probe remote BBQ thermometer which is said to have better range and out-of-range alarm; currently unavailable at amazon. Yard and Pool sells it at 60$.