

Tri2Cook
-
Posts
6,353 -
Joined
-
Last visited
Content Type
Profiles
Forums
Store
Help Articles
Posts posted by Tri2Cook
-
-
19 minutes ago, Anna N said:
Nothing wrong with the rice BUT there was some sticking and the tiniest bit of scorching on the bottom. It is very small and the base is flat so it is not that easy to clean. I’ll give it a few more chances but I can see my granddaughter becoming quite frustrated if it is this difficult to clean.
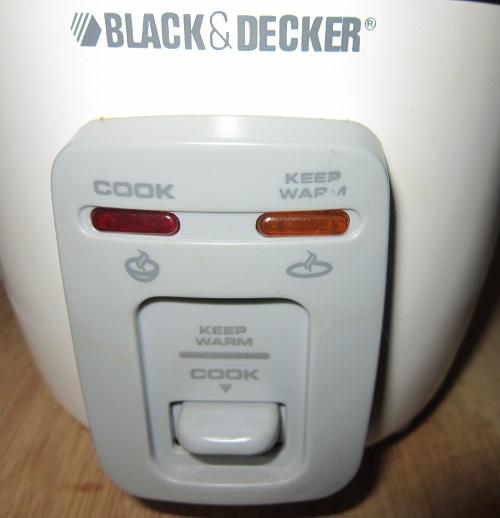
Not sure what would be the cause of that. Mine recommends letting it sit in "keep warm" mode for 10 - 15 minutes after it cooks and there's still no scorching or sticking. I've let it sit as long as 30 minutes or so and just got some very light coloration on the bottom of the rice which also gained a bit of nice texture but still no scorching or sticking. With mine, the lid is more difficult to clean than the bowl because, with a full load, it bubbles water up through the little vent which then runs back down into the rice around the sides so the lid gets a good basting in starchy liquid. But I just fill the bowl with water after it's empty, flip the lid upside down on it so it's submerged in water and by the time I'm ready to wash it, it just wipes clean.-
 1
1
-
-
Howdy and welcome. While I have no recreational interest in or medical need for marijuana, I have no particular bias against it either as long as it's for medical reasons or, if for recreational reasons, not on the road or in the workplace. Basically, anywhere I wouldn't want someone intoxicated, I don't really want them high either. With the soon to arrive legalization of recreational marijuana here in Canada, I'm sure there will be people looking to get into the edible end of the market that could probably learn a lot from you if they find these forums or are already here.
-
2
-
-
5 minutes ago, vtoselli said:
I was thinking about making a silicon mould out of the chocolate mould. Silicon is more elastic and would give enough vaccum for the technique to work. Gonna try it ASAP.
The article said glass on glass works best so I figured that meant something less elastic was better. But that was just my deduction, I really have no idea.-
1
-
-
3 minutes ago, Anna N said:
But come on. It’s not nearly as sexy as an electric lunchbox now is it? 😂
A valid point!
-
 1
1
-
-
I have this one...
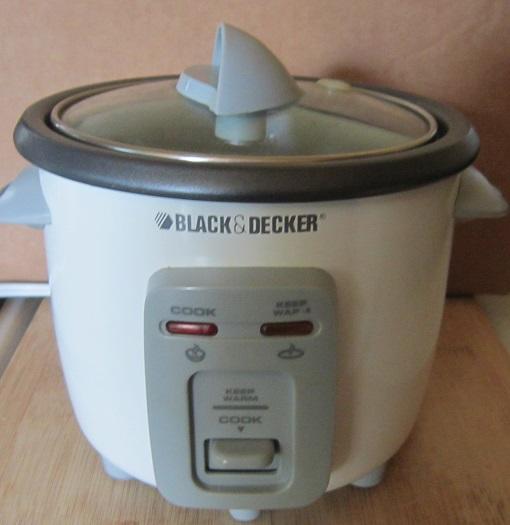
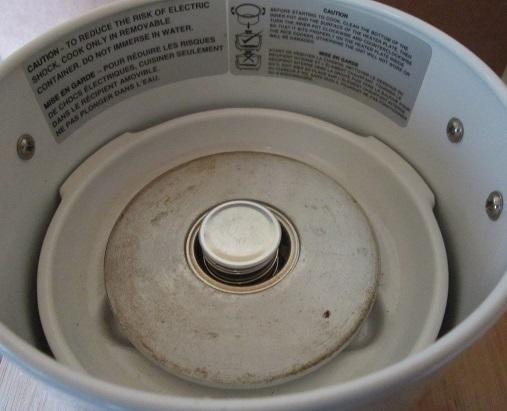
Maximum is about 1 cup of uncooked rice. Full height from counter to top of the handle on the lid is around 6". My wife bought it so I don't know for sure but it most likely came from either Walmart or Canadian Tire. I've had it for a long time and it still works great. I have no idea if they're still available or not.-
3
-
-
30 minutes ago, keychris said:
I feel like this technique is another one that's just too time consuming to do on anything other than a special occasion - whilst it looks amazing, it just doesn't look practical!
If it's done the way I've decided it's done in my head, it's much more practical than a whole lot of other decorating techniques. I think once you get everything figured out for the mold you're using, it would actually go pretty quickly from then on. -
13 minutes ago, Kerry Beal said:
It's those damn round tuits!
Yes it is... and they've been harder to come by the past couple years which feels too much like making excuses so I've been pushing myself to work harder at finding them. -
49 minutes ago, Kerry Beal said:
This one I figured out with the help of a couple of other folks and the video I linked to on the other thread. I'd be happiest to give it a few days and see if you guys can figure it out from the hints I've provided.
I feel like I've already pretty much figured out how you did it, at least in a general sense (though I could be way off)... me actually getting around to trying it may be a completely different story.
-
2
-
-
1 hour ago, Jim D. said:
Even though I mixed some colors in the Dubovik course, it is not something I long to do as a regular thing. It's too messy, especially if the cocoa butter needs to be strained. I also found that arriving at the right amount of colorant for translucent colors is (for me) a matter of guessing because if you spread colored cocoa butter thinly enough, it all looks more or less translucent. So I take the easy way out (not typically what I do, but sometimes we all have to be practical) and use Chef Rubber already-mixed colored cocoa butter, and if I really want translucent, I add some plain cocoa butter to the CR product to thin it out.
I have plenty of colors and even use them but that doesn't stop me from occasionally thinking "it might be kinda nice to not have to". I realize, of course, that there's nothing actually saying I have to... but you see all of this really nice work people are doing and it's hard to fully accept having a box of plain chocolates while constantly saying "but the flavors are really nice!"
-
1
-
-
I'm only 3/4 convinced I even want to mess with colors to any great extent, I don't think adding the additional task of making the colors myself would be conducive to pushing through the laziness barrier that is the remaining 1/4.
-
1
-
 2
2
-
-
It even works in ice water. Sadly, her blog is dead and no longer accessible but there was a post on the Playing with Fire and Water blog where she did a plated dessert for Halloween based on black forest cake flavors and actually made a little spooky section of forest. She did the mousse filled tree by placing the hollow chocolate trunk in a bowl of water and ice cubes and piping the branches on. I thought it was pretty cool at the time and gave it a try myself... it worked great.
-
1
-
-
9 minutes ago, keychris said:
And whenever I buy chocolates (for "research"!) I flip them over and look at the base, because it shows me how much the person that makes those chocolates cares.
I wouldn't agree that's necessarily an accurate indicator of how much a person making chocolates cares about what they do but as you said, "you do you".
-
1
-
-
Most websites I've seen that sell chocolate molds tend to carry the non-polycarbonate plastic molds in addition to the polycarbonate. Some places carry them in two different grades, professional and hobbyist. As far as that specific design goes, I have no idea. I'd be happy to help if I just happened to know the answer but I don't want to sift through hundreds of plastic molds on 20 different sites to see if I can find it... but you could. Or you could email a picture of it to Ikea customer service and see if they can help.
-
1 hour ago, Rajala said:
Ingredients: sugar, cocoa butter 32.9%, dehydrated passionfruit juice 17,3%, emulsifier (soya lecithin).
May contains traces of nuts, milk proteins and gluten.Composition: sugar 49.3% - fat 32.9%
Interesting. 50% sugar and 17% fruit. So, not having tried either, I'm guessing a whole lot sweeter and somewhat less fruity than what Kerry is doing... but explains why they can afford to sell it at their price point. -
1 hour ago, keychris said:
not really a standard piece of kit in the home kitchen though
")
I don't think Kerry's home kitchen is the standard piece of kit. I think a lot of food labs and high end restaurants would be jealous...
-
4
-
-
2 hours ago, VistaGardens said:
The box isn't "hard" to make, but it does have a few steps. The short version is that I took a cambro and cut a hole in it using a special saw like they use to cut casts off of arms and legs (Kerry would know...) and then inserted a thermostat for a reptile box into it.
A Herpstat and Flexwatt… do you work with reptiles? Herpstats are amazing controllers. Most of them are a bit pricey for a cocoa butter warmer but the Intro that you're using is pretty reasonable. I'm running a Herpstat 2 on each of my enclosures controlling a radiant heat panel up top and a UTH underneath and I've had zero issues with them. I have some less expensive controllers that I used to use for enclosures with less temp-reliant species that I'm going to play around with and see if they're precise enough for cocoa butter purposes.
1 hour ago, Jim D. said:@VistaGardens, thanks for posting that. It is very impressive, but unfortunately well beyond my skills.
Not trying to convince you to do it but just for the record, I'm willing to say it isn't beyond your skills and I don't even know you outside of here. That stuff is marketed to the reptile hobbyist/enthusiast and is very user-friendly to work with. -
2 minutes ago, Kerry Beal said:
Did you do the corn one?
Got sidetracked with other ideas and never got back to it after my initial disappointment that it was too soft. I have it stored with some other things waiting to be molded and it actually did seem to harden up more eventually, it just took longer to do it than most things usually do, so I need to finish that and see what I end up with. -
1 hour ago, Anna N said:
I always misread it as Health Bar then wonder in what universe are Oreos and ice cream healthy.

In my universe!
That's my story and I'm sticking to it...
-
2
-
-
1 hour ago, Kerry Beal said:

Nice! I'm still going to give this a try just so I can say I did but I became a little less excited about it when I started tracking down freeze dried fruits and realized what it would cost to do it as a regular thing. I can still see maybe doing it as a seasonal limited edition or something though. -
Decided to play around with a different rub than I usually make. Made a basic rub with sea salt, brown sugar, garlic powder, onion powder and a little cayenne pepper then tossed in a fairly large amount of fresh ground black pepper and very finely minced fresh lemon zest. 2 hours with pecan smoke followed by 2 hours wrapped in foil at 225 F and the ribs are out of the smoker...

Sticking with the lemon theme, I made a bbq sauce with lemon juice replacing the usual vinegar and a healthy dose of fresh lemon zest that I strained out at the end. It's tasty but after a quality-control rib without sauce, I'm not sure how much I'll be using. I'm really happy with the flavor of the dry ribs. The goal was to not heat the house today with oven or stove, it's really hot and humid for here, so the only side dish is a basic garden salad.-
11
-
-
10 hours ago, Kerry Beal said:
Someone left cherries in the nurses break room - so it seemed a summer torte would be a good option
Are those break room finds hints or just happy coincidences?
-
1
-
-
I have to confess that I haven't actually ordered it yet. I was excited about it and geared myself up to grab it when it hit the website, especially when it hit the site with an introductory sale price. But then I took a careful read of the specs and now I'm waffling over whether I consider a 500 gram minimum batch size micro enough to be worth the expense (which is significantly higher than the number on the website after shipping and currency conversion to Canada are added on). That's not really as small as I had in mind for testing and experimenting, I can get down almost that small in the full size unit. I realize there are limits to how small it can go and still generate the forces necessary for it to do it's job and I'm betting that 500 gram minimum is a safe number and can be flexed lower so I'm still giving it serious consideration.
-
8 hours ago, KennethT said:
The last few times I've done it, I did it in the microwave in a glass bowl... Start out at 30s at full power, then stir, then 10s / stir - repeat... done in about 5-10 minutes and a nice dark brown.
That's a pretty hefty time savings but I don't think I have the patience required to stir something every 10 seconds for 5 - 10 minutes. -
48 minutes ago, blue_dolphin said:
Go to their IG feed. Click or tap the circle that's their profile photo or "avatar." That should bring them up. You may need to click or tap the arrow to make them play.
Generally, if there are stories that you haven't seen, there will be a colored ring around the avatar.
On mobile, stories also show up at the top of your feed where you'll see a row of profile photos from people you follow with a colored circle around the ones with unveiled stories. Tap them to view. Once you've viewed them, the colored circle goes away but you can still re-watch stories that are less than 24 hrs old by tapping their profile photo.
On a desktop or laptop, stories show up in a little window at the upper right of your feed and you click on them to view.
Thanks! That was easy. I really do learn something here every day.-
1
-
Rice cookers for singletons
in Kitchen Consumer
Posted
I haven't found the time to be an issue. It takes around 30 minutes (I've never timed it precisely) and stays nice in warm mode for quite a while so I just start the cooker so that things get done in the same general time zone. For quick things like stir fries, I can just start them when the rice cooker kicks to warm mode and it gets it's recommended rest time by the time the rest of the food is done.