
DocDougherty
-
Posts
128 -
Joined
-
Last visited
Content Type
Profiles
Forums
Store
Help Articles
Everything posted by DocDougherty
-
Different products need different level of salt. Sauerkraut for example want about 2% by weight of the cabbage. And after a few days you can measure the pH and see that it is declining pretty fast. And after a few weeks you can titrate some of the pickling liquid with NaOH if you really want to know the acidity, though for preservation you are more interested in the pH than acid concentration (and you should know why pH is not a good proxy for acidity). Once the pH is low enough, you can let taste guide how long you ferment. A batch will continue to get more sour over time as more sugars are turning into lactic and acetic acids. I don't want to quote numbers because USDA has standards that are more complex for assuring food safety, but you can find all of it on-line.
-
Look at the chart of beef cuts and see if you can identify it If not eye of round then perhaps top round (or more likely bottom round). Most likely braised but perhaps cooked sous vide.
-
This is a bit late to the party, but I found a 1979 paper on botulinum growth and toxin formation at pH values below 4.6, so somebody found a way to grow it, but the growth conditions in the reference seem irrelevant to the case at hand - "growth and toxin formation by C. botulinum can take place in homogeneous protein rich substrates (containing 3% or more soya or milk protein) at pH values lower than 4.6" In this recipe, the vinegar will get the pH rather lower than 4.6, though I would make sure that all of the peppers protrude into the vinegar and have a surface that is conducive to vinegar absorption, remembering that the vinegar will be on the bottom and the oil on the top. I would also prep the peppers by torching them to char and then remove the shiny outer skin (which is pretty impervious to both oil and vinegar). Torching also makes the peppers soft enough to be flexible so that a small spoon will easily fit down into the part where you are trying to remove the seeds. I can also envision a long handled, sharp edged spoon with a rounded end that might be made by grinding down the business end of an ice tea spoon and bending it over just enough to make it into a usable scraper. I have one that is a bit larger that I use to remove seeds from winter squash and melons and papaya. For this use I would suggest a blade radius of no more than ~5mm. A bar spoon might be another good place to start. For a slightly smaller individual serving size, you might look at using a yellow Fresno chile (mostly because of its size) but they are pretty mild so adding some finely chopped Serrano chile to the filling would be essential.
-
Cashew cheese is the vegan standard and it lends itself to lots of uses. It might be a substitute for either butter or mayo though there are good coconut-based spreads for corn. It would go well on cauliflower as well.
-
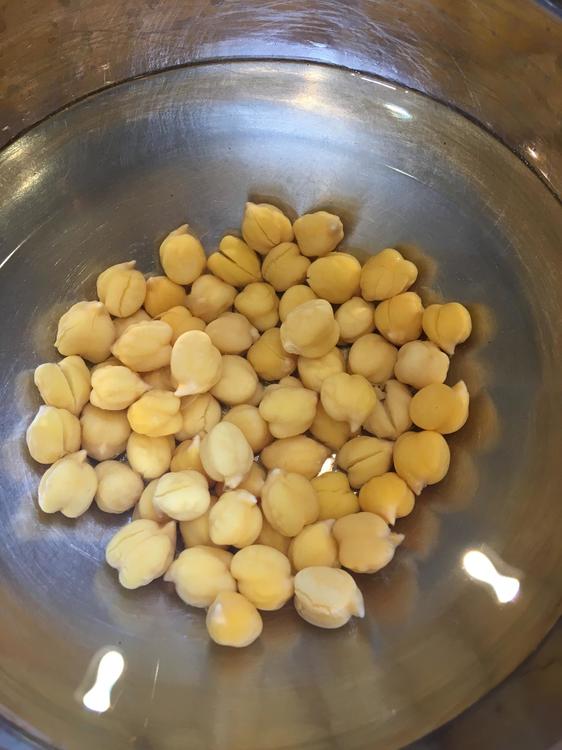
Here we are five years after the last post here, but perhaps with a useful tip. Chickpea skins can be loosened by attacking the skin-to-bean bond with an alkaline solution. About half of the skin is made of pectin which can be substantially weakened by a hot solution of baking soda. If you just want to make the skins soft (as opposed to trying to remove them) cook the chickpeas in a solution of 1/4 teaspoon of baking soda per cup of water. When you boil the water, most of the CO2 from sodium bicarbonate boils off which increases the amount of carbonate in solution relative to bicarbonate and increases the pH from around 8 to around 9. More baking soda produces a more pronounced effect but also affects the flavor. When done cooking you will find whisps of skin floating in the cooking liquid, but if you make it into hummus the skins will totally disappear (I use an Indian wet grinder to make hummus and the result is totally creamy after 40 minutes between the stones). If you want to remove the skins completely and not just soften them, first hot soak the dry chickpeas for 15 minutes (boil water, add dry chickpeas - water should fully cover the chickpeas by 1/2" - put on the top, turn off the heat and wait 15 minutes). Then boil the chickpeas in a solution of 1/4t of baking soda per cup of water for 5 minutes. Strain and chill in cold water. Using your fingers slip the skins off of the chickpeas and flush them out of the pan/bowl. Repeat the rinse about 6 or 7 times to get all of the skins. Soak the now skinless chickpeas for at least 8 hours (up to 12). Now you can steam (20 min for average size chickpeas), boil, or pressure cook the chickpeas to whatever level of doneness you desire (times will depend on the size and age of the chickpeas and how long you soaked them after removing the skins). Done right, I have found that this will result in splitting about less than 5% of the chickpeas in the process. I observed that going directly to boiling dry chickpeas in soda water resulted in the skins tending to come off everywhere except around the little beak at the top of the chickpea and it often left a strand of attached skin running half way around the bean that was removable but was too much trouble. This behavior stimulated me to try a hot soak before introducing the soda. I first tried 10 minutes which was not enough to make it easy to get all of the skin off. High soda concentrations tended to completely break down the skin everywhere except around the beak area where I wanted it to come clean. The solution (no pun intended) was to drop the soda concentration down to 1/4t per cup which softened the skin but did not completely dissolve them. As a result, when you rub the bean or squeeze it between your fingers, the skin comes off as a single sheet, pulling with it the skin around the beak so that everything is then clean. If I further increased the hot soak time to 20 minutes I found that the chickpeas tended to split more often (up from 2-5% to 10-15% when the skins were rubbed off), so this is an area where somebody else may be able to improve this process. The range of soda concentrations is between 1/8t per cup and 1t per cup of water and the boiling times range from 2 minutes to 8 minutes so run a few tests to decide where you want to operate. Since you hot soak the chickpeas before you boil them and rinse them after you remove the skins and before you eat them, the amount of sodium in the baking soda is not anything you should worry about. You will put more sodium in when you salt them than will ever find its way into the chickpeas in the de-skinning process. Photo is of peeled chickpeas soaking in room temperature water.
-
What's required to get a crust on the bottom of the rice pot?
DocDougherty replied to a topic in Cooking
Here is what i do, in my kitchen, to my taste. Your results may vary. Doc Persian Rice (Tadig) Rev 7 (15 Mar 2017) (from web recipes with multiple adaptations) This takes about 90 min to prepare unless you have thought ahead and soaked the rice, then it can be done in about 40 min. 1 c (175g) basmati rice (Royal or Zebra brand sela [parboiled] basmati) 2 qt water for parboiling 4 t salt 3T Nucoa (or ghee) 4 oz water for steaming white basmati (6 oz for brown basmati) for fruited rice, add ½ c raisins and dried cranberries for the last 2 min of parboiling Directions: 1. Wash the rice well until the water runs clear, soak for at least 30 min; drain 2. Bring 2 quarts of water to a boil in a 3 qt Farberware pan with the salt added. Add the rice and bring back to boiling. Boil uncovered for 5 minutes (18 min for brown). Remove from the stove and drain the rice in a big sieve. 3. While the rice is boiling, heat the 3T Nucoa or ghee with 4 oz of water (6 oz water for brown rice) until bubbling. Pour half of it into the 10” Farberware frying pan and swirl it around to coat the sides of the pan. {Do not preheat the pan! This timing does not account for it} 4. Spread the parboiled rice in the pan 5. Make a hole in the middle and pour in the remaining fat and water. 6. Cover the lid with a cloth towel and securely tie it back with a clamp and/or a rubber band so that it doesn’t get burned; seat the lid tightly on the pan. 7. Cook the rice on medium heat using a heat diffuser for 25 minutes; remove the heat diffuser and cook for an additional 6:30. At the end of 10 min the water should have been absorbed by the rice or boiled off and become trapped in the towel, after that you are browning the rice in the fat. The cloth absorbs the moisture preventing it from dripping back and cooling the pan (preventing the pan from getting hot enough to brown the rice). A mottled brown crust will develop on the bottom during the final stage of cooking. 8. Fill the sink with about 2” of water and dip the bottom of the pan in the cold water. The pan will sizzle for a few seconds as it cools; wipe the (very hot) water off the bottom then cover the pan with an upside-down dinner plate and flip the whole pan of rice and tadig onto the plate. It should come out clean, but if it doesn’t just use a pancake turner to remove the tadig that doesn’t come out. Notes: 3T of Nucoa is enough for either white or brown rice Be sure to split the fat into two parts – one half goes in the pan before the rice goes in [this fat is the tranche that is pushed to the outside of the pan when the rice is spread around and is absorbed by the outer ½ of the radius]. After leveling the rice, make a hole in the middle and pour the remaining half in to provide fat for the rice in the center of the pan.
-
I would remove the skin, trim off any gross fat and cut it into 2-3cm slices or cubes and braise it for about 3+ hrs in any liquid you like until it is really tender. Remove the meat and let it cool. Now take it apart by hand separating meat from remaining connective tissue and fat. Chill the remaining braising liquid and remove the fat, heat it back up to dissolve the gelatin, strain to get rid of the extra bits. Now add 0.6% by weight locust bean gum (about 1t for two cups), blend it with an immersion blender and heat it up to 190°F/88°C to fully hydrate the LBG. It should have the viscosity of a light cream sauce. Combine with the meat and adjust seasoning and you are good to go.
-
Tilda and Elephant are good and reliable though I have found that Royal is my favorite. Royal is the only parboiled basmati rice that I know of, and cooks up with very long grains. I generally soak it for at least 30 min then boil it in excess water for 5 minutes, strain, and steam in a sieve for another 7-10 minutes. This seems to maximize the length of the cooked grains, but you can cook it in a rice cooker and get good results.
-
ElsieD got it right, and I do what she does. 133-134°F for 24hr works for most beef (short ribs take longer) if you want medium rare. I do tri-tip that way after running a Jaccard over it a few times. Comes out fork tender and medium all the way through. I pre-season with a chef salt containing a 3:5:2:1 combination of (salt: black pepper: powdered garlic: smoked paprika). Torch it once at the end after it has cooled somewhat so that you don't overheat and destroy that nice pink flesh. Thin sliced it should melt in your mouth.
-
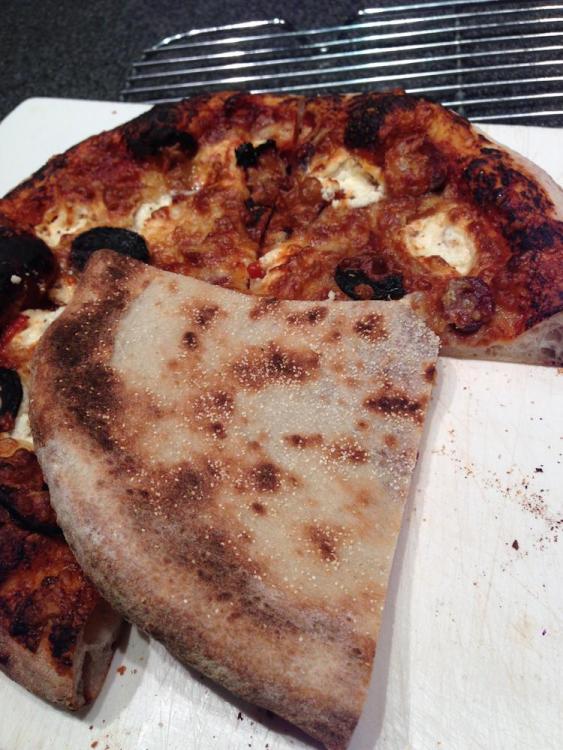
In reply to DIY crispy pizza crust Started by AlaMoi: After many years of making unsatisfactory pizza crust, I too finally went to the trouble and expense of getting some 00 flour. After a 24 hr rest in the refrigerator and a 2 hr warm-up period I could easily stretch and throw (in 2 tosses) a 12" thin skin from 200g of dough and have a nice puffy rim. It was like magic! I had never before experienced the elasticity of this dough. It didn't require a rest between stretches and it didn't tear. With such a thin crust, there is really not that much flour in it - so 00 is not really that expensive. But it made a huge difference for me. The pizza in the accompanying photo was baked slightly less than 3 minutes on a 3/8" aluminum plate preheated in a 575°F combi oven at high fan speed for 20 min to a surface temperature of 550°F. The crust is a couple of mm thick.
-
If you want medium rare beef stew (which is what you seem headed toward) you will need much longer times (72 hr would probably not be too long) at a temperature below 133°F, and you probably will want to start with a more tender cut. Once you get past insisting that it remain pink in the middle, you can go to a higher temperature and cut the time down. Oso bucco is a tough piece of meat (shank) that braises for a few hours at 200°F or so and represents the other end of the spectrum; fork tender and very flavorful with fully dissolved connective tissue. Between stew made with fillet and oso bucco there are a lot of other time/temp/toughness/texture combinations that are achievable. I suggest you experiment in the middle of the zone.
-
You could easily brush the tenderloin with fat before you torch it - use what you have. Pork fat would perhaps be the best (bacon fat, sausage fat, even some grease from microwaving some summer sausage), but if you don't have any of those handy, Canola oil will work just fine. I would suggest not using EVOO as it will smell like burned olive oil and not like pork. The menu looks fine. It is varied and provides choices that appeal to folks with different tastes.
-
I sous vide turkey thighs for 24 hr @ 165°F, then chill and hold in the refrigerator. There isn't much juice when a single thigh is de-bagged so it winds up in soup or sauce within a day or two. But if you are doing a lot of chickenthighs perhaps the best approach is to understand what botulism spores demand and what it takes to denature the toxin: C. botulinum spores can be killed by heating to extreme temperature (120 degrees Celsius) under pressure using an autoclave or a pressure cooker at for at least 30 minutes. The toxin itself can be killed by boiling for 10 minutes. So eat the thighs quickly, and freeze the juice until you have enough to make soup. Then pressure cook the juice for 30 min if you are concerned, or simmer it for 10 min even if you are not, before you make your soup. I find that the long cooking time facilitates the liquid in the bag dissolving a large fraction of the connective tissue, though not all. However, after a few careful dissections you become quite familiar with the anatomy of the bird and can disassemble the pieces into bone, fat, residual connective tissue, and mouth watering tender flesh. If you have enough residual fat you can shred it and make confit. Or torch it and top a salad or soup or put it in a taco or burrito or make an omelet or a souffle, or just put it into the soup.
-
Salt Black pepper chili arbol (one pod, seeded, whole, remove before serving) cinnamon (half as much as black pepper) chipotle or smoked paprika (optional, not much, maybe1/4t, it should be subtle)
-
Concur. If you have met the 10D (or whatever number of decimations you want to insist on for the resident bacteria), then you really don't need to freeze. Just be diligent and practical. If you are considering a re-freeze because your guests missed their flight, I would just toss it in the refrigerator. If it will be a few months before you revisit it then re-freezing might be the best option.
-
What's the right internal temperature for a slab of fish?
DocDougherty replied to a topic in Cooking
It will cease being translucent at around 133°F and will begin to be flaky at ~139°F, so in between it is most tender. I sous vide salmon to 136°F and it gets consistently good reviews. You can eat it raw if you trust the source, but check for parasites in any case. USDA says you can kill fish parasites by freezing at -4°F for 7 days. If not doing sous vide, account for heat soak and take it off early. You can calculate what temperature you want, but you don't have the instrumentation to sense the state vector, so skill and experience will have to guide you. -
Pressure Cooking is the opposite of Sous Vide: Defend or Refute
DocDougherty replied to a topic in Cooking
Not so much opposite as different. For dishes that you don't want to heat above a specific temperature (medium rare beef, fish) sous vide is great because it removes much of the precise timing required to achieve the same result with high temperature cooking methods (frying, grilling, ...). But the high temperature of a pressure cooker can accelerate the process off dissolving connective tissue or softening beans/potatoes quickly. You still have to wait for the heat to diffuse to the core of the food, though it does go faster in a PC and further accelerates the process. So I sous vide chicken breasts, turkey thighs, salmon, steak, etc., and pressure cook lamb shanks, chickpeas, and potatoes. Some things will cross over and others won't. Pick and choose for optimal results in your kitchen, with your food, to get your preferred result. A good combi oven will do a decent approximation of sous vide for a big piece of meat or a whole bird that you can't sink in a water bath without 20 lb of glass beads, and neither of those would be good candidates for pressure cooking (well maybe you could broast a big bird). -
I began doing some research to better understand what I was doing when I make rough puff pastry. In the process, a neighbor who recently graduated from Le Cordon Bleu Paris explained that in France "dry butter" is always used for puff pastry but had no idea why. I found the definition of dry butter and the commercial product but not a good rationale for why it is important or even what it adds to the process or to the end product. One theory is that less water makes the butter melt at a higher temperature. I don't believe this to be true, though it may seem to have that effect. The thought experiment is to consider an emulsion of fat and water with varying amounts of water, and compare it to the pure fat. In this case you are comparing butter with various amounts of water (16% to 20% - the difference between buerre extra sec and standard US butter) to clarified butter or ghee (100% butter fat, available in South Asian markets). Ghee is quite hard and even at room temperature can be difficult to remove from a jar. At the same temperature standard US butter (whether salted or unsalted) is quite soft. In neither case is the butter melted. Butter is actually a mixture of low melting point fats and higher melting point fats and attempts have been made to re-balance the mixture toward low melting point fats to improve spreadability - with less than outstanding results. I suspect that the advantage of "dry butter" comes from its physical properties as it is likely to have higher shear strength (than 80% butter fat butter) at cool room temperature and thus better match the texture of the dough into which it is to be laminated. Consider the case of crunchy bits of really dry butter (100% butterfat or clarified butter) which would be nearly impossible to laminate since it would not flow/creep and would create holes through sheets of dough unless that temperature was exactly right and would not have the water necessary to puff the dough. At the other end of the spectrum you have beaten butter that is spreadable, where the water has been released to combine with the flour and is then not available to form the steam so essential to putting the puff in puff pastry. In between is some emulsion of water in fat (I would suggest ~84% fat) where the shear strength is optimal for laminating a wheat flour based dough. This is an entirely data-free analysis so please don't take it as fact, just as a candidate theory which might explain the benefit of dry butter in making puff pastry.
-
Need help with sous vide timing and temperature for beef and pork
DocDougherty replied to a topic in Cooking
At a little over 2" thick it will need a minimum of ~3hrs to reach equilibrium with the water bath. The advice of below 140°F for beef is good, and 135*F is even better if you want it really medium; that way the torch won't take you past where you want to go. It will benefit from a longer time (I often run tri-tip for 24 hr @ 133°F and it comes out both medium rare and fork tender after which I torch it for color and flavor). Pork "well done" is a food safety issue. If you trust your source then you don't need to spoil it with too much heat (assuming it is a loin). If it is a loin then it is not very fatty and will be dry if cooked to "well done". If it is a butt then it will benefit from long cooking to tenderize and because it has lots of fat, it can be roasted in a conventional oven starting at 300°F for 2 hours or until the core reaches 140°F, then 250°F for another two hours, then 230°F until the core temp reaches ~200°F or a little higher. It can then be chunked or pulled/shredded. If you want to slice it, stop at 190-192°F. -
My version of tamarind chutney: 2t tamarind concentrate ½ chunk of gur (~3T) 1/2c water 1/8 t garam masala 1/8 t toasted ground cumin 1/16 t red pepper If it is too thick thin it down a little with some more water; if too thin boil it down to what you prefer; but it will get you into the target area.
-
Use it to top hummus. I make my hummus very stiff (I use an Indian wet grinder) with lots of lime juice, smoked paprika, garlic, and red pepper. When I plate it, I put little dimples across the top with the back of a 1/4t measuring spoon, fill them with olive oil using a disposable 1 ml pipette, then top with ground sumac followed by fresh cilantro. Serve with oven baked corn chips (cut 6" corn tortillas in quarters, no salt, convection bake 15 min @ 350°F on a perforated 1/2 sheet pan, 20% humidity, low fan speed).
-
I guess I am missing something. It looks like the pre-sear was done with a torch. And a torch that gets meat that brown has managed to raise the surface temperature well above 300°F. It doesn't make sense to me to follow that with any more time below 55°C than you have to. With cuts that thick it will take a few hours for the center to reach water bath temperature and that should be enough to do the job. I understand the notion that you want to accelerate the enzyme activity, but that is also accelerating the bacterial activity. Perhaps the idea is that muscle meat doesn't have bacteria below the surface. But I would like to see the test results when you try to prove that with any rigor. The general rule is that you want the meat to be at temperatue for at least seven decimation times (the time it takes to kill off 90% of the bacteria). That should get you to 10E-7 of the bacterial population you started with. Four hours at optimum growth temperature will produce at least 16 doublings of the initial bacterial population, after which you need more than the suggested seven decimation times to get to less than 0.1 bacterium per gm which is effectively sterile.
-
There is a long history (10 yrs) of this method with many trials, but all in a convection oven. I don't see any difference between one and two butts (almost always butts instead of shoulders or hams but it works the same for all). Use a skewer to probe for the bone and place your meat thermometer tip in the center of the meat but away from the bone. For an 9 lb butt, start at 300°F for ~3:45 (until the core is at 165°F), then turn the oven down to 240°F and let it go until the center gets to 205°F (about 7 to 8 hrs total in my Wolf convection oven). The final stage is quite dependent on the specifics of the oven and a ±5°F calibration error can produce dramatically different times for a 205°F finishing temperature. For a non-convection oven it will take longer but I can't predict how much longer. The advice about starting early and holding it (foil covered and wrapped in a towel and then newspaper in a cooler) is very good. I have held a butt for 3 hrs before pulling it and not been able to tell that it wasn't just out of the oven.
-
I discovered the hard way that regular extruded polyethylene bags (Glad, Ziplock, Presto) are not tough enough to keep the larva in or the moths out, and they will chew their way out to pupate and fly off as moths, and the moths can chew through the thin plastic to lay their eggs inside (though I do not know how they know where to chew). Metal, glass, or heavy duty (molded rather than extruded) plastic containers with tight seals seem to be the best solution. Freezing for a few days seems to be enough to kill off even eggs, but buying recently milled flour and quickly using your stock before the eggs can hatch prevents the problem. You probably have eggs in anything and everything that was not properly protected in the first place so plan to do a complete inventory replacement in proper containers with a thorough cleaning between now and then.
-
First the haiku version: Summer sweet corn - blend; a little chicken broth - add; salt, heat, serve - yum yum! And then the recipe: 1 pound of cooked and cut corn (or a package of cooked frozen baby corn) Place in VitaMix blender and add broth until it comes up about 80% of the way to the top of the corn Add 1/2t salt (up to 1t depending on your taste) Blend on high for 5 min Temperature should be about 180°F when finished (just from the blender energy dissipated in the soup). You will swear that there is a ton of cream in it (I use this instead of bechamel to make a gluten-free, dairy-free souffle) If you want some meat, float a bit of pulled pork or sous vide chicken breast on top, or some cheese. If you want it to add some color, garnish with pickeled red bell pepper and some diced jalapeno, and perhaps some cilantro. But you don't need any of that.


