andiesenji
-
Posts
11,033 -
Joined
-
Last visited
Content Type
Profiles
Forums
Store
Help Articles
Everything posted by andiesenji
-
That is one bean variety that I cook in the pressure cooker. I have an electric one and I cook them on high pressure for 45 minutes and they are still intact and not at all mushy. I then put them in a crock with "additives" and make baked beans. Even after the cooking in the oven they are still intact.
-
I have some old bakeware made by Volrath that seems virtually indestructible. I also have a bunch of bakeware from Fat Daddio's which I have used and abused a lot - I have several of the "heavy duty" cookie sheets that I use instead of regular sheet pans. I got all of my Pullman loaf pans from Fantes - have the 16 inch, 13 inch and 9 inch. I use the 9 inch exclusively for pumpernickel bread. WARNING!!! Do NOT click on the "Tools" section at Fantes. I get in trouble every time I go there so I speak from experience. Did I need another of thee Jonas Baker's Mate 4 tier cooling racks (already have two) - No, but I ordered one anyway because they are so handy for so many tasks when one needs to utilize counter space efficiently. And I did not need a sticky bowl gripper or a Kolacky cutter... It is a dangerous place to linger. I don't like non-stick bakeware, but for any non-intricate mold pieces, I use parchment. In loaf pans, cake pans, etc. - I buy the various pre-cut rounds and the big stacks of flat 1/2 sheet pan sheets. I have a few silicone baking sheets but for me it is usually easier to use the parchment. I buy from an ebay vendor that sells 200 sheets for 26.50 and free shipping.
-
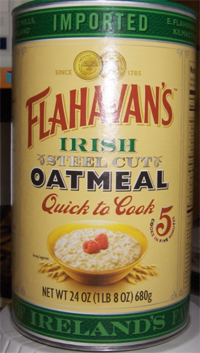
I love oatmeal. But I can't stand the "quick-cooking" or "instant" glop that has such a horrible glue-like texture. I like a mixture of old-fashioned (organic) rolled oats and steel cut or "pinhead" oats in a ration of 1:2 or 1:3. And there is a preparation step that I have found makes a huge difference. I TOAST the raw oats, usually stirring them in a dry skillet until they being to show a bit of color on the edges. Sometimes I toast them in butter and this does require constant attention and stirring. I then often cook them in a slow cooker overnight or on the stovetop - again, this requires frequent attention and stirring. Rarely I cook them in the Thermomix, if I am feeling particularly lazy. Some brands are better than others. I am very partial to Flahavan's Irish oats - they offer several varieties. The FLAVOR is far superior to most oat products from the U.S.
-
Denser cakes keep better and can be sliced thinner. Any ENGLISH recipe for fruit cakes, Dundee cake, etc., will slice much thinner. Some fruitcakes from England with big chunks of fruit can be sliced thin and look like stained glass windows.
-
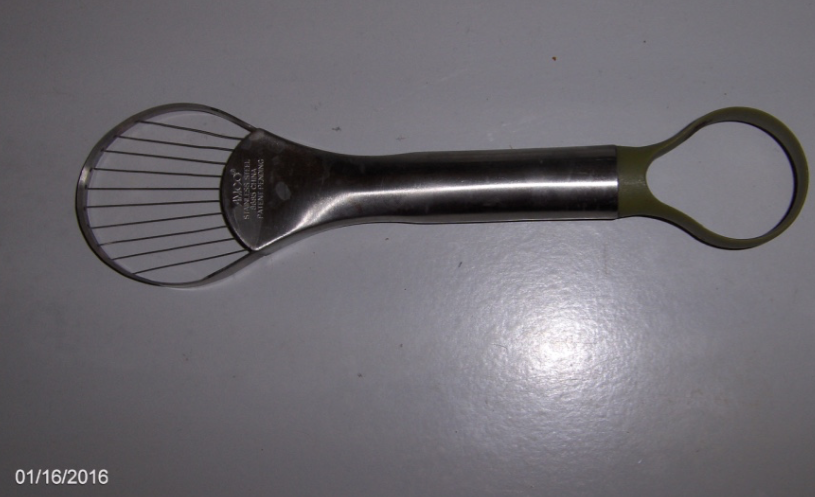
I use my method of removing the whole peel - making a single cut so I have a long strip of peel. The process is documented in photos on my blog - here - I've been using this method for about 40 years. I use an "avacado" tool that is sharp enough to remove the pith without cutting into the peel itself. I roll the peel into a cylinder and cut it into fine slivers if I am doing a small batch. For large batches I use a marmalade cutter. And I "juice" the oranges by putting them through the blender and straining out the pulp. I like clear marmalade.
-
I no longer use mine all that much so am thinking of selling it. Of course I first have to find the box (I always save boxes) and gather the various cookbooks I bought (and never used). I've had a lot of fun with it and found it very useful for making butter rapidly but I have other means and for some of the things I want to make, it does not have the capacity I want. I got it in November 2009 but I never used it like the eager folks in Australia use theirs.
-
I found it. I had TITLED IT WRONG! Misspelled lime. When I did a search for "canning citrus" it popped right up. LEMON OR LIME CURD 2 cups sugar superfine Substitute Truvia at the recommended amount for sugar free or the Truvia/sugar baking blend for Low sugar 1/2 cup loosely packed zest 1 cup lemon or lime juice 3/4 cup unsalted butter 7 large egg yolks 4 whole eggs TRUVIA INFO: https://www.truvia.com/products/baking-blend *Original recipe multiplied by 2 *Recipe rounded to nearest cooking fraction 4 cups sugar superfine 1 cup loosely pack zest 2 cups lemon or lime juice 1 1/2 cup unsalted butter 14 large egg yolks 8 whole eggs *Original recipe multiplied by 4 *Recipe rounded to nearest cooking fraction 8 cups sugar superfine 2 cups loosely packed zest 4 cups lemon or lime juice 3 cups unsalted butter 28 large egg yolks 16 whole eggs Lynn says: I use an old Nesco roaster 21 quart - that belonged to my grandmother which has a wire rack that will hold 12 pint jars or 24 half pint jars using the flat rack between the two layers of jars. You can find information about the Nesco roasters at this site: http://archive.lib.msu.edu/DMC/sliker/msuspcsbs_nese_nationalen4/msuspcsbs_nese_nationalen4.pdf Scroll down to page 25 for the “CANNING RULES” You can usually find these on eBay or etsy at reasonable prices. Be sure and get the 21 quart or larger. They were also made by Westinghouse and GE and the sizes are about the same. Special Equipment Needed: zester, balloon whisk, 1½ quart double boiler*** (the top double boiler pan should be at least 1½-quart volume for small batch- use larger stainless bowl for bigger batches), strainer, kitchen thermometer measuring at least up to 180°F, glass or stainless steel medium mixing bowl, silicone spatula or cooking spoon, and equipment for boiling water canning. Yield: About 3 to 4 half-pint jars for small batch - 7 to 8 half pints for medium batch, 8 PINTS for large batch. Please read Using Boiling Water Canners before beginning. If this is your first time canning, it is recommended that you read Principles of Home Canning. Procedure: 1. Wash 4 half-pint canning jars with warm, soapy water. Rinse well; keep hot until ready to fill. Prepare canning lids according to manufacturer's directions. 2. Fill boiling water canner with enough water to cover the filled jars by 1 to 2 inches. Use a thermometer to preheat the water to 180°F by the time filled jars are ready to be added. Caution: Do not heat the water in the canner to more than 180°F before jars are added. If the water in the canner is too hot when jars are added, the process time will not be long enough. The time it takes for the canner to reach boiling after the jars are added is expected to be 25 to 30 minutes for this product. Process time starts after the water in the canner comes to a full boil over the tops of the jars. 3. Combine the sugar and lemon zest in a small bowl, stir to mix, and set aside about 30 minutes. Pre-measure the lemon juice and prepare the chilled butter pieces. 4. Heat water in the bottom pan of the double boiler until it boils gently. The water should not boil vigorously or touch the bottom of the top double boiler pan or bowl in which the curd is to be cooked. Steam produced will be sufficient for the cooking process to occur. 5. In the top of the double boiler, on the counter top or table, whisk the egg yolks and whole eggs together until thoroughly mixed. Slowly whisk in the sugar and zest, blending until well mixed and smooth. Blend in the lemon juice and then add the butter pieces to the mixture. 6. Place the top of the double boiler over boiling water in the bottom pan. Stir gently but continuously with a silicone spatula or cooking spoon, to prevent the mixture from sticking to the bottom of the pan. Continue cooking until the mixture reaches a temperature of 170°F. Use a food thermometer to monitor the temperature. 7. Remove the double boiler pan from the stove and place on a protected surface, such as a dish cloth or towel on the counter top. Continue to stir gently until the curd thickens (about 5 minutes). Strain curd through a mesh strainer into a glass or stainless steel bowl; discard collected zest. 8. Fill hot strained curd into the clean, hot half-pint jars, leaving ½-inch headspace. Remove air bubbles and adjust headspace if needed. Wipe rims of jars with a dampened, clean paper towel; apply two-piece metal canning lids. 9. Process in the prepared boiling water canner according to the recommendations in Table 1. Let cool, undisturbed, for 12 to 24 hours and check for seals. Table 1. Recommended process time for Canned Lemon Curd in a boiling-water canner. Process Time at Altitudes of Style of Pack Jar Size 0 - 1,000 ft 1,001 - 6,000 ft Above 6,000 ft Hot Half-pints 15 min 20 25 Shelf Life: For best quality, store in a cool, dark place (away from light). Plan to use canned lemon curd within 3 to 4 months. Browning and/or separation may occur with longer storage; discard any time these changes are observed. Prepared lime curd can also be frozen instead of canned for up to 1 year without quality changes when thawed. Package in freezer containers after straining and cooling to room temperature. To thaw, place container in a refrigerator at 40°F or lower for 24 hours before intended use. After thawing, consume within 4 weeks. (See Freezer Lemon Curd, http://www.uga.edu/nchfp/publications/nchfp/factsheets/freezer_lemoncurd.pdf) Use same process for lime curd. Preparation Notes: * If superfine sugar is not available, run granulated sugar through a grinder or food processor for 1 minute, let settle, and use in place of superfine sugar. Do not use powdered sugar. ** If a double boiler is not available, a substitute can be made with a large bowl or saucepan that can fit partway down into a saucepan of a smaller diameter. If the bottom pan has a larger diameter, the top bowl or pan should have a handle(s) that can rest on the rim of the lower pan. For more detailed information on boiling water canning, see "Using Boiling Water Canners" at http://www.uga.edu/nchfp/publications/uga/using_bw_canners.html Developed at The University of Georgia, Athens, for the National Center for Home Food Preservation. Released by Elizabeth L. Andress, Ph.D., Department of Foods and Nutrition, College of Family and Consumer Sciences. December 2004.

-
Haven't found it yet. It was on a blog about CANNING, not a regular recipe site. It interested me because she (or he) used a big electric roaster for the water bath canning, as I have done many times - you can fit a lot of jars into one of the big old roasters.
-
There is a recipe for Lime Curd made with Truvia (much less sugar) that uses 2 cups of lime juice and the zest - makes 4 pints, as I recall and is refrigerated for up to 6 months, unless you do the water bath canning routine. I thought I had it in my computer but haven't been able to locate it but will do an internet search for it. I made it a couple of years ago (when there were some great coupons for Truvia) and gave it as gifts in half-pint jars. Everyone raved about it.
-
I saw one of these Pizzeria Pronto Stovetop Pizza Ovens demonstrated a few days ago and got one of the brochures. I was quite impressed with the results they got with a portable propane burner - one of the higher output types made for the portable turkey fryers. Right now it is only available through Williams-Sonoma but in February will be sold by Pizzacraft - a vendor that I have used in the past. (round ceramic pizza stone with HANDLES which make it easy to position). Has anyone else seen one or tried using one?
-
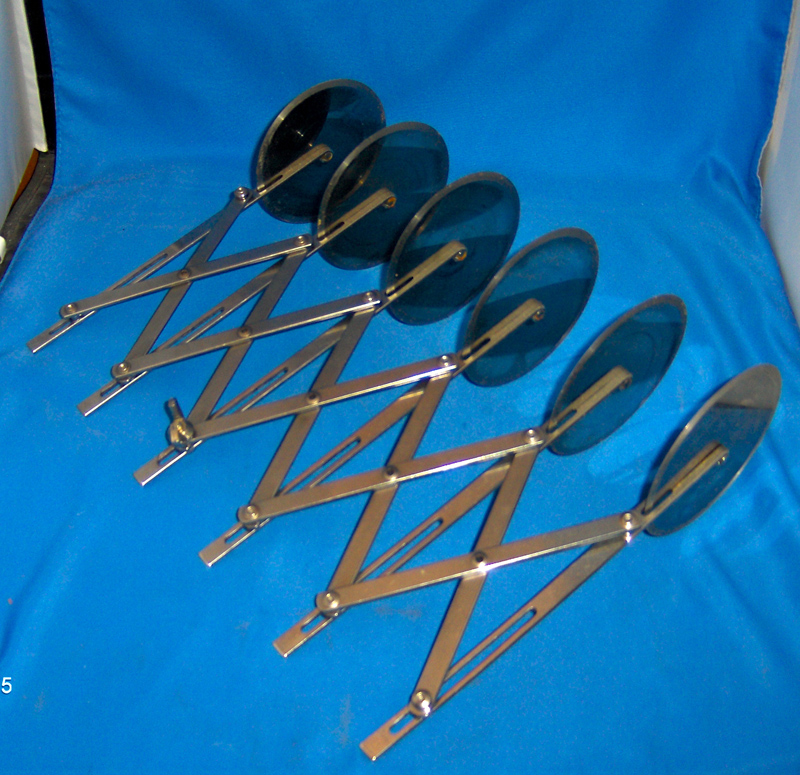
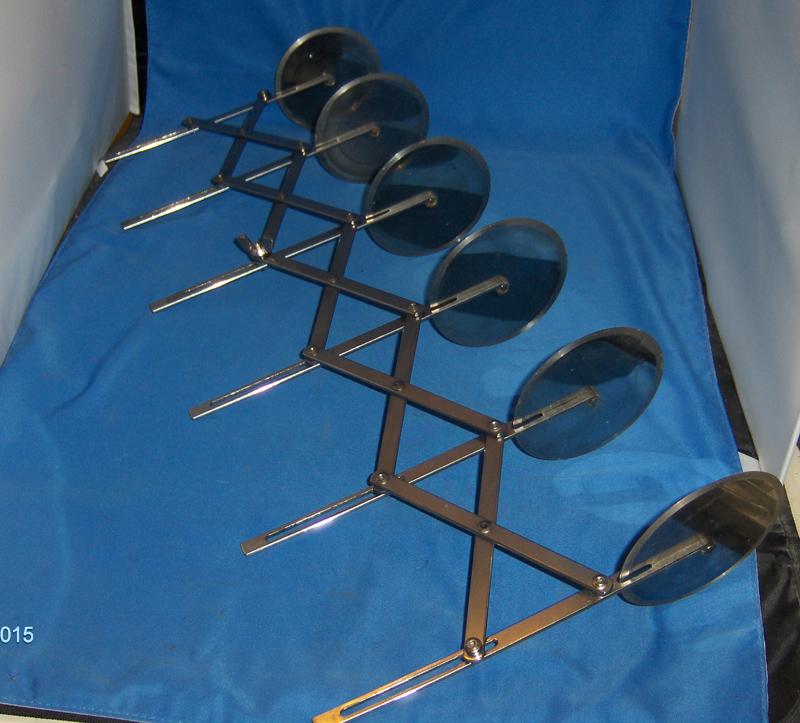
Yes. They are still made. With fewer blades and even more blades, (7) and with smaller diameter wheels. I put it on eBay and it sold immediately and is already in the hands of the buyer. I still have the one with the bar, which has 8 cutting wheels which have to be repositioned one by one with the use of an allen wrench. I never had a problem with uneven pressure. This one is sturdy enough and the stainless steel is rigid enough that even cutting is easy. Maybe when first used, one might have a problem but the learning curve is very shallow and these save a huge amount of time and insure that each piece is the same size. Actually the bar cutter has 10 blades, there are just two not on the bar, in the bag with the allen wrenches (2, an extra in case the first is lost).
-
Back in the days when I was catering, I had a client who always asked for hasenpfeffer - for a crowd. I cooked it in a big electric roaster and usually it was 8 to 10 rabbits, depending on size - about 20 pounds dressed. I got the recipe when I lived in Wisconsin, from my stepdad's sister - German all the way. This recipe is virtually identical, except I don't use MSG. Provide plenty of napkins, because most people can't resist using their fingers. I always served "rustic" mashed potatoes as well as steamed rice and German black bread.
-
Cleaning things that don't fit in your sink
andiesenji replied to a topic in Food Traditions & Culture
I'm a bit late to this but I do use the bathtub for washing some large items but I have a bad back and bending over is not possible. I got a folding baby changing table/bath thingy that was on closeout at Bed, Bath & Beyond for $19.95 - originally 89. It is 100% waterproof and folds when I don't need it but it will hold my large pots, sheet pans, etc., and I have one of the hose-type sprayers with a diverter from the regular shower. This saves me bending over and the thing is sturdy enough to be stable when I'm scrubbing something. I use the Dawn degreaser spray, put the stuff on the changing table part (which goes over the bath) and leave the stuff to "work" for hours, and it is not taking up space in my sinks. -
Not new, but found a gadget that went missing a few years ago and as I was shuffling stuff around in my storage place, I moved a big old Magnalite roaster and something slid from side to side inside it. Inside was this, which I thought I had lost - at least 5 years ago - blamed myself for maybe throwing it out with the trash after a marathon baking session. It was in a big ziplock storage bag, along with some copper cookie cutters, also thought lost, and an old butter knife. In any event, nice to know I did not toss them out. After "losing" the dough divider, I had to haul out my "vintage" one, the straight bar type, "adjustable" in that the cutting discs can be loosened and slid along the bar but each division has to be measured. I don't bake as much as I used to so this may end up in an auction. But it is a gadget that I do love. Once upon a time it cut a lot of puff pastry, cookie dough, caramels, brownies and etc.

-
I used to have several spoon rests but gradually they moved out of reach. For the past year or so, maybe longer, I have been using a shallow jar lid - has been through the dishwasher numerous times. Fit the spot that works best for me, doesn't tip and holds even the largest spoon or ladle. Also unbreakable (a fate that was the end of many former candidates.) And, since I recently came across the rather fancy jar, on which it arrived, I can always give it a good clean and use it for what it was originally intended.
-
Thanks for looking but the one I have is full leaf tea, second flush. Moni says there are no vendors in the U.S. for the high-grown 2nd flush teas from this plantation.
-
Several years ago while attending a Sci-Fi Con, I got together with some internet friends, one of whom was Indian. She said to try the tea we were drinking, which was some Nilgiri she had brought, with half & half instead of milk. She said the milk in India, at least in her region, was usually buffalo milk and it is much richer, higher butterfat content, than cow's milk. So we did some side-by-side tastings and it was true that more of the subtle flavors were enhanced with it. On her advice I tried it with the Assams and with some of the more robust Ceylon teas and was pleased with all. I'm not that keen on most Darjeeling teas so have not tried it with them. The only other tea, and it is difficult to find here, she recommended with half & half is one I had to look for as I can never remember the name. She sent me a small tin a couple of years ago, which I have been using sparingly and it is amazing. It is Kanan Devan Hills Ltd. Munnar black tea and I have not been able to find a vendor here.
-
A malty Assam (Hazelbank FTGFOP), "spiked" with a small amount of Cardamom Cinnamon from RoT. Hearty brew from the Assam, warming spices from the CC, with just a splash of half & half - higher butterfat content brings out the subtle flavors that are missed with plain milk.
-
Sweet potato fries with dipping sauces. (maple mustard and chili lime mayo.
-
Copper vs Stainless Steel Clad Cookware: Is it worth the $$$?
andiesenji replied to a topic in Kitchen Consumer
I have received a rater puzzling to me inquiry about a large copper preserving pan I put up on ebay a few days ago. It's an antique and has been used a lot - I used it a lot when I was still doing a lot of canning. The bottom is black and has been for decades, I always cleaned the interior but didn't bother with the bottom because it didn't matter to me. Now I have received a question, "How do I know the pot is 100% copper when the photos do not show all of the outside bottom without the black coating?" I answered that the copper on the inside is clearly visible and when this was made in the 1890s there was no process to produce a pot with a different metal on the bottom. He or she came back with, "you haven't answered my question. Why don't you clean off the stuff you have painted on the bottom?" I hate to be rude but I feel like telling this jerk to look elsewhere. It takes a lot of work to remove the fired-on stuff and I am not physically capable of doing it. Frankly, I thought it would be attractive to someone who is going to display it. I really don't think many people would actually use it, unless they were really dedicated to preserving or candy making in the old-fashioned ways. Do you think I should have it cleaned and polished or leave it as is? It would cost me about $50.00.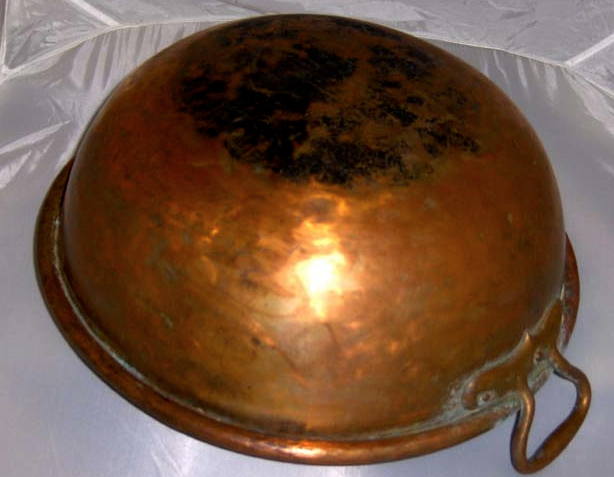
-
That is a piece of meat that needs some working over before it is palatable. You need to pump up the flavor and fix the texture. I beat the hell out of it with a batticarne (meat pounder) till it is about 1/4 inch thick and some of the long fibers have begun to fray. A "filling" which can be whatever you like, bread crumbs, seasonings, cooked onion - etc., roll it up, nail it with a couple of skewers - or if you are inclined, tie it neatly. Braising works but you can certainly use the PC. The Italians call this "Braciole" and there are many variations THIS IS A GOOD START I have been preparing this type of thing to improve the flavor of cheap cuts of meat for 50 years and it never disappoints.
-
I bake a lot of breads with whole wheat with seeds and grains and they can be quite dense. I add a couple of tablespoons of vital wheat gluten and 1/2 cup of dry whole milk for every 1000g of flour. (8 cups) You have to increase the liquid slightly using these additives. During mixing I watch the dough and if it looks a bit dry (the milk powder is extremely absorbent) I add more a bit at a time. I knead the whole wheat doughs quite a bit longer than regular "white" bread because it takes longer for the gluten to fully develop. I have done tests side by side with the same dough, doubling the kneading time from 10 minutes to 20 minutes and the latter was much less dense but still with a fine crumb. I have also substituted up to 1/3 of the flour with oat "flour" - old-fashioned rolled oats (NOT quick-cooking) pulsed in the food processor or blender until it looks like very fine meal - I often toast the oats first and this gives a wonder new dimension to the bread. There are different ways of adding fats. I often use butter (homemade) but I use rice bran oil in most breads. Recently I have been adding egg yolks (I made some meringues so had a bunch of yolks to use up) and the result was a bread with fine crumb and perfectly moist that toasted beatifully. It was a very rich whole wheat, with oat flour, sesame and poppy seeds and finely ground toasted pumpkin seeds. Without the addition of the vital wheat gluten, the milk powder, the oil and the eggs, this would have been a very dense bread.
-
Looking at the title and the avatar photo at the top of this page reminds me of how much I miss Fifi. Especially at this time of the year and I recall her mentioning that after making a batch of burnt sugar candy, she scraped the pan after it had cooled and made a "meal" from the remains, unable to shove the pot into hot water and wash away all the good leavings. I have never had a problem with weevils or similar bugs in beans but the incidence of creepy crawlies in the desert is not as pronounced as in areas with more ambient humidity. I have had one incidence of opening a bag of "heirloom" beans that came in a 10-pound burlap bag and having a horned lizard fall out. The poor thing seemed as startled as I was and I wondered what he had been living on - (bugs???). Anyway, I caught him before the basenjis could and put him or her out in the yard and apparently it found a mate of some kind because for a number of years afterward I would see these little tan guys with the little horns on their faces, quite different from the native stock. After freezing, I think it would be wise to put the beans in a wire colander and dry them well - I would use my dehydrator with the temp on low but a fan would do as well. Growing up on a farm where a lot of beans were grown, the beans were harvested by pulling or cutting the vines after the pods looked and felt dry and brittle, the mass was spread on the floor of the hay barn and allowed to dry some more out of the weather (it rained a fair amount in the early fall in western Kentucky) until they were considered "throughly dry" according to the man who was in charge. They were "winnowed" in a machine that beat the hell out of the vines and pods and the dry beans and a lot of chaff fell into a long wire "box" which was also shaken and which conducted the beans down the length of it till they were funnelled into burlap bags - mostly 50 pounds - the bags sat on a scale. Beans stored in this fashion, in a bag with air circulation, could be stored for many months. The bags were stacked on slatted platforms and shifted every month or so, putting the top ones on the bottom and so on. I don't like to keep beans in plastic bags. If they arrive in plastic bags I transfer them to glass jars or metal canisters (not aluminum, some beans can cause aluminum to corrode). The hard acrilic plastics are okay but I have had some issues with bean in Cambro, the translucent flexible containers, which I love for most things but have had a couple of batches become mildewed or funky. I continue to use my electric pressure cooker for most bean dishes (not lentils, they cook rapidly) and have done a squash and beans "stew" using half of a kabocha squash I split with my neighbor, and "flavored" with some homemade sausage made from some chunks of pork "por carnitas" that I bought at the Mexican supermarket. I didn't follow a recipe so can't record that, but it turned out nicely, warm and satisfying for these chilly days.
-
Homemade Food Gifts - Christmas and Hanukkah, 2015 -
andiesenji replied to a topic in Food Traditions & Culture
I'm going to make a batch of candied ginger, some glacé fruits (starting with dried fruit), and some "cookie kits" which is just the dry ingredients measured and mixed in one ziplock bag and the other non-perishable ingredients in other bags, with the printed recipe and a nice mixing bowl (or one of the large measures big enough for use as a mixing bowl). I have this old recipe for "basic cookie" to which all kinds of things can be added for the variations, which I mix up in large batches and store in the freezer in one of the large Cambro containers (8 quart). Nearer the holidays, I am going to make a few of my fruited cocoa cake, which keeps well for a week or so but not for months like a regular fruit cake. -
I missed this topic earlier. I don't know what you are doing or why your mustard is not hot enough but I've been making mustard for decades and I never had a problem with it being too mild. Once the mustard has been prepared, it usually had a "raw, harsh heat" that has to be tempered with heat - that is acutally physical heating, carefully in small increments because too much heat can completely destroy the spicy heat. Some mustard varieties are much, much hotter than others. The "white" mustard (yellow) which is finely ground for Coleman's dry mustard is a very hot variety. I grew a lot of mustard for years, and my plants were a mixture of the yellow, brown and black - the latter seeds are smaller than the brown or yellow. The heat of prepared mustard will diminish over time and one way to extend this is to add a bit of sugar - commercial preparers learned a long time ago that mustard mixed with HONEY will retain its flavor for very extended periods. I think I have just about every book ever published on mustard. The Incredible Secrets of Mustard by Antol is very good. I have a couple of old ones, can't recall the titles right now, long out of print. The Mustard Book by Jan Roberts-Dominguez, published in 1993 has quite a few recipes for making mustard from seeds but I like the Antol book better.