

alanamoana
-
Posts
2,739 -
Joined
-
Last visited
Content Type
Profiles
Forums
Store
Help Articles
Posts posted by alanamoana
-
-
So I dipped some chocolates at home and took some pictures. Please excuse my lack of skill as a photographer!
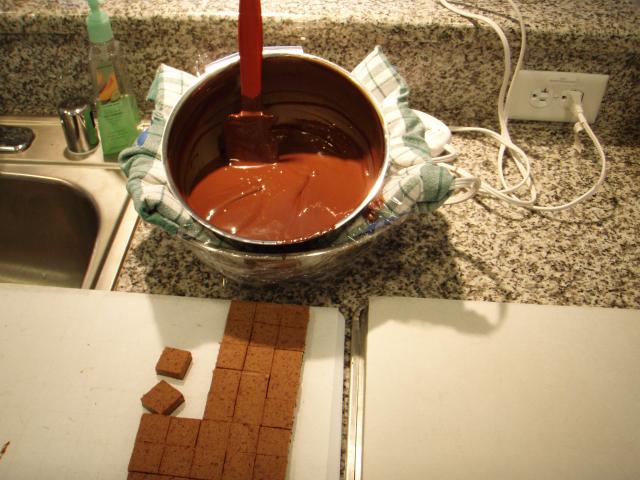
Here is my home dipping set up. On the bottom left is my slab of ganache which I already coated on the bottom with chocolate (bottoming like this is called putting a 'foot' on your ganache). Above and in the middle is my tempered chocolate sitting on a heating pad in another bowl so that the heat is evenly distributed around my bowl. Notice that the bowl is tipped forward so that I have an almost level surface of chocolate with the edge of my bowl. To the right is my clean piece of parchment sitting on the back of a half sheet pan. I place my finished chocolates here and I put it on the back of the sheet pan so that I don't have to wrangle with the lip of the pan which sometimes makes it difficult to place the chocolates. I realized only later that I should have been working in the reverse order since I am left handed...but it all worked out for a small home job.
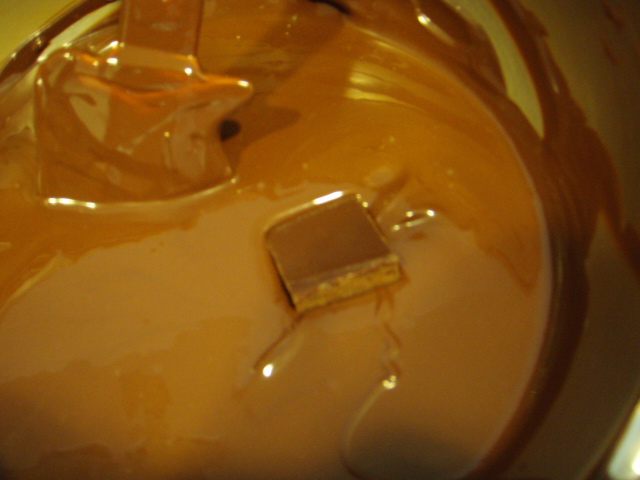
In this picture, you can see that I've dropped my piece of ganache in my tempered chocolate bottom side up. You can see the foot here. So after this point, I put the tines of my dipping fork against the bottom (foot) of the ganache piece and gently flip it over so that the entire thing is coated in chocolate. I tilt it a touch sideways and shake my hand ever so slightly to remove excess chocolate from the top of the bonbon. (edited to add: I don't know what happened to the color in this picture!)
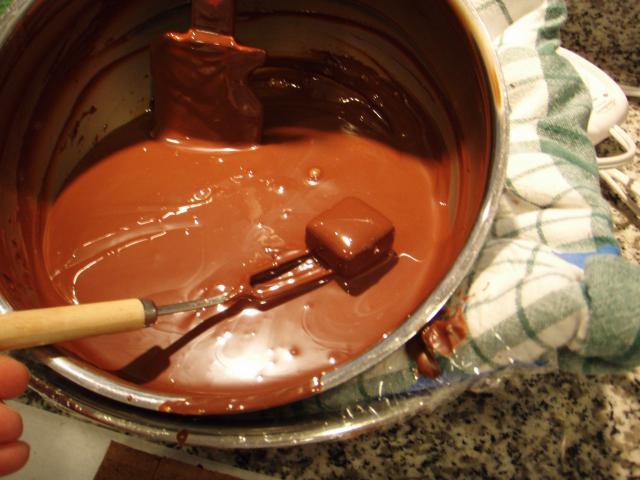
Now, I touch the bonbon to the surface of the chocolate and lift it up a couple of times. Using the surface tension of the chocolate in the bowl helps to remove excess chocolate from the sides and bottom of your bonbon. Do not rap your dipping utensil against the edge of the bowl as the vibration from doing this will surely knock your bonbon off your fork. Notice you can't see the tines beyond the far edge of the bonbon. This is correct. If your bonbon is on the fork and the tines stick out the other side, you'll have a harder time releasing the bonbon onto the paper.
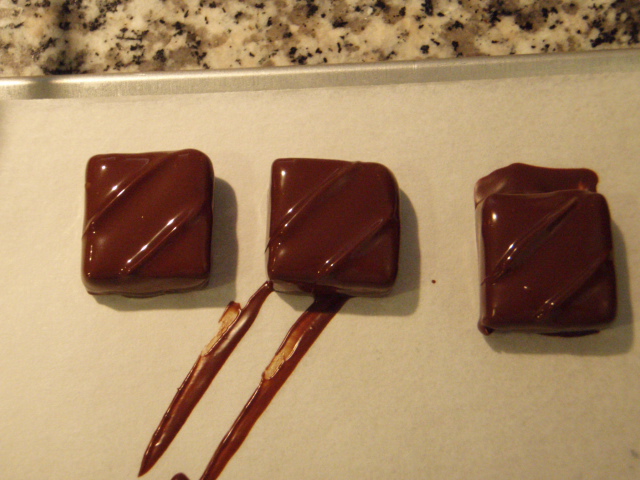
Here's a picture with from left to right: correct, incorrect, incorrect technique. The far right shows a foot at the back of the bonbon. This happens when you slide the chocolate in the same direction that you're using to remove the fork. Rather than do this, you should place the chocolate on the paper and ever so slightly slide it away from the fork as you pull the fork from underneath the bonbon. That way, the bonbon sits on top of any excess chocolate. The middle piece shows an exaggerated drag of the dipping fork on the paper. This will leave little sharp points on the edge of your bonbon. We discussed releasing and then very slightly moving your fork along the bottom edge of the bonbon to eliminate these points and to avoid the dreaded drag. Finally, the piece on the left shows a correctly deposited bonbon with no foot and no points. It is easier to release the bonbon from the fork at a very small angle. The greater the angle, the greater the likelihood that chocolate from the top of the bonbon will spill over the edge and create a foot as it settles down. Any vibration after depositing the chocolates on the paper will also cause this to happen, so don't move the chocolates after they've been dipped until they have a chance to set up a bit.
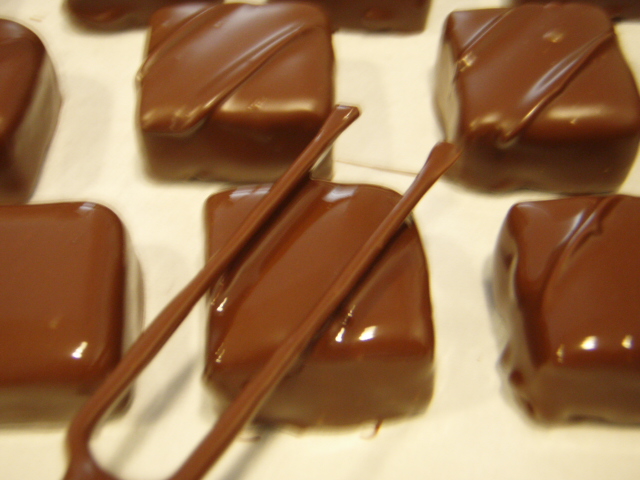
This (blurry) picture shows my fork making a design on the top of the bonbon. I'll dip a few chocolates and as it is about to set up, I place my fork on top and lift it up slowly moving it away from the chocolate. This will create two clean lines. There are different shaped forks for different designs. You can use texture sheets and leave them on for a shiny polished look. You can even use your finger to create designs while the chocolate is still liquid.
and finally...
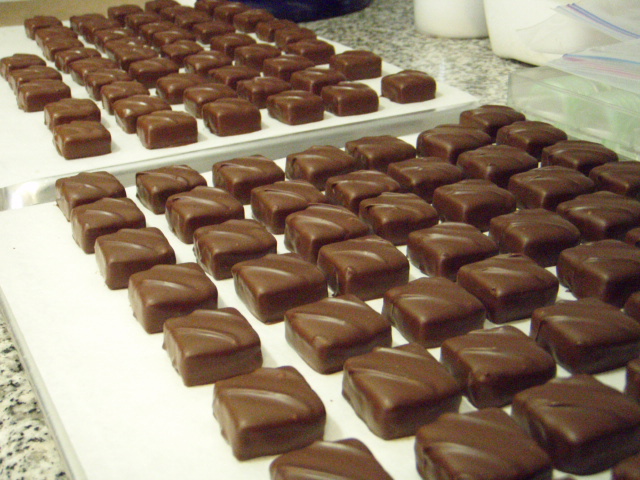
The finished chocolates. About 120 pieces from a small batch of ganache.
Hope this was a little bit helpful.
-
They do look good. I've never made marshmallows but this looks like a good recipe to try. The book is great (although I did find some typos), i find it a little more accessible than the wybauw book.
as much as i love wybauw, i have to agree. i think a lot of it has to do with poor translation whereas the peter greweling book was written by a native english speaker in his own language being read by native english speakers.
is anyone else disturbed by the photo opposite page 114 (cinnamon stacks)? we're always being warned that we need to make sure that our chocolates have no air, etc. in them, but this method clearly allows large air gaps between ganache piping which goes against what i've been taught.
-
i would also check out the post on beta 6 cocoa butter crystals from a bit back
Nicole, are you referring to the use of the packaged cocoa butter crystals that Albert Uster has started carrying? Or is there a topic regarding tempering that talks about crystallization?
At any rate, Jean-Pierre Wybauw sort of poo-poo-ed the idea of using Mycryo or any of those other products as proper pre-crystallization technique should work without these doctors. Particularly when it comes down to price, these items are very expensive.
-
I don't think doing it custard style would be very nice (that is, i've never done it that way). usually, i use a very thick yogurt or i drain a regular style yogurt. flavor it the way i want to and then add tons of sugar and corn syrup (so that it will freeze creamier) and then process in an ice cream machine.
I don't usually measure ingredients for this as i do it to taste. it should be sweeter than you think as the perceived sweetness will be less when it is frozen (cold molecules don't move as fast).
-
The only time I had this kind of problem , was when my chocolate was too warm .Check the temperature and make sure is well tempered ( on parchment paper smir so chocolate and see how it sits and ).I wouldnt use the refgrigerator , because it will set the chocolate even if is out of temper, giving you the false sense that is tempered .I alway work at room temperature ,it works better for me.
yeah, but the room temp in your basement workshop is like 60 degrees


-
yay! late to chime in my enthusiasm for this week's food blogger!
it was great to read your 'blog' when you first started working at your (then) new job...and then the kitchen remodel...and now, a week with you! great!
sounds like your husband and mine (from reading the most recent post on his blog) share some skeptical sensibilities...i think my husband just finished 'the god delusion'...uh-oh! and i'm a pastry chef. we'll have to meet one day as we only live in cupertino.
can't wait to see how your week unfolds. so far it has been delicious.
-
the aging process is also important when making ice cream based on a custard. to let the custard sit overnight allows the proteins, which have been coagulated at a low temperature, time to absorb extra liquid. from what i understand, this can help bind excess water as well, thus keeping your ice cream from being too icy.
you can understand better what i mean if you have ever over cooked your anglaise...the protein from the egg coagulates too much and the proteins tighten up to the point that they squeeze out all the moisture they contain. you have a loose mixture of water and egg protein. same thing with overcooked scrambled eggs...all that water gets squeezed out.
if you cook your anglaise to the perfect degree of doneness, it will be a nice thick mixture which will thicken even more overnight in the fridge.
i'm sure harold mcgee has more to say on this topic

-
When home roasting, how should green beans be stored and how long are they viable? i assume like nuts that they last longer (when stored properly) than roasted nuts as the oils have been released and denatured in the roasting process, thus leaving them more susceptible to rancidity (staling)...is this the case?
I've heard differing opinions on storage of already roasted beans, so any information on that would be appreciated as well. example: if buying roasted beans, store them in the freezer in three-four day measured packets which can be defrosted and used quickly.
by the way MGLloyd, great website!
-
Jon,
Note that the eGullet course suggest well chilled ingredients. If there is a secret it is that emulsion are easier to develop at LOW temperatures. (I always put vniaigrettes into the freezer before adding an oil emlulsion.) All of the commercial mayo's use extremely cold ingredients for a reason.
The other well known secret is the importance of beginning the emulsion successfully with the very first few drops of oil. Once the emulsion develop, you can move a little faster.
Tim
Keep the ingredients cold and wisk the oil very, very slowly at first.Thats the secret.
Regarding emulsions take the simple hot dog type sausage the secret of which is keeping all the ingredients very cold in fact just above freezing. prior to mixing.
I also think its easier whisking by hand, medical reasons exempt Marlene.
Norman Walsh
from Harold McGee's "On Food and Cooking", page 634:
All of the ingredients for making mayonnaise should be at room temperature; warmth sppeds the transfer of emulsifiers from the yolk particles to the oil droplet surfacesemphasis mine.
-
You have got to love Pop Rocks. Has anyone had any luck trying to make these? A recipe? I've got some fun ideas for flavors but need a little direction on the how-to.
don't know how possible it is to make them at home. there are several sources online for neutral flavored poprocks...
for example: chefrubber
-
while for the most part, corn syrup and glucose can be used interchangeably in recipes calling for one or the other...it is my understanding that invert sugar (known by name brands: trimoline, nuvoline, etc.) cannot be used in place of corn syrup or glucose. it is a different ingredient which will give you different results.
-
Sandy, it isn't accessible by public transportation, but Amato's here in the South Bay (Silicon Valley) has pretty decent cheesesteak.
eG member 'ghost', who is from philly, has said that walking through the door transports him home.
let me know where you are, i'll pick you up and drag you down here!
-
ummm, costco sells a pack of 48 general use towels for like $12...that's 24 cents per towel. cheap enough to almost be disposable.
that's what i buy because i like to have a zillion towels around the kitchen when i'm working. i guess it is a result of all those years working in professional kitchens.
-
you start by making a dry caramel in a pot and then you add your infused cream to it. you can add butter and even chocolate to it after it cools.
it is thicker or thinner based on how much cream you add to the caramel.
i had a coconut-curry truffle from vosges (whose chocolates i was determined NOT to like) and it was surprisingly good. i have a hard time with things like basil because i feel fresh herb flavors get muddied when infused, particularly leafy herbs...not so much things like thyme or rosemary. you end up tasting cut grass, if you know what i mean.
Alana,
Was it a caramel center with the coconut-curry flavourings? Might be fun to try, deglazing your caramel with coconut milk or cream for the coconut flavour, infused with a mild curry.
kerry, it was a ganache...but your idea sounds great for a caramel. i was just surprised that i liked it as much as i did. i think it could have been more subtle...it was a bit in-your-face-ish.
i also make a nice kaffir lime caramel that i like. i am going to try to make it more liquid for a filling for molded chocolate.
-
you start by making a dry caramel in a pot and then you add your infused cream to it. you can add butter and even chocolate to it after it cools.
it is thicker or thinner based on how much cream you add to the caramel.
i had a coconut-curry truffle from vosges (whose chocolates i was determined NOT to like) and it was surprisingly good. i have a hard time with things like basil because i feel fresh herb flavors get muddied when infused, particularly leafy herbs...not so much things like thyme or rosemary. you end up tasting cut grass, if you know what i mean.
-
I just ordered some metal bars from onlinemetals.com
Very fast service and from what I can tell, very reasonable prices. While I think the aluminum bars are fine (and MUCH cheaper), I really like the weight of the stainless steel bars better. I bought 0.375" (3/8") square bars in both aluminum and stainless to compare.
0.375" Stainless steel annealed square at 16" long = 13.60USD
0.375" Aluminum 6061 T6 bare square at 16" long = 2.24USD
So you can see the difference in price.
Shipping was +/- $10.00
Still a lot cheaper than buying from chefrubber, I think.
-
And sure there's plenty of moisture inside the cake that re-distributes with freezing and thawing. And you are correct that the very carmelized top skin can become swampy and yes that moisture comes from within the cake. And this is a desired result so that the rest of the outside crust of the cake remoistens after baking. But you always cut off that swampy mess on top.
and that's why you're exactly right and why i said to kim that it doesn't matter if the tops of the cupcake get swampy because she's icing the tops anyway
as you said, more than one way to skin a cake!
-
When I have frozen cakes and cupcakes in the past, they always seem to get sticky and bits of the crust come off on the plastic wrap. Here is what I am doing:
Bake and cool completely. Wrap in plastic wrap and then freeze. Thaw in the wrap, then unwrap.
What am I doing wrong?
Ta, Kim
you're not doing anything wrong. if you're going to ice your cupcakes, then i wouldn't worry about losing some of the top crust.
maybe we can get harold mcgee to write abut this, but this is my theory:
you know the top layer of cake (the crust, so to speak) has a lot of sugar in it. with sponge cakes this is particularly noticeable and you usually scrape this off before icing it. sugar is hygroscopic (it absorbs moisture) so when you freeze things, the moisture will migrate to where there is a higher concentration of sugar - to the crust. so when you thaw, the top crust gets a bit sticky and soggy.
i wouldn't change what you're doing as long as it doesn't bother you aesthetically. if you unwrap and thaw, you chance having pretty dry cupcakes as the moisture has migrated to the surface and now you're letting it evaporate. evaporation (loss of moisture) is the main cause of staling.
i'm not trying to contradict you k8memphis, but if you've got ice crystals on the surface, they were once inside your product...they don't just magically appear between your cake and the plastic wrap. same goes for ice cream. eat a few bites and leave the carton in the freezer for a couple of weeks and take a look inside sometime...the ice cream will have tons of ice crystals on top and the ice cream itself will have changed texture from losing all the suspended water which was once part of the emulsion. this is just what happens.
also with home freezers, they cycle through temp changes much more inefficiently than commercial freezers, so the thaw-freeze-thaw-freeze helps to accelerate the ice crystal formation on products in your freezers.
edited to clarify?
-
are you sure you're putting the bowl in properly? there's a nipple on the back of the bowl that should fit under a little metal tab and hold the bowl in place in back while the two side tabs pop onto the arms.
if your bowl is tilting forward, then this might be your problem. just give a little pressure on the top edge of your bowl toward the back and you should feel the nipple pop under the metal tab and it will be seated properly.
let us know if this works...i could be wrong.
-
actually thermohauser makes great NON-disposable bags. but i use kee seal.
and just for you fat guy, i'm going to use my brand new digital camera and take some photos...see if i can't work up a mini demonstration.
-
i only wish i had a tv so i could have watched!
congratulations on your tv spot and lets hope it brings business as well as fame (15 minutes tho' it may be
)! -
freeze the pie solid (either baked or unbaked), fedex with ice packs or dry ice. overnight shouldn't be a problem.
include warming or baking instructions with the pie.
-
I don't have much in the way of food recommendations, but this was in the paper recently:
just in case.
-
however, i don't like either payard or Maison Du Chocolat, both pretentious and mediocre, with the former more pretentious and the latter more mediocre. I only go to payard to impress non-foodie visiters, and never buy chocolate from the latter.
Kye - I'm curious - where do you buy chocolate in NYC?
I was curious as well when I read this response as I work with several chocolatiers (and know several as well) and although they can be pretty critical, none of them has much negative to say about Maison du Chocolat. Quite the contrary, most can find no fault with Maison du Chocolat.
Can't speak for others, however.
Favorite tools for hand enrobing?
in Pastry & Baking
Posted
I only wish Kerry! I have thin pieces of acrylic that I cut into one inch wide strips. I use them like a ruler/straight edge and cut using them as my guide. A very thin bladed sharp knife and it works a charm. I'm still jonesing for a guitar though. I think I'll have to have a business plan worked out before I can dare spend the money!
Thanks!