btbyrd
-
Posts
1,808 -
Joined
-
Last visited
Content Type
Profiles
Forums
Store
Help Articles
Everything posted by btbyrd
-
The potatoes in Potato Buds (and instant mashed potatoes more generally) have been pre-cooked and cooled, which retrogrades the potato starch and minimizes the amount of starch that comes out of the potato flakes during the final cooking process. This prevents instant mashed potatoes from becoming gluey and gross when you rehydrate them. In the context of your recipe, potato buds allow you to thicken the soup and add potato flavor without turning the final dish into a pot of glue. You could do this without the instant potatoes, but it would take a lot more work and I doubt the finished product would be significantly better.
-
Apart from texture issues, I don't think there's anything "wrong" with sous vide fermentation. Dave Arnold at Cooking Issues has mentioned this technique a few times (though he hasn't really discussed it in depth) and seems to think it's worth trying. His only real caution was that once fermentation gets going, there's going to be a lot of CO2 produced and the bag will puff up. If it really gets going, the bag may explode. So he suggested that you double bag it, using a smaller bag to contain the food you're going to ferment and sealing that in a bag the next size up. Over at Star Chefs, there's a profile of chef Sanghoon Degeimbre that outlines his method of preparing kimchi sous vide. It's not a "recipe" per se, but it's proof of concept. He uses a centerfuge, on the cabbage juice but that's not really necessary. The folks over at Nordic Food Lab have also mentioned SV fermentation before, suggesting that you basically just toss vegetables in 1-1.5% of their weight in salt, seal, and let it ride. I can't find the specific post on their site, but in a post on the microbiology of fermentation the lead image is of a puffy vacuum bag. If Noma's doing it, it's probably worth trying. I just sealed some napa cabbage with some salt following this program and will report back on the results. (I didn't have the time to go "full kimchi" on it at the moment). But if the OP is seriously interested in trying his hand at fermentation, there's not really a need to invest in an expensive, unitasking fermentation crock (although they're nice if you've got the money and the space). For thirty or forty bucks, you can pick up some wide mouth mason jars and some special lids that will vent excess gas (Pickle-Pro and Kraut Kaps are two quality brands) and you'll be able to ferment to your heart's content. Also, if you're looking for good information about fermentation, I can't recommend Sandor Katz's two books ("Wild Fermentation" and "The Art of Fermentation") highly enough. The first is more recipe driven, while the latter is more about the theory behind fermenting different types of food. His website also has a lot of quality information.
-
Those idiots don't seem to know what they're doing. The gaskets will be exposed to oil as well as steam, since the chicken will be spattering hot oil all over the place inside the cooker. If the gasket should happen to become damaged or melt out while the cooker is under pressure, you're in for a world of hurt. Most pressure cooker manuals explicitly tell you not to do this. That's because pressure cookers aren't pressure fryers. If you still want to risk it, invest in a cooker that has a bar that clamps the lid down so that it won't blow off if you build up too much pressure or if the gaskets fail. Serious Eats did a piece on this a while back.
-
The MC@H recipe calls for salt at 1% the weight of the vegetable during the pressure cooking step, but you went over by half a percent. But they also call for seasoning it again at the end, so that might not have been the issue. Were you using salted butter? Did you puree the squash before you tasted it? It could be that the outside of the squash was too salty but the inside wasn't.
-
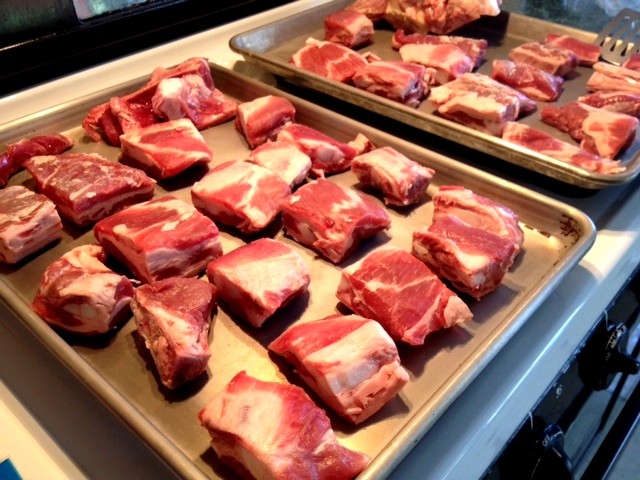
Pot roast round 2... again with butternut squash, turnip, parsnip, and celery root.
-
This technique was first suggested by Bruno Goussault, one of the godfathers of low temp cooking. I wouldn't say that it's necessary, but those who have done side-by-side taste tests have found that SV meat that's chilled slowly in stages retains more juice. Dave Arnold discussed it on a recent episode of Cooking Issues; it's the first question in this episode.
-
How long are you cooking them for? "A couple hours" is too long unless you're trying to pasteurize at a low temp. Also, are you salting them before? If so, don't. That draws out moisture and firms up the texture.
-
If you're trying to avoid a watery sauce, pre-salt the noodles for 30 minutes or so, dry them with towels, then cook them separately from your sauce. When they're done, pat them dry again and add your sauce at the end.
-
Sounds like false labeling to me. I've run into that problem before; my local market carries real boneless short ribs (as well as bone-in versions) but I ran across a cryovacked package of something that obviously wasn't short rib yet was labeled as such. Maybe what you (and I) came across were those chuck short ribs that FeChef was talking about. I'd never heard of this cut, but found a video about the cut on the YouTubes. It's hard to tell without a good closeup, but these chuck "short ribs" don't seem to have anywhere near the marbling or connective tissue of true short ribs.
-
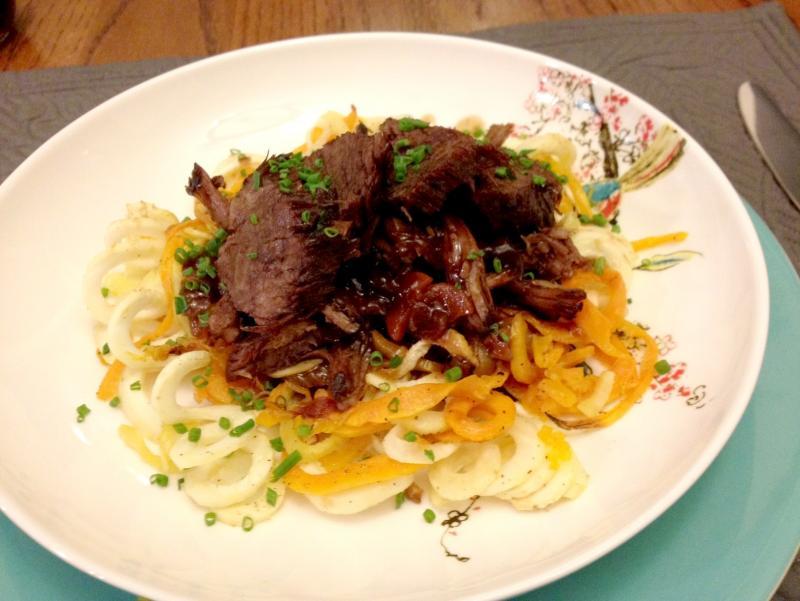
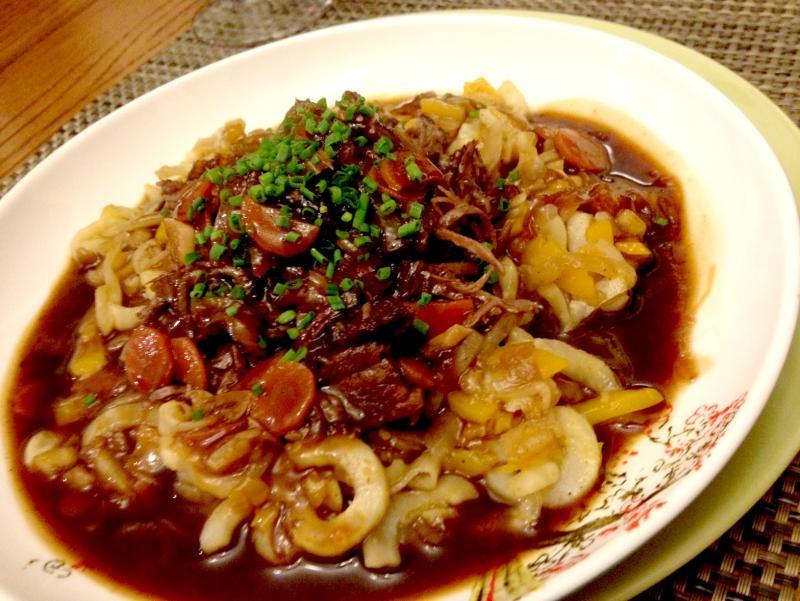
I season them with salt and pepper and sealed them with a small amount of fat (butter in this case, but sometimes olive oil). As I mentioned, I usually cook veg for pot roast separately, and sous vide is a great way to do it because you don't lose any flavor to boiling water (or end up with veg that all taste like meat broth). I cooked them at the standard veg temperature (85C) but didn't keep a good eye on the time. When you cook them in larger chunks as opposed to noodles, it's not a big deal if they go over because they're not going to fall apart the way that noodles will... so I was less concerned with monitoring them than I should have been. Next time I'll check them after 25 or 30 minutes -- just give the bag a squeeze to test the texture -- and see if they need more time. I'm also not sure if the vegetables soften at different rates, which seems likely. It might just be easier to roast them in the oven on a sheet pan, which I'll also try. I really like the concept of this dish because it's a familiar dish that eats much better than the traditional version.
-
Feeling that my spiralizer was underutilized, I decided to do a new take on pot roast: braised chuck with turnip, parsnip, celeriac, and butternut squash noodles. My usual move with pot roast is to cook the root veg separately from the braise and then add it at the end so you still have different flavors instead of a "one note" stew. I usually cook them sous vide, so I did that this time. The only downfall was that because the noodles were thinner, I ended up overcooking them and they fell apart when I combined them at the end. Next time I'll be more mindful of the noodles so I have some longer noodles with a firmer texture. After a tweak or two, I'm confident that this will be a successful dish. The flavors were spot on. It was good. It will be better.
-
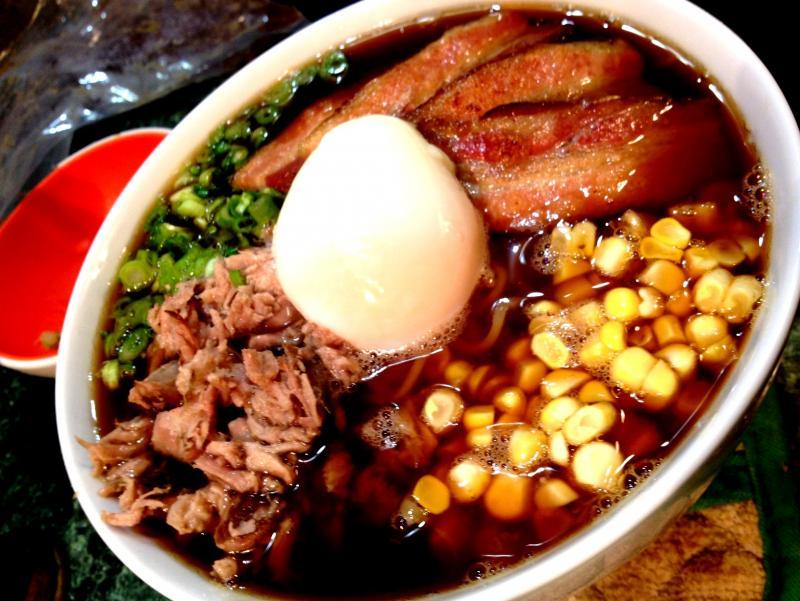
Ramen. Finally tracked down some fresh alkali noodles in my area... I'd been using hand pulled noodles from a local dumpling joint which were great, but not truly ramen. But I tracked down some Sun Noodle ramen at Mitsuwa market about 30 minutes away. Just as robust, but much thinner. Killer noodles.
-
Denis Papin is credited with inventing the pressure cooker, though he called it the "steam digester." Papin's digester was also nicknamed the "bone digester." He wrote two texts on his machine: "A New Digester or Engine for Softening Bones" (1681) and "A Continuation of the New Digester of Bones, Together With Some Improvements and New Uses of the Air Pump" (1687). So yeah, bones will soften and break down in a pressure cooker. Chicken bones will fall apart with little provocation after a round of stock making. Beef and pork bones are heartier, but they'll break down after enough time. They still look like bones, but you can pulverize them between your fingers.
-
Certain styles of ramen (e.g. tonkotsu) require that you boil broth not only to extract gelatin, but also to emulsify fat into the broth. The traditional French wisdom about stock making is that you should keep your stocks at a light simmer because boiling them makes them cloudy; tonkotsu turns this wisdom on its head, using the agitation caused by boiling to create a milky looking broth that's rich in fat. Pressure cooking is the best way to extract gelatin from bones and tough cuts (unless you've got a day or two to simmer your stock). It also produces relatively clear stock because there's little agitation from boiling inside (unless you're venting loads of steam or you do a "fast release" of pressure). At the moment, I'm making Momofuku ramen broth. I take half the water and pressure cook roasted pork bones in it, while using the other half to create the kombu/mushroom/bacon/chicken broth. Then I add the pork to the dashi, add carrot and onions, and simmer for an hour or so, skimming frequently. An 8 hour (or more) recipe gets a lot fast when you use a pressure cooker. Here are my unroasted pork neck bones; they were super-meaty (not so boney) this go round so I added some chicken feet to compensate. $1.99 a lb from the Whole Foods. Not bad!

-
Bones are made mostly of collagen, which provides the basic framework for bone. Calcium and other minerals bind to this framework and harden it into a tough, solid structure. There's much more collagen by weight in bones than there is in even something like cheek or short rib. Oxtail is pretty much the best of all possible worlds since it has a lot of flavorful meat, connective tissue, and bone as well. For chickens, wings occupy this role. For hogs, I usually use neck bones and throw in some chicken feet for extra collagen. As for the economic point, it obviously varies depending on how the bones were butchered. Sometimes my grocer has very lean bones with very little meat attached; other times the same store sells bones that have more meat than bone on them! I try to think of broth making in terms of ratios of meat to bones. It's hard to be precise with it, but if my bones are lean I supplement with ground meat; if they're really meaty, I don't. Bones are usually the cheapest cut at the store, with ground meat being the next cheapest thing. But regardless of what you're doing, it's important to use a fair amount of meat and bones relative to the water used. The problem with most people's homemade stock is that they use too much water (or not enough animal) and it ends up relatively tasteless.
-
Bones have more collagen in them than a tough cut of meat does and they tend to be cheaper than meat. Most stock recipes that call for bones advise you to use bones that still have a fair bit of meat attached. If I can't find sufficiently meaty bones, I'll up the meat quotient by browning some ground meat and adding that to the pressure cooker/stock pot. Roasting bones before stockmaking will denature the proteins enough so that you don't have to blanch them. Blanching is a real pain... bring bones to a boil, drain, scrub, return to pot, and bring to a simmer? I'd rather not. It also brings out roasty flavor from the bones themselves that are hard to develop by just pan frying.
-
The absolute best resource for new ideas about how to use this tool is a website called Inspiralized. I've had mine for a little while and have basically just used it with zucchini and yellow squash. The results are pretty amazing; spiralized zucchini pasta is light years beyond spaghetti squash. Here's a zucchini noodle dish with MC@H's pesto and shrimp. If you're avoiding carbs and like to eat noodles, it's indispensable.
-
I want one so bad. It's a shame they don't have a decent home version. Here's a (probably too long) video about the controls on a Rational combi. There are a few other videos out there, but they're mostly cheesy promotional videos that don't really explain the controls in depth like this video does. The fun stuff starts with the automatic programs around 8 minutes in.
-
I forgot that I also got Morimoto's cookbook... there were so many that it's hard to keep track! Deryn: Luckily for me, Santa tends to get me things off my Amazon wishlist! I'm also a big Heston fan and have wanted The Big Fat Duck Cookbook for years, but finally "downsized" my wish to the normal sized (but still large) version. I joked with my dad: "You know this is the small version of this cookbook, right?" He asked whether in the big version the text was bigger... then I showed him how small the text actually is in the book. It's jam-packed with information so that even if you never make a dish out of it, you can still learn a lot. I believe Chris Young referred to it as "Modernist Cuisine before they published Modernist Cuisine." Shel: Glad you're liking the Thermapen! Everyone seems to. My wife finally broke down this year, saying: "You've been asking for one of these for years and I thought it was finally time for you to get one." I haven't really used it yet, but the time will soon come. As for the Waring, I doubt that you'd want one of the Xtreme ones if you're looking for a lighter blender or a shorter blender; they're quite heavy and quite tall (it weights almost 14lbs and is about about 18.5" tall with the pitcher and lid). They do make a shorter pitcher, though. I've been on a blending spree since I got back home from the holidays and have been very pleased. My previous blender was the Kitchenaid that Cook's Illustrated/ATK used to rate as their top, non-Vitamix choice but it had a problem with the gasket so that it would leak out the bottom of the pitcher. This made for a lot more cleaning, since you had to wash the base and the underside of the pitcher. The Waring blows it out of the water. I have limited experience with my parent's Vitamix, but I'd say that the Waring is equal to or better than the VM. The power of both is so much greater than the Kitchenaid.... I tried making vegetable smoothies in the Kitchenaid, but they always came out grainy. Not a problem with the Waring. It's scary powerful. I've used it so far to make a boatload of smoothies and "juices," coconut milk, and a few purees. Everything has come out better than in my previous blender. I highly recommend it. But it's probably going to be taller, heavier, and louder than the blender you already have.
-
I don't know if anything I got is especially interesting, but I made out like a freaking bandit this Christmas. Seriously, I don't know how it happened. The main highlights were a Thermapen and a Waring MX1200XTX Commercial Blender. With these, I feel like I'm pretty much out of kitchen stuff to buy. Which is fine by me! So happy to finally have a high power blender. It's been a blend-a-thon since I got home from the holidays. And I've wanted a Thermapen for years, so now I can quit complaining about my "instant" read thermometer. I also ended up with a load of cookbooks: The Fat Duck Cookbook - Heston Blumenthal Historic Heston - Heston Blumenthal The Complete Nose to Tail - Fergus Henderson Heritage - Sean Brock Smoke and Pickles - Ed Lee Mastering the Art of Southern Cooking - Nathalie Dupree and Cynthia GraubartManBQue: Meat, Beer, Rock and Roll - by my homeboys John Carruthers and Jesse ValencianaI've got a lot of cooking to do...
-
I'd run back into the house to save my chamber vacuum sealer, but I don't think I'd make it out alive.
-
Hi Doug! Welcome to the forum! To answer your questions.... 1) Yes, that soft texture is what you'll get when you cook tender cuts of beef sous vide. Because you're not exposing the meat to higher temperatures, the proteins do not denature/unfold as much as they do in traditional cooking methods. Though this has the bonus that the meat tends to hold onto more of its moisture, it also produces a softer texture that not everyone prefers. 2) Yes, this is also just how it works. When you cook a steak in a bag, its juices do not have the same sort of exposure to oxygen that they do if you cook it in a pan or on the grill. The appearance of "red" meat is a consequence of myoglobin in the protein/juice bonding with oxygen. Grocery stores often exploit this property of red meat, using modified atmospheric packaging to seal meat in a tray with a bit of carbon monoxide which bonds with the myoglobin on the surface of the meat, turning it a bright red. Anyway, when you cut into a SV steak and let it sit, the juices on the surface of the meat (and on your plate) will "bloom" and turn from brown to a bright red. Some recipes exploit this property of meat, such as this recipe for intensely flavored, bright red rare beef jus from Modernist Cuisine. 3) You should always sear in a "dry" pan -- a pan that contains no moisture. That doesn't mean it doesn't contain oil or fat, but that it doesn't have any water in it. If your pan has moisture in it, your meat will steam rather than sear, and it'll take longer to develop a nice crust. This also increases the risk of overcooking the meat. Also, if your pan has water in it, it's not hot enough to sear. Your pan should be so hot that any water you sprinkle into it will immediately vaporize. You want the pan as hot as you can get it so that you get maximum sear in minimum time. For this reason, it's not generally recommended to sear off a steak with whole butter because the milk protein will turn black and bitter if your pan is hot enough. Clarified butter is much better for this purpose. Also tallow or lard -- really, any saturated fats that is able to withstand high temperatures without breaking down. If you want to infuse a bit of thyme flavor, it's better to just seal it in the bag with the steak before cooking. A little will go a long way, and make sure that you keep the thyme off to the side so that it's not pressing into your steak (which can over-flavor the meat and distort its shape). I'll add that I don't really prefer tender cuts like strip or ribeye when they're cooked sous vide... at least when I'm eating an entire steak. If I'm doing a plated dish and will be including slices of steak rather than the whole thing, that's a different matter. But otherwise, I'd rather just grill it. For my taste, the real strength of sous vide isn't in cooking tender cuts of beef, but in transforming tough cuts like short ribs or cheek into supple, meltingly tender meat. I also like cooking things like flank or skirt steak SV to ensure that they're cooked all the way through before searing them hard on a screaming hot grill. I also find that tender cuts of pork - like chops - turn out well, especially if you brine them first. And tougher pork cuts can really shine with SV... ribs, cheek, and shoulder are all great things to put in the bath. And, of course, pork belly cooked SV is amazing.
-
The Nordic Food Lab brings you... cricket and mealworm broth! Now with more kombu! It looks pretty gross to me, and the descriptions of the tastes don't really do it any favors either. They developed a bunch of insect-themed dishes for an event called "Pestival," and you can read more about them here. On a related note, I just saw this documentary on PBS the other night and it reminded me of this thread. Can Eating Insects Save The World? I'm not sure it can, but it was pretty interesting nonetheless. I'm curious about those red ant eggs. Not so much about the spiders or water bugs. I might be on board with a fried cricket or two though. Maybe.
-
Like others have suggested, the problem seems to be with the technique rather than with the meat itself. Did you cook it straight from the fridge or did you let it sit out for an hour or so? If you're just searing the steak on both sides, even a deep seer won't be enough to cook the interior, especially on thicker cuts. It's much better to sear on both sides and transfer to a low oven. If you're just cooking one steak and you can babysit it, you can do the Heston method and cook it in a scorching hot pan, turning every 15 or 20 seconds.