

keychris
-
Posts
821 -
Joined
-
Last visited
Content Type
Profiles
Forums
Store
Help Articles
Everything posted by keychris
-
It's not solely chocolate, by the way! Here's the Contents: Entremets Tarts Petit Gateaux Macarons Individual chocolates Chocolate bars Chocolate lollipops Petit chocolate showpieces and some theory things
-
If you're not already, you should definitely be keeping your instant dry yeast in the freezer for longer life span! (slightly off topic, sorry!)
-
thanks all! Curls, I used Boiron (? spelling) frozen puree, plus zest
-
tyvm I applied a streak of tempered green cocoa butter with my finger, when that was set, brushed in gold metallic, then a streak of white over the green, when that was set, created the dark shell. I got the book direct from the school that the author runs here in Melbourne - pre-ordered for a discount cheers Chris
-
Lime from "Chocolate to Savour" by Kirsten Tibballs, released recently. I shall be making plenty from this book. Chris
-
that's about all we're lucky for!
-
I was taught to never rely on temperature - rely on the test. If you're getting streaky, but no bloom - that's not enough crystals, it needs more stirring. If you're getting bloom, the temperature of your chocolate is either too high or too low. it's all about practice though - once you know what to set the bowl at and what the chocolate feels like when it's in temper, you'll wonder what all the fuss was about!
-
They are simply meringue, put together with a little tempered dark chocolate. Thanks very much
-
mmm, Delicious, a Joe Pastry recipe? (That's where I got my recipe from ) 4yr old party today... She wanted fairies and a toadstool house. I think I delivered on the brief
-
I think the problem with dipping things that are soft and syruppy is that the chocolate contracts around the product, squeezing it. When you have a ganache or similar filling, it's fine, nothing can leak, but when you have these soft caramels and syrups, the liquid doesn't like being compressed so looks for a way out - any tiny crack and voila! Out it comes.
-
How do I become a better confectioner and chocolatier
keychris replied to a topic in Pastry & Baking
as with all things, practice, practice, practice. and as much training as you can afford -
ah, I've found the recipe you're referring to in Chocolates & Confections. No, the recipe used is similar, but uses almond praline paste and pure hazelnut paste. I use commercially available pastes and as a result, the finished product is very smooth, with no graininess that I get when I prepare my own praline pastes. cheers Chris
-
Molded and Filled Chocolates: Troubleshooting and Techniques
keychris replied to a topic in Pastry & Baking
pure, tempered cocoa butter should set up within 5 or 6 minutes for the amount sprayed in a mold. surely no more than 10 minutes. I've always found it's better to get the chocolate on as soon as possible after the butter has set so that the chocolate and the cocoa butter can contract away from the mold at the same time - that's what it looks like is happening in these pictures, the cocoa butter is not contracting properly and is sticking to the mold. If it is taking an inordinate amount of time to set, you've got the wrong crystals forming (it's not tempered properly). -
Molded and Filled Chocolates: Troubleshooting and Techniques
keychris replied to a topic in Pastry & Baking
how are you preparing your cocoa butter colours? (up to the point you spray) -
$9/kg is pretty cheap - If I could find quality chocolate for that price, I'd grab it. Of course, I'm in Australia so it generally costs more, but the cheapest I can get Felchlin (my preferred brand) is $18/kg.
-
OMG I did exactly the same thing with the season 1 Croquembouche, my wife turned around and said "Well, you can make it for my birthday" so I did, and it wasn't
-
Molded and Filled Chocolates: Troubleshooting and Techniques
keychris replied to a topic in Pastry & Baking
it looks like (from that picture) the milk chocolate is OK - they're contracting away from the walls ok - but the colour isn't contracting away with the chocolate. I know most people around here say that the temperature of cocoa butter isn't important, but I've found it seems to be - if you airbrush it in, what temperature is it before you apply? It was recommended to us in class that you have it at 32-34C before spraying (after stirring it down from 45C). Was there much time between applying the cocoa butter and the chocolate? -
A peanut praline base, topped with a caramelized peanut and all dipped in milk chocolate. My 3yr old daughter immediately named them "gnomes" so they are peanut gnomes now a few bubbles here and there, and I took the caramel which I made the peanut praline paste with a little too far so the base has a quite strong flavour. I like that dark caramel flavour but it's a bit too intense for the people that have tried these ones so I'll back it off a little on the next batch. (hope that picture isn't screen-burstingly enormous...)
-
One last post from me on technique... might need to slip into a new thread otherwise I personally heat callebaut to 45C (felchlin I was told to heat to 48C), add 25% of the melted chocolate weight in callets and stir until it reaches working temperature. This is the seed method I was taught in school, and it works every time I'd table it, but I don't have beautiful marble benchtops in my house Total time to temper 1kg (my usual batch size) is about 10 minutes or less.
-
Streaks usually indicate not enough of the right crystals when you left the chocolate to set - easiest way to get more? Stir that chocolate more as it cools to working temp, or once it reaches a degree above working temperature, just reseed with one or two callets whilst stirring to encourage the correct crystals to form. Bloom is usually caused by the chocolate being too warm or cool as it sets.
-
fingers crossed! I have a big syringe that holds 50 or 60 mL that I use for liquid delivery, I think my wife found it at the chemist ages ago. That would still only fill 10 or so though...
-
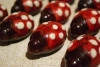
Thank you... probably should have remembered to put flavours in the post! The three layer piece is called "Tendre Praline" from Kirsten Tiballs' Savour School, I had a raspberry ganache in the egg and the ladybug was just a solid piece. I was quite proud of the eggs, that was the first time I'd worked with colour out of the classroom!
-
maybe not quite showroom, but the best I can manage...
-
Molded and Filled Chocolates: Troubleshooting and Techniques
keychris replied to a topic in Pastry & Baking
exactly... There was a smear of milk (test looked OK, buta fter 20 minutes the test had bloomed) on the top of the chocolate (base of mold) and it didn't contract away from the surface, stuck, had to bash the bejeezus out of it to get them to come out... luckily there were plenty of people on hand willing to taste test those ones LOL -
I'm sure everyone has seen these before... Out of temper milk chocolate *sigh*