
paulpegg
-
Posts
247 -
Joined
-
Last visited
Content Type
Profiles
Forums
Store
Help Articles
Everything posted by paulpegg
-
That looks good to me! It goes especially well with spaghetti of any kind. You can put anything on top that you want. Try it with tomatoes, garlic and capers, or onions and olives. For a different approach boil 200 grams of potato in 600 grams of water and use the riced potato instead of the AP flour and the cooking water instead of plain water. You will probably have to add a little water to make it sticky enough to pour. This is certainly the least fussiest bread i make. It can be started at 1PM and be ready for dinner at 6. Thanks for trying it.
-
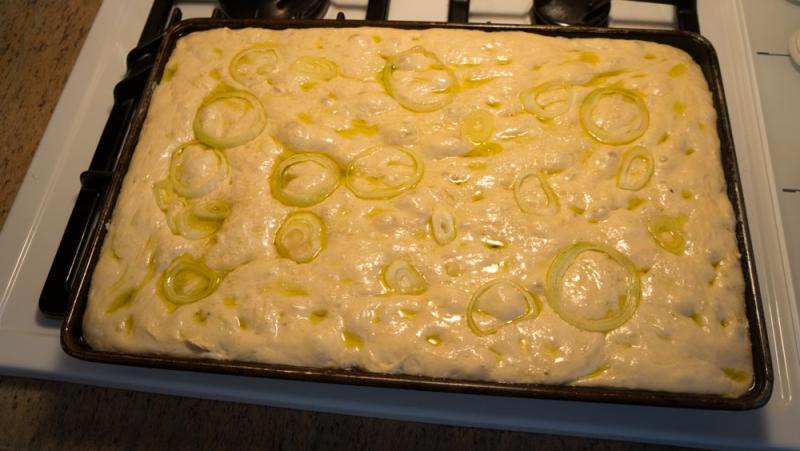
The pan is 13" x 19" x 1" deep.
-
No, I always mix by hand. Wash your hands well. Put all the dry in a bowl, mix it up and add the water. Turn the mix into the water until it is thoroughly wet, adding more water if it looks like it will be too stiff or a bit more flour if it is too wet and you want it to be stiffer. A shaggy mess is just that. It sticks to your fingers and does not ball up. You pour it out onto the sheet pan and just push it to the edges to fill the pan. it is all very quick and fun to make.
-
I needed a quick bread the other day so I made a focaccia. It takes all of 4 hours to make this simple bread and it is best eaten on the day. There is no kneading at all. you make a very sloppy dough with 600 grams bread flour, 200 grams AP or cake flour (or boiled potatoes), 16 gm yeast, 10 gm each salt and sugar. Mix all the dry stuff and then add up to 800 gm water. I start at 600 and work up until I have a really shaggy mess. Let it rise on a bowl for 2-1/2 hours, pour it out into an oiled sheet pan and spread it evenly. Generously brush it with EVOO and lay on any thing you want on top, in this example i used sliced onions. Punch it down with your spread fingers to create dimples, sprinkle all over with course sea salt and let it rise for another 45 minutes. Bake in a 400F oven for 30-45 minutes. let cool on a rack until the urge to eat it takes over your senses.


-
No, it is intended to be worldwide. There are only 168 hosts right now so coverage is light right now, as is traffic. Camille is the founder and she only started last Spring. Take a look at the site and search for places you might go to. Many of them are in France since that is where she started.
-
I thought I would post this here since all of you are such great chef's and some might enjoy sharing their talents with others. My wife and I spent 6 weeks in France this Fall on our 15th trip to Paris and all the other yummy parts of France. Last summer I discovered an interesting website called http://www.vizeat.com . VizEat is what it sounds like i.e. Visit and Eat. The idea is to host visitors to your home where you will serve a meal of your design and be paid a fair price. You set the price, the menu, the date and any other things you would like to control. My wife and I visited with the founder, her mother, father and friends in a wonderful apartment in Paris where Marie-Claude served a fantastic meal and Yves broke into his wine closet. This was a great way for American's to see how a Parisian family lives and make some new friendships in a way that never happens to tourists. Later in the trip we visited Dauphine and her wonderful family and friends for another great time in Cagnes sur Mer. We are planning on becoming hosts ourselves very soon. Best wishes for the New Year. Enjoy!
-
Beautiful job. That's my kind of cooking! I use a chinoise to strain the soup which makes it very smooth. Great presentation also.
-
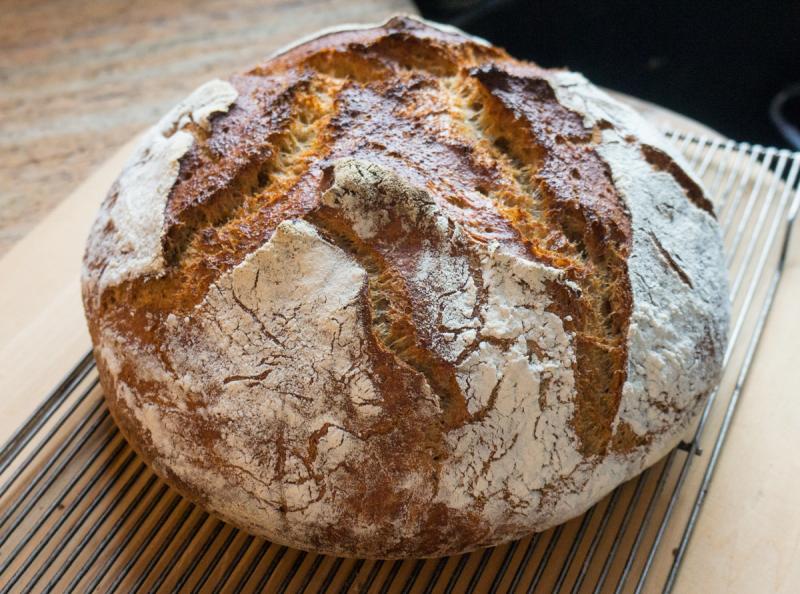
The cracks tell me that you have a nice crust that should produce a great crunchy bite. Nice job.
-
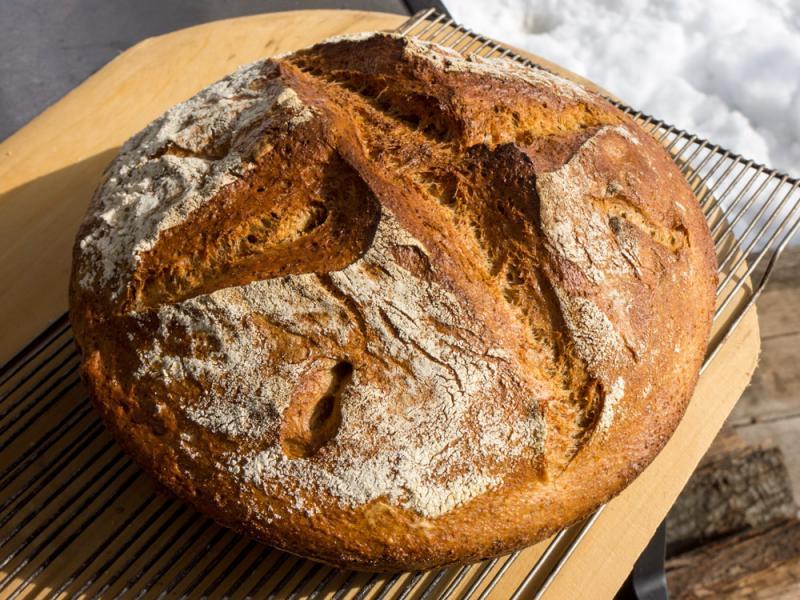
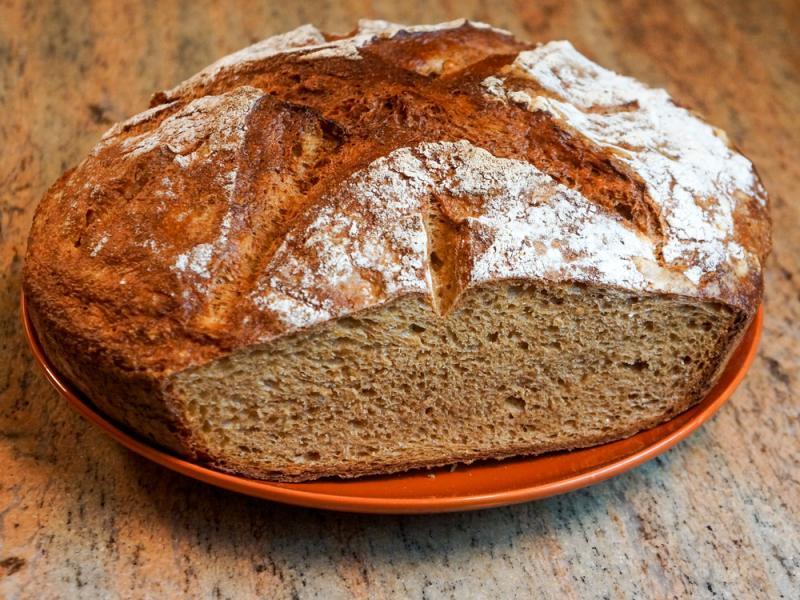
I have been a member here for some time but never posted in this forum before. The work I see all of you have done is outstanding. I have been a baker for almost 45 years and have read may books on the subject and tried almost all of their procedures. In recent years I have been mostly using Jim Lahey's no-knead method with some adjustments. I recently learned about Gontran Cherrier's Red Miso Rye and adapted to my method. The first part of this is a straight rye and the second part incorporates red miso into the mix. Try it, you will be surprised. Adapted from Jim Lahey, Sullivan Street Bakery with inspiration from Gontran-Cherrier in Paris http://gontran-cherrier-boulanger.com/ Time: About 1½ hours plus 14 to 20 hours’ rising 600 gm bread flour, more for dusting 200 gm rye flour 4 gm instant yeast 16 gm salt Cornmeal or wheat bran as needed. For straight rye bread use 600 gm Bread flour, 200 grams rye flour, 4 gm yeast, 16 gm salt, Mix all dry ingredients then add 500 to 600 gm cool water and mix well to get a firm but sticky mass. In a large bowl combine flour, yeast and salt. Add 600 gm water, and stir until blended; dough will be shaggy and sticky. Cover bowl with plastic wrap. Let dough rest at least 12 hours, preferably about 18, at warm room temperature, about 70 F degrees. Dough is ready when its surface is dotted with bubbles. Lightly flour a work surface and place dough on it; sprinkle it with a little more flour and fold it over on itself once or twice. Cover loosely with plastic wrap and let rest about 15 minutes. Using just enough flour to keep dough from sticking to work surface or to your fingers, gently and quickly shape dough into a ball. Generously coat a cotton towel (not terry cloth) with flour, wheat bran or cornmeal; put dough seam side down on towel and dust with more flour, bran or cornmeal. Cover with another cotton towel and let rise for about 2 hours. When it is ready, dough will be more than double in size and will not readily spring back when poked with a finger. At least a half-hour before dough is ready, heat oven to 450 F (232 C). Put a 6- to 8-quart heavy covered pot (cast iron, enamel, Pyrex or ceramic) in oven as it heats. When dough is ready, carefully remove pot from oven. Sprinkle the bottom with some corn meal or wheat bran. Slide your hand under towel and turn dough over into pot, seam side up; it may look like a mess, but that is O.K. Shake pan once or twice if dough is unevenly distributed; it will straighten out as it bakes. Score with a sharp knife or razor bladé as desired. Cover with lid and bake 30 minutes, then remove lid and bake another 15 to 30 minutes, until loaf is beautifully browned and interior temperature is 200F (93.3C). Cool on a rack. For Rye-Red Miso Bread add 150 gm of red miso to 450 gm water and mix into the dry ingredients as above, adding more water if the mix is too dry. This will make a stickier mass and you should definitely allow it to rise overnight or longer. Bake to an internal temperature of 200F (93.3C). The bread will be quite damp and need at least one full day to dry out. The taste continues to develop for two or three days. Here are a few shots. This one was made with the above procedure. It had a nice tight crumb This one was made with less water to produce a rounder boule in the dutch oven. Sorry, i didn't take picture of the cut loaf, but it was similar to the one above.

-
SV for 80? I have already used my system for 150. I built this thing in 2010 and have used it constantly ever since. The new clip on SV systems for $200 look pretty good to me for home use. Times change fast when you are having fun. Best, Paul
-
Here is the Deconstructed Pumpkin Pie I made for Thanksgiving. Recipe complements of Le Bernadin. Sorry I haven't been here in quite a while. I got caught up in many other projects and just took a moment to come back.

-
I made a killer paella with lobster, shrimp, clams, mussels, chorizo, onions and red peppers. I used lobster stock to keep the rice cooking properly. This was a big one that fed 10 people.

- 581 replies
-
- 11
-

-
Richard, I live close by in NJ and am in Manhattan regularly. I bought 1000 12" VacMaster bags last year and am still on the first bag of 250. i would be willing to trade some for some smaller bags if you are interested. Paul VP, Secty and webmaster www.lesmarmitonsnj.com
-
Richard, Go to http://www.modernistpantry.com/ . You can buy small quantities of just about every modernist ingredient without breaking the bank. Buy a whole bunch of things you think you might need and get started small. I still have many items that I have not used in over three years of experimenting with MC. Don't buy too much at first since some things have a relatively short shelf life. Best, Paul
-
I agree wholeheartedly. You are wasting your time and money messing around with the cooler body. For the cut lid just stuff some bubble wrap in the cutouts after you have the water up to temperature and the food in the box if you are worried about evaporation and heat loss. As I said before, I only do this for cooks longer than 24 hours.
-
The motor I have is 4 years old and still pumping. I bought two and still have the spare waiting to be used. Give me the specs on yours and I will check it out. Thanks, Paul
-
If you go with the foam I would suggest that you protect the open edge with a good coat of waterproof paint or glue some plastic to the exposed edge. Most of the foams you find in the hardware store are not meant for high humidity/temperature environments and could degrade and flake off over time. This could be messier than just stuffing some bubble wrap in the cutout area when cooking overnight or for several days.
-
No, It is a small centrifugal pump that I prime by sucking on the end of the return pipe until the pump fills and the flow starts. I crimp off the return line right away so I don't get a mouth full of water. I could probably use a fish tank pump to prime it but never bothered. Fish tank pumps cannot take the high temperature which is why I went to very reliable external pump. Your solution is good if you shield the stirrer so it doesn't get caught up in the bags.
-
As I said, knock yourself out! Filling the cutout area on the lid is totally optional. On long cooks (over 24 hours) I do find that some condensate collects in the lid, but it is not really a problem and I just drain it out. On really long cooks, 48 hours or more, I put a piece of bubble wrap on top of the water to reduce evaporation. Again, this is not really a problem since I always check the cooler in the morning and add any water lost due to evaporation. This is not rocket science and should be fun for you. You will find that you just do it with whatever food you have with total confidence that it will be good! The best investment you can make now is a good chamber vacuum sealer!
-
I posted this link in 2010 http://www.lesmarmitonsnj.com/sous-vide-cooker.pdf which describes the DIY sous vide system I built then. I am still using it on a daily basis with no problems at all. There is no need to add foam to the lid where you cut out for the heater etc, but there is no reason not to do it either. Knock yourself out! I have used the cooler at temperatures up to 85C and there has never been any sign of the plastic softening.
-
Yeah, there is little vibration in this unit and the gauges look good to me.
-
WOW, I've never seen that level of vacuum. I guess I need to fill the box better.
-
I have yet to get to 29.5. What time did you use? My best has been 28.5 at 50 seconds.
-
I think there is a lid interlock. Anyway, I just sent them a query to get the definitive answer on this one. I'll send their response when I get it. Thanks,
-
I'm not so sure about that. 1. The bar is quite heavy. 2 It raised with only -15 mm Hg in the chamber with the same speed and clamping action as at -28. and it stays up until the chamber has refilled with air. Also there is a significant spring holding the rods down. You have to get a good grip and pull hard to lift them. I doubt that -8 psi could do this. More likely is that these are magnetic plungers that are pushed up only if the lid is closed. BTW, a few weeks ago someone suggested putting some vaseline on the gasket to help get a better seal around the lid. DON"T DO IT! I tried it and even a very thin layer caused the gasket to squirm under the lid as the vacuum level got to about -26 mm Hg and it got sucked into the chamber. What a job to clean that up! The best way to treat the gasket is to keep it and the groove it sits in clean and dry. It needs the friction in the groove to keep it from deforming and sliding around. lesson learned.