

dtremit
-
Posts
644 -
Joined
-
Last visited
Content Type
Profiles
Forums
Store
Help Articles
Everything posted by dtremit
-
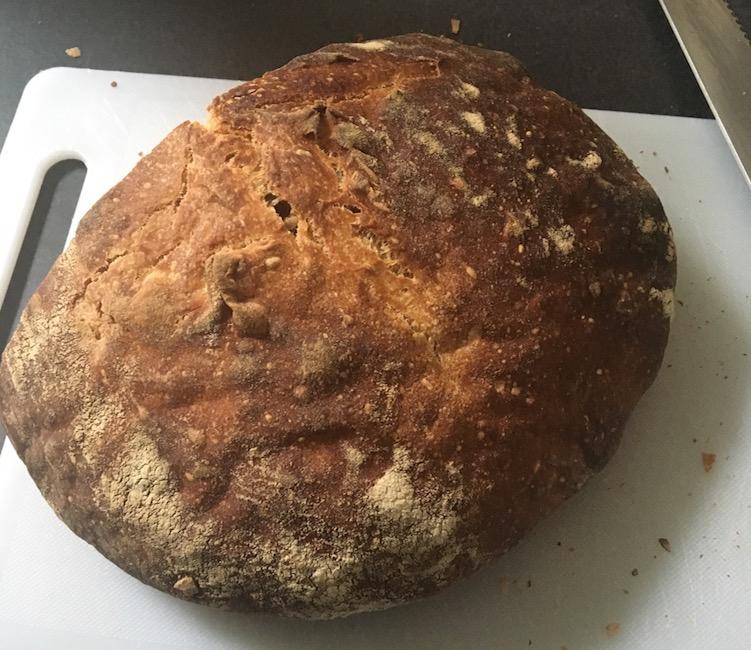
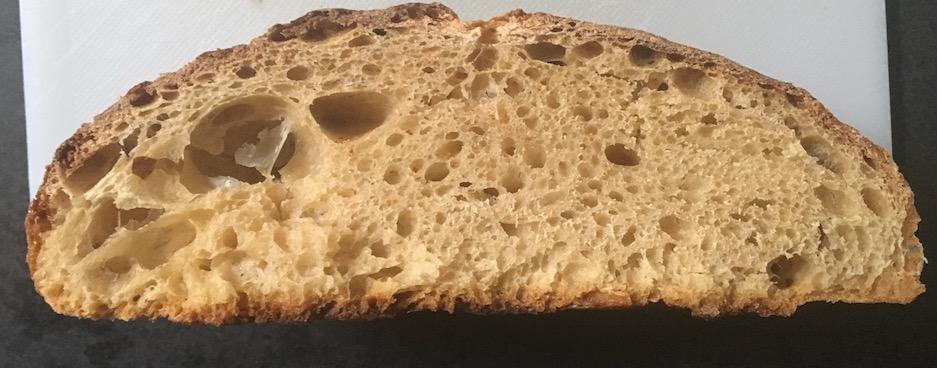
Jumping back into bread baking after a long break -- I lost two sourdough starters (one I'd made myself using pineapple juice, and another borrowed from a friend) to overzealous house cleaners and took it as a sign. We happened to be up in Vermont in October and stopped at the KAF store on the way back, and I picked up some of their starter. So far it has been working well for me. I have kept it at 50% per their recommendations. I have made the KAF naturally leavened sourdough recipe twice now, with good results, baking on my Baking Steel griddle. I forgot to take pictures soon after baking; this is loaf #2 that's a few days old: I'm generally very happy with these, though I would love to get more height out of them. When I turn them out of the forms, they end up flattening out almost completely -- so even though they rise well in the oven, they're not very tall loaves. Thinking of reducing hydration a little and/or switching all the AP flour to bread flour, but not sure if these are really the correct responses. Also curious -- what do others use sourdough discard for? So far I've had great luck with waffles and pizza dough, but middling success with dinner rolls.
-
Do you mind my asking who has them for that price? I can find good prices on whole turkeys but haven't seen that price on the frozen breasts. (Live in Somerville and work in Waltham, so I can hit up most of the chains pretty easily.)
-
There do exist induction compatible donabes -- not shocking, I guess, given the huge popularity of induction in Japan. This attractive but pricey one is readily available in the US: Kinto Kakomi IH Donabe There are many more (at lower price points) on amazon.co.jp but I'm not sure how you'd get them here. Some of them appear to use some kind of special ceramic that reacts to induction (maybe with high iron content?). Others like this one seem to use a metal insert *inside* the pot, presumably with a thinner/flatter bottom than traditional donabe. My guess is the efficiency isn't amazing, but for the low/slow cooking style of a donabe it may not matter. No experience with any of these myself -- just was fascinated by your question!
-
This is designed for commercial kitchens -- and this single-burner format is very common for restaurant use. They can be moved around and put where they're needed. Likewise, most commercial kitchens use 208v/240v for larger appliances. I wouldn't read too many limitations into the design. A typical breaker for a home range is 50A @ 240v, which theoretically gets you 12kW -- though in practice most cooktops are limited to a bit under 11kW. As an example, the center burner on this Samsung cooktop is 3.6kW, same as the Panasonic, but the total wattage is 10.8kW.
-
I've learned recently that this is extremely common nowadays in Southeast Asia -- where cooking spaces are traditionally outdoors. The "open kitchen" trend has spread to new developments there, but anyone who has ever cooked with shrimp paste knows, doing it in the living room is unthinkable. Hence the closed, "wet" kitchen for serious cooking, behind the open, "dry" kitchen for finishing meals / serving breakfast / etc. In our next house, I'm hoping we'll have a small, kitchen-adjacent room that I can use sort of like this. I'd build a nice, standard-sized kitchen (with an eye towards resale, as I doubt our next house will be our last one). The "back room" would have lots of open, commercial shelving, an extra fridge/freezer, and stations for baking and batch prepwork. OP -- your kitchen looks like it's going to be magnificent -- I'm so jealous of your skylight!
-
As another bean club member with a burst bag, I appreciate this response -- but as someone who's followed RG for years, I'm also so appreciative of the quality you provide at a reasonable price. And asking you to spend money to ship another bag of beans when I could just pour them off into a Ziploc just seemed silly. This did remind me to email your customer service about the recurring subscription notifications -- for us East Coast people, the subscription renewal reminder went out at about 9:30pm and the shipment was billed at 4:45am. So I woke up in the morning to both the "click here to modify your subscription" email and the confirmation that my order had shipped! I wasn't planning on cancelling, but...
-
This about sums it up for me. I do like it for tabletop cooking (hot pot and the like) because it's way more attractive than my Duxtop. (Of course, the $50 one from IKEA is attractive, too.) I dragged it out a few days ago to cook up some vegetable fritters in a cast iron skillet -- wanted to cook sitting down after a knee sprain -- and it worked just fine. Cast iron seems to throw off the temperature control, but it does a great job of evening out the heat from the small induction element. I also think I could get back to using the temperature regulation at *low* temperatures; it seemed to work fine for that, but my poor experiences at high temps kind of soured me on the thing.
-
Keep in mind that killing bacteria and deactivating enzymes via pasteurization is a function of temperature and time -- and that government recommendations to consumers typically only list the temperature required to pasteurize instantly. In many cases, the same results can be achieved by longer processing at lower temperatures. The process is slower at lower temperatures, but can still be reliably effective. For example, US FDA tests milk pasteurization by detecting "the phosphatase enzyme, a constituent that is inactivated by pasteurization at 63°C (145°F) for thirty (30) minutes or 72°C (161°F) for fifteen (15) seconds." I would imagine that instant deactivation would probably happen right around 180°F. (As an aside -- milk labeled as "ultra pasteurized" has been shocked to 280°F for extended shelf life. Unlike regular milk pasteurized at 145°F, the enzymes are already deactivated. I've had great luck making yogurt from ultra pasteurized milk without any preheating at all, though I always open a new container directly into the pot.)
-
I think you've summed up my reaction pretty well. It's not useless, but I don't have much love for the device, and I have had enough frustrating experiences with it that I haven't been motivated to play with it much. I was aware of its design limitations when I got it, and was perfectly happy to live with a device with a limited feature set, but I haven't found the implementation to be particularly reliable. My completely unsupported theory is that it has inadequate cooling, and ends up running into thermal protection limits when trying to sustain temperatures above boiling. I've had no major issues with it when cooking with water (or for low temperature tasks), but things like frying and candy making have not turned out particularly well for me, nor has cooking with cast iron. The clip for the temperature probe also fits on absolutely nothing. It is an unusually attractive burner for tabletop cooking, though... The lights in manual mode correlate to wattages: Cooking power levels: 1- 100 Watt 2- 200 Watt 3- 300 Watt 4- 400 Watt 5- 600 Watt 6- 800 Watt 7- 1000 Watt 15 8- 1200 Watt 9- 1400 Watt 10- 1500 Watt So not quite linear, but you can roughly think of it as 10% - 100% of potential output.
-
I am speculating, but I think it's because they already had separate versions of the Tasty app for iPhone and iPad, and didn't add the feature to the iPad version. They added the One Top as a new feature to an existing app, rather than releasing a new app. There is no technical reason the iPad couldn't control it.
-
I don't know why you think there's any extrapolation going on. The surface temperature setting on the TOT is just that -- the temperature of the bottom surface of the pan. It's not trying to guess what the internal temperature is at all, just control the output based on the temperature sensed by the center button. Does it cycle? Of course it does. But so does my radiant electric stove, at any setting except "high." And when my radiant stove cycles, the steam output on my PC cycles with it. The PC's steam output is much more consistent on the TOT than I have ever been able to achieve on my stove, suggesting the overshoots and swings are being maintained in a fairly small window.
-
My experience with my pressure cooker has been that it's *extremely* sensitive to changes in burner output.
-
Well, I think in this case, the unit is demonstrating good precision, and the accuracy is irrelevant. I mean, it may well be doing a great job of accurately measuring the bottom of my pan, but until I can figure out how to cook under the pan, the number doesn't matter much. But the fact that the steam output stayed super consistent after the pan temperature stabilized does demonstrate that it's holding the arbitrary temperature pretty well.
-
In this case, I am essentially using surface temperature as an arbitrary numerical setting. You could replace the surface temperature controls with a color wheel and I'd be just as pleased. I'm just stating that the surface sensor regulates the pressure cooker better than any standard radiant or induction burner I've used in the past.
-
The value here is not control of internal temperature (which is regulated by the pressure valve) but ease of use. Setting a consistent pan temperature (rather than a consistent burner output) means less overshoot, and therefore less liquid lost through the pressure valve. And in a purely practical sense, it means less time fiddling with the burner.
-
One good use for the surface sensor: pressure cookers. I dug my Fagor Duo -- which I basically quit using when I moved into my condo with an electric stove -- out of storage, and did a water test today. Setting a surface temperature of 267F resulted in a nice, reliable burble from the valve. I lost about half a cup of water over a ~15 minute cook and natural release, but I suspect a lot of that was when I was adjusting the temperature. Not quite as "set-and-forget" as my Instant Pot, but pretty close, and the extra capacity will be nice to have. Will probably try a recipe in it tonight or tomorrow.
-
Glad to see those improved results! Thanks for doing all this testing. The manual lists 410F as a maximum temperature, IIRC. As for why you can set the surface temp -- it's for cooking things without measurable liquid (with the probe unplugged). Useful for e.g. scrambling eggs gently, or making pancakes or grilled cheeses. The little metal dot in the middle measures the temperature of the pan directly. Less accurate, of course, but I actually find it pretty helpful.
-
I’d be interested to see what the same amount of oil does, in that same pan... I’m also curious to repeat your tests with my TOT but am traveling until next week. Assuming the probe is just a thermocouple, I wonder if there’s just an issue with the conversion? That could theoretically be fixed in firmware.
-
I think it might be worth trying this with a lighter weight pot. Cast iron pots are fantastic for many applications, but temperature control isn't one of them; they have extremely high thermal mass and very poor thermal conductivity. So it is probably throwing off the algorithm that the One Top uses to regulate temperature. The other potential option would be skipping the probe for cast iron, and just figuring out what surface temperature produces the desired oil temperature.
-
Modernist Cooking and Food Lab both have variations on that with boiling water -- MC does SV first and then shocks in boiling water, while FL boils briefly, chills, and then SVs. I've done one (I can't remember which!) and it gave me a texture I enjoyed. I could see the OT being helpful to set the center of a poached egg more than you'd get otherwise. Cook the outside traditionally to set the whites, cool, then transfer into a precisely controlled bath at your target yolk temperature. As an aside, the temperature control of the OT is really nice for scrambled eggs, though I need to play more with target temperature.
-
Mine shipped directly from Shenzhen, China. 9.9 lbs / 4.49 kgs and 19x18x6 in, if FedEx is to be believed.
-
The thing is $150 -- given that, I think it's a pretty impressive package; the fit and finish is better than other cheap induction burners I've used. And you can buy both a One Top and an iPod Touch for less than the price of the standard version of the Vollrath (and I suspect a smart version would cost something closer to the Breville) I am hopeful that someone will reverse engineer the Bluetooth protocol so that third-party apps and devices can control the unit -- for future proofing if nothing else.
-
@rob1234 The fried tofu recipe instructs you to use the probe. Maximum set point is listed as 410F; I think the 450F might be the maximum operating temperature of the unit in manual mode.
-
@rotuts probably best to use the app store directly on the iDevice rather than the mac one -- tends to be more reliable. This is the direct link from the Tasty One Top page; if you open it on your iPad or iTouch it should open the app store directly to the Tasty app: http://tstyapp.com/m/MfFr8Oqe6E
-
@rotuts as far as I know, it's not available as a Mac app -- only an iPhone/iPad one. The listing on that app store says it supports the iPod Touch as well. @ElsieD I am embarrassed to say I didn't actually check -- I was really just playing around -- but I'll do it next time and report back. I did notice that the target temperature drifted a bit more than I'm used to with my Anova; it went over by 4 degrees at one point. I used a fully clad pan; I suspect using a lighter pan might actually be preferable with this if really precise control is needed.

