

ChefDanBrown
-
Posts
70 -
Joined
-
Last visited
Content Type
Profiles
Forums
Store
Help Articles
Posts posted by ChefDanBrown
-
-
What are your favorite vegetables for roasting and how do you use them?
Roasted Carrot and Coriander (seed) soup. Nice crisp flavors, but still a definite winter soup.
-
I don't have a problem with the hands as long as they are washed frequently but the scale must be disinfected or protected from the raw fish every time. I think gloves are overated, too easy to contaminate by touching your face, making change, etc.. I would also ask to smell the fish before they wrap it up.
I have to agree, gloves give an incredible false sense of security. I've worked with cooks and chefs who seem to think that wearing one set of gloves is the equivalent to perpetual hand cleaning (that's one set for a shift!). I personally have zero tolerance for poor sanitation in the kitchens I work in, but cultural changes are the single hardest thing to do in a management position. I walked out of a job in Kansas City the first day when I saw the Exececutive Chef cut a raw chicken in half, and them immediately use the same board to slice cooked chicken for plating (didn't even bother with the sani-water, lip service to food safety would've been a huge plus). If you've got that little respect for, or knowledge of food safety, why would I choose to associate myself with you?
From my perspective, I cannot afford to ever get one person sick, EVER. This leads to a borderline paranoia in a lot of cooking situations, but I've figured out ways to address the behavior without attacking the person, and explaining to them that my reputation is on the line (no pun intended) when they choose to cut corners during service. If I'm working a station (broil or sautee) I'll wash my hands after every high PHF that I touch. Yes, it slows things down a little bit, but to quote my mentor, "Do you want it right? Or do you want it right now?" It's really about awareness, and once cooks have learned to really look at what they're doing, they've usually (but not always) had the importance of handwashing beaten into them.
As to what I'll tolerate when I'm out. Very little. If I see more than one food handling mistake (be it temperature, cross-contamination, handwashing, etc.) in a meal, I'll point them out, leave, and never return. Food is sacred, and failure to treat it as such is a violation of the laws of survival.
-
Rub the end of a cucumber back where you sliced it off, or the cucumber will be bitter.
-
-
Favorite fall back dessert: Creme Brulee - everyone has fun eating it, and after making countless batches, I can do it without really adding any work to what I'm doing. It's easy to vary the fruit with puree in the custard or garnish to what's in season, making it adaptable.
-
Baigan Bharta?
-
Ther was one variation on cooking liquid that I didn't get to do during the seminar, but I'm driven to investigate. I'd like to know if anyone has any experience with braising in milk, I believe it was pork chops that I read about in Marcel Hazan's book, but I can't remember for sure. If anyone has recipes or experience in this area (the one area I'm really concerned about is the milk curdling if it's heated with the dish, and I'm not sure if avoiding other acids or heating the milk separately is the smartest way to tackle this one), can you please share it with me? If not, I guess I'll just go for it, although another braised meat is definitely going to have to wait a week or two.
-
Braising Experiment Day 4 2-18-2005
I had a job interview in the afternoon yesterday that did not permit me to do the experiment. I’m conducting it today, Friday. The interview went well; I’m doing a working interview tomorrow afternoon at Kevin Taylor’s new restaurant “Prima,” wish me luck, and hopefully I won’t need it.
In order to have finished the seminar, I hope no one will be opposed to me posting a day behind schedule, and if so, you have my humblest apologies.
Question: Is the final product in braising substantially different when browned on a stovetop, browned on a broiler, or not browned at all? Will frozen steaks work for braising?
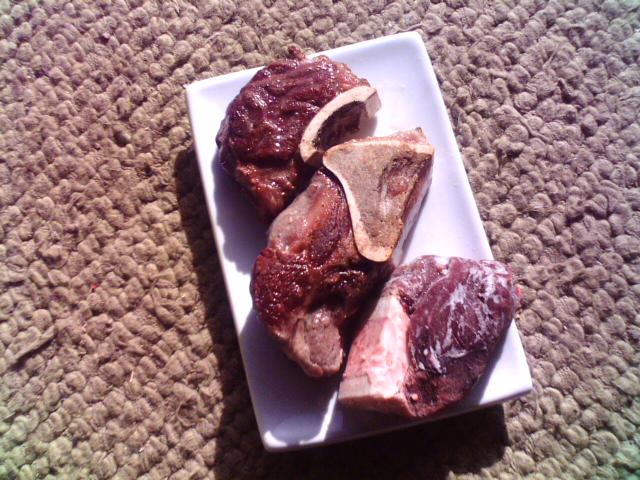
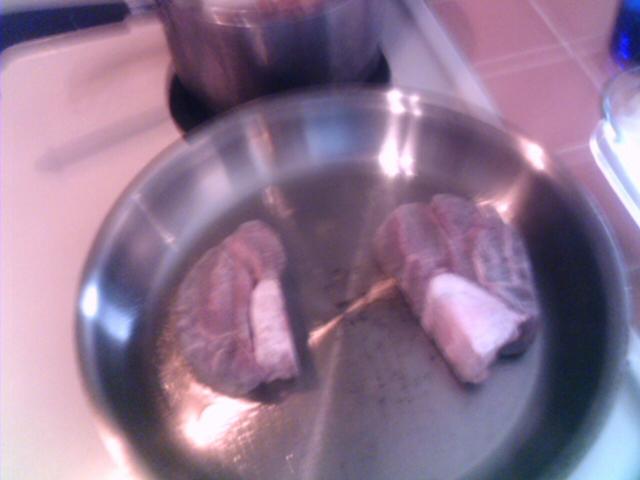
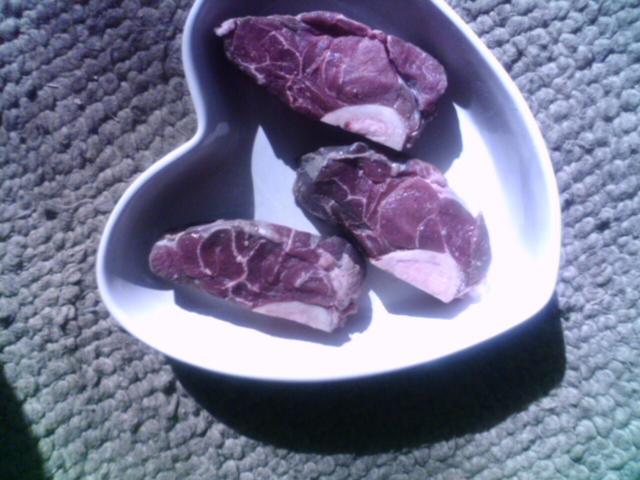
For my experiment I will be using the last three cross-cut beef shanks, which are frozen. I browned the first (A) using the broiler of my electric range, the second (B) went to the stovetop in olive oil, and the third © went frozen, into pan with the other two.
A, B, and C in sequence top to bottom before braising
Having used all my stock, and patience for cooking food without mire poix, I’ve made what I believe is the culmination of what I’ve learned from altering the cooking liquid. I deglazed the pan with the Talus Merlot, and then put together the following recipe
1 cup red wine
3 cups water
1 carrot – loose chop
1 leftover celery heart – I’m not concerned about the bitterness of the dissolving celery leaves, I think this short-cook stock will benefit from it.
1 yellow onion – skin as well – I needed the caramel color
¼ teaspoon black pepper
I’ll make a reduction sauce of the stock once the dish is finished.
In the pan, ready to go, still in sequence A, B, C
I began broiling the first rib at -0:20, and had finished browning both and had a stovetop simmer at 0:00. As they’re frozen, the first temperature reading, wasn’t taken until 1:00
0:00 Frozen (just a home freezer, not frozen below 26ºF
1:00 178ºF-182ºF – simmer looks great, meat shows visibly shrinkage, smells great
2:00 182ºF – everything’s tightened up, steady simmer
3:00 182ºF – meat is relaxed, perfectly done
The results would’ve surprised me a lot more had I not read the other posts first. They really are indistinguishable from each other. The browning is consistent with the exception of the underside of the un-browned piece.
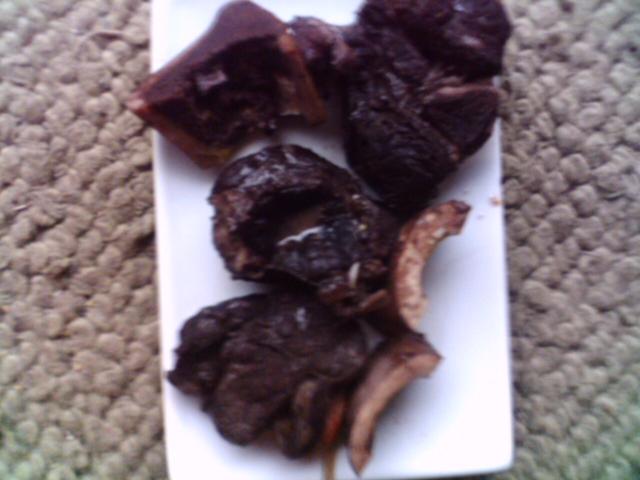
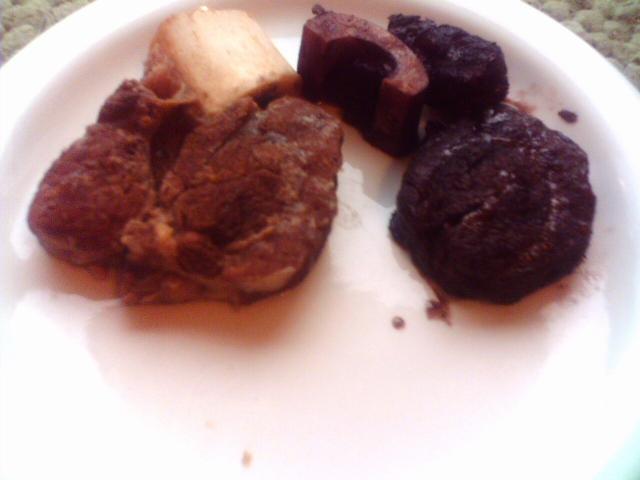
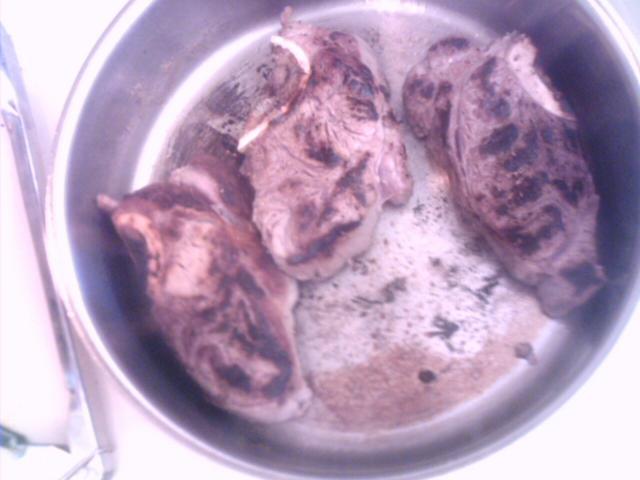
The finished pieces A, B, and C
I also re-heated my last leftover form the first day in the oven, as well as pork ribs from day 3. The shank was starting to fall apart, but was still maintaining structure on the third re-heat. The pork ribs really didn’t improve in any way with an additional heat and cool.
The other thing I was really hoping to learn from this one was whether or not the frozen meat would work just as well for braising as thawed meat, and the answer is a definite yes. Browning was equal with all the pieces, and therefore I think I may have done a lot of work this week to teach myself the easiest dish to cook from scratch in my repertoire.
Lastly the weight results-
Piece A – Broiled 8.5 oz raw – 6.125 oz cooked / 18% loss
Piece B – Stovetop 5.75oz raw – 4 oz cooked / 21% loss
Piece C – Raw 5 oz raw – 3.75 oz cooked / 25% loss
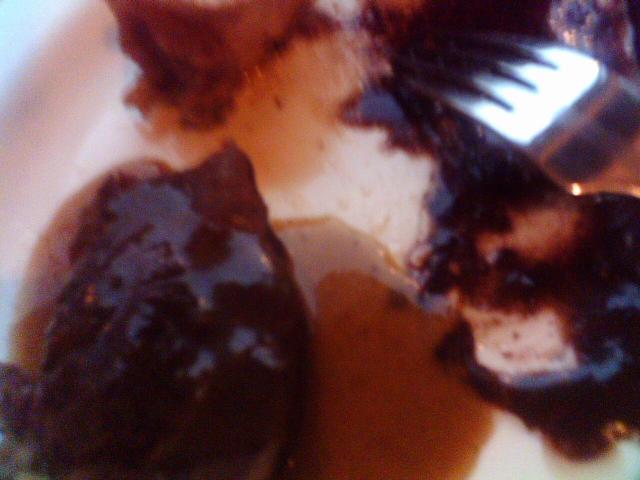
I tasted a little of each, but then my fiancee offered to finish dinner, mashed sweet potatoes, grilled asparagus and the braised shank with the reductions sauce. She reduced it to 4 oz, and dinner was delicious!
Thanks again for conducting this seminar, I look forward to the next one, and kudos to Smithy, I think you were the only one who did all four on the assigned days, as well as to Fiftydollars for sticking it out after the hazardous Jerry Lewis skit you did in the kitchen earlier in the week.
-
I fixed my problem today.
Thank you Mr. Shaw, this haw been an eye-opening experience for me on several levels.

-
Sorry to be late in posting, but I didn't have time to do the experiment yesterday. I just fired it and I'll post in a few hours when I'm finished.
-
Question: Does the temperature used for braising result in substantially different results in the braising process? Since the time will vary dependant on the cooking process what is the difference in cook time between different temperatures? What is the difference in yield between different cooking temperature?
Braising Experiment day 3 2-16-2005
For today’s experiment I’m going to be using pork ribs. I purchased a 1.98# package of “Rancher’s Reserve” ribs which state “Guaranteed Tender.” As there will be differences from one end of the rack to the other, I will try to discern those as well, using the pieces which I feel are the most similar for the 300ºF and 200ºF oven braises. I will begin by cutting the rack into three parts, then weighing and discussing the differences between the cuts. I will the dredge 2 of the pieces in flour seasoned with salt and black pepper, and brown them in olive oil over medium high heat. My braising liquid will consist of stock left over from previous experiments. I will leave one piece on the stovetop, in a straight sided sauté pan, covered with a tight fitting lid, and place the second piece into a Pyrex casserole pan, tightly covered with a double layer of aluminum foil, and that will go into a 300ºF oven. I am more interested in the final results on this one, and will not be taking time and temperature readings with the voracity with which I did yesterday. Once the first set of ribs is out of the oven, I will repeat the procedure with the remaining ribs and place them into the oven at 200ºF. I expect higher yield and a much longer cook time from the second round.
I will also reheat both remaining samples from day one, and taste the one which was initially braised in Pyrex on 2-14-2005, and suffered severe moisture loss due to a lid which did not fit snugly. I was unhappy with the results on this piece initially, and am looking forward to seeing what changes have taken place, as this will be the second time I’ve re-heated it.
I re-weighed the rack of ribs, and my scale gave me a reading of 1# 14 oz. As my scale measures in 2 oz increments, my weight measures lack the exacting specifications I would like for this test. (Note to self: quit bitching about scale and buy a new one.)
I cut the rack into three parts, as one was substantially bigger than the other; I removed a bone from the end of the largest piece and fed it to the dog. The head and tail ends will be cooked at a simmer on the stove top (head – piece A) and in the oven at 300ºF (tail piece C), the center piece (piece B) will be cooked in the oven at 200ºF. I browned the first two pieces together and then heated the stock to a simmer before dividing it and placing piece C into a Pyrex casserole dish covered with a double layer of aluminum foil and placing it into the oven.
A.Head piece – 3 bones in this rack weight 8 oz
a. This piece has more visible fat on top than the other two, and is much thicker as well.
b. I used 1 cup of stock and ½ cup water (I’m out of stock, I divided it equally between the three tests).
c. Temperatures
i. before browning 48ºF
ii. 0:00 84ºF – after browning, temperature when entering oven
iii. 0:20 not simmering, turned oven up to 350ºF
iv. 0:30 182ºF – simmering, smells great
v. 1:00 192ºF – simmering, I’m wishing I’d used pork all week, it smells much better than the beef did. I’m thinking the amount of fat on this ribs might be responsible for the smell. Shrinkage is apparent, bones are protruding from meat.
vi. 1:30 194ºF – liquid is at a rolling boil in the oven, I adjusted back to 325ºF
vii. 2:00 198ºF – Meat is done
d. Yields
i. 6 oz of meat 25% cooking loss
ii. 4 fl oz cooking liquid 66% loss
e. Flavor and texture
i. Cripes! This meat is great; Rancher’s reserve might actually hold some truth to it. It is fall of the bone tender, structure is solid until a utensil or a set of teeth get into it. I decided this piece and piece C were going to be dinner, and my fiancée and I tore them apart in a matter of minutes after tasting.
B.Center piece – 4 bones in this piece weight 10 oz. I browned it, then brought the stock up to a boil in my straight sided sauté pan, covered it with a tight fitting glass lid and threw it in the oven.
a. This piece is between the other two in thickness
b. I used 1 cup stock and ½ cup water for the braising liquid
c. Temperatures
i. Before browning 38ºF
ii. 0:00 90ºF
iii. This is where I got tired of going to the kitchen. I watched a movie with my fiancée, and took off my watch so I wouldn’t be distracted. After watching the longest bad movie I’ve ever sat through (Chronicles of Riddick, don’t rent it, even if you love bad sci-fi like I do, it’s worse than Rollerball)
iv. 3:00 182ºF – barely simmering, just done
d. Yields
i. 8 oz weight 20% loss
ii. 9 fl oz cooking liquid 25% loss
e. Flavor and texture
i. I’m really buying into Rancher’s Reserve, it’s pricey ($4.99/lb for this rack) but this one too was falling off the bone, and very delicious.
C.Tail piece – 6 bones in this piece, all very small 8 oz weight.
a. This piece was the thinnest of the three
b. I used 1 cup stock and ½ cup water for the braising liquid
c. Temperatures
i. before browning 44ºF
ii. 0:00 84ºF – after browning, liquid is simmering
iii. 0:30 192ºF – simmering, smells great
iv. 1:00 192ºF – simmering, shrinkage apparent, turned down heat a touch
v. 1:30 184ºF – simmering, looks almost done
vi. 2:00 188ºF – Meat is done
d. Yields
i. 8 oz weight (no loss?) –insert complaint about scale
ii. 1 fl oz cooking liquid 92% loss
e. Flavor and Texture
i. Exactly the same as piece a, no discernable difference that couldn’t be directly attributed to the difference in shape, and addition of more bones.
Conclusions- Mainly I found what I thought would be true was true, the lower temperature wound up having a higher meat yield and a much longer cook time. The texture and flavor of the meat was not noticeably different between any of the three tests I conducted today. Were it not that my results were so similar, I’d feel this experiment was a bust, due to the differences in size and shape of the cuts I used today.
Re-Heats – well, this proves it to me again. The Pyrex re-heat was spectacular, and it was basically inedible when I cooked it initially. Repeated re-heat and cooling really contributes to the quality of a braised dish. The texture was still firm enough to hold together, but fell apart easily under pressure. It was moist and delicious, and I wish I had more of it.
edited in an effort to fix the formatting of my outline - didn't work

-
I just took the last braise out of the oven, I don't think I'll be posting my results until tomorrow morning.
-
I'm with Smithy on that one, I'm perplexed by your last post Mr. Shaw, as it disagrees with not just other people's posts, but your own as well.
-
There has to be a reason that only going half-way up the meat is the advised procedure for braising. I looked first in Escoffier, to see what he had to say. He gives no advice as to the quantity of liquid used in braising, except to say "add sufficient brown stock to cover the meat (it being understood that the meat only just conveniently fills up the pan), cover the braising pan, set to boil, and then put in a moderate oven." As well as late in the process, "the braising-liquor is found to be considerably reduced and no longer covers the meat, the operation is nearing it's end."
One other point of note, he begins the area on braising by saying,” Of all the various culinary operations, braisings are the most expensive and the most difficult."
My understanding is that braisings effect is to replace the collagen in the meat with water, and to me it makes sense to keep the top of the meat uncovered so that evaporation of water will be occurring upward through the meat, encouraging the replacement of connective tissues with braising liquid.
Larousse Gastronomique has nothing to say about the science of braising, although there are a couple of recipes, and advisements to use white wine for chicken, and red wine for beef.
The Art and Science of Culinary preparation (Jerald W. Chesser, CEC, CCE) provides more useful information, "The moist heat is drawn completely into the piece of meat. It is allowed to stay there until the connective tissue that holds the muscle fibers together dissolves." It also states that the cooking liquid is only to come 1/4th of the way up the piece of meat being braised.
I also found it interesting that both Art and Science and Escoffier state that braises are to be taken out of their sauces three quarters of the way through the cooking process, and glazed with the reduced cooking liquid for the last quarter of the cooking time (is that news to everyone else too?).
-
To answer your question - Yes. It was superior to the first day. I've seen from past experience that re-heating braises seems to make the meat more tender and juicy than the initial cooking, and this piece was no exception. It seems to me that the remaining connective tissues are softened and/or eliminated by the cooling and re-heating process, I'm not sure about the science, enlighten me if you know the answer, please!
-
Question: Does the use of wine, water with mire poix, and stock create substantially different results in the flavor, and texture of the finished product? Does complete immersion create substantially different results from leaving the top of the meat uncovered?
Braising Experiment day 2 2-15-2005
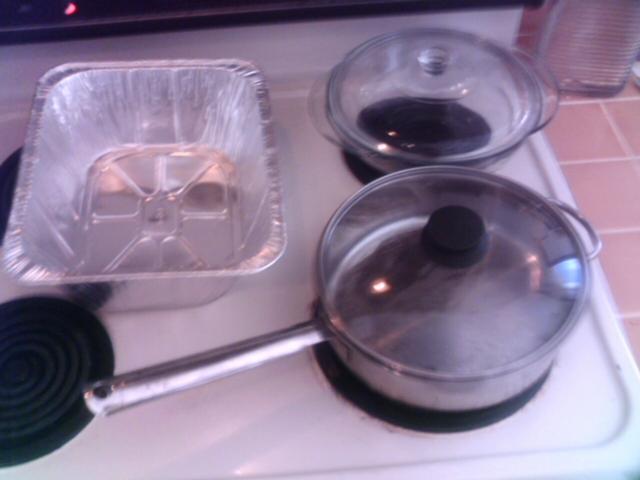
Due to a lack of four equally heating pans, I’ll be conducting my experiment in two batches. I will compile the results and present them in a single format. The pans I’ll be using today are Pyrex dishes covered tightly with a double layer of aluminum foil. I was unhappy with my results yesterday from Pyrex, but I believe that may have been due to evaporation, as the Pyrex lid did not create a tight fitting seal. While my dishes are not the same size, I will use the smaller one for the wine and complete stock immersion phases, and the larger one for the water with mire poix and partial stock immersion phases.
The cut of meat I’m using is cross cut beef shanks, with a half moon bone attached to each piece. I shall begin by dredging each piece in all purpose flour seasoned with kosher salt and black pepper. Each piece will be browned in olive oil over a medium high electric range for 5 minutes, and then placed into its respective dish and into the oven, which I will preheat to 350ºF and then turn down to 325ºF when the steaks go in. I will be measuring fluid after braising today, and comparing it with fluid in pan when the experiment started, to determine loss during cooking.
At this point I’ve got to say, I really wish I had a professional kitchen to conduct these experiments in, doing this at home just creates too many inconsistencies. As I said yesterday, my scale only gives me 2 oz increments, so the variance with that could be substantial.
I also wanted to learn more about the initial temperature changes, so I will be taking measurements every 15 minutes for the first hour, followed by half hour increments thereafter.
I will also be re-heating the three pieces from yesterday’s experiment, and tasting the one that was cooked in and aluminum foil pan, and stored without cooking liquid. For re-heating I’ll be using the very small Pyrex bowls I stored them in, covered in aluminum foil.

All pieces measured at 40ºF upon removal from my refrigerator. Temperature before entering oven is taken as 0:00
A. Braised in water with mire poix – larger Pyrex casserole dish
Mire poix consisted of 1 yellow onion (4 oz), 1 carrot (2 oz), 3 ribs celery (3 oz)
Liquid measured 13 fl oz, ½” from bottom of pan at center
8 oz steak
0:00 68ºF –Placed on upper rack of oven
0:15 102ºF – Not simmering
0:30 138ºF – Smells great!
0:45 164ºF – Still not simmering, adjusted oven to 350ºF
1:00 190ºF – Gently simmering, I adjusted oven back to 325ºF
1:30 184ºF – Gently simmering, placement and temperature seem very good
2:00 184ºF – looks very good, smells even better, simmering
2:30 184ºF – Done, a little pale
6 oz steak yield
Amount of liquid left / % of loss – 5 fl oz / 62% loss
Taste and texture w/o braising liquid – Slightly dry, tasted good, but needed salt
Taste and texture with braising liquid reduction – Great, I didn’t think the braising liquid would have enough gelatin to have consistency, but as you can see in the picture, it thickened very nicely when reduced to 1 fl oz.. The fresh vegetables had a slightly different tenor (fresher) than they do with a sautéed mire poix, and I preferred it, I’m sure the fact that I’d just finished the reduction, after just finishing cooking, helped accentuate the fresh vegetable flavors. I think that’s one area of this experiment which has changed the way I will braise from here on out. I also tasted this one with the wine reduction that I’d used for braising, and the strong acid bite filled out the one aspect of the taste which had been absent, acid, also very, very good.
B. Braised in Red Wine (Talus Merlot) – smaller Pyrex casserole dish
Liquid measured 7.5 fl oz, ½” from bottom of pan at center
8 oz steak
0:00 80ºF – Placed on upper rack of oven
0:15 118ºF – Not simmering
0:30 164ºF – Simmering, moved this pan to the lower rack
0:45 184ºF – Not simmering, adjusted oven up to 350ºF
1:00 184ºF – Simmering, very attractive color, deep red, adjusted oven to 325ºF
1:30 184ºF – Looks much more done than it’s current counterpart
2:00 184ºF – looks good, gentle simmer
2:30 190ºF – Done, almost all the liquid evaporated
6 oz steak yield
Amount of liquid left / % of loss – 1.5 fl oz / 80% loss
Taste and texture w/o braising liquid – slightly dry, very acidic, salt and pepper didn’t help to mask the taste. It was not as tender as the piece that had been braised in mire poix.
Taste and texture with braising liquid reduction – With how far I’d taken the reduction down during cooking, I didn’t bother to go any further. The reduction just made the acid stronger, edible, but certainly not enjoyable. I also tasted this piece with the braising liquid reduction from the first test (A), and although this was a marked improvement, I still would not use this method again. I was hopeful that this one would provide me a new braising alternative, but to no avail.
C. Braised fully immersed in stock – smaller Pyrex casserole dish
Liquid measured 23 fl oz, 1¾” from bottom of pan at center
6 oz steak
0:00 88ºF
0:15 98ºF – Not simmering
0:30 120ºF – Not simmering
0:45 198ºF – Simmering, turned the oven down to 300ºF
1:00 190ºF – Simmering, shrinkage visible, order of these events seems to have been reversed by immersion in stock
1:30 182ºF – Simmering
2:00 184ºF – Simmering, almost done
2:15 184ºF – Done
4 oz steak yield
Amount of liquid left / % of loss –18 oz / 22% loss
Taste and texture w/o braising liquid – My Fiancée and I shared the last two pieces for dinner and discussed them in the various stages. Talking and tasting helped me solidify what I thought, and another set of taste buds is a great asset in my mind. This piece was dry, but what I noticed this time is that the meat seems moist when it enters my mouth, and then it sucks all the moisture right out of my cheeks. It was tender, but not as tender as the other three. It did not need seasoning.
Taste and texture with braising liquid reduction – I used the same sauce for both of the last two pieces, combining 14 fl oz of stock and then reducing it to 2 fl oz, it was way too salty though, so I added 2 fl oz of water to it. It still seemed dry, even when soaking wet. Again, it’s as if it takes moisture out of my mouth. The meat seemed poached, even though it had been browned first. The color was not nearly as appealing as the final test, or the previous two.
D. Braised partially immersed in stock – larger Pyrex casserole dish
Liquid measure 15 fl oz, ½” from bottom of pan at center
6 oz steak
0:00 102ºF
0:15 120ºF – Not simmering
0:30 170ºF – Simmering, visible shrinkage
0:45 188ºF – Simmering, turned oven down to 300ºF
1:00 190ºF – Simmering
1:30 182ºF – Simmering
2:00 184ºF – Simmering, almost done
2:15 184ºF – Done
4 oz steak yield
Amount of liquid left / % of loss – 6 oz / 60% loss
Taste and texture w/o braising liquid – Great. It was tender and moist, didn’t need additional seasoning. It was a much more attractive piece than the one which had been completely submerged.
Taste and texture with braising liquid reduction – As I stated, both of the last two used the same sauce. When sauced, this steak come in second to the one which had been cooked in mire poix for flavor, apparently the use of fresh vegetables to round out the flavor is more important to my palate than stock is. This piece was delicious.
I tasted the piece that I’d braised yesterday in aluminum foil, and it was excellent. This piece was the one which I was the happiest with yesterday. Is the importance of vessel important for re-heating braised items? I’d never thought it was, but I’d like to hear some responses to that question.
After today’s work I’ve come up with better markers in my mind for the points of progress in the braising method. I do agree with Mr. Shaw’s point however, I don’t think I’d be losing liquid at this rate were it not for the on and off motion of the top in order to do temperature testing.
1. Raw meat
2. Browned meat, going into oven
3. Shrunken meat, prior to simmer
4. Initial simmer, tough meat
5. Midpoint of process, liquid reduced by 20%
6. Late in process, meat becoming tender, liquid reduced by 40-50%
7. Done
To answer the question I started my post with – Yes, one’s choice of braising liquid does create substantially different results, which was plainly visible with the first two tests I conducted. To the second question – Yes, immersing completely in braising liquid does make a difference as well, and it’s not a positive one.
Even more importantly I fell I’ve refined my methodology for doing tests in the kitchen, and thanks to everyone else’s postings yesterday, I feel I’ve improved my presentation of my results.
Wow, that was a lot of work.
-
Can you let me know what equipment we'll be needing for tomorrow? I feel like I could have been better prepared, and I would've purchased some loaf pans yesterday for today's experiment, but I didn't know beforehand. I still participated, and I'll be posting my results as soon as batch #2 comes out of the oven.
-
Since my store didn't have any beef ribs, I used pork. They are smaller, so my cooking was completed in little over an hour. I say that because I took them out at 160F/1:30 minutes, but thought they were overcooked.
There's always a long period during braising when the meat appears overdone, but is, in fact, underdone. The connective tissues have to dissolve completely in order to get that "fall off the bone" finish. I don't think a temperature that far below a simmer could produce the results you were looking for, but God knows, I've been wrong plenty of times before.
-
First off, I’d like to thank Mr.Shaw for conducting this seminar. Braising is one of those mystery topics to a lot of people, and this a great forum for teaching and learning more about the process.
Braising Experiment
Day One 2-14-2005
For my experiment I used cross cut beef shanks. I wanted to use whole shanks, but that wound up moving in the realm of being cost prohibitive. By chance, the store I went to had an oddball shank cut on sale, so I decided it would work for this experiment. I began today by selecting my steaks, and the three largest that were approximately the same size. I weighed each, but the accuracy of my scale makes it more difficult. It weighs in 2 oz increments in American measure, and 50 gram increments in Metric. All three pieces weighed in at 8 oz, 1# 10 oz total and about 200 grams each, but totaling 650 grams between the three, I could not identify the source of the missing 2 oz (50 g). I am lamenting my lack of an ideal braising pan, but I’ll work with what I’ve got. It reminds me of what a friend of mine said, “You’re a cook. Improvise!”
All three pieces tested at 40ºF prior to going into the pan for initial browning. I began by dredging the meat in seasoned flour (kosher salt and black pepper), then proceeded to brown all three pieces at the same time in my straight sided sauté pan (functioning as a metal Dutch oven) using olive oil as my fat, browning took a little under 8 minutes at medium high heat on an electric range.
After browning, I transferred the meat into the three separate containers, and measured stock into each one to a ½” mark. For my stock I used a combination of chicken and vegetable stock. Unfortunately I had to use bullion cubes for the vegetable stock (the chicken stock was made Saturday). Not having previously dissolved the vegetable bullion, I heated up water and added the cubes. I then combined the vegetable stock and chicken stock, but the temperature it was at may lead to problems in my experiment, as the stock measured 100ºF prior to being added to the respective cooking containers. My understanding of braising leads me to believe that using stock which is not cold goes against one of the guidelines, but frankly, I’ve always wondered if it would work correctly, so I’m looking forward to seeing the results.
1. Aluminum
Amount of stock used 3 cups
2. Pyrex
Amount of stock used 1 cup
3. Metal
Amount of stock used 3 cups
0:07 Temperature before entering oven
1. 82ºF
2. 80ºF
3. 76ºF
0:43 after 34 minutes in oven
1. 172ºF
2. 172ºF
3. 191ºF
1:32 after 83 minutes in oven
1. 184ºF - appearance between the other two, still tough/rubbery
2. 190º F- appears rubbery, has turned up on the ends, some shrinkage
3. 190ºF - very attractive piece, still tough/rubbery, has begun to shrink
2:07 after 120 minutes in oven. All three smell good, but I can tell there’s no mire poix (it all smells a little flat)
1. 180ºF – beginning to fall apart, still tough in the center
2. 191ºF – looks much better, beginning to soften
3. 188ºF – still looks the best of the three, connective tissue is almost dissolved
2:40 after 153 minutes in the oven
1. 182ºF - Looks about the same, still not done
2. 182ºF – looks dry on top, not quite done
3. 188ºF – very close to done, bone fell off when I was taking the temperature
2:57 after 170 minutes in the oven
3. 183ºF – Done -6 oz cooked weight (25% loss)
3:03 after 176 minutes in oven
2. 183ºF -Done – cooked weight 6 oz (25% loss)
3:10 after 183 minutes in oven
1. 165ºF – probably due to oven being open, not quite done, turned oven to 350ºF
3:46 after 219 minutes in the oven
1. 168ºF –Done –cooked weight 6 oz (same on all three)
Future use?
1. Saved without cooking liquid
2. Saved with cooking liquid
3. Saved with cooking liquid
One other problem I noted with the scientific aspect of this experiment. I unconsciously chose the best cut for the metal pan, since I expected the best results from it. I’ll consciously choose the best cut for a different container tomorrow. I also kept the aluminum foil pan on the bottom shelf of the oven, and had some trouble keeping a simmer consistently on all three; in retrospect it would’ve made more sense to use the container that is the best at holding heat in that position, I’ll try it tomorrow.
Results
Aluminum
Texture Very good, moist and tender, can be cut with a fork
Flavor Good, no seasoning needed. Just tastes like shank should. Probably the best of the three
Appearance Very good – again probably the best of the three – the only one that the bone stayed attached
Pyrex
Texture Very dry, use of less liquid probably led to this result, can be cut with a fork
Flavor Good, but flat (needs seasoning)
Appearance Lousy - dry and crusty on top
Metal
Texture Moist throughout, can be cut with a fork
Flavor Very good, moisture makes up for the lack of seasoning
Appearance Good – not quite restaurant quality, but certainly presentable
Conclusions – Total weight loss was equal based on the results of my scale. I think the extended cook time contributed to the fact that the aluminum foil pan produced the best results. It also had a lower temperature for the duration of the cook time, and I’m sure that played a part as well. I need to do a better job of maintaining consistent temperatures, utilizing oven placement in a better manner. I don’t feel that my stock being hot played a part, as the best results I got are comparable to the best results I’ve ever had cooking lamb shanks in a restaurant kitchen. Mainly I feel much more focused on avoiding differences between containers, and I’m looking forward to tomorrow’s experiment.
Edited to add the pictures.
-
I'm interested in the technique and execution of braising in milk, any chance you'll include that?
-
My understanding is that blanching also stops enzymatic action on the exterior of asparagus, helping to preserve it, and making it easier to digest. If you're going to overcook your vegetables, then it's not important if you blanch them or not, because you're a bad cook. If you're going to respect the vegetable you're using, blanching is an excellent way to focus on vibrant green colors. It's vital to use enough water to return to a quick boil, as well as repeated dunking into an ice-bath to chill quickly, followed by very thourogh draining and/or drying. I also tend to arrange my blanched vegetables for service into pans so that they are easy to use as garnishes during plating. It's easy to see the difference when someone really takes the time to prepare vegetables correctly, and you never know who's looking.
-
The one good thing about Bobby Flay being on another show is that it's another opportunity to watch him flail, then try to fix his mistakes. Knowing the limitations of your staff is a huge key to success, and his overdelegation to his Sous was the cause of the burnt chutney. I watched his show one afternoon (when I wasn't feeling irritated enough and needed to get edgy), and watched him incorrectly use his right and left hands for drt-wet-dry breading. They cut away as soon as he realized he'd gotten his dry hand fully breaded, and when they cut back, he was clean as a whistle. I'm not sure if it's partly jelously of his success, but I can't help but think of him as the red-headed New York step-child of modern Southwestern. Isn't it great when a whole region and a number of very influential Chefs (not the least of which is Chef Bayless) come up with a cuisine idea you can swipe and self-promote with?
I'm certainly not a proponent of Food MTV, but I do think this show will have a lot of positive effects on our culture. It may not be the most perfect representation of what we do, but there are a lot of people who will now be exposed to the fact that the are great American Chefs.
I think the key to winning the competitions will be to know the particular tastes of the judges, and play to those points. Obviously, though, they're going to favor the "Iron Chefs" they've selected. Sad, but better than no serious cooking competition on television.
-
Are there animal proteins withing the compound? Did vegetarian sausages just get a lot easier to make? I've sent an email to the company requesting information, and (hopefully) samples.
On a similar note, does anyone know what compound of alginate Ferran is referring to when he writes the ingredient "alginato"? I found dental paste powder on eBay, but I'm not sure if it's Calcium, Sodium, or what his alginate is...see
http://www.starchefs.com/events/studio/tec...r_f_adria.shtml
The real joy of finding new things is burning those new neuron pathways in the brain, and mine's on fire. Thank you for this topic!!
Porcini, Truffles, etc Now Illegal in LA County
in California: Cooking & Baking
Posted
I just emailed the LA Times regarding this thread. With the article that they ran today it might be an opportune moment to get your plight a little more media attention.
Best of luck