chefpeon
-
Posts
1,800 -
Joined
-
Last visited
Content Type
Profiles
Forums
Store
Help Articles
Everything posted by chefpeon
-
Lucy Thanks for the kind words! It means so much more to me, coming from my peers! You all know what goes into this stuff and can appreciate it more. Hey, I love my clients, but they kinda just don't get it. They ask me stuff like, "How did you find a cake pan shaped like a brain?" <sigh> Anyway, to answer your questions: My clients are generally really involved in the whole cake design because they are paying big bucks for it. I do have a few clients who know me and say, "This is the theme...whatever you do will be wonderful." I LOVE those people! I do my best work for them, because they give me free reign to do whatever I want. That's when I try out new techniques and ideas. The only drawback is I tend to undercharge them because when I do something new I spend more time on it than I'd originally estimated. In the case of the Prada purse, this guy was a regular client and he knew exactly what he wanted. He brought the purse in and said, "Do this purse." and I said "OK, what flavor and how big?" and that was that. Most clients, however, don't actually KNOW what they want. At first, this kind of annoyed me, but now I like it, because I've learned to tell them what they want. Even better, I can sell them stuff that I want to do, and dissuade them from getting something I DON'T want to do. For instance, in the case of the Cranium cake, the client originally wanted me to do 6 stacked game boxes. Cranium makes 6 different games, and they were going to give me the games so that I could replicate them in cake. Well, I really didn't want to do something as boring and tedious as game boxes.....I wanted to do something DIFFERENT. I always want to do something different. I get bored easily. Boxes=boring. So I said to the client......it's for your Christmas party right? Why don't I sculpt your brain logo and have the characters dancing around it? I could even put Santa hats on them! It would be fun and festive! And the client says, "Oh! What a cool idea....ok!" And that was that. Most people don't even THINK of the stuff that seems to occur to me naturally, so I always make sure I spew my opinion to them. They seem to like it. Personal service by someone who actually cares.....doesn't happen very often these days! One time, some women came in to order a cake for a friend of theirs who got a trip to France for her birthday. They were giving her a party and they wanted me to do a cake in the shape of the Eiffel Tower. I really didn't want to do the Eiffel Tower, because I don't really enjoy doing buildings very much, and they didn't need a very large cake either....it was just going to feed a few people. So I suggested a "french themed" cake, and I thought it would be a much more fun idea to put a french painter in front of an easel painting a picture of the Eiffel Tower. Next to him, on a picnic blanket would be a loaf of French bread, cheese, and a bottle of wine. They loved it. Here's a pic......(all decorations done in plastic chocolate) As far as my clients reactions......that usually comes when they SEE the cake; sometimes I'm there to see them when they see it.....sometimes I'm not. Depends on the circumstances. I will say that one of the best parts of my job is getting positive feedback from them. A lot of them will call and thank me, and some send thank you notes. I love those people. But then, there are the people who are royal pains in the ass the whole way through, and usurp your time, or call every day to make changes or just be generally annoying. High maintenance people....ugh! Nine times out of ten, it's these same people who say absolutely NOTHING to me after the cake has been delivered, and my heart and soul has gone into it. The only way I can tell they liked it, is when they call me again to order another cake. I figure if they're ordering from me again, they must like me, but they never say anything. You'd think they'd at least say "thank you" for all the time I spend coddling them! But, they give me money, so I guess it's ok. I never stick around long enough to see them cut it! When I'm working on a cake, and I start to get in the mode of "why am I doing this? They're just going to eat it in a fraction of the time it took me to put it all together...what's the point?"....I put it out of my mind. I like to think I'm delivering a piece of art and they are going to install it somewhere.....never mind if it's their stomachs....! When I was in pastry school and my instructor noticed that I was spending WAY TOO MUCH TIME decorating cakes (I was obsessing), he said to me, "You've spent 45 minutes decorating that cake....you see that cake over there?" (He pointed to a cake a fellow student had done....not as lovely, but he did it in half the time) "Remember, it all comes out the same in the end anyway.....if you know what I mean." At first I didn't get it....but then the lightbulb went on. So sometimes if I find myself getting a little too anal-retentive about details, I remember what he said. Keeps it all in perspective. It is just food, anyway! Annie
-
I grow my own herbs....so I know a little bit about mint. The best way to hold it is to keep it in a cool dry place. Not cold, because as you've seen it turns black. Now I know a hot humid kitchen is by no means a cool dry place! I would suggest wrapping your mint loosely in paper towels, and finding the coolest place you can to keep it....maybe near the door of your walk-in or reach-in fridge, which is the "warmest" part of either. Of course, the BEST way is to have mint plants in pots and just snip the leaves as you need them. But I know.....NOT practical! Hope this helps.....a little..... but like you said, mint is cheap.....thank god! Annie
-
Based on the above definition of invert sugar, would it be possible to make your own? Or is it more complicated than that? Inquiring minds wanna know. Annie
-
Yeah, I just want to re-iterate on the "tools" thing......I use them brand-new.....it's not like I go do some painting, rinse them off and then smooth cakes with 'em! I never confuse my icing and spackle buckets.....:-P Also, regarding the copper tubing, it is all very very clean and sanitized before it goes into the cake. I am also very clear to the people who are to be cutting and serving my cakes, exactly where all the supports are and what to look for. It's all written down very clearly. Believe me, I cover my butt in this litigation-happy world! When you engineer cakes like I do, there are certain challenges you face. I would love it if I could do EVERYTHING with edible material, and I try if possible to leave as many "foreign objects" out of them. But sometimes you gotta pull out a little styrofoam, straws, skewers, dowels and copper tubing. Thems the facts. Condensation! Man I hate it. I have found that after I finish a cake that is covered with fondant, marzipan, or plastic chocolate, if I box it up, then put the box in a large clean plastic garbage bag, it significantly reduces my condensation problems! Another bonus about putting the box in a bag is that it prevents the box from getting soggy with condensation. This prevents soggy box slipping accidents, or the walls of the box from caving in and touching the cake. I am thoroughly into disaster prevention! Wendy I LOVE your purses!!!! What a great Mother's Day idea! I'll stay with the theme and post a pic of a purse I did....... This was a recreation of a Prada brand purse that a woman's boyfriend was giving her for her birthday. Leaning against the purse is a chocolate replica of a Barney's New York credit card....which I was told she maxes out constantly. Gee, wish I had that problem! I wish the pic was better quality.....I also wish I had enough brains to have stood the actual purse next to the cake because you almost couldn't tell which one was real and which one was the cake. I was pretty proud of myself. It always happens to me though......I'm tired, it's late, I'm hungry, I wanna go home, so I never put enough effort into the photography. I always regret it too! My husband bought me a digital camera two years ago, and my photography has gotten much better since then.....now when I take a lousy photo, I know right away! Luckily, I also have Adobe Photoshop, so I can edit out those mop buckets that always seem to be the background for my lovely cake photos. Oh, I cover my cake boards with something called Highlander Polyfoil. I love it......it comes in all different colors and it's very thick and sturdy, wipes clean like a dream! When I do sculpted cakes and I have quite a mess of cake scraps down at the base as I'm carving, it's nice to have the polyfoil since it wipes so clean. I haven't found anything better. That's really neat how you decorate your cake boards, TP. I notice Colette Peters does that a lot too. Also a lot of the English sugar artists do it. It's weird for me though, by the time I get done doing the cake, I have no desire or patience to do the board too. Except in some cases....when I do a seashell themed cake, I'll usually decorate the board with "sand". Ok...gotta go bake a Kransekake now....... Annie
-
Yeah, once you lose your grip on the bag, it's a drag.....then you have to empty it and wash it to get all the grease off. I use a fairly large bag.....I do have to refill it often, but I don't overfill it and I don't have it leaking out the top, so it doesn't get greasy on me. Like I said, I used to think using a bag to get my icing on the cake would be too time consuming, but the actual time it saves me in not having to even the icing out and deal with all the crumbs saves me time in the long run. Again, the key is to not overfill your bag. How does hanging pastry bags from the ceiling save your wrists? I don't quite get it. I've never seen that before....how bizarre! And yes, my wrists and hands are TOAST. Arthritis and severe carpal tunnel problems have me wondering how much longer I can really do this. It's kind of scary. What are you talking about when you refer to "food proof papers"? Not sure if you were implying it, but there are no "papers" on my taco cake.....all the decorations are made with chocolate and completely edible. What are "food proof papers"? Annie
-
Well, after reading your thread about "burning down the house", I guess I believe you! Boy, you sure picked a challenging profession, given your proclivity for "accidents"! There's SO MANY things that CAN go wrong! Do you think you'll die of old age, or from some horrible pastry accident? I can see it now......."I don't know Officer, I saw Wendy scraping down an 80 qt Hobart full of buttercream.....and....then.....she was just.....gone!" Later, the local news interviews the rescue team: "It was horrific Bob....we dug our way through the buttercream to get to her......but it was too late......and <SOB> she was still clinging to her bowl scraper!" What you asked about Mike: I don't believe he has a book out....yet. But knowing him I wouldn't be surprised if he was working on one. He's really good at marketing himself, so I know if he had the opportunity, he wouldn't pass it up. He does have a wicked sense of humor....he can be very funny. But he also has a dark side, and it's ugly. I've had the "pleasure" of experiencing it a few times. I will say that it worked to my advantage after he opened his own shop and became my competition. His gruffness scared a lot of customers over to my shop because they couldn't deal with his personality. Goes to show that there's always a silver lining! Annie
-
Aaaaack! My own thread? I don't do too well in the "limelight". That's why I like to hang out in my kitchen.....so I can hide. I'm a lousy self-promoter. Ok, so cakes are my "thing"... my "specialty".....but please please don't call me a "cake decorator". Makes me sound like I work at Safeway or something. I really prefer "pastry chef"....it took me a lot of sweat and tears to be able to feel I could call myself that, so that's what I prefer. Very Weird Tip o' the Day: How to make "fake ground beef" (like anyone really has a use for this....but you never know! I did.) As you can see, in my taco cake above, I needed to make some "ground beef" for the filling. This is how I did it: I threw some chocolate chips in the food processor, and chopped 'em up so they didn't look like chips anymore......they looked more like unevenly chopped small chocolate chunks. Threw my chunks in a bowl, and tossed them with some clear piping gel. YUM! It looks amazingly like the real thing. It's actually kind of......scary. This "fake ground beef" also serves as wonderful fodder for practical jokes on your co-workers. Not that I've tried it or anything.
-
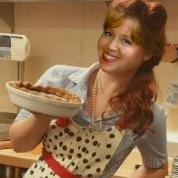
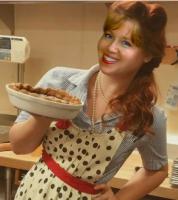
Thanks Neil! It's actually one cake.....I had to take two pictures so you could see all the characters. Yes, the "brain" is covered with blue fondant. It was easy to do actually. I split and filled a bunch of 18 inch round cakes and then carved out the general spherish brain shape. Then I piped buttercream with large plain tip to make the "brain squiggles". I let it firm up in the walk in, and I rolled out my blue fondant. Took cake out, and covered it with fondant, pressing the fondant into the squiggles to make the grooves show. I then used an airbrush with black color to add depth to the grooves. The hardest part was engineering the red ring. I made it so 3 of the characters are supporting it. I used copper tubing running through the characters' bodies and arms for support. That wasn't very easy, but when I finished sweating that part out, it was foolproof! :wub:Annie
-
So I had to do a little "name dropping" to get a little respect, eh? Well, whatever works I guess! Like I said, although I went to culinary/pastry school for two years (and graduated), my learning experience with Mike McCarey was probably the most valuable. It was the best (and the worst) time in my career. I won't talk about the "worst" part.....too personal. I worked with him for about 2 years. He hired me as the grunt to help him and his assistant John Auburn during a very busy wedding season. That August, the three of us worked our butts off to crank out more than 100 elaborate wedding cakes. That was in 1991. After he and John butted heads more than once with the clueless owner of the shop and he fired them, they opened up their own shop (just down the street) and that was the beginning of Mike's Amazing Cakes. I stayed behind at the old shop and took over as pastry chef there. Mike, formerly my mentor, became my chief competition. Lots of gossip and politics (and a lawsuit) between the two shops. Basically I was thrown to the wolves. I had only watched Mike do most of the difficult and elaborate cakes (he relegated the easier stuff to John and I since we were the "grunts"), and I had really never done any kind of sculpted work by myself. But here I was, the only person left in the shop who knew anything about it, so I had to manage as best I could. It was like being a medical student in a war zone. If I didn't just "buck up" and DO it.....I would have had many cake "casualties"! I hired in two "grunts" of my own and immersed myself in specialty cakes for 2 years. I finally had to leave that shop because of burnout. Two solid years with an average 16 hour day 6 days a week takes its toll eventually. I spent the next few years baking bread and breakfast pastries at a neighborhood bakery.....I didn't care if I never saw another cake again! Eventually, I "recovered" and got back to it. Can't stay away.......it's in my blood sor sure! But now my workload is manageable because I manage it. I no longer work for other people doing cakes.....too easy to get screwed....believe me, I know. It's my own business now. A lot of the "secrets" that I know aren't really secrets at all. But the more I read here, the more I find that there's a lot of myths and misinformation that some people subscribe to. If I see that someone is unduly stressing about something or doing something the "hard" way...I jump right in and make a suggestion....I like to help. On the other side, there's still plenty for me to learn and get better at too.....so any input you all have for ME is greatly appreciated! For instance, you all helping me with my quest for perfect pate a choux is a great example. By the way, I did it.....I got the choux results I wanted! Yay! Anything ya wanna know......(about cakes) just ask.....it's my "thing"! Upside down on acetate? Yipes! Too much work! One thing I've gotten good at is saving time. When you do a LOT of labor intensive cake work and you know you're going to be in the shop a long time anyway, you try to think of ANYTHING that is going to make the job easy and quick (but NO sacrificing quality! NO SIR!). It used to be that I would use my elbow (some people call it an offset spatula) to ice and smooth my cakes. Worked well for me because I did it so much, but I usually had to crumb coat the cake first, then give it it's final coat. A lot of my day went into icing cakes twice....first the crumb coat, then the final coat. I knew I could save a lot of time if I could get the cakes iced perfectly in ONE STEP. Using my elbow spatula as carefully as I could wasn't working. I still had crumbs showing...especially when I iced up chocolate and carrot cakes. Then my wonderful pastry chef friend Robin introduced me to my very favorite time savin' tool. Or should I say, "tools". The first was a very large pastry bag with a giant basketweave tip to apply the icing to the cake. At first I thought that was stupid......I thought it would take more time to scoop my buttercream into a pastry bag, pipe it on my cake, then smooth it. I liked to just plop a big blob on top of the cake and work it down with my spat. Well, doing it that way, OF COURSE you're gonna have crumb problems. Piping my icing on in more or less an even way with the icing bag saved me a lot of work in the end......and significantly reduced my crumb problems. The next miracle tool that Robin showed me was something called a.......a.....I hope I get this right......a paint guide, or maybe it's called a paint masker. I can't remember. You can get them at the hardware store or a paint store. It's a thingy that painters use to hold up to edges and corners so they can paint on something without getting brush marks on an adjoining wall. There are different kinds of paint masker thingys.....some are plastic, but the ones I use are a very thin flexible kind of metal. Aw heck....I got a digital cam....I'll just take a pic of it..... See? I love this thing! The edge is PERFECT for getting a perfect surface in buttercream, and I've also found it an invaluable tool for making perfect square cakes. It's also nice and wide so you get perfect tops and sides with no spatula marks. I pipe my icing on with my large icing bag and giant basketweave tip (I do it so the smooth side of the tip faces me and the "grooved" part hits the cake), then make sure I adhere the icing to the cake with my elbow spat, and finish smoothing with my paint thingy. These two things helped me ice up a wedding cake in ONE STEP! No crumb coat! Now, I will say, I had to practice using those things a bit before I got the feel for it and perfected it. But if you just stick with it and practice, it ends up being easier....way easier....and the time savings......well, what a perk! Also, the paint masker thingys are cheap, and disposable. I use one til it starts getting a little "bendy" or if I've put it through the dishwasher and it gets bent, it's no good. So I just pull out another one and it's good for a couple of months or so. Actually, I think I have found more cool tools for decorating at the hardware store as opposed to a kitchen store! And now I'll leave you with a couple of pics of a cake I did last December for the company that designs the Cranium line of board games. It was for their Xmas party......the cake is their "brain" logo, with all their game characters surrounding it. The characters were made entirely out of modeling chocolate. Annie
-
Wendy I don't use dowels. Well, I did once for a cake that was particularly heavy and huge......8 tiers high....that was an exception. But truly, the method that I outlined above really works....there is no "weakening of the cardboard" or anything like that. The bamboo skewers are so thin they pierce right through like a needle. I can honestly say, that I have NEVER had a cake disaster in my entire career. No falling, no sinking, no melting, no toppling. Some of the sculpted cakes I do can be an engineering nightmare, but I'm proud to say I conquered the challenges of them, and all arrived at site, undamaged and exactly the way they left the shop. I don't consider myself an expert on many subjects, but on this one I do. Doing cakes runs in my blood, I do it well, and I love to share the knowledge. I was taught by one of the best cake designers in the country (Mike McCarey of Mike's Amazing Cakes) and it's the least I can do to pass down the awesome "secrets" he showed me. I am so fortunate to have mentored under him. If I were there, Wendy, I could teach you how to do cakes so that they are stress and worry free. I'm sorry that you had those disasters happen to you! It's no fun. Even though it doesn't happen to me, I'm always afraid that it will.....but I suppose a little paranoia is a good thing....it keeps you on your toes! Annie
-
If we were all Peanuts characters, I most certainly would be "Pig Pen". Well, as far as my clothing is concerned! I work very neatly, keep up with my dishes as best I can, and I wash my hands so much that I'm keeping the Vaseline Intensive Care people in business singlehandedly. Can you say "dry cracked hands?" Yep! If my place of employment doesn't make me wear one of those STUPID chef jackets, I don't wear one. Actually I just save my nice chefs jacket with my name embroidered on it to wear when I'm consulting with clients. Makes me look all professional and stuff. In the kitchen though, it's another matter. I'm in an old t-shirt, black leggings (so comfy) and a four way apron. My apron and front of my t-shirt is covered with chocolate or food color or whatever dough or batter I happen to be handling. There's usually spots of stuff on the back of my arms that I've missed on one of my frequent handwashing trips. There is splotches of buttercream or whipped cream in my hair that has somehow "splooted" back at me when I burp my pastry bags. Sometimes I have flour on my face and don't know it. People laugh and don't tell me. A lot of times, I'll have a big floury handprint on my butt because I absentmindedly go to wipe my hand on my apron (I know, BAD habit) and I miss and hit the hiney instead. Looks great on black leggings. I love to wear short sleeve t-shirts.......they're cool, cheap, and the short sleeves are great for when you've got to scrape down a big hobart full of chocolate cake batter. I find chef's jackets to be highly impractical in my line of work. My sink is at the opposite end of the kitchen too. I don't like running back and forth, so I just fill two buckets and have a towel in each one. The first bucket is my "rinse" bucket, and my second bucket is my sanitizing bucket. Saves me a lot of running around. I hear you about the "feet" thing. Over 14 years of standing non stop for 8 hours or more takes it's toll. I wear special orthotic arch supports, but the pain at the end of some days can be pretty horrible. I do face some sort of surgery in the near future. And I won't even start to tell you about my carpal tunnel problems. But I'm loving your blog, Miss Peaches! Annie
-
Gosh you guys......I'm confused. I'm not exactly sure what the fuss is about in this li'l topic! I've been specializing in wedding cakes for 14 years. I've done LOTS of ganache wedding cakes. If they were to be stacked directly on top of each other, I stacked them in the shop, just like any other wedding cake (buttercream, marzipan, modeling chocolate, etc). If you know a few simple little tricks, ganache doesn't pose any particular problem in pre-stacking and transporting. I much prefer to do most assembly and decorating in the shop. It's my "comfy zone". If I make a mistake, (me? a mistake? NEVER!) I have all my tools, icings and my walk-in to help me. On site, you have an audience (sometimes) and you have to be very careful not to make a mess on the nice linens. Would I want to be stacking a ganache cake on site where I can risk little chocolate smears on the nice tablecloths? Heck no. I also hate it when people watch me.....I feel like I'm jinxed when they do.....like I'm going to trip over a chair leg and dump the whole cake on the floor. No, I like to make my wedding cake deliveries as fuss free and disaster free as possible. I slink in and out in under 10 minutes and no one even knows I've been there......I like it that way. I am............ THE STEALTH PASTRY CHEF! Anyway, here's how I do it, and this pretty much applies to all cakes I do...... I'm going to explain my technique as though I were doing a 3 tier stacked ganache cake though. 1. Split, fill, and ice each tier. I use a medium chocolate buttercream. Of course, each tier is on its own little cardboard circle (the 6 inch cake is on a 6 inch board, 8 inch on an 8 inch board, and the 10 inch, which is the bottom tier, is on a 14 inch round 1/2 inch thick plywood or particle board covered with the appropriate colored polyfoil.) 2. Let the iced cakes sit in the walk in til firm. If I'm impatient I stick em in the freezer for a bit. While I'm waiting for them to firm up, I either make fresh ganache or take some ganache out of the freezer or walk-in and warm it up so that it's pourable but not hot! You don't want to melt the buttercream off with hot ganache! You don't want the ganache too cool either, or it doesn't cover the cake smoothly, rather, it looks all drippy because it sets up as it moves down the sides of the cake. Yeah, I'm sure you know that drill. So anyway, I pour my ganache over the cakes, then put the cakes back in the walk-in to set up a bit. 3. After they've set up, it's time to stack! I pull the bottom tier out of the walk-in (that's the 10 inch cake sitting on the 14 inch plywood board), and I take an 8 inch cardboard circle and center it on top of the cake. I don't care that it's marring the surface, because that's going to be covered by the 8 inch tier. I trace a circle around the cardboard lightly with a long bamboo skewer, and remove the cardboard. I now know exactly where I'm going to place my next tier. Now for the supports......meet my friends the "heavy duty bar straws". The big plastic kind.....like you get in your milkshake at Dairy Queen. I take one straw and stick it all the way down through the center of the cake. I mark with my thumb the point on the straw where it's flush with the top of the cake. I remove the straw, and cut it at the point where I've marked it with my thumb. Then I proceed to cut about 8 more straws exactly that same length using my first straw as a guide. I put the center straw back in the hole I originally made with it and place the rest of my straws in the cake in a circular pattern within the circle that I made with my bamboo skewer. I then pipe a spiral of chocolate buttercream within that circle. I go in the walk-in to grab my 8 inch tier. I place the 8 inch tier on top of my 10 inch tier carefully with my handy dandy elbow spatula. 4. Now meet my friends, the "long bamboo skewers". You know, the skewers commonly used for shish kebabs. My 8 inch tier is now sitting on my 10 inch tier. I take one of the long bamboo skewers, and stick it down through the center of the 8 inch cake til it hits the cardboard circle that the 8 inch cake is sitting on. I then take a little hammer, or more likely, the side of my wire snips that I use, and hammer the skewer down through the cardboard until it hits the plywood board that the 10 inch is sitting on. At this point the skewer is still sticking up out of the 8 inch cake a bit. I lift the skewer out slightly, and snip off about 2 to 3 inches of it with my wire snips, then place that little piece on top of the skewer in the cake and use that to hammer the skewer back down until it hits the plywood board again. I pull my little piece out and throw it away. I now have an 8 inch cake on top of a 10 inch cake with a skewer going down through both of them. See? I put two more skewers in in the same way keeping them closely grouped in the center with the first one. 5. Then I repeat the whole process for the 6 inch tier....the straws in the 8 inch to support the 6, then place the 6 with a little spiral of chocolate buttercream, then hammer 1 to 3 skewers on the top of the 6, down through the 8. I then fill in the little holes that I made with the skewers on the 6 inch with a little ganache.....and voila! I have a stacked ganache cake that will NOT slide apart.....even in an earthquake. Ok. A small earthquake. 6. I then pipe the bottom borders as needed and decorate as needed. As you'll recall this whole thing is sitting on a 14 inch round plywood board. I take my 14x14x20 box and cut down one side so I can slide my finished cake inside. Because the 10 inch cake is on a 14 inch board and the box is 14x14, there is no way the sides of the box will mar the finish on the cake. I cannot stress enough how handy it is to have the right sized box.....saves a lot of transportation worries! I then tape up the side of the box that I'd cut down, and put the finished cake in the box back in the walk-in, and there it sits til delivery time. 7. Delivery time! Put box in car. Crank up A/C if needed. Drive carefully. Ignore people honking at me as I hold up traffic on the freeway. Get to delivery site. Put cake on a little cart or carry it if it's not too heavy. Locate cake table. Cut down side of box, slide cake out. Put on table. Leave. Yes, it's just that easy. No muss, no on-site stress, no sliding, no marring. I've done this hundreds of times.....yes, hundreds. Never a problem......ever. Some people are incredulous that I use bar straws as supports, thinking I am crazy not to use wooden dowels. But you know what? They totally work, they are cheap, and they are easy to cut. You have to remember to use enough of them and place them evenly apart. As a general rule, I will use 5 straws in an 8 inch cake to support a 6 inch cake on top of it. Obviously, the bottom tier will have the most straws because it has the most weight to support. I know this was a long post, but I wanted to show you that if you know the right tricks, this isn't at all as hard as it seems! Cheers! Annie
-
Wendy Thanks for the recipes! I'm going to be doing some baking today! Hey, wait, I do that every day......what am I saying!? Lesley Gotta know what it means to "fork"! I may be missing an important tip here! The rest of you Quit your snickering at the above question! Annie
-
Neil T'is true, if you have a great recipe for pate sucre and the like, you don't even have to MESS with the beans and the rice and the weights and the extra tins and the flip-flopping and all that. In fact, I have my favorite tried and true pate sucre that I use every chance I get. No lining needed. Problem is though, that you go to work for a new employer, and they INSIST that you use all their recipes, even if they suck. And most of them do......but that's another thing. They are certain that every part of their recipe is perfect and it's a signature item, so you MUSN'T mess with it! So even though we PC's KNOW BETTER, in order to keep our jobs, we just suck it up and deal with the crap. Hence, beans, rice, weights, extra tins and flip floppin'. Sigh. Gotta love it. Sort of. blueapron Yes! Beans and cheesecloth sounds much handier than my method of rice and saran! Same concept different components! Yay! Thanks! Tracy K. About plastic wrap in an oven.....I think the manufacturers say that to cover their butts. You know in this litigation happy world that some stupid moron who manages to burn themselves somehow by using plastic wrap in the oven will try to sue the manufacturer because they didn't post a "warning" about it. That's why you see stupid copy on the hairdryer instructions...."do not use while in bathtub". If they don't say that they're liable. So the plastic wrap guys have to post every single warning that they can think of to prevent frivolous lawsuits by people who shouldn't be in the gene pool anyway......that's my take on it anyway. I know I haven't suffered any ill effects from plastic wrap in the oven .....mostly because I'm smart enough to use a HOT PAD. Annie
-
This is my tart shell blind baking trick: After the tin has been lined with the pastry dough, I lay a sheet of plastic wrap over it. On top of the plastic wrap, I pour uncooked rice all the way up to the top of the shell. Then I wrap the plastic wrap around the rice. What you end up with is a tart shell tin lined with pastry dough with little plastic wrap bundle of rice in it. I throw my shells in the oven for about 10-15 minutes to set them. Then I pull the sheet pan full of tins out of the oven, and pull out my little rice bags and throw them in a bucket. I return my shells to the oven to finish baking the rest of the way. So easy! I just keep reusing the same rice. Unfortunately, you can't reuse the rice bags because the plastic wrap gets weak after being heated. After they've cooled I just break the plastic off of them and throw the plastic away, and my rice is ready for the next batch of shells. It really works great. Thanks to PC Michael Howe for teaching me this trick! Annie
-
Lesley I definitely don't pipe my choux straight up and down.....always at an angle and in staggered rows....I know I'm doing that part right! I think perhaps I will try baking them at 350 to 375 instead of the "425 for 20 minutes" method. Perhaps at that high a temp, my shells are setting before achieving maximum puff. I had always been taught (told) that you needed that initial push of heat to get the eggs to steam and expand the dough. I know what you mean by "egg wash", but what does it mean to "fork"? Wendy No I don't have Herme's recipe.....if you wanted to post it for me, that would be great! I always thought you had to cool your paste before adding your eggs....otherwise the hot paste might cook the eggs.....that's what I was taught in school from day one. Get your paste below 140 degrees then add your eggs. You all don't believe this is true? Gosh, now I'm confused.... Thanks for all your help! I'm gonna turn my oven down.....see how that works! Annie
-
Ok, so I've been doing this pastry chef thing for 14 years, and I'm pretty good at it. I believe I've mastered some things.....but others....well, I haven't figured out yet.....well, I have, but I know they could be BETTER! Two things that come to mind are a good genoise and pate a choux. I make an ok genoise, and do all right with pate a choux.....I mean, they always "work", but I don't consider them GREAT. I'm aiming for GREAT. I'll leave the genoise for another thread. I wanna talk paste here! I have tried SO MANY recipes for the stuff. Some say, don't use any milk, and they will be nice and crisp. True, but they don't taste very good. Some say all milk, but you lose your crispness there. I've found that using some of water and milk is the best bet. So far anyway. Some say to use butter, and I always have, but I had one PC I knew swear by oil, and I tried that. I had nice crisp hollow shells, but again, taste wasn't there. I recently read in "Baking Illustrated" that you can get a lighter shell by using one white for every two eggs. I tried that, but it didn't seem to make much difference. I've also experimented with using bread and all purpose flours. I think I like all purpose better....the bread gives good structure, but the toughness and chew is unappealing. I also know that good pate a choux isn't all about ingredients.....methodology is a big part of success. Here's what I do, method-wise, and you all can give me your opinions on how I go about it...... 1. I bring my water, milk, sugar, salt, and fat to a big ol' rollin' boil. 2. I add the flour all at once and cook and stir for about 3-4 minutes. I've been told that the longer you cook it on the stove, the more moisture cooks out, and the more moisture you cook out, the more eggs you can add, and the more eggs you can add, the puffier your shells get. Supposedly. 3. I put my big ol' pasty flour ball on the mixer, and mix it up til it cools down a bit. 4. I add my eggs, a few or one at a time, scraping the bowl often, until the mixture is glossy, and thick.....pipeable, but won't lose it's shape sitting on the pan. 5. I pipe and bake them right away, so no skin has a chance to form on the choux, preventing maximum puff. 6. Depending on what oven I am using, I double pan if necessary. 7. I put the choux in at 425 for about 15-20 minutes. I do not open the oven door during this time. After that initial period, I open the door and rotate my pan if my oven has obvious terrible hot spots. Then I reduce temp to 375 and let em go for about 45 more mins.....after that, I turn the oven off, and crack the door. I never have a problem with underbaking....I've mastered that part for sure. I know I'm doing everything "textbook perfect" (maybe). I'm still not satisfied. I have a recipe that I know is close to perfection taste-wise and mouthfeel-wise....but puff-wise, it's just not there. When I go to pipe filling in the suckers, I know they aren't hollow enough....I have to poke about 3 holes in the bottom and pipe the pastry cream in different spots in between all the "webbing". Very frustrating and time consuming. Here's the most irritating thing......one time I worked with this other PC in a wholesale operation. She really knew her stuff....everything she touched was perfect. ESPECIALLY her choux. God, she did beautiful choux!!! I finally swallowed my pride one day and asked her to walk me through exactly what she did when she made it. She was so nice, and she showed me. We did a double batch, side by side. I did it right along with her and did everything she told me. When our choux came out of the oven, it was pretty obvious which one was mine and which was hers....mine were not as puffy....not by a lot, but there was a difference. She looked at me and said, "I don't know what to tell you......maybe you have bad "choux karma". We laughed.....but dammit! You guys, DO I HAVE BAD CHOUX KARMA???? One more thing.....how do you all feel about using baker's ammonia? I never have. I've always felt it would be like "cheating".....that I should be able to use only eggs and get the result I want. Besides, it just seems "wrong" to put something that smells SO HORRIBLE into something you eat. Even though it evaporates out......yecch! Maybe it was my initiation to baker's ammonia by my pastry instructor. He did this to every new student. He'd say, "Hey! You ever smelled Chinese Sugar?" And, of course, we'd say "No." Then he would open the bucket (a plain bucket, mind you), and say, "Here! Smell!" The student would then stick his head in the bucket and get a fun surprise!!!!! It was then that I learned that it was also referred to as "smelling salts"......OK! NO WONDER it wakes people up!! I get it now! Any input you all have on this is very much appreciated! Annie
-
No, vanillin powder and vanilla powder are not the same. When you see the word "vanillin" as a primary ingredient in your vanilla product, that's a pretty good indicator that it's artificial in nature. No reason you couldn't use vanilla powder in fondant! Annie
-
Not sure if you knew...... but clear vanilla is artificial flavor. If you're a vanilla purist, and you don't want to add color to icings, etc.....it's better to use vanilla powder. Annie
-
I've been thinking about your sagging problem a lot today. I really can't say for SURE what could be causing it, because that has never happened to me.....well, it has, but my fondant would sag right away because I rolled it too thick or whatever. I've never covered a cake and then had the fondant sag hours later. My fondant always stays put. I'm INCLINED to think that your recipe produces a very soft fondant.....am I right? This could explain the sagging, especially with heat and humidity. I've always used commercially made fondant, because I go through SO MUCH of it. I don't have the time to make it myself. Pettinice is what I usually use and it's pretty good. You gotta work really fast with it though because it's starts to "crust up" pretty quickly. A lot of people don't like to work with a fondant that is that unforgiving. People who don't do fondant a lot, like to feel they have enough time from roll-out to covering. In my case, I've done so many and do it so fast that working with unforgiving fondant is sort of a non-issue. So, in conclusion, my best rootin' tootin' troubleshootin' guess is that it's your recipe, and maybe you should try tweaking it a bit more, and see if it makes a difference. So there is no bakery supplier in Malaysia that stocks ready-made fondant? Cheers! Annie
-
Hi TP...... hee hee.....I figure if I'm an expert on ANYTHING in this life, it's a fondant covered cake.....I must have done MILLIONS of them....truly. BUT.....after posting for just a few weeks in this wonderful forum, I have found out how little I DO know. I'm humbled, but grateful to have found such a wonderful bunch of pros to nosh with! I'm lucky where I live in the Pacific Northwest of the USA.....I don't have to deal with humidity or heat. It's nice and cool pretty much all the time here, except for a couple days/weeks in July and August (which is of course, peak wedding season). So I have experienced a few heat related problems, but never as severe as other parts of the world. When it comes to heat and humidity combined I always appreciate the advice of other bakers who deal with it on a daily basis. I'm sure I use a lot of decorating techniques that work great up here but would be complete failures in a different climate. Yes, I'm very fortunate! I worked with a wonderful pastry chef who moved here from Virginia. She told me that using fondant there was a completely different thing, and on hot humid days she said it had a tendency to kind of "melt off". I don't know EXACTLY what she meant by that, but perhaps that melting off gave the fondant a "sagging" effect. Just guessing. Questions: I assume you cover a cold cake with the fondant, decorate it, then put it back in refrigeration when you are done. Do you notice this sagging the next day, after it's been in refrigeration all night? Or do you not refrigerate it after you decorate it to avoid sweating problems? I would imagine with the heat you have down there that not refrigerating it is sort of not an option. What kind of fillings do you use in your cakes, and are you generous with the fillings, or do you just spread a thin layer between each layer? fiftydollars asked a good question about whether it was the fondant that was sagging, or if it was the cake itself. You know that if your cake was a bit taller going in and shorter coming out, then you have a settling problem. Even if it's a couple millimeters. I personally have never had any sagging problems due to refrigeration, but then, like I say, I work in an easy climate. The only thing I hate about refrigerating a fondant covered cake is the sweating, but I really have no choice....I have to refrigerate my cakes. When I teach newbies how to cover cakes in fondant, I have noticed they tend to roll out their fondant kind of on the thick side. They would get all frustrated that the fondant would start to sag and tear on the sides before they were able to finish smoothing it out. When I asked why they rolled it so thick, they'd tell me that the thicker fondant looked smoother on the cake, which is true, but the weight of the fondant pulled itself down and created a lot more problems than not. It's key to roll out the fondant to just the right thickness.....thick enough so that it doesn't show minor bumps and flaws on the cake, and thin enough so that it doesn't stretch itself out before you've smoothed and adhered it to the sides. Fondant that's too thick and heavy WILL pull itself down even after you've had a chance to adhere it in some cases. My ideal fondant thickness is approximately just under a quarter inch or 5 millimeters. Also the type of fondant you are using could be the cause. I have noticed major behavior differences in varying brands. And I don't know whether you are buying commercially made fondant there in Malaysia and if it's a brand similar or the same as US brands, or if you're making your fondant yourself. There are so many variables! These are my thoughts.....hmmm....not sure if I've helped or confused you more! Annie
-
Yeah Wendy.....good question..... although I've never actually tried to whip pasteurized egg whites (previously frozen or not) I was always told, "don't bother, they won't whip". So I never did. Do they whip? Do you have to whip them 30 minutes because it takes that long for a pasteurized white to peak? What say, spyddie? Annie
-
Gosh! What an odd way to mix that cookie! It seems that that whole procedure incorporates more air in the dough than is needed. The more air you incorporate into a cookie dough, the more likely it is to spread. Since you want these things to retain most of their shape, think "no air"! Here's how I would mix these cookies: Cream the butter with the powdered sugar just til smooth.....don't make it fluffy. In fact, after I browned the butter and re-chilled it, I would bring it out of the fridge to come to near room temp before I attempted to mix it. Then add your juice, zest and salt, mix a little on low speed, scrape down bowl, then mix again (on low) til smooth. Then add your flour and mix til incorporated. Wrap dough and chill. OR Scoop your dough straight from the bowl into your little one inch balls, then chill. Much easier. Remove the amount of dough balls from the fridge that you want, place them on your baking sheet and give 'em that little thumbprint. It probably is wise to bake these right from the fridge....a cold dough should prevent some spreading. Then bake. Hopefully they will not spread this time! Let me know how it goes, huh? Annie
-
Well put, Steve! Annie
-
Ok......let's see if I can help..... Ok.....step one looks good..... Regarding step two, I don't think you necessarily have to worry about heating the milk and sugar slowly......it's when you are cooking the custard as a whole that you heat slowly. For step three, it also isn't necessary to cool the milk....in fact, you're just making a long drawn out process even longer. Whisk your hot milk into your egg mixture while whisking constantly.....all you're trying to do here is temper the eggs so they don't curdle. Eggs are like men....you can't just all of a sudden hit them with something and expect them to be all agreeable with it. You have to broach ideas slowly or present it to them in a way where they think it's actually their idea in the first place......oh....but I digress...... For step four....that looks good....when I do it, I use a whisk instead of a spoon, and use a clean spoon to test it for doneness. It may also help you to know that custard thickens at 160 degrees and curdles at 180. It might help you to use an instant read thermometer instead of doing the "spoon test". I also think its easier to make creamy thick custards with cream instead of milk. Since you seem to have a bit of trouble with scrambled egg bits, you might want to try using a double boiler instead of using direct heat. When you use a double boiler, make sure that the water in it doesn't touch the bottom of your top pan. Also, remember that custards thicken as they cool......if you heat it to the right temp, when cool, it should be completely satisfactory. Hope this helps! Cheers! Annie