jedovaty
-
Posts
423 -
Joined
-
Last visited
Content Type
Profiles
Forums
Store
Help Articles
Everything posted by jedovaty
-
I have an apron from amazon that I don't like, it has plastic clasps that rub against my neck, and as such I rarely wear it and have ruined so many expensive shirts (when I'd come home from work, first thing I'd do is start cooking before changing, I'm a nerd in salesmen's clothing). Looking at the recommended/influenced rough linen brand here, the aprons seem like they'd sit too low on a skinny dude, so I think I'd prefer a more traditional kind over the neck so it sits up higher. There was a link here to an eater article.. "Merci" brand has some, but all the models are women. Any of you tried that brand? Any good? Similar pricing to rough linen it seems. i.e. expensive 😖
-
I have a 7 or 8 year old foodsaver, no chamber sealer (yet?). My fridge has a quick-chill drawer with fan that will be perfect to cool things down. Let us know if you notice a difference with the vacuumed base. My wootcreami arrived yesterday, 11 days earlier than expected, and sadly I don't have time until the actual expected delivery day to play with it. Meantime I should probably order some exotic ingredients like gums and add ins I suppose - take the easy route and go with the modernist pantry mixes, or pick up individual types mentioned in MC and member Paul Raphael's web log?
-
I was wondering about air bubbles, but before getting to this, do you think the container lid will be strong enough to take the vacuum? It seems too floppy/flimsy and would suck down, deform, or even crack. Maybe pull a vacuum in a different container, then gently pour into the creami one? In reviewing many recipes last couple days, it appears the blender is used quite a bit, and my experiences with a vitamix yielded a lot of excess bubbles and foam. Wouldn't this cause the resulting frozen treat to be full of air which ultimately leads to ice and unpleasant texture? After reading about using a vacuum sealer to pull out the bubbles a couple weeks ago on this forum, I tried it with my food saver mason jar hose thing on some blended veggie soup**. The contents in the jar expanded very quick and could have resulted with hot soup everywhere, fortunately, I stopped it in time. Use caution. Oh, and thank you for the idea that one can use the foodsaver hose with other lids besides just the mason jar attachment. Can't believe I didn't think of this after 7 years with this thing haha. 🤦♂️ I can use a larger jar, poke a hole in the lid, stick in a grommet, and all's good. Thanks!! **all remaining veggies in fridge near wilting get boiled in water then blended into a hot smoothie sort of soup thing, called green soup, brown soup, or camo soup mmmmm
-
Refurbed woot delivery eta 6/13 🤪 I don't have any ice cream/gelato books. What are some good sources, recipes, or places to learn frozen-treat science so I can make my own recipes? I think I'm looking for combination of traditional (for me) and specialty diet (family members are allergic to eggs and dairy/casein). I have the pacojet recipes bookmarked, and read the go-to pistachio/nut butter recipe on modernist's website. Anything else? I've read through this thread a couple times now - I understand the aversion some people here have to the unique ingredients such as the gums and stuff - but my disdain for them also comes from a different paradigm, whereby I dislike waste. I don't use them up before they expire, then must toss them. For example, in 2017 and 2018, I made vegan marshmallows a handful of times, then she dumped me, and a couple years later ended up throwing out $75USD worth of ingredients because they went bad (one of the gums was stupid expensive, and all smelled absolutely vile a year post expiration date, one had bugs, another went moldy). Hopefully I'll make these frozen treats more but.. hmmm.
-
Ah. It's a $20 instant coupon through today, otherwise it is $180 here in california. Probably a memorial day thing.
-
With its power, I'm surprised it didn't come out as butter?
-
Costco has it for $160 through 5/30 (tomorrow). I'm still tempted by the refurb on woot, but $60 more for a brand new units, hmmm. For fun, I looked up some reviews before truly committing, so many influencer links on that thing holy cow. I also found a youtube video comparing it to a vitamix. I know the vitamix can blend frozen ice cubes but it's a pain with the tamping then removing everything, so much so that it was just a novelty for me the first time I tried it a few years ago. I also have a Donvier with two containers from my childhood and.. well.. it's not very good, takes up so much room. Only purpose I keep it around for the memories. In the review, the dude indicated there were ice crystals in the creami one, especially after putting it in the freezer. Hmmm. But here I'm reading it's super smooth.. I trust you more, but.. before I spend more money, I'm just.. checking in first.
-
Hi: What would you all consider the next step roaster for cacao beans? Here's the background: I make chocolate from scratch as a hobby, currently have a behmore which I've modified with a bean temp probe and connected to an arduino device I made with some old processing software I hacked a few years ago when I was into roasting coffee (which was on a small huky 500 roaster). The behmore's capacity is too small. I'd like to roast about 2kg/5lbs in one sitting. I asked the chocolate alchemist dude this question, and he said to just use more than one behmore roaster... nah, not for me. Apparently the next step up is 10k USD.. yeah.. also not for me. This is a hobby, I don't sell anything, just make a few dozen bars every 3-4 times a year to taste the beans and share with friends. I'd like to double what I do now without doubling up the roasting, and stop there. A friend sent me this video: https://twitter.com/blogto/status/1529230762683162624?s=21&t=y6zmnWlIXSwZiLeMrosDqQ The dude there is simply using a commercial convection oven. Huh. Is that the answer? Or maybe modify one of these ovens with a rotisserie? That's really all the behmore is, a small rotisserie toaster oven. But, I was hoping to find a drum roaster with fan control. I remember trying to stuff 1lb of beans into the small huky, and despite the difficulties, the resulting roasts were possibly better than what I get form the behmore? I would attribute it to the fan. Who knows, it could just be nostalgia creeping in. But this opens up some possibilities.. it could also be a small, commercial steam oven that I keep in my garage and could bake my pastries as well. Hmmm. Those are super pricey, but maybe I could pick one up at an auction or a used one from a restaurant supply place. Thanks for your thoughts and time!
-
- 1
-

-
With all the respect in the world, https://www.youtube.com/watch?v=AADiEuvhCu0 😁
-
Thank you! I use it as a direct filling. I'm more interested in keeping it dairy free than vegan, one family and a few friends have issues with casein. Almande looks interesting! Actually.. easy to make at home, no different from a few things I do with coconuts and hazelnuts! Thanks for that Will be in contact - whole farts carries the product, but they are out of stock in the store near me right now.
-
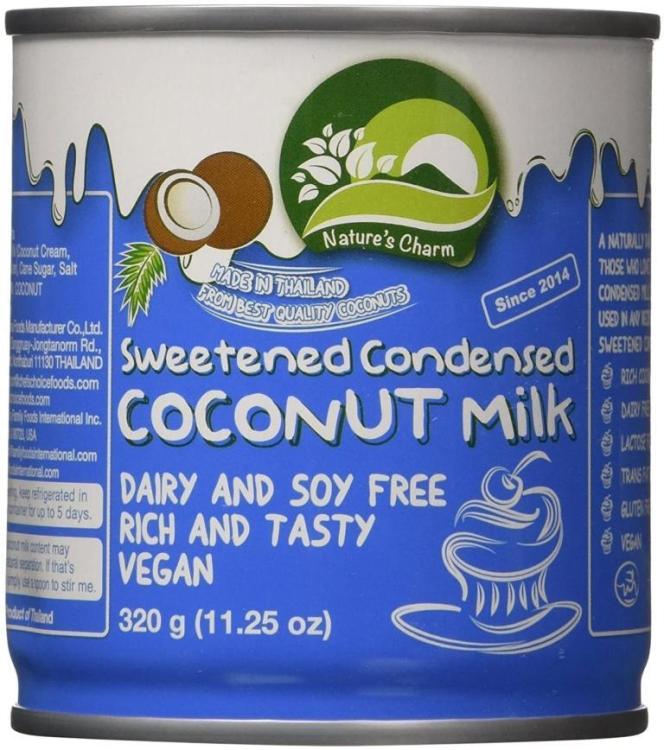
Would someone be willing to test WC for a "dulce de coconut" ? I buy sweetened condensed coconut milk and put the can in pressure cooker or boil it, just like with regular condensed milk to make dulce de lece. Example product I purchase at grocery store here. I occasionally make little filled chocolates for fun, getting a WC tester is.. overkill. In this case, I may be shipping the chocolates to a friend in canada, and shipping from California averages 10 days. I did test batch few months ago and left them on counter for a couple weeks, they seemed okay? I'd rather be safe with science though...
-
Interesting.. I have no issues attaching it to wide-mouth Ball or Kerr jars. I'm using the attachment with a foodsaver, not a chamber vac sealer, sorry that was not clear.
-
FWIW, it works "okay" if using a foodsaver with the mason jar attachment. It takes 4 or 5 vacuums to get it, though, since the foam rises up the jar. I also use the mason jar attachment to quick pickle things like cucumbers, onions, and radishes. Works great for those. edit: "it" being pulling vacuum on blender foam
-
Hi: Sort of a two part question. First part is specific: I have whole hulled oat groats and barley, decided to grind some into flour, and made a "cream of" with 1 part flour and 4 parts water. it took only a few minutes for it to come to a boil and thicken, which made me scratch my head because whole groats take 45 minutes or so. Same with brown rice. Other grains and seeds take 15-20 minutes. Instant oatmeal takes a few minutes, but.. that stuff is pre-cooked with steam. I figure this time is how long it takes for the water to be absorbed, soften, and "cook" the insides. Was my "cream of barts" cooked after only a few minutes? Do things change nutrition-wise if I let the flour soak in water for a while? Which leads to the second part.. a more general question, maybe rhetorical. When does one consider food cooked? In the US, there's correlation to temperature which kills bacteria, but then, we do eat food at lower temps.
-
In addition to bread, I recently saw someplace where the cooks use the chamber sealer to vacuum out bubbles created from high-speed blending - this may be old to many of you, but to me it was pretty nifty idea! I had always wanted a chamber sealer but combination of cost (for the good ones) and "where to put it" kept me away. I saw a slightly used beefy unit on craigslist once for a great price, but sadly did not jump on it. Nowadays, I don't think I'd get much use out of one, I don't sous vide like I used to, and I figured out how to use my foodsaver to make the quick pickles (the jar attachment with mason jars works great). The only thing I might use it for would be to vac-seal stock to make for easier freezer storage.
-
@blue_dolphin Aha, that makes sense, I've done that a lot, duh, shouldn't thought of that. I found the spreadsheet that lists other members' recommendations for different foods in the oven. I'm going to try roasting a few small beets. I typically foil wrap then toss in my grill while roasting chicken. Should I foil wrap them for this oven, or leave them bare?
-
Sorry to spam you all so many years later, it's a new toy for me Having always grilled or pan seared fish, I was curious and attempted to steam a wild salmon fillet from costco for 8 minutes at 210F. It was way overdone, suppose since it was fairly thin. Still curious, I broiled the skin as well. This was just okay, prefer the pan searing. Leftovers reheated.. holy crap, +infinity. Even the overdone salmon was great this morning and quinoa just like it was fresh! Outside of it taking four times as long, I actually could see myself getting rid of the microwave with this thing** I'm interested in knowing why some of you are using the oven to steam eggs, when it is just as easy and probably faster on the stove with water (direct boiling or steam)... For anyone interested, the warning about not putting it under cabinets are true The previous owner put these cheap laminated cabinets*** all over the kitchen and they are peeling ugggh. The toast boss, de toast! I keep toasting bread it is so delicious I ate my entire loaf yesterday what no I didn't write that out loud 🤪 ** my microwave is an original advantium GE convection/microwave from 2004, and the LCD panel just went so I can only push the 30s button and know what's going on. It's also taking up the place where I want to put a hood, as this house does not have an exhaust over the range and I really need one but don't want to lose space to a microwave, topic for another day when I'm ready to remodel *** the actual cabinet fronts are nice and solid, but the sides are all laminated crap, yet another motivation to remodel
-
I've toasted some fresh breads, and am definitely team "it toasts well"!
-
Thanks FlashJack. I'll try the bread again soon, I found some tips earlier in this thread and pretty much what I was thinking might work @rotuts I could be wrong on the $130 at costco after going through this topic here, I just remember it being heavily discounted in 2018 or 2019, I forget when exactly it was. Eitherway, missed opportunity, now they run $280-290. Given there aren't many toaster ovens with no non-stick interiors, I may just have to break down and get a backup if this thing continues to work well. I read in the history here how many love making chicken in it.. dunno, I might give it a go, but I have a method down with my outdoor gas grill that gives me perfect chicken and there's like no cleanup. I will certainly try steam roasting fish, that'll be later this week, I'm accustomed to pan searing or grilling only. Meantime.. what's the purpose of using steam function with rice when it's in a container that's closed? To steam clean the container?
-
Tried to bake a small sourdough batard simply on bread setting and it baked the bread, but no oven spring and dense loaf compared to same dough in the regular oven with stainless bowl + ice cubes. I think I'll swing by pottery store tomorrow to pick up a small kiln shelf, cut it to size, use the oven in dry mode to pre-heat, then bake with steam. Seems to be fine with a 400-500g loaf size, which is perfect. It heats up the house less, but, it costs more because electricity where I live is something crazy like over $0.40/kwh 🤑. Can't wait to try toast once the doughs cool down. There's no bagel setting which is a little disappointing, and the manual isn't very clear on which elements are used in which setting? Did I not read it carefully enough? Time to read through all three parts again to see what other tips/tricks I can glean with this giant (to me) countertop toaster oven.
-
I broke down and got one instead of the balmuda. Pricey, but I wanted something nice, practical, and without any interior non-stick coatings. Paying for a recent vacation left me with sufficient amazon points on my credit card to purchase the unit for half price, so, there's that. But I still regret not picking at least one up at costco back when they were $130 bah! I like how it came with a sticker to change the display to french
-
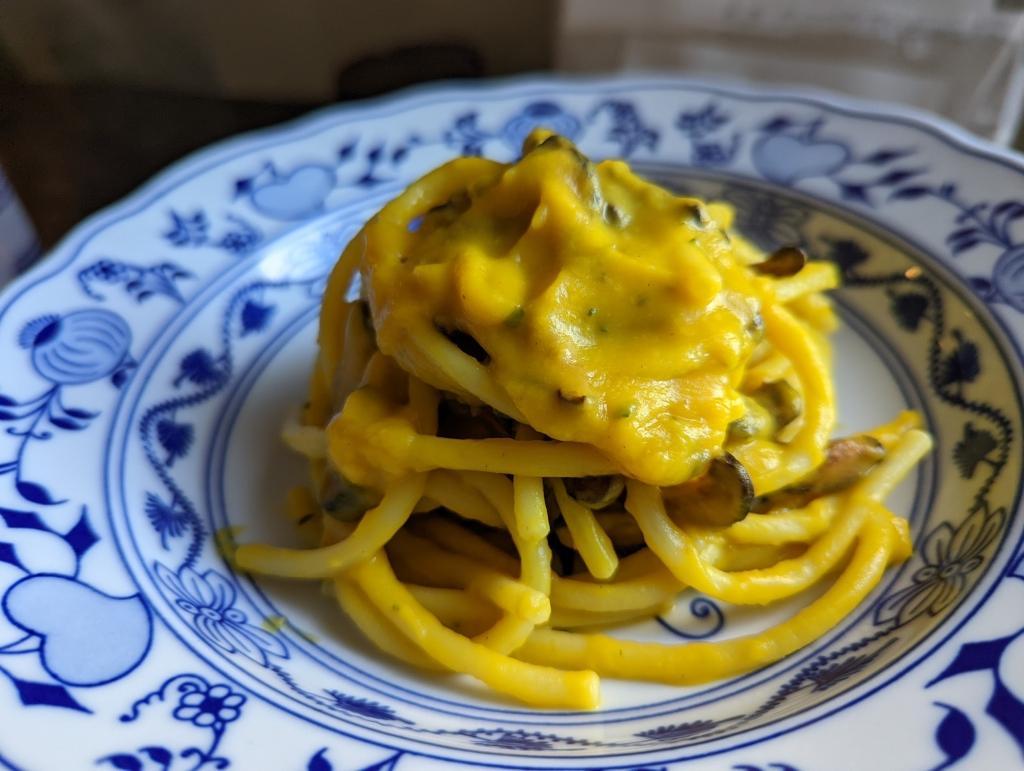
Bon Appetit online featured an eggless "carbonara" recipe a while ago using kabocha/butternut for the sauce. I didn't have bacon/pancetta or chicken stock on hand so improvised with dried shiitakes. It's no carbonara, yet still very tasty albeit unusual (squash + mushroom).

-
FWIW, I gave this another try, cooked thirds to 18 and 20 minutes. Very little difference between them. There appears to be a thin, uncooked line inside both - maybe it is cooked, just shape or density prevents it from fully changing. The longer cooked texture was softer than my first attempts, but it's still unpleasant. I tried eating cold leftovers as a pasta salad tossed with mayo and veggies, and it kind of worked for the first few bites, however, after a few more the noodles reminded me of gloved hands at the dentist. I've got one box left, anyone in this thread here that hasn't tried it, let me know before end of 2021 and I'll happily send it to you. Otherwise, I'll leave it at the office and see who picks it up. Its redeeming factor: pasta water actually has the dusting flours/starches in it, unlike the typical commercial pastas. So, adding pasta water to my sauces does thicken them up
-
I'd suggest waiting for the all-clad version, although, it'll likely be twice as pricey.
-
Not everyone has the space for that. I tried to do my own composting for about 2 years, purchased a small-medium sized tumbling composter (only thing I had space for). It barely works because it's just too small to get to the right temps, and to actually make it work takes a lot of effort: waste needs to be finely chopped or better yet, blended. This is all super noisy, messy, takes several minutes, and then requires cleanup. Then I have to haul it downstairs to the garden. And on top of that, keeping it filled with proper ratio of browns to greens to prevent bad smells, I just don't have the leaves (sure, I can walk/drive/cycle around the block and rake up fallen leaves from the city... riiiiight..). Paper bags from grocery store work, or cardboard boxes, but.. again, now you need to shred those to be effective, and the amount you need is pretty high (or you can buy wood dust pellets for smoking.. but.. you are buying stuff again, plus carbon footprint now). After all that work, I ended up with a five gallon bucket of compost. This was not even close to enough for my small garden. The gadgets like the vitamix foodcycler are fun and interesting. I think some versions try to fix the smell issue by cooking the stuff. It's not really going to work in the long run. They are very noisy, will need maintenance, and when they break, rather than fix them people will toss them and there you go, more e-waste, plastics, etc. In the urban life, research energy really needs to go elsewhere, not at the individual level like this. On the other hand: it's good people are thinking and working to come up with solutions