

lordratner
-
Posts
116 -
Joined
-
Last visited
Content Type
Profiles
Forums
Store
Help Articles
Everything posted by lordratner
-
Sadly the easiest way to tell is when they come out terrible, as you and I have experienced. Finding thick bone in short ribs can be a chore, but it's worth it. I'm sure someone with more butchery experience can help with identifying the various cuts. I was super excited to find a huge cut of boneless short rib only to be shocked by how dry and overcooked the finished product was. Going back to bone-in solved everything
-
I asked if you were using boneless in another thread, but I'll respond here. In my experience, boneless short ribs are not what you think they are. Rather than use the same meat that is attached to the rib, it is a muscle just above the rib meat, and though it looks the same, the results are dramatically different, as you discovered. Use bone-in short rib and you'll find the droids you were looking for.
-
 Were your short ribs on the bone?
 -
I think you're wrong on this one. I won't dispute the unlikely nature of the claims, since that's a lot of pressure for a microwave shaped appliance to deal with, but...Assuming the device is able to pressurize, the same cooking advantages that a traditional pressure cooker experiences would happen here. Increase the pressure, and the boiling temp of water increases. This should be no different than using a rack or jar in the pressure cooker. Now, if it doesn't use boiling water to build the pressure, I have no idea how it works. But if it can in fact hold pressure, food should cook faster in it.
-
You're right, I misread the response. Apologies. In fact, the second method (which I don't recommend) has the highest-temp steaks in the bath for hours after cooking through, while the others cook, but at lower temps. I've had great success with the method, and texture problems never developed (probably due to the temp being lowered), but I still had the occasional batch of over-cooked steaks, which is counter to the point of sous vide.
-
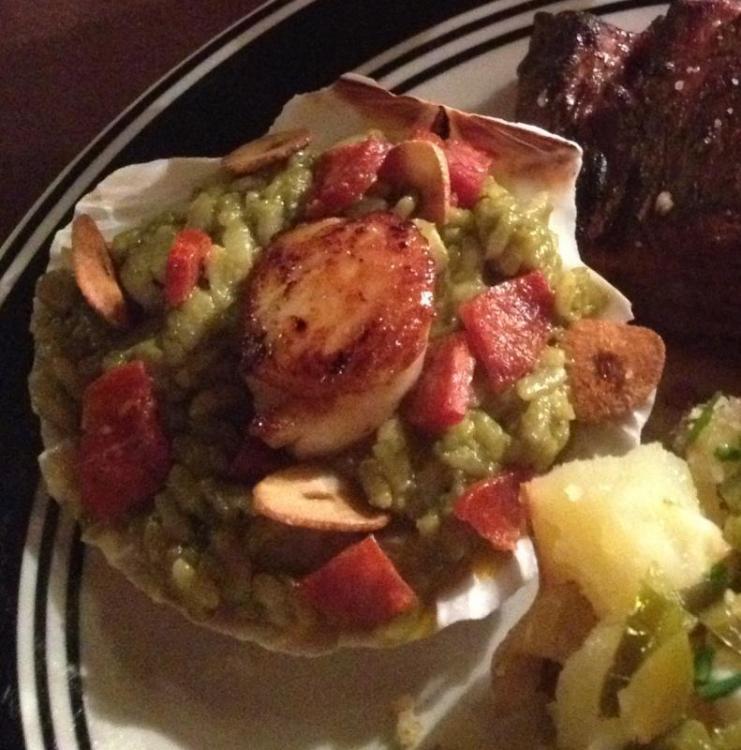
Bomba Rice with Chorizo and Broccoli Gruyere puree So I've made this one three times now. The first time I had problems similar to those described by Chris H in this post, though mine was still green rather than brown, it was still way, way too oily. So I changed things up the next two times, and this is what I came up with: Cut up some chorizo into slices and toss in the base of the pressure cooker on medium to extract the oil. I used about 30 grams. Not looking for a lot. get as much oil out without scorching, then discard the chorizo slices. Cut up however much chorizo you want in the dish into triangles (thin slices, then quartered). I used the chorizo as a garnish, similar to the picture in the book. Add to the oil in the pressure cooker from the earlier chorizo and cook until tender. A few minutes. Too long and they will start to crisp, which you may like. Remove and set aside, keeping as much of the oil in the pressure cooker as you can. Add 25g of neutral oil from recipe (instead of 40) and saute the shallots. Add the rice (not the chorizo), cook for a minute, then add the liquid and pressure cook for 7 minutes. Depressurize and stir in the puree. I use a bit less than the 150g called for, but you should just do it to taste. 125g seems to work for me. Add EVOO to taste. The books calls for 90g. This is ludicrous. I used about 25, but you may want more or less. Do not add all at once, as it will stop incorporating at a certain point, and make an oily gross mess. You can also add more grated gruyere to taste at this point. Now, depending on the chorizo, you may have lost the bright green color. It will still be mostly green, but it may be a darker, less appealing green. I had a bunch of liquid food coloring sitting around, so I dumped some green in and presto, color restored. Cheating? Maybe. If you don't want to do this, skip the oil extraction steps and use only the neutral oil to cook the shallots and rice, but you'll lose some of he flavor. Season to taste. Garnish with the chorizo triangles and fried garlic per the recipe. I thought it was a lot better this way. I'm not crazy about broccoli, but this was good once the chorizo and garlic were added. I served it with a pan seared scallop. It all went together well. Sorry for the fuzzy pic.
-
I'm going to disagree with the people here, having used those methods and getting the occasional strange result. With the tender steaks (filet, strip, sirlion, ribeye) I try to take the meat out of the tank as soon as it's to temp. Not to the second or minute, but I don't like to leave it in for hours longer than needed. I recommend you cook the steaks at the proper temp for the desired doneness, take it out when done and refrigerate, then work on the next doneness level. Then throw them all in at 45C for half and hour to reheat before service, and sear as desired. If you don't want to refrigerate any, here's what you do. Start at the highest temp, and cook those steaks till done. Lower the bath temp to the next highest doneness, and add the steaks for that temp (leave in the previous steaks as the lower temp should have little effect on them). Continue until the lowest temp steaks are done, and all the steaks should be ready to sear and cooked at the desired levels. Both methods will work fine. I've just found more uncertainty when leaving tender cuts in for hours past bringing them to temp. There is also the additional moisture loss to consider, though minor in most cases.
-
Not quite, but a strip is still a good night. I wish I could grill like that reliably. But I suppose I don't really need to.
-
Short ribs and baby backs come out divine at 62C. But I'm with you on most others.
-
Ribeyes? Either way, those look amazing.
-
[Modernist Cuisine at Home] Modernist Vichyssoise (p. 162–164)
lordratner replied to a topic in Cooking
Testing complete. First off, I don't think there is any need for the sous vide step. I pureed the potatoes while hot, then waited until the puree cooled to 60C, added the malt powder, blended to mix, and let it sit for 30 mins. The temp dropped about 3-4C in that time, and it was a very noticeable change in the texture and taste of the puree in that time. Then into a pot to breach 76C, which took about 3 mins max. I made 5 different variants using the puree, leek juice, heave (double) cream, roasted potato water, and salt: 1. MC recipe 2. MC recipe with half salt 3. MC recipe with double portion of puree 1/2 salt 4. MC recipe roasted potato variation 1/2 salt 5. Roasted potato water instead of leek juice, 1/2 salt Between my wife and I, number 2 was the best. The salt content in the original recipe was tolerable, and just on that line where you start picking up a salty taste, but a bit too in-your-face for us. With half the salt, the potato flavor still jumped out, but at a tamer level we are more used to with a vichyssoise, which I consider better as a subtle palette cleanser rather than a front-and-center dish. Number three was ok, definitely more potato-y, but too thick. I liked number 4, but it had a rather smokey after taste, and it made the dish less subtle. Other may like it a lot. Maybe I'm just boring and really like the traditional style. Number 5 was grainy for some reason. My wife said it was salty, which I don't agree with, but she described it as the same effect you get when eating a lemon, but not bitter. I kinda liked it, but it has the same after taste as 4, and I think the dish is best left mellow. I'll be making it again for sure, probably as an appetizer, 3-4 ounces per serving. -
This is a tough one for me, because I don't like meat cooked much past medium rare. I'm with a couple others here who believe lean sous vide is a tricky task. That task is made a lot harder when you get to and above medium. Depending on how long you had the steak in the pan with butter, I can see why it dried out. I started sous vide because I wanted great steaks. I still get them, but honestly I like it better for what it can do with eggs, poultry, vegetables, and custards more. For what it's worth, my steaks always come out best when I use the deep-frying method of finishing. I suspect it's because the steak spends the least amount of time subjected to high heat.
-
[Modernist Cuisine at Home] Modernist Vichyssoise (p. 162–164)
lordratner replied to a topic in Cooking
So I'm making this as I type, and after adding the malt powder, I couldn't help but think there was something I was missing from eGullet. Sure enough, here it is. Although I'm not sure if I deactivated the powder, I'm guessing I did. So I waited till the puree was below 60C and added another helping of malt powder. Rather than putting it in a sous vide bath (I have one, but this seemed easier), I'm just leaving it in the blender since it's holding between 52 and 60 rather well. Then I'll heat it up to 76C per the recipe. Next time I'll just let everything cool completely. I am also going to do the roasted potato variation. I'll report back with results. -
A few questions first: Ribeye? Frozen, Refrigerated, or room temp? If frozen, how? Flash freeze (from distributor), ice bath then freezer, or just tossed in freezer? Thickness? How much liquid in the bag? I'm assuming you like a light pink center, yes?
-
I have three. Each one cost $7 at TJ Maxx. I have the one you pictured, another that makes ribbons (about 1/2' wide), and one with larger teeth for more coarse grating/planing. I have never used a regular grater that does as good of a job. I imagine we managed the same way people cooked proteins before sous vide.
-
I'm certainly interested in certain ones. Gellan and pectinex come to mind, but I'd be willing to buy others I don't already have. For the more basic ingredients, you can check out http://www.barryfarm.com/our_store.htm The prices have gone up a bit, but if you buy from their website, rather than from Amazon (where they also sell the exact same stuff), you save on multiple items due to Amazon's prime shipping "scam."
-
A display that shows how long the bath has been at temp.
-
Magic. https://www.google.com/?gws_rd=ssl#q=why%20do%20things%20dissolve%20faster%20in%20hot%20water&safe=off
-
As with many other SV applications, I combine old with new when cooking eggs. 45 Mins at ~63C, then into a pot of just boiling water for a minute or so. Firms up the whites to give a more familiar poached egg exterior, but reliable, repeatable runny yolks.
-
I remember when the older pilots banded together and proclaimed the GPS instrument approach was unreliable and less precise than the old ways. We younger pilots were lesser pilots because we didn't practice the fix-to-fix, and no amount of reduced navigation errors, better equipment, or successful landings could change their minds.They were threatened by the change, as we humans are prone to do. I learned how to sous vide meat before any other technique. It's what got me into cooking. I've spent the years since then refining the technique while learning the more traditional methods. There's an elegance to the Duchaise (sp?) method that If you look at the meats I SV'd then and the meats I SV now, the difference is night and day, because I have been able to combine the knowledge from each method to improve the results. SV is no different than confit, braising, bain marie, beer can chicken, marinade injecting, or putting tin foil over a turkey until the last 20 minutes. They are all methods of control. The only difference between them and sous vide is your parents didn't use it while you were growing up.
-
Ah, if you're planning to do them separate, you're golden. Just be ready for the skin to curl and warp. I hear a panini press is aces for this.
-
Host's note: this post and several following it were moved from the "Cooking burgers sous vide" topic. I've not found a way to get the best of both worlds without separating the meat from the skin. There are topics on eG about this. The meat comes out great, but gets overcooked during the rendering process. I haven't yet tried undercooking the breast SV then rendering.
-
Pre-Salt: Pre-salting can give you the perfect texture and cohesion when grinding your own meat. You can either salt the meat overnight and grind the next day, or grind the meat and then salt it. With the latter method you can't salt it until about 30-90 minutes prior to cooking, or you'll get the sausage texture you stated. MC and MCaH as well as a few other websites go over the timings, but I was blown away the first time I used the MCaH pre-salting technique. Zero additional ingredients and perfect patty cohesion. Oil in Bag - It can help with very coarse ground burgers, since the surface will trap a lot of air bubbles (without the oil to fill the holes) and you can't vacuum seal them. Meat juices will eventually fill the holes, but you may have to increase cooking time to compensate. This, this, this, and this one more time. No one is claiming that "best" isn't a matter of taste. But the arguments here sound like many of they nay-sayers to sous vide ribs, to the tune of "I've never had it but there's no way that fancy pants sciencey stuff can out-do a good old fashioned charcoal grill." The bottom line is, if you haven't tried it, you have no idea what you're talking about. I absolutely believe someone can dislike sous vide meat, since everything is a matter of taste. But it's a difficult proposition to believe it's due to dryness, unless of course the chef was not experienced in the technique. To me, what makes a sous vide burger worth the "effort" is that is can in-fact produce a type of burger that is either far more difficult, or impossible to make by other methods (except perhaps with a combi oven). Thick, deeply medium rare ( 57C all the way through, no rare or well-done spots, which to me is far more important with ground beef), and aggressively crusty on the outside. The recipe is straight out of MCaH, and I can understand why it's one of the recipes they talk about in interviews. I have a hard time believing the liquid nitrogen step from MC would make it much better, but I also thought a deep-fried burger was lunacy until I tried it. Now, I have a hard time going back. To the original poster - I use the same method you devised for cooking various temps of meat for one meal. If the meat is super tender or the cook times are really long, I'll chill the higher temp meats while the lower ones cook, then add them all back to the bath for the last 30-60 mins (depending on thickness) to reheat. I hope it worked out for you. The only issue I would have is with the salt breaking down the meat. I'd either have to salt the meat in batches, or cook them all at the lowest temp to stop the break down, then work again in reverse order from hottest to coolest.
-
Yeah, I knew I should have elaborated more. I'm familiar with the MC technique, but its generally easier to tell someone to get the meat close to the broiler elements. Silly thing to do on a forum like this. I also consider the broiler to be a last resort. Fault mine. I went back and realized I read your post wrong. I didn't realize you were looking for information specifically regarding using a pan to sear. In that case, you are correct, as hot as possible isn't always the best answer. The problem with using a skillet and minimal oil is that you have to balance poor surface contact with the high heat. If you could somehow get 100% contact between the meat (in this case tuna) and the pan, a million degrees would still work, so long as you removed the fish before carbonization. Sure, it would be a microsecond, but you would have a great sear with almost zero of the underlying meat being overcooked, thus the emphasis on higher temps being better. But with a low oil pan, you get air pockets between the meat and pan, and those areas "sear" way, way, way slower than where the pan touches the meat. So you have to lower the temp to a point where the contacted areas don't scorch in the time it takes the pocketed areas to brown. The lower the temp, the longer it takes, and the more the underlying meat gets exposed to higher-than-desired temps. This balance is mostly why I avoid the technique in favor of torching or deep-frying. IMO (and only my opinion), to use a pan well, you need to use just enough oil to fill any potential pockets between the meat and pan. Any less and the air pockets will create underdone-spots, any more and you have to deal with the oil losing temp and acting as an insulator (though one not nearly as bad as air) between the pan and meat. But it's more complicated than that... You also have to contend with the smoke point of the oil. If the oil smokes at 425F, you can't just dump the oil into a skillet, heat it to 700F, then toss the meat on. Many of the techniques I've seen have you add the meat to the pan as soon as the oil smokes (or ripples, even worse), which means you're using a ~425F skillet instead of a 700F skillet that would transfer the heat better. Using a ton of oil (deep frying) is one work around, since the large quantity of oil will keep above the desired maillard temps when starting from smoke point. Another is to put the oil on the meat, instead of in the pan. I've seen this technique mentioned, but rarely explained. Oil the meat generously, then drop it on the screaming hot skillet. The oil will still help minimize air pockets, and the high retained heat of the skillet will minimize sear time. You will still have to deal with smoking (and flaming, depending) oil where it isn't in contact with the meat, so be ready for a show, but you can get a very fast pan sear this way. It's too much of a dance for me, which is why I use the deep-frying method. You get about the same amount of added oil with both techniques, but the deep-fried proteins get a much more even (and IMO, pretty) sear. When I want zero added oil, I use the torch or the broiler. IIRC, the salamanders in a Ruth's Chris get up to 1800F.
-
Deleted

