btbyrd
-
Posts
1,808 -
Joined
-
Last visited
Content Type
Profiles
Forums
Store
Help Articles
Everything posted by btbyrd
-
I like to cold smoke beforehand so the flavors develop in the bag. Then, after the SV step, remove your protein, pat it dry, and apply whatever rub you want. Then smoke it again at higher temps (like standard 225F or higher) to dry out the outside and develop some bark. Put some molasses in your rub to make a glaze if you want to form a more pronounced bark, since that will dry out and get hard faster.
-
The theory is that if you cook a smoked item in a plastic bag it's going to sweat its crust off because it's sealed inside an environment that's at 100% humidity. Bark development relies on dessication and the removal of surface moisture, which is pretty much the opposite of what you're doing when you cook sous vide. If you're going to do a smoke/SV combo, smoke the meat and apply the rub after you cook sous vide and develop the bark once it's out of the bath.
-
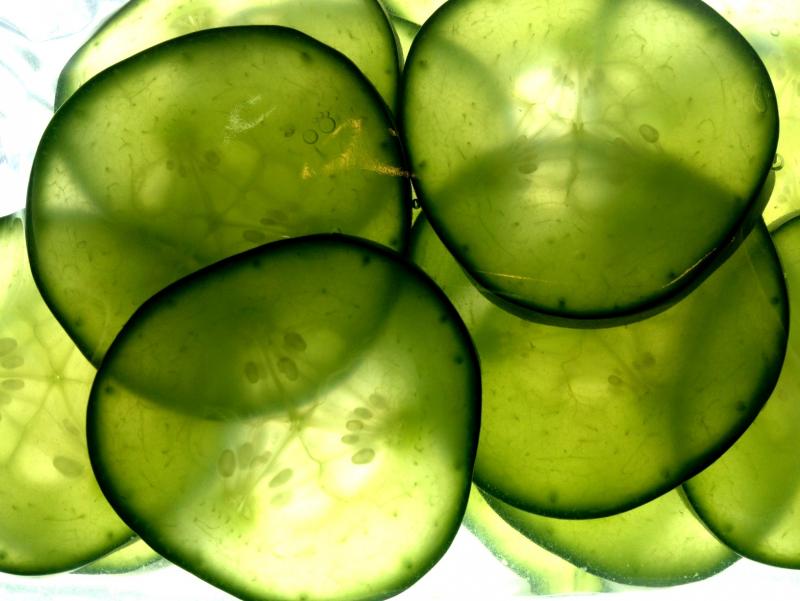
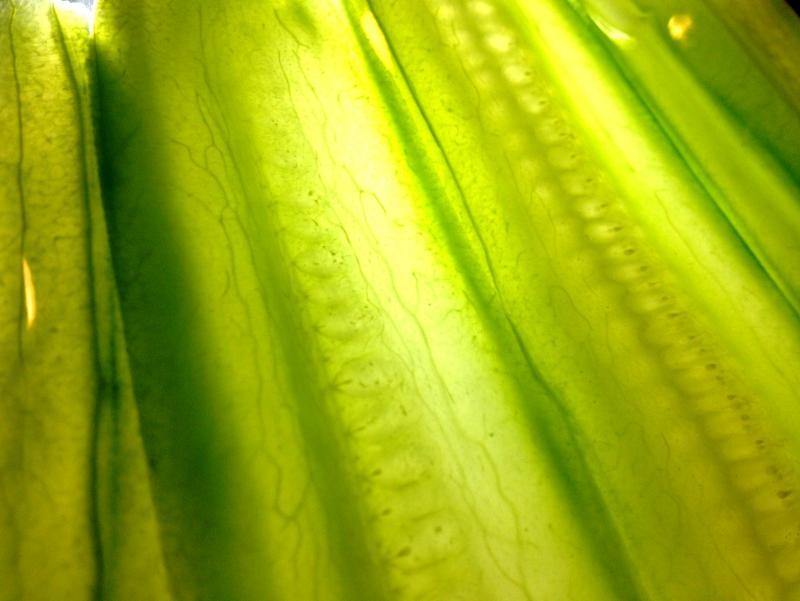
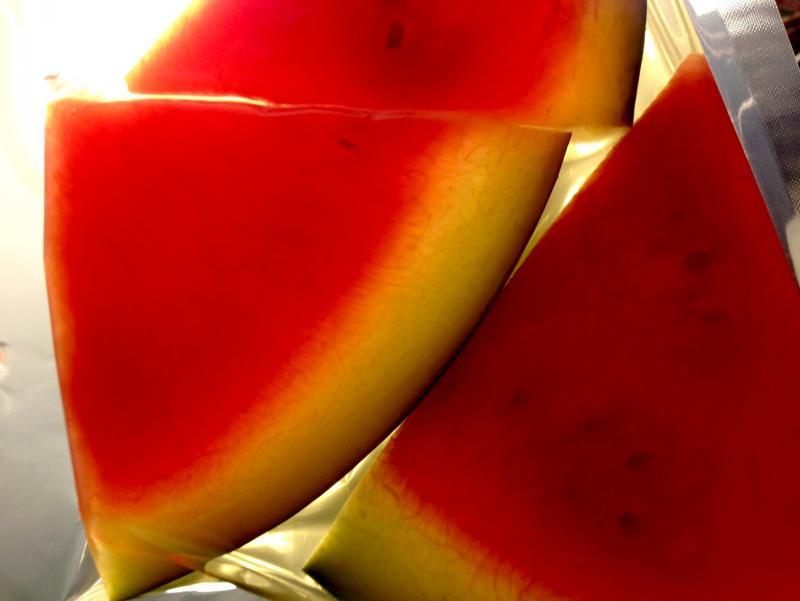
I've tried it with lots of stuff. If you haven't injected booze into watermelon yet, you should do it. Compressed melon is beautiful, and the fact that you can make it alcoholic is an even better plus. I've used it to quick pickle onions and summer squash, infuse olive oil and balsamic into tomatoes for caprese salad, and infuse gin into cucumber for an edible martini. For pickles, any standard brine recipe will work but you won't need nearly as much brine as if you were doing a traditional pickle. One of the coolest things is how the appearance changes as the air gets sucked out; cucumbers and onions turn transparent and you can see all their inner bits. Melon becomes darker and more vivid in color; watermelon looks like raw tuna and honeydew takes on a vivid bright green color (even greener if you add Midori). Cucumber pickles: Edible cucumber martini planks: Tequilla infused watermelon:

-
Fish/chicken/lamb tagine with preserved lemons.
-
Cellulose and polyethylene are fine at those temps. Cellulose is what makes up the bulk of cell walls in plants, so you're eating it whenever you eat veg. The inner layer of SV bags is made of polyethylene, so you'll be fine there. But I don't think this method will help preserve your bark. Finishing SV is a bad move if you're trying to preserve a dry, crusty exterior. No matter what, it's going to be a moist cooking environment inside the bag. You'll just have your meat in there with some soggy sponges. I cold smoke before SV and then finish by doing a hotter smoke to refresh the flavor and develop more bark.
-
The average preference for salt content in a finished dish is roughly 1% by weight. If you leave a piece of meat in a 6% brine for longer than initially suggested, it'll become overly salty and you will have wasted your meat. A better approach is to use equilibrium brining, where you measure the weight of the meat and the water you'll use for the brine and then add 1% by weight in salt of the total. This takes a bit longer to brine than a traditional (stronger) brine, but you never run the risk of over-salting and you can leave (basically) for as long as you'd like.
-
Cooking sous vide in a bath that's set to a temperature higher than the target core temperature of the finished product is called "Delta-T" cooking. As others have mentioned, using this method produces a temperature gradient in the finished product, with the outer sections of the meat cooked to a higher temperature than the core. Sometimes this is desirable; a lot of people prefer to cook fish this way. But it's a more demanding method in terms of time management; there's no room for error. If you don't pull the product at the right time, the whole thing will be overcooked.
-
The problem isn't that the vegetables were organic, but that they were either bad varieties with irregular shapes or they were improperly harvested/stored. I've purchased plenty of organic carrots and potatoes that don't have any of these issues.
-
Flash pickling is a technique that's best done relatively close to when you'll be eating the pickle. The reason for this is that the process removes the air from the cucumber's cells and replaces it with brine. At the end, the cucumber ends up holding much more liquid at the end of the process than at the beginning, so it'll get soggy relatively quickly. So it's not the best technique for pickling a bunch of cucumbers and giving them to friends to eat later. But regardless, when you do this any standard brine recipe that you find online will work well. Unlike normal pickling, it doesn't take much brine to get the job done. When I'm feeling really lazy, I'll take a bit of brine out of some Claussen pickles and use that. Just put some in the bag with your veg and then pull a vacuum for the longest time you can. Your brine will boil quite vigorously, so don't overfill the bag (or it might leak out the front). It's as simple as that!
-
Eric, Thanks so much for your detailed reply. Developing dual griddle surfaces with that precise and even temperature control is quite an achievement. It would make for an amazing griddle / flat top as well, though that's obviously a much different product category than you're shooting for here. I'm still curious about how searing works though. Searing temps are many times hotter than you'd use for low temp protein cooking. Is the strategy to cook your meat through on a low temp, remove it while the Palate heats up to searing temps, and then finish it off at the end? If you left the meat in, it seems like it would overcook while the griddles come up to searing temperatures. Maybe your algorithm compensates by undercooking the meat in the low-temp cook-step? I'm also curious why it's supposedly so much better at searing than a screaming hot pan or cast iron skillet. I can easily reach 650F+ with pans, so I've never had a problem developing crust quickly.
-
I sadly don't have that problem, but I am __ loving __ the way you've been plating these tomatoes recently.
-
My first thoughts were: It's expensive. Requires an iPad. Can't make more than a couple portions at once. Cannot cook larger cuts or those with an irregular shape (including eggs). Cannot cook for extended times to transform the texture of tough cuts. Potentially difficult to clean. I don't see any advantage of this method over SV, apart from the ability to sear where you cook. But that's not a big advantage since I finish SV meat in a bunch of different ways (grilling, smoking, searing, torching...).
-
It's also good mixed into grits or piled atop a slice of fried polenta.
-
Pre-grated cheese is never as good as grating your own, as pre-grated cheese tends to break down too much when you mix everything together. It's also usually dusted in starch or cellulose to keep it from clumping together in the bag. I shred sharp cheddar with the Cuisinart, then mix with mayo (Hellmann's, Dukes [if I'm back home], or homemade [if I'm feeling fancy]), pimentos, lemon juice, cayenne, S&P, and a dash of Lea & Perrins. The traditional way we eat it is on commercial white bread, plain or toasted. But it's really nice on a grilled crostini or a burger. It also makes a killer grilled cheese if you don't use too much mayo. My favorite store bought brand is Stan's, but it's hard to find outside of the NC Piedmont. I also like Palmetto's jalapeno flavor, but they grate their cheese too finely and their mix isn't as creamy as I like it. At the end of the day, it's almost always cheaper and better to just make your own. It's not difficult.
-
That's not what MC says. Their method seems like a lot of work though.
-
Cooks Illustrated is a good way to learn, but given its nature as a periodical it's not going to really teach you the fundamentals. As far as comprehensive guides go, I think Jacques Pepin's Complete Techniques is the single best resource for someone starting out learning to cook. It covers everything you might need to know and is jam packed with photos that show you (and don't just tell you) how to prep and cook food. As far as other gadgets go, I'd suggest a pressure cooker. I know they can seem scary and/or weird at first, but once you've used one for a while you'd never want to be without one. Pressure cookers are great because they speed up the time in which food cooks and preserve the nutrient content of foods. If you want quick and healthy, there you go! And if you do it right, the results are delicious. They're well suited toward cooking large batches of stock, stew, soup, chili, and beans as well as tenderizing tough cuts of meat like ribs or roasts in a short amount of time. Lorna Sass has a couple of great cookbooks on pressure cooking which are great companions to anyone picking up a pressure cooker for the first time. I also think an immersion circulator and vacuum sealer would be a good investment, especially since circulators are so cheap these days. The precision that comes with sous vide cooking makes it easy for a novice cook to consistently produce good results. The convenience factor is also very high. Say that chicken goes on sale. You can buy up a bunch of packages of chicken, portion them into individual servings, season with various herbs/spices, vacuum seal, and cook up the whole batch. Then ice them down, refrigerate, and freeze what you're not going to eat over the next week or so. It's awesome to look in your fridge/freeze and see packages of garlic-basil chicken, southwestern chicken, asian chicken, and bbq chicken just waiting to be reheated. It's convenient and super tasty. And since you can freeze what you don't use, there's very little waste. A vacuum sealer is also nice for sealing up portions of your pressure cooked stews and chili, or individual portions of chuck roast or pork shoulder.
-
Count me in the Thermomix skeptic camp. For the price of a Thermomix, you could get a Vitamix or a Waring Xtreme blender, an ANOVA circulator, a pressure cooker, a Kitchenaid stand mixer, a food processor, a chef's knife, a dutch oven, rice cooker, scale, and still have money to spare. It can't possibly be worth it. One of the big reasons that you find Thermomixes in a lot of European restaurant kitchens is that Vitamix blenders aren't available or they cost 2-3 times what they do in the US. From a blending standpoint, they don't have the power of the Vitamix or the Waring. Seems to be a "jack of all trades, master of none" sort of deal. I do see the appeal if kitchen space is limited, but if you're not living on a boat or in a 375 square foot apartment from Ikea, I'd put my money elsewhere. This does seem like the appropriate response. The OP wants home cooked meals without the necessity of cooking or having basic knowledge and skills. There's no gadget on Earth that can deliver on this promise. In his words, he's "not in the 'learn over time school' for the basic skills. ... Hence, the shortcuts to easy but good foods." The thing is, he's already discovered the shortcut to easy but good foods: eating out or ordering in. Most cities have shops that sell pre-prepped and packaged meals that you can take home and heat up in the oven. Might be something worth looking into.
-
 I've found that the time/temp guidelines for short ribs yield roughly similar textures on cheek. Higher temps (e.g. 85C for 16-24 hours) will shred like a traditional braised short rib. The same is true if you go down 15 degrees to 70C for 48 hours. If you drop the time at that 70C to 12-16 hours, it's a bit more like a steak and isn't falling apart like a braise. But when I cook them, I almost always go for 72 hours at 54C. This slices like a steak and is velvety delicious. If you want it a bit more toothsome, you can do it for 48 hours. I love to put slices of it on top of a bowl of Pho. I'll add that the last batch I did was cooked at 62C for 72hr and they came out awesome. I cooked them along with some pork cheeks (for ramen) using the recipe at ChefSteps. Incidentally, 72hr @ 62C is the MC@H preferred time for short ribs. Whenever I cook for 72 hours, I always try to make a big batch and then freeze it so I have lots of the goodness on hand. It's a nice easy way to stock your freezer. So overall, it's pretty similar to the textures of short rib. It can be a bit more fibrous though (sort of like flank steak) because the muscle grains are longer than they are on short ribs. Size wise, the one's i've gotten are roughly the size of my hand but a little bit thicker.
 -
Current Early Bird pricing is $139. Looks like the "normal" price is $149. But they won't deliver until March of next year. I'm not nuts about the front-mount with the power cord running toward you... the one with a clip on the back (i.e. the way everyone else does it) seems like a much better design. Is the benefit supposed to be that you can clip it on a pot that you already own? Like you couldn't already do that with other circulators? And does anyone really need wi-fi or bluetooth connectivity? I don't understand how this could ever be useful unless you had robots who could add/remove bags from the bath for you. I guess it's primarily for interfacing with their app?
-
That's really strange. I've done low-temp short ribs four or five times, mostly using pastured beef or bison (which have a comparably low fat content when compared to grain fed choice beef) and they've been plenty juicy. 72hr @ 130F with a bit of clarified butter in the bag. I'm sorry you haven't gotten good results. Maybe try some cheek! It's very beefy and comes out with a super silky steak-like texture that I much prefer to braised versions. And unlike short ribs, it's still pretty cheap -- when you can find it.
-
Are you salting the meat before you bag it? If so, don't. I also don't think that prolonged cook times are necessary or useful for tender cuts like ribeyes. The temperature at which you're cooking isn't hot enough to render fat so you're not getting any real benefit. As for cuts that lend themselves well to the "silk purse" effect, apart from short ribs, cheeks are quite nice. If you're not scared, tongue also takes long cooks quite well. Same for pork belly and cheek.
-
Pork butts will pull nicely after 48 to 56 hours at 60C/140F and not be mushy. Collagen converts to gelatin roughly twice as fast for every 10C increase in SV cooking temps, so using this as a general guideline your 33hr @ 155F pulled pork will be roughly the same to one cooked for 60 hours at 60C.
-
That's a strange sentiment given that 72 hour short ribs are one of the hallmark achievements of low temp cooking. My 3 day cooks of short ribs and beef/pork cheeks have been delicious. Likewise with my 48 and 56 hour pork belly/shoulder cooks.
-
You're trying to sear the sides of the steak as well, so you need to use a fair bit of oil.