

Jim D.
-
Posts
2,415 -
Joined
-
Last visited
Content Type
Profiles
Forums
Store
Help Articles
Everything posted by Jim D.
-
I really like the cocoa pod mold but find it too small to fit with my other molds. In looking around, I found one like it but a little wider/deeper and making a piece 10g in size (rather than 8). It's a Cacao-Barry mold and I got it from Chocolat-Chocolat.
-
@Kerry Beal (or anyone): Can you tell me who makes this mold?
-
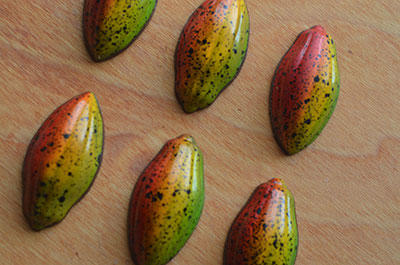
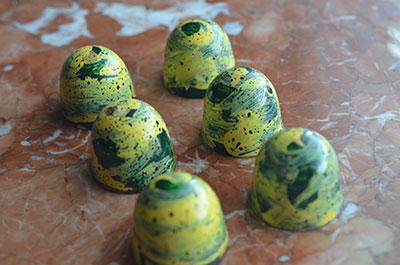
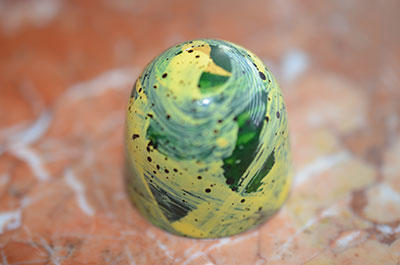
A few more photos of what I have produced for the Dubovik course. As is obvious, these classes have been emphasizing gradient techniques, in each case using a cocoa pod mold. Photo #1: Filling is a Dubovik take on almond gianduja. He calls for roasting almonds with skins on and a cut-up vanilla bean, then pouring a caramel over everything, and grinding it all (including the bean) until it becomes a paste--very aromatic and delicious. #Photo 2: If you use your imagination a bit, the same mold becomes a strawberry. I filled it with strawberry pâte de fruit (this is not one of Dubovik's fillings). Photo #3: Again, with the same mold, it's a sort of yellow and green bean. I did not use Dubovik's recommended fillings in every case because he repeats them, and since I am giving my "homework" to friends and customers to evaluate, I didn't want to bore them with repeats (I have labored hard to make the point that fillings are really more important than the appearance of a bonbon--and yes, I do realize that I am enrolled in a course that puts a total emphasis on the latter). The filling in this one is a Wybauw recipe for dark chocolate ganache flavored with orange and spiced honey.
-
I don't know if this arrangement would suit you, but to the following question: Dubovik replied: He doesn't say whether a student could submit some of the homework (but not necessarily when scheduled) and get feedback on that, but I would think that would be OK--you just couldn't take longer than 14 weeks. All the course materials are available to students for the 10 weeks of the classes plus one additional month; everything except the videos can be downloaded during that period (and the step-by-step directions include some photos from the videos). The next course begins July 2.
-
My granite is Verde Borgogna. I think it is not one of the porous types but am not sure about that. Good to hear that granite comes in various thicknesses. I have written to a natural stone seller and fabricator outside Charlottesville to see what they might have lying around.
-
Thanks for all the ideas. In doing more looking, I have come across something called "ultra-thin stone," which is slabs of marble or granite 1 cm (about 3/8") thick. That sounds promising as it would not weigh what a normal piece of those stones would. I don't table my chocolate, so that is not an issue. I want to be able to scrape molds without worrying about where the excess chocolate is going. But I'm still exploring this idea since I don't know how quick I would be at cleaning off the slab between filling molds--and speed is required because of the crystallizing of the chocolate. With parchment, I can just get out another sheet. Stainless may be the way to go since it can be cleaned better for what the food inspector looks for. It would have to be food-grade stainless--if there is such a thing.
-
Thanks for that idea. What are the approximate dimensions of your stone?
-
I have granite countertops on which I make chocolates. Because there are stories about granite absorbing oil, I don't work directly on the stone but spread moisture-resistant butcher paper over it, then parchment for the actual chocolate work. I am thinking of finding something that would be more like working on granite/marble and have thought of getting a large sheet of stainless steel for this purpose. A slab of granite or marble would probably be too heavy to be practical (unless granite comes in thinner sizes--something I don't know). I would welcome any thoughts on this. I know SS is widely used in restaurant kitchens. Would it be an appropriate choice for chocolate?
-
You are right. It's just that the negative reviews (19%) were really negative--especially the one where the buyer had to pay shipping to return the defective unit and also to get a new one. I should not pay so much attention to the bad reviews. If you purchase the item, I would love to read your review of it. Currently I sometimes use a bread proofer for melting chocolate and cocoa butter, and although it maintains temperature reasonably well, it is not totally dependable--sometimes it will melt a big bowl of chocolate overnight but other times it won't.
-
I would be interested in the NutriChef PKFD58 dehydrator because of its temperature range, but am troubled by the really negative reviews on Amazon.
-
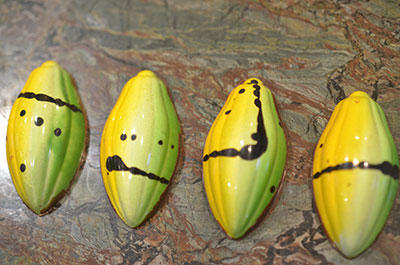
Glad to know that you used a brush. Mine came out with much more gold than black showing--the sponge just delivers more cocoa butter to the mold.
-
Both the gold on black and the cocoa pod are beautiful and as close to Dubovik's as it is possible to get. Congratulations!
-
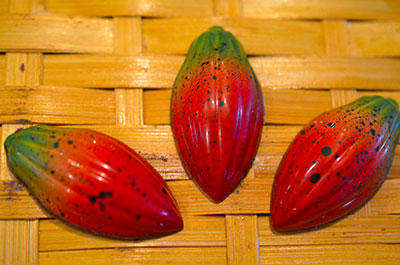
I love the look of the gradient. I've been trying to think of other molds where it would work, but haven't come up with anything yet. The cocoa pod is a difficult mold--it produces a chocolate that is too long (about 2") to fit in ordinary trays or even in candy cups and, because of the necessary elongated shape, makes a bonbon that is rather small in weight (the Chocolate World mold is 8g; Cacao Barry has one that is sightly fatter and makes 10g). I have tried strawberry and rhubarb many times and have never been satisfied that the rhubarb actually contributes anything. Even a relatively small amount of strawberry overpowers the rhubarb. With the water content of both, the Aw is also a problem. How did you make your filling?
-
Ah, the yellow spots. They took longer than the rest of the colors put together. Dubovik recommends the low-tech method of a toothbrush against a plastic scraper. Try though I might--and I used every type of scraper I own--I could not make a decent splatter. So I went to my mini-spray gun. It worked, but there were too many tiny splatters. So I finally succeeded with rapidly moving a firm-bristled toothbrush against my gloved finger. It makes a terrible mess, and I don't know why it works and the scraper did not (for me), but that's what I used. Alas, the Grex does not do splatter. There is a discussion of this in an eG airbrush thread. Adjusting the air flow on the Grex produces either a fine spray of cocoa butter or nothing at all--no in between. The Grex tech support people said it splatters paint but not cocoa butter, and they recommended the method of spraying the cocoa butter onto a spatula or wooden stick and letting it ricochet onto the mold. That worked for me, but the results were erratic. @gfron1 reported that Dubovik's method worked fine for him, and @Kerry Beal said that her Fuji sprayer did a good job.
-
Leave it to you to find this small cutter. I thought I had scoured the entire internet looking--but somehow missed this. Thank you very much. It would allow me to use a less huge mold when including cookies. Or I could use the mold I use now and not have to worry about the cookies spreading out a bit.
-
Now that I have completed the course assignments for the first two weeks, here are a few photos: Photo #1: An impossibly angled mold holding passion fruit caramel with fresh tarragon. Photos #2 and 3: A much more sensible half-sphere decorated in one of Dubovik's signature looks (this one called "Outer Space"), filled with prune, cinnamon, and red wine ganache. Photos #4 and 5: A dome swirled with multiple colors (not all of which, alas, show up in my rendition) filled with caramel flavored with lime and vanilla (substituted for the tonka bean called for). Photos #6 and 7: A half-sphere painted with two translucent colors and backed with white, a very useful technique. The filling is a ganache flavored with Oolong "milk" tea leaves (unfortunately too subtle for my tasters to detect).


-
I really like that mold--had not seen it before. 18mm x 18mm is small, but a cookie could be baked that small, as long as it did not spread at all (squares are unforgiving). The height should also work.
-
Anita, that is an intriguing idea. The mold you pointed out makes a 0.6" square, whereas my current biscuit cutter (it is the smallest I could locate) produces a 0.75" circle, and a cookie made from the mold would not have the spreading issue. But, as you wrote, getting the rolled-out dough into the mold and keeping it thin is an issue. I wish I had a square chocolate mold that would work, but the whole filling (layer of caramel + enough gianduja to cover the caramel thoroughly + the cookie + more gianduja) requires a deep cavity. For reasons that escape me, there is no chocolate mold (that I have seen) that makes a large square or even a rectangle.
-
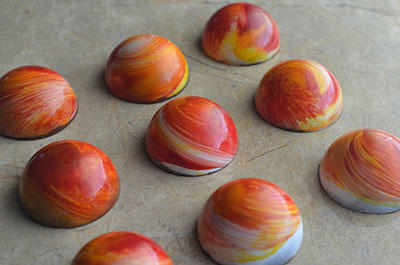
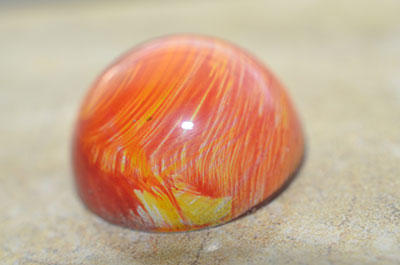
@Kerry Beal, your red and yellow "fireworks" are very close to Dubovik's (with lots of white showing). I wasn't crazy about the design. Mine turned out with less white showing, and I am warming up to the look. I really like the technique. Who knows how he will react to my "deviation"--I will submit this and another assignment this weekend.
-
I've found cheesecloth works fine for straining, and it's not expensive.
-
Yes, Dubovik emphasizes proper lighting and attention to the photography. He recommends using sunlight. He has a detailed section in the online course on photographing chocolates. I know all this from some experience since he commented on my first submitted photo for not showing how shiny the bonbon was. I had taken the photo from the side, not from above, and because it was a gloomy, dark day, had taken it with indoor lighting. Otherwise there is nothing unusual he does to get the shine--just perfect technique!
-
Thanks for that recipe. Do you think this makes a more tender cookie (because of the cornstarch and confectioner's sugar)? I'm not sure exactly what you mean by "cake (AP) flour." As you probably know, in the U.S. "cake flour" is very finely milled, low-protein flour, different from all-purpose flour. U.S. cake flour would probably add to the tenderness of the cookie.
-
I find that if the humidity is above 50%, chocolate tempering does not go well. Outcomes I have experienced: The chocolate thickens more quickly than usual and thus becomes more difficult to work with. It can take longer to crystallize (while it's sitting on the counter, waiting to go in the fridge). And it can crystallize in undesirable ways: uneven color, blotches, matte rather than shiny look. Often it turns out OK to use, but it never (in my experience) has that snap and shine we look for. All of this is why I usually stop making chocolates for sale during the summer. This summer is different in that (1) I am taking the Dubovic course and for the next 9 weeks need to make chocolates with shine (that's his specialty)--fortunately he can't judge whether there is snap or not . (2) I had a reception last Sunday (270 chocolates) and a wedding in August (800 pieces) and so have to move bravely forward. I dread my air conditioning bill for these months.
-
That's a very interesting recipe. Do you recall how pronounced the apple flavor was? Apple is a subtle flavor to deal with, and I would think that would be especially true when mixed with dark and milk chocolate. Of course the added Sosa flavoring probably helps.
-
Thanks for those ideas. I'll try the freezing method, then recut. In my first attempt at this, when I saw the spread cookies would no longer fit, in a panic (the hazelnut mixture was crystallizing fast) I recut, but (of course) many of them broke. I don't think Andrey uses cookies, at least in the course. People love the cookie--that got the most comments out of 9 fillings at a reception a few days ago.


