

Jim D.
-
Posts
2,415 -
Joined
-
Last visited
Content Type
Profiles
Forums
Store
Help Articles
Everything posted by Jim D.
-
The technique may be easy (I am not totally convinced of that), but if you look at the number of colors involved, that involves a lot of preparation and a lot of juggling to keep multiple cocoa butters in temper at once.
-

EZtemper - The Help You Need to Achieve Perfectly Tempered Chocolate FAST!
Jim D. replied to a topic in Pastry & Baking
There are various schools of thought on cleaning molds. Jin Caldwell in Las Vegas doesn't clean hers at all. As you say, Melissa Coppel uses alcohol. Andrey Dubovik washes them in hot soapy water (that's what I do). Andrey says they don't even need polishing unless you see water droplets or water residue. And one could not quarrel with the shine he gets! So I don't think the shine has anything to do with the cleaning method. I still polish mine, but now I suspect it's mostly superstition--to keep away the chocolate gremlins. And I do temper my cocoa butter as if it were chocolate. -
I love those Sosa raspberry crunches, but quite a price on those. The hidden costs of this course (hidden until you sign up and get to see all the lessons) are considerable, especially if one buys all the molds, ingredients, and equipment called for. It should all be stated clearly, I think, though I suspect it would scare off potential students.
-
I'll let Rob respond about the circular marks. What Dubovik used was indeed a pastry tip. I can attest that the technique requires a very steady hand. The red seals were made with a wax stamp. Again, a very difficult decoration to get just right. As I posted with my photos, I could not get the stamp cold enough to make more than one seal at a time. I have received lots of positive feedback about the look, but for obvious reasons it's not a decoration I will be able to use much in future batches.
-
I didn't know where else to post this question. I have made almond gianduja many times and have always ground the nuts in the food processor with success--they liquefy in a fairly short time. But this last time they did not. After so long that I worried about my Cuisinart, I added some unflavored oil; it took quite a lot of it, but the almonds finally liquefied (more or less). Unfortunately some of their flavor is gone, and I want a paste tasting strongly of almond. I have some good French almond flavoring, but of course that is mixing water with the fat of gianduja. So I began looking online for almond oil. There is lots of it available, but it's meant for salads and not for flavoring. The only one I found that looks promising is a "toasted almond oil" from France. So often nut products are rancid, especially when they are "gourmet" products that probably sit around for a while. The most frequently referenced almond flavoring made from oil is Lorann, but a little research revealed some dramatically negative reviews for its artificial taste (it's not made from almonds). Does anyone have any knowledge of a good almond oil? Can I get away with a small amount of water-based flavoring in a gianduja?
-
To second the previous comments: Almonds are often added to pistachio paste (the difference in price is notable). There is a thread on pistachio paste where the subject of finding it (unadulterated) is discussed. The Sicilian pistachio paste is considered among the best, but as you can see in that thread, I have found it increasingly difficult to locate in the U.S.--places like L'Epicérie have (last time I checked) stopped carrying it, and when you do find it, it is astronomical in price. I have, however, found Fiddyment Farms in California and really like their paste (and it's reasonably priced). The "good stuff" has no added almonds and no added color (which is often the case because pistachio paste is not the color people expect). I use pistachio gianduja quite often and did a lot of experiments with choosing the best chocolate to mix with the paste; I can go into more detail if you want (it might be in that thread to which I referred above). I too was confused by Wybauw's terms, until I deduced that he was using those terms you mention in the European sense (where hazelnut is the default nut!).
-
Beautiful work. Do you share your technique, or is it a trade secret?
-
I was inspired to look it up, and here is an explanation. I checked my order, and I got the "classic culinary" grade, as opposed to the "premium culinary" grade. So I paid $9.95 as opposed to $29.95 for the good stuff. I should have known "classic" is now a derogatory term.
-
Yes, after all the colors of the past couple of months, something simpler comes across as elegant. That's why when I use my triangle mold that is so popular (for reasons that mostly escape me), I often leave it completely plain. For the eGullet chocolate workshop last year, I brushed the sides of it with gold dust in vodka--never realizing that the gold comes off on the eater's hand. Good idea about the dry ice. Kerry used some sort of medical spray that quick-freezes things.
-
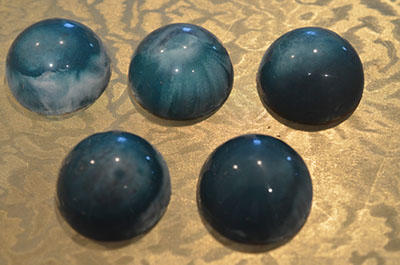
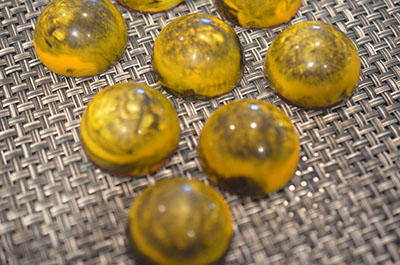
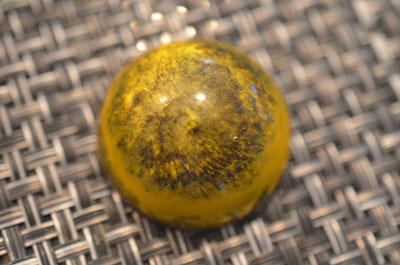
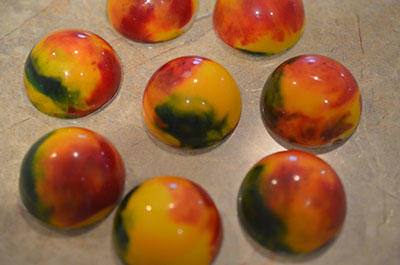
Now my last four efforts at Andrey's designs. Photo #1: The "eye" design in turquoise and white. Most of them aren't what he has in mind, but after experimenting on literally several hundred cavities and trying every permutation I could think of in room temp, strength of air stream, consistency of cocoa butters (how much coloring I added and how overtempered they were--that was the goal in this case, not a defect), I decided I had done enough, at least for now. These are filled with peanut butter mousse. Photo #2 and #3: The yellow and black version. I think these are a bit closer to what Andrey does. They are filled with lime ganache. Photo #4: And the multicolored ones, made by spraying yellow, red, and green cocoa butter. Mine are OK, but again, not a replica of what Andrey created. I filled them with a yuzu and ginger ganache. As I have said before, after trying the fillings he offers, in order to avoid duplication, I used what I had in my freezer. A further reflection on the "eye" design, which is a key component of the course: I think another person taking the class offered the best conclusion: one would have to be with Andrey in his studio to see exactly what consistency he has in mind for the cocoa butter; it's not possible to tell fully from the videos. And at least I had difficulty replicating the process for all the eye designs. In the videos it works for him every time without apparent effort. Photo #5: This is the final lesson and offered for me an opportunity to think about variations on what Andrey does. The red pieces used in two of the decorations are "raspberry crunches" (made by Sosa, and "waterproof" so they remain crunchy--a delicious item that could have lots of uses). The red seals turned out OK and are a clever addition, but the stamps I found didn't stay cold long enough to create more than one seal at a time--making this an impossible decoration for me to use in any quantity. The decoration showing one raspberry crunch and a gold-dust stripe is my own attempt (I like the use of gold dust very much, but it really works only when it goes in a place the eater is unlikely to touch, such as the top of a dipped piece). The filling for these is a raspberry ganache (a recipe from Andrey) and is delicious.

-
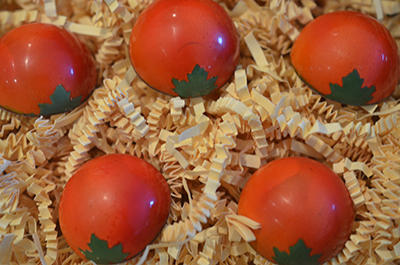
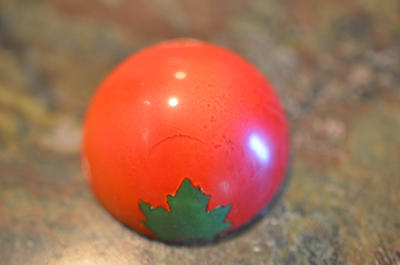
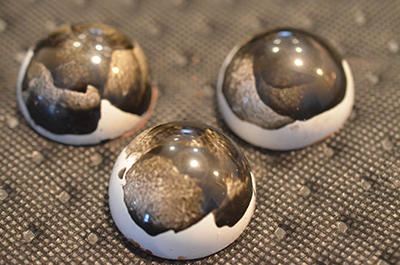
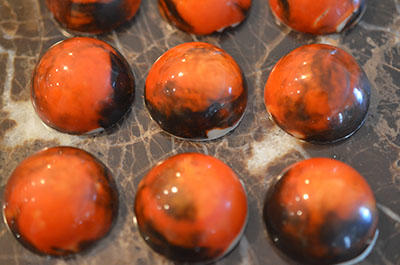
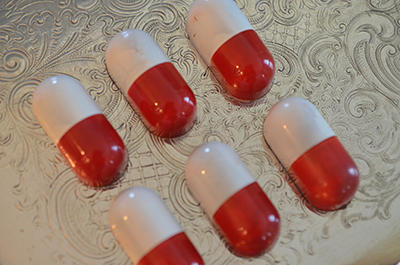
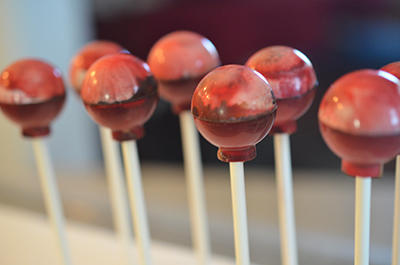
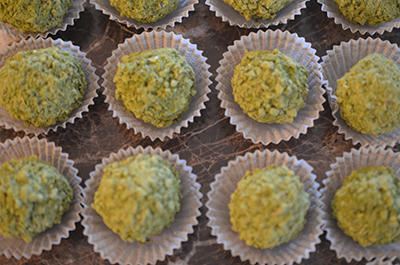
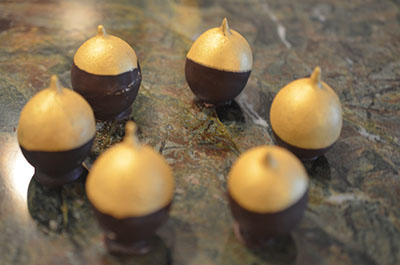
Some more efforts in the Dubovik course, some more successful than others: Photos #1 and #2: The tomato simulation, mine filled with a citrus ganache (couldn't bring myself to try a tomato ganache). When I was making these, I asked myself what fool would ever do this again, but I am now going to repurpose the tomato as a cherry (colored with a dark red and bright red gradient and topped with a longer leaf and filled with cherry pàte de fruit and pistachio gianduja--a flavor combination requested by the bride and groom for their wedding). Photo #3: the "shades of grey" design, this filled with pineapple caramel mousse. Photo #4: the first of the four "eye" designs. These proved a challenge for me, and I still haven't mastered the technique, which is very dependent on consistency and temperature of the cocoa butters, temperature of the room, strength of the air stream, and too many other factors to mention. Even Andrey has varying results, but he makes the process look effortless. Photo #5: The controversial pill design, mine filled with walnut caramel (to make the medicine go down more easily) Photo #6: My version of the gianduja-filled lollipops, technically mini-lollipops because I didn't have the proper size mold. There was also the issue that most of them came out of the two-piece mold in two pieces, there was no way to judge how thin or thick the shells were until it was too late, and no way to tell exactly how much gianduja was being piped in. All in all, not a stellar result...but the cuteness factor of this design is undeniable. Photo #7: The matcha truffles. As I have said elsewhere, this was my first time tasting matcha...and my last. Photo #8: And last, my attempt at the gold-dipped gianduja-filled spheres. What a production this was. It didn't help that when I pierced the spheres with a skewer to suspend them upside down (to create the "tail"), the skewers shattered the spheres. This course is definitely a test of one's ingenuity. Picture me standing over a bowl of chocolate holding a sphere in each hand upside down (pierced with a thin metal skewer, which did not shatter the gianduja) waiting for the tail to set. As gfron1 said, not to be repeated.
-
Don't throw it away. In the tempering process, you would be raising all chocolate to far more than 30C/86F. So just temper it when you can work on chocolate again. Just don't assume they are still in temper. Experts say these temps reduce shelf life, so use them as soon as you can.
-
If you think custom polycarb molds are expensive, wait until you investigate custom trays! I was astounded at the cost. The search experience has given me a whole new level of appreciation for the plastic containers in produce sections. Of course it's not the actual making of the trays but the tooling costs that get you, and the minimums are very high. I found only one company that would make them for my relatively small quantities, and I did a lot of searching and inquiring. I did finally get some made. I am very pleased with them, but they would make only clear ones (no gold, which is what I wanted) unless I paid even more. I use stock trays for three of my sizes and the custom ones for the fourth size. I would like to get one other size, but the cost holds me back. If you want more details, just ask.
-
Commercial kitchen for chocolate production - temperature challenges
Jim D. replied to a topic in Pastry & Baking
I have FLIP insurance, $299 per year. It gets good reviews, but unfortunately it's one of those things in life where you don't know whether it's good or bad until you try to use it.- 18 replies
-
- 2
-

-
- Chocolate
- Confections
- (and 1 more)
-
I think Kerry had the right idea, to find a substitute for the tea specified. I think Earl Grey ground to a powder might be very good. Matcha is certainly not my "cup of tea." The best description I have seen of it is "vegetal" in taste. It does produce a great color, but the taste is really disappointing to me (I'm trying to protect the feelings of the matcha fans out there). As I was preparing an insert to accompany the homework assignments from the course that I will be giving to family and friends, I came to the matcha truffle. I decided to include a few of them in the assortment but to add the note that recipients should feel free to toss them out if they so desired but that if anyone really liked them, there were lots more at home. All I could think of is what a waste of pistachios (the taste of which is lost in the matcha). All in all, it was a curious choice for one of the final lessons of the course (#18 out of 21) as it was very easy to make whereas the others have been increasingly difficult (wait until someone posts photos of the chocolate-covered gianduja spheres crowned with a peak dipped in gold).
-
I found the bare bones of Kerry's recipe. There are other threads dealing with buttercreams as well.
-
I make buttercreams quite a bit--with vanilla, with rum, and as a "crème brûlée" (with even more vanilla and some caramel crunch). I use @Kerry Beal's recipe. It is based on fondant and butter plus white chocolate to make it firm up (and add yet more vanilla). Since it's her recipe, I don't feel I can post it, but she will probably notice this and respond. Contrary to expectations, the fondant is not overwhelmingly, cloyingly sweet in this recipe. I tried Jack Daniels and also a "boutique" bourbon as flavorings once, but surprisingly to me, the booze flavor was lost--it would take so much of it to taste that the buttercream would be practically liquid. Dark rum, however, is delicious. These are quite popular--it's that old-timey thing, I guess. Why don't you want a butter ganache? That would also work with what (I think) is the right texture. It's quite similar to the fondant approach.
-
Told you so. 😋
-
You can increase the proportion of chocolate and get a firmer product, but it will have less hazelnut taste. I don't know if adding chopped nuts works into what you are thinking about, but that would add some flavor without thinning out the mixture.
-
In my adaption of Greweling's recipe, I use: 200g dark chocolate (I know you said you would use milk) 200g hazelnut paste 50g hazelnut praline paste 4.5g cocoa butter silk It gets quite firm, in fact so firm that I posted a question on how to get it softer for bonbon fillings (the answer was to add coconut oil). But when gianduja is handled, it's the nature of the beast to melt. I would think adding more cocoa butter (probably not silk) would make it even firmer.
-
Yes, a huge amount of gold dust--and some truly beautiful packaging.
-
Almonds and cherries are a great combination. I would go with that. If your friends aren't so weird that they dislike nuts, you could also add some chopped toasted almonds.
-
That is exactly the quote I was going to use as a caption of my "pill" picture on Instagram. I think the pill design falls into the classification of a "witty" piece, probably not something one would make by the dozen. A number of the last designs in the class are more in the showpiece category, and it's a bit difficult to labor over them too much when in the back of your mind you are thinking that this is something you will never, never make again. If some pill and lollipop molds show up in the eGullet classified section, you will know where they came from.
-
You might want to check the existing thread on natural colored cocoa butter.
-
I"m sure you are already aware how quickly hazelnuts go rancid. I bought several U.S.-made praline pastes, and all were rancid. Now I buy Cacao Barry from reputable places and (so far) haven't had any issues. If you find good hazelnuts, I am sure your homemade paste will be even better. I wish I had space for a melanger, but I have to draw the line somewhere. The (former) guest bedroom is now completely taken over by chocolate-related equipment.

