

Jim D.
-
Posts
2,415 -
Joined
-
Last visited
Content Type
Profiles
Forums
Store
Help Articles
Everything posted by Jim D.
-
Let me add my praise of Felchlin. I regularly use Maracaibo dark and Maracaibo Criolait milk. Albert Uster has free shipping (if I buy enough) and good customer service. A few minutes ago I picked up some leftover Maracaibo dark I had firming up on parchment in the kitchen and scarfed it down--couldn't resist. I am very surprised that Felchlin is a less expensive brand in Australia because in the U.S. it is about the same as Valrhona, but as @ChocoMom wrote "worth every. single. penny. or franc, or whatever." I think Valrhona Caraibe tastes very much like it, and if the political situation in Venezula ever puts an end to Maracaibo, that will be my substitute. I have tried the various Felchlin whites, but found them too sweet. For white, it's Valrhona's Opalys for me, as difficult as it is to work with. For milk chocolate ganaches, I often use Fortunato No. 4, which is amazing in taste.
-
Yes, the cost is 1400--but that is in Belarusian rubles. It converts (at the moment) to about $725 US.
-
@pastrygirl, I was wondering what that black liquid was. I completely agree with you--if it's cocoa butter, then I think I'll pass. A thin layer of colored cocoa butter sprayed on a bonbon is one thing, but this seems a bit much. Is it possible it's something else?
-
I use a tempering machine, and I have also observed the temperature variations from one part of the bowl to another. And there is the issue of the variable temperature that comes from having the heat turn on and off with a thermostat in the chocolate--very inexact. In actuality I can usually tell if the heat has come on because the chocolate varies sightly in consistency--and the size of the "foot" (when I am dipping) fluctuates accordingly. Like you, I try not to worry (too much) about what I consider spoiled pieces; often, I have discovered, those who receive my chocolates don't appear to notice streaks or other imperfections, and, of course, with the right decoration on a dipped piece, no one notices! I believe @Kerry Beal has a temper meter but don't know whether she uses it regularly or not. I was interested that you switched from dipping to molding. I think of molded chocolates as much more difficult to make and more prone to "user error."
-
I am interested in what you write about maintaining chocolate's temper. The theory under which we all operate is that properly tempered chocolate has a predominance of Type V crystals. I think most of us take that on faith since it is impossible to test the chocolate constantly (and still keep working with it); we don't really know how predominant those crystals are or if other types are also present. I have long wondered what keeps the undesirable ones from re-forming as the chocolate cools, but I am not a chemist. And then there is the over-crystallization issue--too many Type V crystals--but then one wonders how many is too many? It seems to me that testing temper by spreading a little chocolate on parchment or marble is somewhat inexact--how long is too long to wait for it to set? or is that actually a streak or not? From what I have read about temper meters, they take quite some time to perform a reading, and it would seem that by the time the meter has the verdict, the chocolate has moved on to another state. With all of these issues, it's a wonder any people continue to work with chocolate!
-
I wasn't going to say anything, but since Kerry has commented: I would be happy with that dipping job. Those feet! Amazingly small for a non-machine job. I think you might need to accept that there are imperfections in chocolate work (particularly without an enrobing machine). And how did you make those green dots? A pastry bag? Very nice work, I would say. Certainly a steady hand at work. IMHO you should be pleased.
-
Now that sounds interesting. The screen in my faucet gets clogged much too quickly; the plumber thinks it is from the cast iron pipes. And it is horrible to clean since the manufacturer designed the faucet to be attractive to look at but impossible to take apart fully. I definitely don't need anything that will slow down the water flow more than it already is. So where would a prefilter be installed? Under the sink? That under-sink area would get rather crowded with all this equipment. I suppose everything could be installed in the basement before the pipe comes up into the kitchen. I did have a plumber discuss replacing just the particular pipe that runs from the initial house inlet to the kitchen (leaving other pipes as they are). That new pipe would still require some sort of filter because of the stuff in the pipe from the street to the house.
-
@paulraphael, thank you very much for all those details. Very helpful.
-
@paulraphael, I am very interested in what you installed under the sink to filter your water. I am in a similar situation: good water in the city, but by the time it gets through my ancient pipes, it has an "off" taste, slightly bitter, an iron taste. Currently I use the filter in my refrigerator, which makes a huge difference in the taste. As a result, for all my chocolate work and anything else requiring pure-tasting water (such as making coffee), I keep a pitcher in the fridge, but it is a nuisance to have to keep it filled and it doesn't help with all my other cooking (filling a pasta pot, for instance). I would love to know more about what you did. I have no mechanical abilities at all, so would have to hire a plumber to make any changes. Therefore it would help to know how complex this work would be. Lots of companies are more than willing to install a filter at the point where the pipe enters the house, but there are still the pipes between the new ones in the street and the ancient ones in my house.
-
I don't know the answer to your question, but must say they are beautiful. What intrigues me is that they seem to have overcome what I see as the major problem with transfer sheets--many colors, especially red, get washed out when they are applied to dark or milk chocolate. I have so many transfers that I can rarely use because I bought them before I realized that fact. And I am not going to coat them all in white (for one thing, it make them bend and the white flakes off--at least when I apply it). So I too would love to know the source of Marie Belle's.
-

Your Daily Sweets: What Are You Making and Baking? (2017 – )
Jim D. replied to a topic in Pastry & Baking
The pie is beautiful. How I wish my last attempt had come out so well. I did a mix of rhubarb and strawberry. I even microwaved the rhubarb first to get rid of some of the moisture, but it was ridiculous. I think I baked it for two hours, and it still was almost impossible to cut, had to be served more like a cobbler. Delicious, but....So what's your secret? Adding 5 cups of flour? ☹️ -
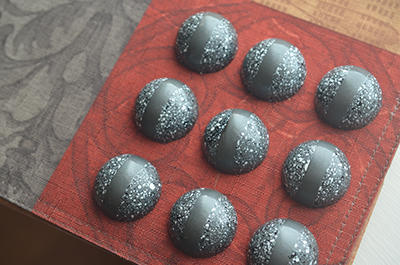
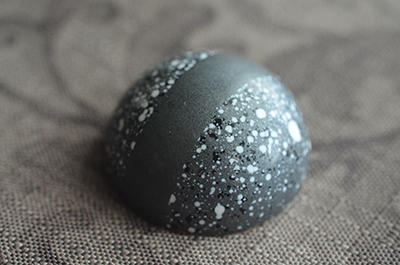
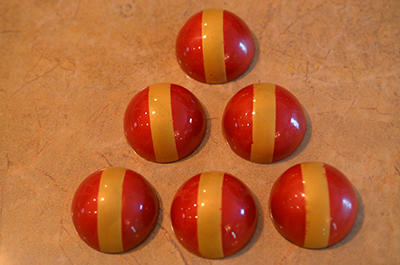
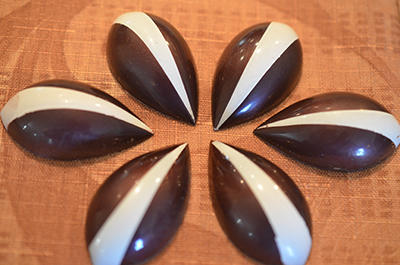
I will join the display for the "tape lessons." Photos #1 and 2: the speckled black, white, and gray design (three of Dubovik's favorite colors). Although the stripe appears to be overlaid on the bonbon, this is a sort of optical illusion--the tape keeps the mold clean while the splattering is being done. I can see this being adapted to other colors easily. Photo #3: While I was working on stripes (a subject the pages of eGullet can demonstrate has fascinated--and frustrated--me for years), I tried another design, one that is less forgiving of any errors. The trick when there are no spots to distract one is to get the stripe completely clean (needless to say, I didn't reach that goal). Photo #4: The triangle design. This is probably not a decoration you would want to adopt for your Christmas rush orders.
-
Sorry about that. I don't know when you got those siphon-feed ones, but I posted a review of my Grex airbrush some time ago. As you undoubtedly know, siphon-feed ones work fine, just require a little more attention.
-
Oh, I did not mean to ignore that airbrushing has improved for me greatly since I switched from a siphon-feed to a gravity-feed model, and, as you suggest, the compressor makes a huge difference. But having the room a few degrees cooler seems to make the procedure more difficult (more reheating with the heat gun)--which makes sense. I also think (something I haven't mentioned specifically before) that sometimes there seem to be little bits of cocoa butter that get stuck in that 0.7mm opening they have to get through. I say that because at times it's as if, after I heat enough, the cocoa butter suddenly becomes unclogged and starts flowing beautifully, a flow that lasts through an entire mold or even a second one. Which all leads me to wonder if there is enough of a market out there among chocolatiers to make worthwhile the development of an airbrush with a 1mm or even larger nozzle. Maybe such a thing already exists (I'm not speaking of spray guns).
-
I agree totally with what @gfron1 said about his attitude when taking a course: if you are going to profit from the experience, do what the instructor says. You can refine or deviate from those instructions later if you want, but you will never know if he has special insights unless you try them. For instance, I still don't think I agree with his rather strict room temp directions (primarily because low temps make airbrushing really difficult), but I'm giving it a try. And when as in this case the results are as stunning as Andrey's are, who am I...? I keep my colored cocoa butter in small Pyrex bowls with plastic lids. I can put the jars in the microwave or over hot water if needed. I got tons of them at a kind of overstock store.
-
Of the three eGullet members taking the Dubovik course, I seem to be the dissenting one on the subject of mixing colored cocoa butter from scratch. Not knowing what the classes were going to require in detail before they started, I got some basic powders from Chef Rubber. For the translucent colors Dubovik specifies, I did indeed mix my own, even though I already have a zillion bottles of mixed Chef Rubber colors, because at that point I was not sure how else to make translucent colors except to make them myself. I made those two plus a couple of others and was not pleased with any of them (no doubt user error, I freely admit). Deciding how translucent to make them is quite difficult, as is knowing how much powder to add for an opaque color. It's really trial and error because different brands (and even different colors) behave differently. I made a nice medium green (Chef Rubber's tends to be quite dark), but although it looked opaque when tested, it wasn't, and it remained quite fluid compared to the CR ones. CR does not list any ingredients other than cocoa butter and coloring (at least one other U.S. brand does include some kind of starch or something similar), but I never achieved that thicker consistency. I have noticed in the videos that when Dubovik spreads a little cocoa butter on granite to test it for temper, even the opaque colors sometimes look considerably closer to translucent than similar CR colors do. So I have now decided that I will just use the CR bottles I have on hand and mix colors as needed. For the aforementioned black currant color, I started with CR teal and added red until it looked black currant-ish. For a dark gray supposed to be made with black luster dust (which I did not know to purchase before the course began), I used CR silver and added some black to darken it, so I got the color and the sparkle as well. I find the mess of mixing cocoa butter not as bad as I anticipated (the straining of it is decidedly a pain), but there is definitely a mess compared with melting the contents of a bottle and pouring it out. I am not sure of the price comparison, but there does not seem to be a huge difference. I now think I could make translucent colors by simply adding plain cocoa butter to a CR bottle but have not had occasion to test that.
-
Yes, Bob, and I found irony (not sure that's the right word in this case) in an explanation of tempering to Kerry Beal ("We need a stable crystalline grid in cocoa butter"). Maybe this could be used in a future ad for the EZtemper.
-
I forgot Orelys! You pointed that out to me some time ago, I ordered a kilo of it, liked it a lot, ordered a 3kg bag but haven't used it yet. I plan to use that combo the next time I make my chocolate chip cookie truffles.
-
If you have a mold with deep enough cavities, you could do a variation on what I have done with these flavors: Put a little caramel in the bottom of each cavity and let it firm up a bit. Then make a pecan gianduja with milk chocolate (you can caramelize the pecans first if you want even more caramel flavor). I haven't tried the following idea, but I plan to do so: Add some molasses powder to the gianduja to provide that brown sugar taste. Pipe a little of the gianduja over the caramel to cover it completely. Then add a thin cookie (I use shortbread) made a bit smaller than the cavity diameter. Pipe in more gianduja to cover the cookie (you can see why these cavities have to be large). This way you get the taste of toasted pecans, brown sugar, caramel--and even the crust (and the cookie stays crisp because it is surrounded by the non-water-based gianduja).
-
Alas, the molds have arrived, and they are white and completely opaque. I smeared a little red cocoa butter in a cavity just to test, and it was completely invisible from the other side. I am very disappointed--these will be a struggle to decorate.
-
I finally had to deal with the molds used so far in the Dubovik course (that is, washing them). Then I came to this one: It does not take much imagination to realize what those sharp corners that had been filled with black cocoa butter were like to clean. Everything had unmolded successfully, but many bonbons left behind little bits. So I'm looking for ideas for getting into those corners without, of course scratching the mold. If I were never going to use it again, I might not be concerned, but (embarrassing to admit, but I hadn't cleaned it at the time) I have ordered more because the shape was extremely popular. A curse on Davide Comaschi for designing this mold!

-
Actually I think yours looks better than the one made by the instructor. The lighter gray makes the stripe show up much more clearly--and, after all, having the stripe is the whole point of this one.
-
I would have thought Cacao Barry would have changed to a clear material long ago. It would be (will be?) very difficult to decorate a mold when you can't see the bottom of the cavities--just have to hope for the best. Dubovik's techniques require frequent inspection of how the project is going (as with spraying gradients). My cacao pod molds arrive in a few days--I'll report.
-
When did you get yours? I just looked online and, according to L'Epicérie, Cacao Barry has recently switched from polycarbonate to clear tritan plastic. I'm hoping that may be the case with what I ordered.
-
That is bad news. I didn't know about that. Makes it really difficult to decorate, I would image (I've never used any of these--I assume it's white).

