

Carolyn Phillips
-
Posts
28 -
Joined
-
Last visited
Content Type
Profiles
Forums
Store
Help Articles
Posts posted by Carolyn Phillips
-
-
Oh, I'm in heaven. Thank you so much!
-
Oh wow, that looks so delicious, and the photos are great! Do you know whether they ever available outside of China?
-
A very late reply to Panaderia Canadiense's question of April 9 w/r/t bamboo leaves...
In Taiwan, my understanding was that they generally used the largest bamboo leaves they could find, which are from the Indocalamus or "giant leaf" bamboo (http://www.lewisbamboo.com/tessinfo.html). After I read your question, I happily went to my two Chinese books on bamboo, thinking that I'd be able to nail the answer with all sorts of details in a second. Strangely enough, the articles were about growing bamboo, as well as making furniture, hats, etc., but not one about cooking with the shoots or wrapping with the leaves! Very frustrating.
There is an interesting article in Chinese on the varieties of bamboo leaves used for wrapping tamales -- including the lumber bamboo (mazhu) which seems to be grown everywhere in Taiwan -- as well as the spotted brown bamboo shoot sheaths that are used to wrap certain kinds of Chinese tamales. (The ones I tried that were enclosed in these beautiful leopard-patterned [yet much thicker] wrappers tended to be pork tamales.) This blog says that the best of these sheaths come from Makino bamboo (guizhu), which IIRC are also used as lumber and so are quite huge. Anyway, here is the article complete with photos: http://npuir.npust.edu.tw:8080/index.php?op=ViewArticle&articleId=705&blogId=2
Hope this helps, and sorry for the lateness of this reply (deadlines, always deadlines). A blanket offer to anyone with a question or comment for me which I don't respond to right away is to drop me an email. That tends to prod me out of my catatonia.
-
Any recipes or pictures you could share? It sounds incredibly good...
-
This is brilliant! What did those honey mushrooms smell and taste like, how did you use them, and where were they grown?
-
Second that emotion w/r/t the great idea for this discussion. And canna leaves! That is so cool! I am going to try that soon.
As my love is Chinese food, I often cook with bamboo leaves and lotus leaves -- which have been mentioned above -- and they are not only pretty, but they impart a wonderful fragrance to whatever they contain. Chinese tamales (zongzi) take on a particularly beautiful shape, as shown here:
-
Passionfruit are around. We receive them at the office in our weekly Fruit Guys delivery in the fall. I've also ordered them from White Dove Passion Fruit Farm in Santa Paula, CA. I've heard that Berkeley Bowl carries them, as well.
My green grocer Felipe says that they are just too expensive to sell here in the Bay Area, and they rot before he unloads them. A trip to Berkeley Bowl confirmed that with some pretty fruits bearing scary prices. Good news: Latino markets often sell the pulp frozen. Mi Mercado in East Palo Alto sometimes has it. I'd call around to places like that to see if they have it in stock.
-
I agree wholeheartedly with everyone who loves Chaozhou (aka Teochew or Chiuchow) cuisine. It has to be one of the best around, especially when seafood is on the menu. A dish that is quite popular in Taiwan is Dry Fried Flounder, and I'm pretty certain that this is from Chaozhou, since it has all of the flavor elements of that region. Does anyone know for sure?
Anyway, I never could find a recipe for a dish that we always order in restaurants, so I had a lot of try & fail experiences in working this one out. Finally, after too many attempts to mention, I'm happy to report complete success! This is my own recipe, so I hope you enjoy it as much as we do...
-
Sounds like a terrific idea! Do you need recipe testers?
-
Ha!
I'm really looking forward to hearing how your experiment turns out, annachan. Are you salting it first, or using any sort of marinade?
-
Made a wonderful Cantonese dessert tonight, just milk that is gelled up with fresh ginger juice. Easy and really delicious!

Ginger milk pudding -- 薑汁撞奶 Jiangzhi zhuang nai
Makes 4 servings
1 large finger of fresh ginger, either young or brown-skinned
Large pinch of sea salt
4 tablespoons agave nectar, plus more for the topping, or sugar to taste
2 cups fresh, organic, full fat milk
1. Grate the ginger. Squeeze the pulp over a fine grater placed on top of a small measuring cup until you have 4 tablespoons of ginger juice. Set out 4 dessert bowls with little more than half a cup capacity. Stir the juice and pour a tablespoon into each bowl.
2. Add a small pinch of salt to each bowl, as well as a tablespoon of the agave nectar, or a teaspoon or more of sugar.
3. Heat the milk in the microwave or on the stove until it almost boils, and then pour half a cup of the hot milk into each of the bowls. Don't stir the milk, as it will mix with the ginger juice and sweeteners as it pours into the bowl. Let the bowls set up, which only takes a minute, and don't stir or disturb them. Serve the puddings either warm or cold with a swirl of agave nectar on top, if desired.
-
Thanks, Shalmanese!
-
Oh man, Prawncrackers. I want to go to your house and eat.
-
I haven't tried this recipe, but it looks like it might be really good: Steamed Garoupa on Fish Maw. It comes from a Cantonese cookbook, "Dried Seafood & Chinese Foodstuff." Let me know if you want me to post the recipe, as well as whether you need the info on how to rehydrate the fish maw (i.e., swim bladder).
Admire your adventurousness and look forward to seeing what you make!
-
I recently re-created a Sichuan style fried chicken wing recipe with a sweet-sour-spicy-garlicky sauce that is pretty close to Heaven. The recipe has two parts that needed mastering: getting the chicken wings crispy and crunchy without a whole lot of greasy batter, and managing to caramelize the sugar in the sauce so that it's lovely and sticky. This was a genuine hit even the first time around, and I recommend it highly. Do note that the sauce is slightly tart, so if you like a sweeter flavor, add as much sugar (or other seasonings for that matter) to suit your tastes.
Dry fried chicken wings -- 乾烹雞翅 Ganpeng jichi
Makes 6 wings
6 whole chicken wings or 12 middle sections only, preferably organic and free range
¼ cup cornstarch
2 cups (or so) frying oil
6 cloves garlic, finely chopped
½ inch fresh ginger, peeled and finely chopped
2 green onions, trimmed and finely chopped
10 dried Thai chilies, or to taste, broken in half and the seeds discarded
¾ cup white rice vinegar
6 tablespoons white sugar, or to taste
1 teaspoon roasted Sichuan peppercorn salt, or to taste
2 teaspoons regular soy sauce
1. Start this recipe at least 6 hours before you want to serve it. Rinse the chicken wings and lightly pat dry. If you are using whole wings, cut off the tips and use them for stock, and then cut the wings between the first and second joints so that you have 12 pieces. Place the wing pieces in a work bowl and sprinkle the cornstarch over them. Toss the bowl until each wing piece is thoroughly coated.
2. Place a cake rack on a large plate or small baking tray, and then arrange the wings on top of the tray so that they do not touch each other. Put the tray in the fridge uncovered so that the cool air slightly dries out the wings. Refrigerate for at least 6 hours and up to one day.
3. Pour the oil in a wok and heat over high until a wooden chopstick inserted in the oil is immediately covered with bubbles. Holding a spatter screen in one hand, use the other to carefully add half of the wing pieces to the hot oil. Cover with the screen to cut down on the possibility of burns and mess. As soon as one side of the wings are golden, turn them over, adjusting the heat as necessary, and remove the wings to a large work bowl as soon as they are nicely browned and cooked through (see Tips). Repeat with the other half of the wings
4. Prepare the sauce either in the wok or a saucepan. Either drain off all but a tablespoon of oil from the wok, or pour a tablespoon of the oil into a small saucepan. Heat the oil over medium high and add the garlic, ginger, onions, and chilies. Toss them in the hot oil to release their fragrance, and then add the rest of the ingredients. Turn the heat to high and quickly boil down the sauce. Just before it turns syrupy and starts to caramelize, taste and adjust the seasoning. Once it is the consistency of maple syrup, remove from the heat. If you are using a wok, dump the wings into the sauce and quickly toss them to coat completely. If you are using a saucepan, pour the sauce onto the wings in the work bowl and toss to coat completely. Arrange the wings on a serving platter and eat while hot.
-
Well, there's this peach cobbler that purports to be La Franklin's recipe: http://www.foodnetwork.com/recipes/emeril-live/aretha-franklins-peach-cobbler-recipe/index.html
Lots of supermarket stuff, like canned peaches and ready-made pie dough, but the reviews are over the top. Happy early birthday to IowaDee and mm84321!
-
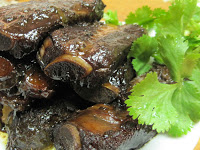
"They even look like there's a smoke ring!" Love that.
Actually, Deus, the ribs are not as deadly as you might think, except that they taste so good you might end up eating the whole batch.
They are first deep fried after a brief dousing in soy sauce, as this gives the sugars in the soy sauce a chance to caramelize. There's no batter to trap the fat, just the sugars creating a seal on the meat, so the frying fat doesn't really adhere to the ribs. (By the way, pork or chicken fried with just a soy sauce coating has to be one of the most heavenly scents in the world.)
The braise then cooks away much of the pork fat and infuses every bit of the meat with flavor. You can refrigerate the ribs and remove the hard fat layer too, which really reduces the calories. The slow braise makes these extremely luscious, and since most of the fat can easily be discarded, it's not as fattening as it sounds on first reading.
Diet tip: serve it with lots of vegetables and have lots of friends over so that you are not tempted to eat them all, which is always my greatest temptation.
-
Smoked paprika... yes!
My favorite ribs recipe actually is a Chinese braise called Wuxi Spareribs. The ribs are given a quick toss in soy sauce and then deep fried. After that they're cooked in a rich sauce and are so good I cannot stop eating them.
Wuxi Spareribs - 無錫排骨 Wuxi paigu
Serves 1 to 4
Spareribs
1 side of pork spareribs (about 2 to 2½ pounds) cut lengthwise in half, if possible (get the best quality pork you can find - it really shows here)
½ cup good quality, regular soy sauce
Peanut oil for frying
Sauce
6 stalks green onion, smashed with the side of a cleaver and cut into 1-inch lengths
4 finger-sized pieces of fresh ginger, smashed with the side of a cleaver
6 tablespoons Shaoxing rice wine
4 star anise
2 cinnamon sticks
3 - 4 cups boiling filtered water (or as needed)
4 pieces rock sugar the size of walnuts, or 5 tablespoons sugar (rock sugar highly recommended here)
1 teaspoon dark soy sauce
Roasted sesame oil, optional
1. Have your butcher cut the ribs in half so that you're left with two long strips of riblets and then cut between the bones and through the cartilage at the base of the bones, or, if you don’t have an accommodating butcher, consider finding another place to buy good pork. Place the riblets in a large bowl with the soy sauce, toss well, and marinate them for 20 to 30 minutes, tossing them now and again while you prepare the rest of the ingredients. The ribs will absorb lots of the soy sauce, which you soon will find is a very good thing.
2. Heat the peanut oil in a wok over medium-high heat until it shimmers. Lift about half of the ribs out of the marinade (reserve this soy sauce for later), shake off any excess, and cautiously add them to the hot oil - it will splatter like crazy when you first put them in the hot oil, so direct the wok away from you and have a spatter screen or cover ready to protect yourself. Deep fry the ribs until they're a dark brown. They can almost be black in some areas along the edges where the soy sauce has caramelized; this is something extremely good, as these areas will turn into chewy, sticky morsels later on. Remove the fried ribs to a plate, heat the oil back up again, and add the rest of the meat.
3. When all the ribs are brown, pour off all but a tablespoon or two of the oil. Reheat the wok, add the onions and ginger, and stir-fry them for about a minute to release their flavors. Pour in the soy sauce used as a marinade, as well as the rice wine, star anise, cinnamon, and boiling water. Bring the sauce to a boil and add the ribs, and top it off with a bit more water if necessary to cover the ribs. Bring the sauce to a boil again and then lower to a gentle simmer. Cook the ribs covered for about 90 minutes until the meatiest areas can be easily pierced with a chopstick, and then add the sugar and dark soy sauce. Remove the cover and continue to braise the ribs until they are meltingly tender. (Don't add any more water during the braising, as you want the sauce to thicken and penetrate the meat.)
4. If the meat on the ribs doesn't threaten to fall off the bones, raise the heat under the wok to high in order to boil down the sauce to a lovely dark syrup; if the meat is unable to withstand any more abuse, remove the ribs to a platter with a slotted spoon and tongs before boiling down the sauce. Taste the sauce and adjust the seasoning if you want, but that probably won't be necessary.
5. Arrange the ribs in a welcoming manner on a serving platter, and be sure to claim any imperfect pieces for yourself. Strain the thick sauce to remove all the seasonings and then pour it over the ribs. You can sprinkle some sesame oil into the sauce to provide a bit more gloss, if you like, but don't add more than just a few drops, as this could overwhelm the flavors. Serve immediately while they're hot, wait a bit and serve them a room temperature, or cool them down and store for later; these freeze very well and can be reheated by steaming.
-
Chinese noodles are certainly interesting enough to warrant their own topic, and so here is a place where we can discuss them in all their wonderful variations. Here is a recipe on alkaline noodles Hong Kong style, as the discussion on using "lye water" in Chinese cooking got me quite interested in seeing what it is about this ingredient that makes noodles special, and also whether I could make them myself. What I've discovered is that they really do add a nice snap to the texture.
-
So much of the problem with these English recipes is the translation. Gad, "lye water" for jianshui is one of the deadliest renderings I've ever seen! No, NEVER USE LYE IN FOOD except under very rare and controlled circumstances, as this can cause severe burns! (FWIW, caustic soda or lye in Chinese has names like shaojian 燒鹼 or yejian 液鹼.)
Even Wikipedia has it wrong (http://en.wikipedia.org/wiki/Lye): recipes for moon cakes, amber Chinese tamales (zongzi), etc., use baking soda in their preparation, not lye. Period.
Jian means "alkaline," and, as some have already pointed out here, this means baking soda. So, jianshui would (as Chinese dictionaries explain) just be baking soda dissolved in water, allowing better distribution in the batter. It's used as a leavening in moon cake wrappers, but from what I can find, this only applies to Cantonese style moon cakes.
And so the initial question is quite interesting; why add it to the wrappers? An old Chinese cookbook called "Zhongguo dianxin xiaochi pu" mentions no leavening for the Beijing and Suzhou style moon cakes, as these rely on using two types of dough (one of flour with more water than fan and the other with more fat than water) to form flaky layers. Only Cantonese moon cakes call for leavening, at least according to this cookbook.
The recipe says to mix the dough out of good quality flour with sugar syrup, lard, and the alkaline water, so I would imagine that the density caused by the syrup would make this leavening quite necessary.
Hope this helps.
-
Completely agree with Prawncrackers about the overnight rest; red-cooked whatever will turn from good to insanely delicious with a night in the fridge.
However, one Shanghainese chef told me that if you keep cooked meat in the sauce for more than a day or two, the texture starts to disintegrate. This was one of those satori moments in my life. He explained that for some reason the muscle turns powdery and loses its moistness. (Eggs, though, seem to just get better after days in the sauce, as long as they are totally immersed with a nice layer of fat on top of the sauce.)
-
I'm in the frying rather than heating camp here. The best version of fried rice ever was at Ding Tai Feng in Taipei: each grain was given a wisp of egg coating (sort of like what Jaymes mentioned) so that every bit of rice had a range of texture and flavor. The barest amount of oil was used, and tiny pink shrimp dotted the landscape. It was a revelation.
-
That's absolutely correct, as far as I know. And it so happens that I just prepared a Beijing version this last week using duck and sweet wheat paste (tianmianjiang) that was great. Pork certainly could be used instead of duck, as the luscious yet gentle sweetness goes with both quite well.
Those of you who read Chinese will wonder why it is called "mifen" (rice powder) instead of "fenzheng" (steaming powder); that's just northern vs. southern terminology. (Mifen in the south usually refers to rice noodles.)
Steamed lotus duck with rice crumbs -- 荷葉米粉鴨 Heye mifen ya
Serves 16 as an appetizer or 8 as one of the entrees
Wrappers:
2 large dried lotus leaves
Rice crumbs:
½ cup regular raw rice (not sweet or glutinous)
2 petals of star anise
1 teaspoon Sichuan peppercorns
(or ½ cup commercial rice crumbs)
Filling:
1 whole duck breast (two halves) with skin on, preferably organic and free range
1 tablespoon minced, peeled ginger
2 tablespoons minced green onions
1 teaspoon freshly-ground black pepper
2 tablespoons Shaoxing rice wine
2 tablespoons light soy sauce
2 tablespoons sweet wheat paste (tianmianjiang)
2 tablespoons roasted sesame oil
1 teaspoon sugar
4 large fresh Chinese black mushrooms
Garnish:
Chinese radish (or Japanese daikon) sprouts, or cilantro sprigs, or green onion shreds
1. Soak the lotus leaves in a large bowl of very hot water while you prepare the rest of the ingredients. When they are soft, rinse them carefully to remove any dust, and then wipe them clean on both sides with a paper towel. Trim off the center stem and then cut each leaf into 8 wedges. Cover the leaves with a damp towel to keep them supple.
2. If you are using commercial rice crumbs, skip this step. Otherwise, place the dry, uncooked rice in a dry, unoiled wok along with the star anise and Sichuan peppercorns. Cook the rice over medium-high heat, tossing constantly, until the grains turn from translucent to white and then very slightly toasted. Cool the rice and then grind it coarsely).
3. Rinse the duck breast and pat it dry. If it is not boneless, remove the bones, but keep the skin on. Slice each side of the breast horizontally (against the grain) into 8 even pieces. Place the duck slices in a medium work bowl.
4. Add the ginger, green onions, black pepper, rice wine, soy sauce, sweet wheat paste, sesame oil, and sugar to the duck. Toss them together. Remove the stems from the cleaned mushrooms and slice each mushroom into ¼ inch wide strips. Add them to the duck and toss again. Pour the rice crumbs over the duck mixture and toss again.
5. Prepare 16 plain toothpicks and a steamer. Lay the 16 lotus leaf wedges out on a clean work surface, the wide side facing you; the smooth green side should be face down and the rougher lighter side on top. Divide the filling among these leaf wedges, placing a mound near the wide end. Fold the bottom third of the sides over the filling and then roll up the leaf all the way to the filling; secure with a plain toothpick.
6. Place the little packets in the steamer and steam over medium-high heat for about half an hour. Remove one and check; the rice crumbs should be soft and completely cooked through. If not, close up the packet and steam the duck for another 10 or 15 minutes. (This dish may be prepare up to this point, cooled, and then stored in a resealable freezer bag in either the refrigerator or freezer. To serve, simply steam them until heated all the way through.)
7. To serve, you may replace the plain toothpicks with fancy ones. Arrange the packets on a serving platter or individual plates, and garnish as desired. Show your guests how to eat them by unrolling one wrap completely onto a small plate and then rolling up the leaf back up and tucking it at the side of the plate out of the way. Pieces of the duck filling can then be plucked up with chopsticks or a fork by the diner.
-
Good point.
 /monthly_04_2012/post-69576-0-23675200-1333951775.gif' class='ipsAttachLink ipsAttachLink_image'>
Chewy Salty Soy Bean Snack - Looking for Recipe 筍豆
in China: Cooking & Baking
Posted
The recipe above is basically a good one. (And yes, just use sliced licorice root, which can be found in most Chinese grocery stores.)
If you like the flavor, a terrific thing to add is dried, salted bamboo shoots, which are called yulanpian 玉蘭片, or "magnolia petals." Soak them until soft, cut off the hard parts and discard, and shred the shoots. Chop them up until they're the same size as the soybeans, and then add them to the braise. They infuse the beans with a lovely fermented flavor. Adjust the salt in the recipe accordingly, of course. Lots of shredded ginger is good, too.
As for oil, I wouldn't add any. These are meant to be eaten with the fingers as snacks, rather than as sides for congee and suchlike.