
ericthered
-
Posts
34 -
Joined
-
Last visited
Recent Profile Visitors
1,251 profile views


-
I live in a rural area where mice are prevalent. Each year, they seek out our warm house as winter approaches. Years of experience have taught me as follows: Exclusion is the first, essential step. If you don't plug the holes where they enter, you can trap for weeks and others will simply replace the dead ones within a short time. Get steel wool, caulk, etc., and plug every little hole where they can enter. If you don't exclude, all else is naught. Keeping things clean inside is also key. Conventional snap traps (e.g., Victor traps) do work very well, with a few key steps. Use several at once--they're cheap. I buy the traps in bulk via Amazon and throw them out when they catch a mouse because where I live the mice spread Hantavirus, the Plague, and other awful stuff. The triggers are too stiff on half or more of the traps in a given batch so mice can often eat the bait without triggering the trap. I use a needlenose pliers to slightly bend the part of the trigger paddle to make the trap more sensitive, then I re-bait it, re-set it, and nearly always get dead mouse shortly thereafter. I also put bait inside and underneath the trigger which forces the mice to dig longer/deeper and is more likely to snap the trap. Use a mix of peanut butter, cheese, shelled sunflower seeds, raisins, etc., on different traps to appeal to different tastes. Jam the bait in the tiny trigger tube and make 'em dig to get it out. On a few traps, I'll wind a bit of butcher's string on the trigger paddle--mice like this string to pad their nests in the fall. Place the trigger portion of the trap along walls where mice walk. Space the traps at leas several inches apart so that when one is triggered it doesn't trigger the next one. I have to be vigilant and re-check to ensure exclusion each fall to keep the mice out and I've been very pleased with the results. I concur with others regarding how awful glue traps are. Ditto for poison which kills raptor birds.
-
<<Does the 10 piece set have lids that are all stainless or are they glass with stainless trim and handle?>> -Mine came with stainless steel lids. They fit well. <<Are there any trouble spots....like between the handle and the rim....that are a pain in the butt to clean?>> --Generally easy to clean. A bit of more work near rivets and where handles meet the body. I have a similar set of Gourmet Standard (no longer in business I'm told) and the Gourmet Standard are harder to clean and are coming loose near the rivets on the 12" fry pan. The newer Tramontina set seems more solid. <<I'm not sure what type of stainless steel is on the tramontina (is it brushed?)>> --I don't know what type of stainless, but the exterior and handles are highly polished and the interiors a bit less so.
-
I have the Tramontina set and like it a lot. The pieces heat and sear/brown evenly. Handles stay cool and are comfortable to hold--even the huge frying pan. Lids fit tight. All clean-up well and easily--if not, a bit of Barkeeper's Friend powder does the trick. I have used All-Clad in the past and think the Tramontina is almost, but not quite as good. The All-Clad pieces heat a bit more evenly and seem to have a bit more hefty construction (e.g., larger rivets holding the handles). The price difference, however, his huge and for the money, the Tramontina strikes me as a very good value. If money is no object, get All-Clad, for the remaining 99 percent, the Tramontina is excellent. My 10-piece set came with a different, and I think more practical mix of sizes, including 10 and 12-inch fry pans, 2 saucepans, a 5-quart dutch oven, and a big stock pot--but no saute pan. I don't see my set listed on Wal-Mart's site anymore. The big fry pan is great, especially if cooking for more than 2 people.
-
I recently bought a Clever Coffee drip cone ( http://www.sweetmarias.com/sweetmarias/coffee-brewers/filtercones/clever-coffee-dripper-large.html). It's like a regular coffee cone, except it has a valve at the bottom that allows me to control how long it steeps before running into my cup(s). I prefer french press, but don't care for cleaning it and taking the screen assembly apart. This cone gets me close to french press with the ease of tossing filters rather than the cleaning associated with a french press. My french press works well too--it has a stainless steel thermos-like build and maintains the temperature much better than the fragile glass ones.
-
I got the 8-inch (just over 20 cm) version from a thai importer (http://importfood.com/mortarpestle.html) and am very happy with it, though it isn't attractive. It is very heavy--so I keep a mat underneath it so that it doesn't scratch the countertop. I use it primarly to grind spices for curries and similar purposes. It grinds them up in a hurry with relatively little effort. A quick rinse seems to do away with residuals. I also have a much smaller white marble one--the small pestle hurts my hand for all but the smallest tasks.
-
Yet another vote for Tramontina's 18/10 stainless tri-ply. I bought their 10-piece set for my second home from Wal-Mart. I don't live near Wal-Mart, so had it shipped to me and both the price and shipping were economical (less than half of most comparable quality products). The quality and finish is first-rate--I like them nearly as well as All-Clad. The saute pans are excellent and yield a strong, even heat on my gas (propane) range. Ditto for the pots. They clean very easily--especially if properly heated, so I haven't put them in my dishwasher yet (though directions say doing so is OK). I haven't used the Dutch oven for making stew yet and instead use my Le Cruset. The pots and pans in the 10-piece set are on the large size and are suitable for cookng for a crowd. The 8-piece sets feature pot/pan sizes that I think are a bit odd for my style of cooking. Handles are comfortable and stay reasonably cool. My only gripe is that I wish the larger saute pan had a second handle because it's heavy and that it lacks a lid (the others have lids).
-
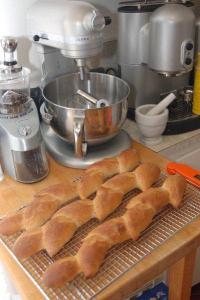
I've "gone primitave" and went back to a big bowl, super-stiff wire dough whisk, and huge wooden spoon for much of my everyday baking. Good for arm muscles and gives a much better feel for the dough. Though KA mixers went through a bad patch of models with plastic gear housings a few years back, it appears that the metal ones are back. Mine (Professional 600 with metal gears) cranks through dense whole grain and similar doughs with no problem, but is rather noisy. I like the newer style "corkscrew" dough hook. The price of KA mixers is much lower than any of the other apparent alternatives, espeically if bought from KitchenAid's web-based outlet--got mine for around $200. I also have KA's original Model "H" mixer. It's now around 80 years old and still capable of kneading smaller batches.
-
Another vote for Cambro containers. Square ones are more space-efficient than the round ones.
-
I never proof. I use SAF Instant and buy it in 1-lb vacuum-packed bags. When I buy it, it usually has an expiration date one or two years out. After I open it, I keep it in a jar in the fridge or freezer and it seems to last well beyond its expiration date (e.g. over a year past) with little or no appreciable loss in rise.
-
I have the same smoker and use is a few times each year to serve larger gatherings (25+ people). It's a very nice unit and if kept out of the wind, it holds a steady temperature for a few hours at a shot. It seems best suited for smoking pork ribs and pork shoulder (some call it Boston butt). I second the recommendation on the www.virtualweberbullet.com web site. In particular, see the videos on how to prepare ribs, the basic recipes, and the instructions on the so-called "Minion method" for firing the unit up. Stock-up on Kingsford charcoal when it goes on sale and get some Hickory chunks to start. Get a good thermometer. I use a Maverick remote electronic thermometer with two probes, but this is overkill unless you use it a lot and like to fiddle with tempermental, battery-powered gear. I've also used it to smoke beef brisket, but good cuts of brisket are hard to find in Northern California. Turkey works well too, though it requires a higher temperature and judicious (more limited) use of smoke. The rust may be a result of the poorly-designed Weber cover and the fact that water landing on the top dome drips into the inside of the unit, mixing with caustic ash from burnt coals. This cover has a seam that lets rainwater drip in from the dome and seems to allow condensation. I wouldn't worry much about the rust, but would suggest keeping it in the garage or under a better cover that doesn't allow dripping and condensation. Keep the vent holes open during storage to prevent condensation. If you're concerned about burning a lot of charcoal, you can also smoke most items for just an hour or so (most cuts take 6+ hours to fully cook when using the correct "low and slow" method). After smoking for an hour, finish in your oven at 225 degrees (f). Since most of the smoking part is done in the first hour, additional smoking is overkill and you merely need to finish in the oven at low temperature to fully cook and break-down collagen and connective tissue to get that "fall off the bone" quality that distinguishes real barbecue.
-
I live at high altitude (6,200 feet/1,889 meters) and am very disappointed in the way that rice, pasta, and especially legumes/beans cook at high altitide in a conventional pot. Undercooked or mushy seem to be the only options. I like my pasta "al dente." I both make fresh pasta and, when lazy, used boxed pasta. Would a pressure cooker remedy this? If "yes," any practical tips on how to handle the timing? I often taste-test rice/risoto and pasta as they cook to check doneness and texture and wonder if this is at all possible when pressure cooking? Or does one simply have to time things right and cool/de-pressurize at the correct time without taste-testing?
-
Hand cranked pasta machine vs Kitchenaid attachment?
ericthered replied to a topic in Kitchen Consumer
I use both frequently, the KA at my house in town, the Atlas at my ski house. Pasta is the same from both (very good). The only differences are (1) noise (the KA is noisier than the hand cranked Atlast) and (2) time (the KA is much faster). -
I'm a fan of classic modern lines. For dinnerware, Heath's Coupe line is at once functional and sensuous. http://www.heathceramics.com/go/heath/tableware/coupe-line/ For flatware, Gense's Focus Deluxe line is wonderful and the feel in hand is flawless. http://www.gense.se/index.php?id=442 Both are rather pricey, so I have built a collection through their factory outlets, ebay, and thrift stores.
-
I've used both my Weber kettle (22") and bullet smoker and both work well. It's easier to manage the temperature with the smoker. I use the standard recipe approach on the virtualweberbullet.com web site, but use no sugar in the brine and use no spice rub. Big birds don't always fit. Birds in the 12-13 lb range seem to work well. When using the kettle, it helps to use the version of the Weber top grate that has the folding sides that allow you to add coals without removing the grate. Spread the coals on either side of the kettle (not underneath bird), with a chimney full of hot coals split on top of 15 or so unlit briquettes on each side. This gets the kettle hot pretty quick and I use the vents to adjust the heat once it reaches 350 degrees F or so and try to keep it there. With the kettle, one needs to adjust the vents frequently. When using the smoker, I use two full chimneys of hot coals to get the smoker up to temp in a hurry. It's often necessary to keep the air vents full open when it's chilly and to adjust a few times during the smoke. Put the turkey on the top rack where it's hotter unless the bird is too big to fit. I use no water in the water pan and simply line it with foil. I don't end up with much drippings and don't bother to make gravy from the very little drippings that result. Whether using kettle or smoker, I only put a few chunks (not chips) of smoke wood on top of the hot coals when the bird first goes on. I've used various types of wood and they all seem to work well. Additional smoke beyond the first 30 minutes or so is overkill and simply results in black skin that tastes beyond burnt. No need to soak the wood. Keep the temperature much higher than when smoking pork or beef brisket--325 degrees or higher. Add coals as needed, but try to keep the lid on to avoid unnecessary temperature swings. Smoking works pretty well in the cold, but it's vitally important to protect the kettle or smoker from wind unless you have a lot of time and coals. A digital probe thermometer is helpful--I use one that has two probes--one for the turkey and one at the grate to monitor smoker temp. Double check with an instant read just prior to pulling from the grill/smoker--165 degrees at the breast, 175 in the thighs--no higher or it will be dry. If I pull the bird at the correct temp and let it rest 30 minutes prior to carving, it is quite juicy (brining is key).
-
Another vote for Barkeeper's Friend cleanser. Also excellent for cleaning stainless pots/pans as well as copper.
