Lloydchoc
-
Posts
35 -
Joined
-
Last visited
Content Type
Profiles
Forums
Store
Help Articles
Everything posted by Lloydchoc
-
That is the cutting base; it is made from a 1" thick HDPE cutting board
-
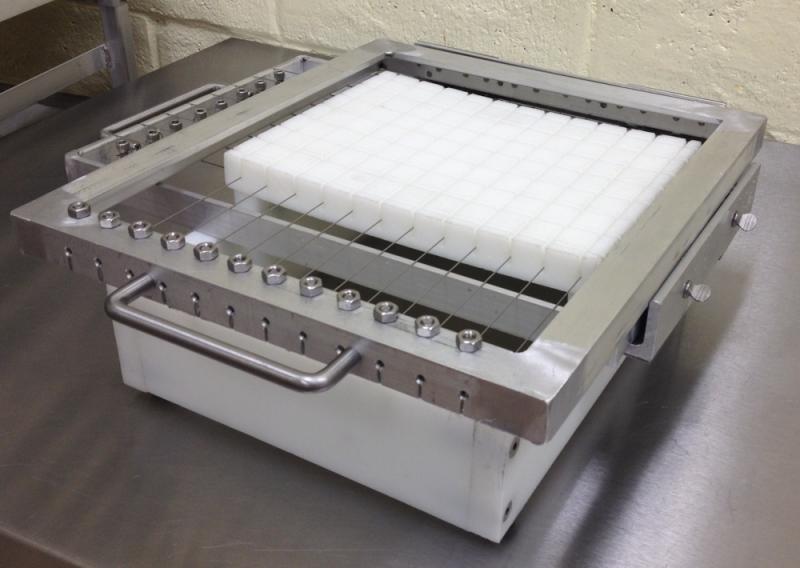
After thinking about it for several years, I finally designed and built a double guitar cutter. It is made entirely of aluminum and stainless steel with a High Density Polyethelene base. Both the cutters and the base are interchangeable. This cost me less than $400 to make. I used a chop saw and a cheap drill press along with assorted hand tools. I did have the cutter frames TIG welded.


-
I just checked out your website and noticed you used a chocolate display case similar to Christopher Elbows. We are, after 6 years of producing only wholesale, planning on opening a retail shop and are looking for ideas. Where did you get your display cases? Are they refrigerated? If so how does the refrigeration work. Thanks Lloyd Martin (lloydchoc) Chocolate Visions
-
How about marshmallows?
-
We have often looked at getting an enrober, but we can't figure out how to get the precision placement of our transfers that we need for the look that we are after. Here are two examples: and We find that they have to be very carefully placed on a piece of chocolate and I can't imagine being able to place them well on a moving belt. Does anybody have any ideas?
-
Dawn Dishwashing soap and hot water does a great job of cleaning screens. It's very easy to put a hole in a screen using a heat gun.
-
I got the vacuum table on Ebay--they have some similar ones now, but they are quite a bit more than I paid for mine. I also made one once by making an airtight box with a lot of little holes drilled in the top--make sure that the top remains flat when you apply a vacuum from a vaccum cleaner. 280 mesh is not "off-the-rack". I have all my screens made to order. It's not that expensive, there are a lot of screen companies that do that. I just put the heat lamp bulb in a Luxo lamp knock off and aim it at the screen. Use the flood stroke only on the first impression to initially fill the screen. If you use it for other impressions, it will overfill the screen after 3 or 4 impressions and then you have to blot off the excess and start over. At the end of the print stroke, use the squeegee to lift most of the ink of the front of the screen and return the ink to the rear of the screen so that you are always doing the print stroke in the same direction. Also use the stiffest squeegee that you can find--I use a 70 durometer.
-
Some thoughts on printing chocolate transfer sheets. According to Ulano, the regular TZ is also food-safe and is more readily available. I get mine from http://www.valleylitho.com/ in a 28(?) oz size. They also sell nice laser printer transparency film. The TZ contains a dye so the design is more visible on the screen. I use a 280 mesh screen, which is about the finest mesh that you can squeegee the food dye particles through. You can get very fine detail with this mesh. But you absolutely need a pressure washer to reclaim these screens. And always use aluminum frames--to keep it food safe. Use a food grade heat lamp to keep the screen warm so the cocoa butter won't freeze up. It keeps the temp at about 90-100 f. The temper doesn't seem to matter, but don't try applying the ink at much over 105 f. For color, get the best quality Lake powdered food color that you can find. It can cost as much as $200/kilo, but it will make many thousands of transfer sheets. Food grade titanium dioxide is also a must, but it is much cheaper Don't use a flood stroke--that will but too much "ink" on the acetate and give you a fuzzy image. If you are not getting enough ink through, try thinning it with a little cocoa butter. Use some kind of screen hinges and a vacuum base if you can, it will make for a much better image quality. When using your transfers, it is best to have your chocolate at the very top end of just barely in temper. In the demo photos it looks like the transfer sheet is applied to several dipped chocolates at once--it that is so, you should cut the sheet into individual designs and apply each seperately as each chocolate is dipped.
-
Use the same design that you have. I had some aluminum frames TIG welded for $10 each. I went to a shop that was set up to weld aluminum frames so they didn't have to figure anything out.
-
Wouldn't it be easier to take it down to a shop that can do TIG welding and have them weld it up in about a half an hour?
-
Your best bet is to buy prechopped or sliced nuts from a nut processor. They come in different uniform sizes depending on the nut and the processor. They use sieves to produce the various sizes. For example we use a pecan piece called a midget which is a 1/16" cube and is perfect for coating a truffle.
-
We used to use chambord, but we discovered Bonny Doon Vineyard's Framboise to be much superior. Try this: 18 oz dark chocolate, finely chopped 6 oz Framboise 1 oz butter 1 oz trimoline Heat Framboise and add it to the chocolate. Emulsify and add butter and trimoline. This makes a very stiff ganache which can be cast in a frame, cut into squares and dipped in bittersweet chocolate.
-
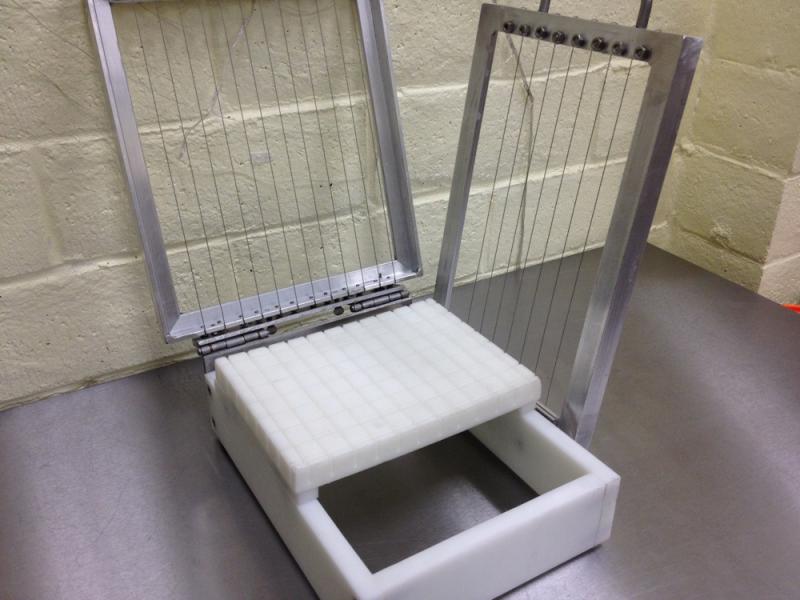
I don't believe that the table slots in commercial cutters are what keep the wires from wandering. It would be the tension on the wires combined with the frame being attached to the table via a hinge with no slop. I think some form of bridge with thin slots would keep the wires from wandering on the frame, and a solid hinge should keep the frame from shifting relative to the table. At least that is what I am aiming for. Does anyone have knowledge of the precise tension applied to the wires? That is one critical piece of information I currently lack. ← I found a 1" thick High Density Polyethelene cutting board at a restuarant supply house and I cut 3/4" deep slots in it with a thin kerf saw blade on a table saw. You need deep slots because the strings flex and by the time the center of the slab is cut through, the wire on the edge is 1/4" below the top of the cutting board. I make ganache slabe about 7x10 and I can cut 77 centers in less than a minute with a single action by having the wires go in both directions. I can generally get very accurate sizes without any "wandering". As far a tension goes, tighten the wire until just before it breaks, or you could pluck it like a guitar string and tune it until you get the proper musical note.
-
the cold air sinks. The ice packs would be in a tray above the chocolates. I still have to be careful about condensation and not leave the chocolates and/or ice packs in too long. Lloyd
-
You can get one of thoses mini fridges from Home Depot for about $120. I think the brand is Magic Chef and it is 4 or 5 CF. Set the thermostat to barely on and it will hold a 50 degree temperature. Great for chocolates and usually above the dew point so you won't get condensation . Lloyd
-
I looked at the thermoelectric coolers, bot none of them were large enough. Each drawer holds 4 24 pc insert trays from modpac. They are made with plexiglas and I use metal drawer slides that I got from a cabinet makers supply house--they have them in hardware stores too. Thed drawers are just rectangular boxes. The hard part was fitting the frame (also plexiglas) into the existing cooler. The drawer fronts are white plex glued to the drawers to dress them up. Notice the strip of foam on the inside of the lid. That presses against the drawer pulls when the lid is closed to keep the drawers from rattling. I used trunk latches to keep the lid closed. Lloyd
-
We took a cooler turned it sideways and added some drawers that we made out of plexiglas. The ice packs are in the bottom. If we did it again we would put the ice packs in the top. the only time that we had problems was on really humid days and we got some sugar bloom because of condensation. We have used it in 110 degree weather
-
You can apply a transfer sheet to practically anything by brushing melted cocoa butter on the surface and then applying the transfer and chilling the piece. I put some transfers on some crackers using this technique.
-
A few tips on transfer sheets: Use powdered food color and plain cocoa butter--don't use the expensive stuff from PCB or chef rubber. Use Titanium dioxide to make it opaque. Use very fine screen material (I have used up to 355 threads/inch). Use the stiffest squeege you can find (at least 70 durometer). Most of the emulsions are probably food safe--Ulano only had the TZ certified--most of the other emulsions have a similar chemical makeup. Screen printing is more difficult than it appears--especially if you are making up your own "ink". I'm still throwing away a lot of prints, but then I am trying to work to a finer tolerance than what is available commercially.
-
Try searching for a dental investment vibrator on Ebay.
-
Here is the big secret. You mix powdered food color in melted cocoa butter until it is the consistancy of, say, sour cream and then you use it to print on acetate (or mylar or polyethelene or polypropolene) using a silk screen. No special machines or hitech ink jet printers. But it will take a lot of trial and error to get good at it. I have been printing transfer sheets for about a year and a half, and I am just beginning to feel confident about acheiving consistant results. I know a quy who lives not too far from me who, I was told, went to Switzerland and spent $50,000 to learn how to print transfer sheets. I know about him because he buys his screens from the same company that I buy mine from, and the owner of that company told me about him. I tracked this person down, and the only information that I could get from him was that he printed transfer sheets--so there are secrets to be learned. Now, I have a lot of experience in the graphic arts world (not to mention engineering) before I started making chocolates, so when I started looking at transfer sheets I immediatally know how they were made. There are only two printing processes that will deposit a thick enough layer of "ink" to be used for transfer sheets--screen printing and pad printing. Pad printing is how PCB puts the transfers in their one-shot dome molds. Find someone who knows how to do graphic arts screen printing (not t shirts) and pick their brain. Lloyd
-
The frame is drilled and threaded for the socket head cap screws which were drilled with a 1/16" hole perpendicularly about half way down to hold the end of the wire. I used a drill press and too many to keep track of drill bits (it was very difficult). There is a nut on the other side of the frame to lock the bolt in position once the desired tension is placed on the wire. As I said the base is just a 1" thick piece of PE cutting board with 3/4" deep saw kerfs that the wires go into. I wasn't difficult to cut the caramels, it was just messy because the caramel (and marshmallow) would stick to the wires.
-
I've always used an offset knife, but a paint roller sounds interesting. What kind of roller did you use?
-
They don't loosen up much after the first few uses (it seems to stretch the wires at first). You have to be careful not to overtighten since the wires break very easily. This fishing leader doesn't seem to have the tensile strength that some other ss wires have, but ss wire is very hard to come by. I am going to try to get some 0.31 wire next time. If you use a fairly firm ganache ( 1 cup of cream to 1 lb of bittersweet chocolate) and let it warm up to room temperature (68f) before cutting you shouldn't have any problem. You do have to put a lot of pressure on the cutter sometimes, but if the pressure is even it won't break the wires--but I always keep spares.
-
Like you, I couldn't see spending $2000+ on a quitar, so I built my own. My design is a fixed size, but it cuts both ways at the same time. Right now I have made two different sizes, and if I decide I want a different size ganache center I cam make a new one in a day or two. I first made 7x10 casting frames from 1/2" aluminum angle from a hardware store. They can either be welded or bolted as shown below. I use paper clamps to clip the frames to 1/8" acrylic lined with foil or parchment. The guitar is designed to cut the ganache cast in this frame all at once. Here is a picture of the guitar as seen from the bottom. It cuts 1"x7/8" rectangles: The 1-1/2" x 1/4" aluminum angle was obtained at a scrap metal yard. I cut it with a power miter saw and had it welded at a welding ship for about $25. The wire is 0.025 stainless steel fishing leader from a bait shop (I live near the ocean). The hardest part was drilling a 1/16" hole through the socket head cap screws to thread the wire. These bolts should have been stainless steel, but I was unable to drill ss with the tools that I had, and I couldn't find anyone to do it at a reasonable cost. The bolts are 1/4x28 and they are threaded into the frame and there is a lock nut on the other side to keep the wire from loosening up. The most critical part was the base which is a 1" thick piece of polyethelyne cutting board with 3/4" deep saw kerfs that match the wire layout of the quitar. This does not, in my opinion, cut as cleanly as a Dedy ( a German brand) because the cutting is more of a punching action rather than a shearing action. It does quite well on ganaches and fudges, but it is a little more problematic with stickier things such as marshmallows and soft caramels. I can use it for marshmallows, but I have to clean it off after about two cuts. Over all though, it is a success. There is about $75 in material costs and about a day's worth of labor to make one. Let me know if you have any questions. Lloyd Martin