andiesenji
-
Posts
11,033 -
Joined
-
Last visited
Content Type
Profiles
Forums
Store
Help Articles
Everything posted by andiesenji
-
Sometimes it's the water. Some municipal water has a lot of additives because the purification system is not efficient and they don't want to spend the money on upgrades to produce drinking water that has fewer chemicals. These chemicals can interact with the compounds in tea and over time the chemical composition in the tea actually changes into other compounds. I recall that on a much earlier thread someone posted some results of research. Some cities, New York among them, have excellent water processing and actually use fewer chemicals than many smaller municipalities taking water from the same sources. The water in parts of Los Angeles is okay while in other parts it is awful. The west end of the San Fernando valley, where I worked for almost forty years, has really bad water. If you turn on the tap and after it has run for awhile, fill a glass pitcher and let it sit, it will at first appear cloudy and within a few minutes the stuff will begin to settle on the bottom. It is disgusting. Complaints to the Metropolitan Water District brought someone to test it and we were told that the water was "okay to drink, we don't have to make it look pretty, just make sure there are no toxic chemicals or pathogens in it." We used Arrowhead water - a lot of it.
-
I had the same problem but repurposed the lid of a lettuce keeper. The round domed part with the outer edges cut away just fits into the outer rim of the lid and any liquid runs back into the TMX and only the dome gets splattered with wet stuff. I had a bit of a problem when I processed something that flew up and knocked the measuring cup out of its hole.
-
I've got a thick, heavy chopping block with a hole in which I sink a "Texas Tack" (big tent peg that looks like a giant nail). Impale squash on spike and work from top to bottom, or with long squash, like a banana, work from end to end. I am so used to using it that I don't even think about it most of the time. I can't even remember when I began using it but it was before I moved up here because I used it in my prior home and that was more than 22 years ago. I have some other woodworking tools that occasionally are used. I have an inshave that I originally bought when I was carving bowls and it is dandy for cleaning squash. I seem to be hung up on squash but I love them. I use woodworker's rasps too. I have a cordless drill that is for kitchen use only. I use small hole saws to open coconuts neatly. I have a good-sized vise that I use for holding bones while I saw them into pieces (cordless reciprocal saw). I put it through the dishwasher and then into the oven to dry it well because it does rust if any moisture is present. I got tired of using a hack saw. I used to have a band saw but sold it a while back - to the same guy who bought my big cheese press, commercial oven and dishwasher.
-
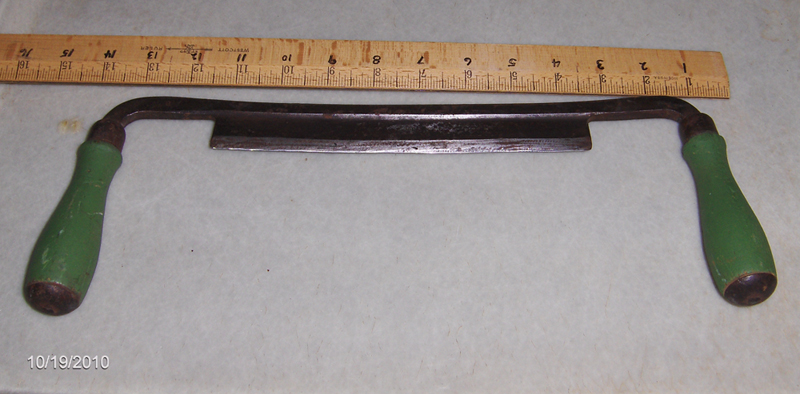
I have this big old draw knife. It is very, very sharp! I use it to remove the skin from big winter squash, pumpkins, watermelon (for the rind to be pickled). I have some old recipes that require the squash/pumpkins to be cooked whole, seeds and all and if the skin is left on, it is a mess to remove later. It also works great for splitting large root vegetables - celeriac, parsnips and just a few days ago I used it on some giant horseradish roots. I know I have used it for other purposes but these are what comes immediately to mind.

-
I found these slow cookers: There are commercial ones that are more costly. Big slow cookers Amazon has some fairly large And the 18 quart Rival "roaster" that works just like a crock pot.
-
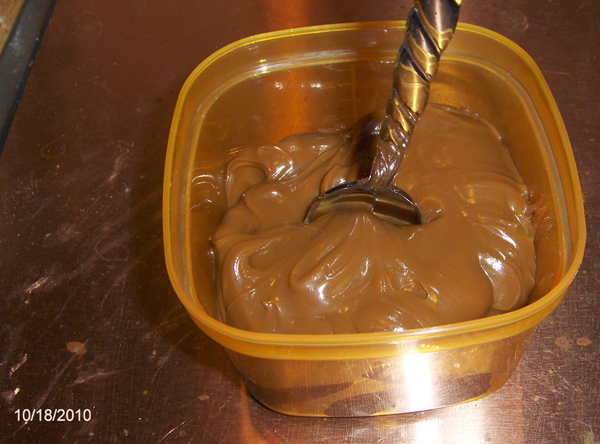
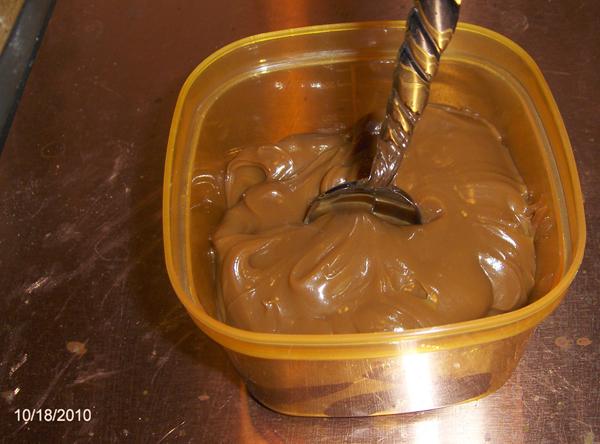
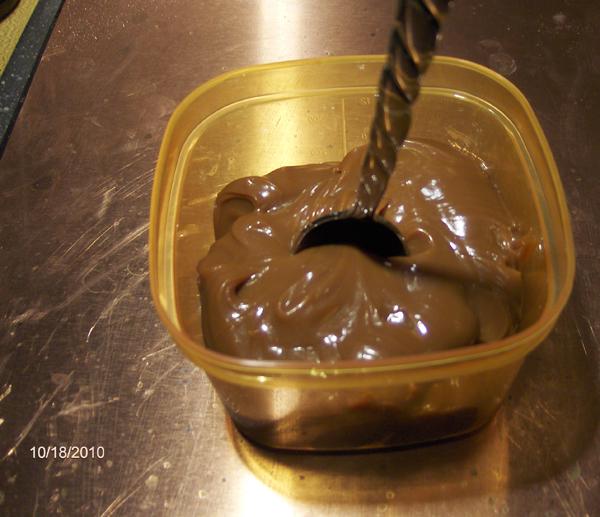
Gee, Carmela's daughter just brought me a container of cajeta that was made on Saturday and has not been refrigerated. They use it up so quickly it isn't necessary. It's pretty thick, as you can easily see. The spoon is standing up by itself. It is darker than "normal" caramel but looks lighter in the photos with flash so I took one without. It's also yummy - I licked the spoon. It's 100% goat milk because they now have their own goats. This is from a 2-quart batch. (Big family!)

-
One company makes a 10-quart. Hard to find, or at least it was. There are 8-quart models readily available. I'll check my files and post the links later.
-
I had a chat with Carmela Obregon a little while ago and she suggested heating the milk in the microwave to begin with. Add the sugar, continue heating and resting it for several more brief sessions. She suggested two minutes because otherwise it will foam up. Add the water and baking soda and nuke it for a few more times, until it begins to have the "scalded milk" taste and the milk clings to the back of the spoon just a bit. It should begin to change color, Carmela calls it "crudo" which I think means a beige color. Then put it in the crock pot on high and let it cook down from that point. Carmela's daughter says "crudo" means the color ecru. Boy, that's an old color term. I used to buy crochet thread that color - forty years ago!
-
I'm moving my questions here rather than keep them in the crock pot thread. . . I hope you find me! So I doubled the recipe and started with 670-ish grams sugar and 6 cups of goat's milk in my 5.5 qt crock pot. It took forever and a day (3 or 4 hours) to get it to 135F, and since I got tired of waiting for it to hit 140F, I added the water/baking soda mixture. Now, roughly 10 hours after the addition of the water/baking soda, the mixture has reduced by about 1 inch, but I think it has plenty of hours to go until it gets thick as it's still pretty watery, though it has a slightly less white colour to it. My crock pot has high, low, and auto choices for temperature, and it's on high right now. I'm thinking I can last maybe 2 more hours or so before I need to sleep. It will have to continue thickening overnight, but I'm concerned about it reducing too much while I'm sleeping. At high, the mixture has been pretty stable at 135F, give or take 1 or 2F, and I'm not sure how low it would go if I used low temperature. Questions: Would it be better to turn off the crock pot, and then continue cooking it tomorrow? Or is it OK to continue cooking it throughout the night? If I leave the crock pot on throughout the night, should I leave it on high or reduce the temperature to low? I would not be stirring every two hours, and I'm a little concerned about that. Don't turn it to low, I don't think it is going to cook at all if 135 is your high temp. I'm surprised it is taking so long. I think my slow cookers all cook hotter than yours. 135 is just too low. Mine all cook on LOW at 165° F. On high they cook at 195 - except for the Cuisinart that boils on high. You add the water and baking soda at 140° and the milk should increase in heat after that until it is at least 155 degrees and 165 is better. No wonder it is taking so long.
-
Here's a "trick" for using one of the big roasters that most people never think of but which was very common at church suppers and large home parties back in my childhood days. Set three or four deep casserole dishes or heat-proof bowls filled with food into the roaster, pour hot water into the roaster pan, set the temp for 225° F., and plug 'er in. It works like a giant chafer and keeps the foods at a perfect serving temp. I have two rectangular slow cookers and the two inner crocks fit perfectly in my old Hamilton Beach roaster. It will also hold two large fish poachers. (I have an eye for seeing these things with alternate uses.)
-
I missed this when it was first posted. Just let it cook longer. Don't add corn starch. Not all Crock pots are equal when it comes to temps. Some are hotter, some not so much. It should turn a dark caramel color and be thick enough to leave a "trail" as the spoon is scraped over the bottom of the pot and should be very thick when it has cooled to room temp. It should, in fact, mound up on the spoon at room temp and slowly collapse.
-
The recipe can be doubled or tripled. Just add up the volume of the ingredients allowing for enough head room for the milk to boil up a bit.
-
I don't know if this would qualify as a "gadget" or be eligible for the "stupidest" title but it seems to me to be just another variation on something that everyone already has in their kitchen. Self-Basting Roasting Pan Self-basting roasting pans have been around since the turn of the last century and it seems to me that it is a bit of overkill. If you don't have a self-basting covered roaster it is easy to make one behave that way by putting a sheet of foil under the lid, just loose enough so that it dips in the center. Have done this many times. I think it would be more helpful if the basting fluid was distributed evenly over the top of whatever is in the roaster. But then, what do I know, maybe this will be just the ticket for some.
-
eG Foodblog: Fat Guy (2010) - Goin' Mobile
andiesenji replied to a topic in Food Traditions & Culture
Thanks for posting about Sarabeth's book. I pre-ordered it a while back but had forgotten all about it. (Several upcoming books on my pre-order list and it had dropped to page 2) Now your photos have really increased my desire to actually hold the book in my hands. I visited a few bakeries the last time I was in NYC but my time was very limited (was there for the Westminster dog show) and can't recall if Sarabeth's was one of them. One of the reasons I began baking at home was because of the dearth of good bakeries within a reasonable distance of my home. That was many years ago and now I do it simply for pleasure. -
I use bulk couscous all the time and it is not the "instant" couscous like that in the boxes and should be cooked (steamed) the traditional way if you want it to turn out nicely. I don't add it to broth until I have cooked it the way I learned years ago. I put the dry couscous in a bowl, pour cold water (just enough to cover) over it and allow it to soak for about ten minutes. I then drain it, oil my hands and toss the couscous until lightly coated with the oil. Meanwhile I turned the steamer on and when steam starts to come through the holes in the steamer bowl I transfer the couscous by the handful to the bowl until all the holes are covered and sort of mound it into a dome. DO NOT COVER THE STEAMER. Steam for twenty minutes, immediately remove the steamer bowl, place on a towel and let it rest for five minutes. Fluff with a fork and place on a serving dish or add to whatever dish you are preparing. I think Paula Wolfert posted about cooking regular couscous a couple of years ago.
-
Which one did you get? Some operate better than others.
-
I've been thinking about this all day and I remembered the first time I ever had "toasted" cheese. I was about 8 years old and was reading Heidi. I questioned my grandpa about the scene where Heidi's grandpa toasted cheese on a fork over the fire and spread it on bread. My grandpa, ever indulgent, got some bread, impaled a hunk of cheese on a long fork, removed one of the lids from the wood stove and melted the outer part of the cheese over the fire, scraping it off onto the bread as it became bubbly. It tasted so good that it became a periodic treat, usually in the winter when there were fires in the fireplaces. I think I was a foodie even back then. (Actually, I think grandpa and grandma's cook was a bit annoyed about his usurping her stove for something like this so after that first time we were relegated to the fireplace to keep peace in the kitchen. It was often a pre-bedtime treat - anything to delay going to bed.)
-
a demonstration on couscous. First Annual Couscous Festival, October 16 and 17, 2010 11 am - 7 pm @ Ecole de Cuisine Pasadena/Chefs Center of California 45 N San Gabriel Blvd, Pasadena 91107. Read about it Here! I'm considering making the trek over there on Saturday to see Paula's couscous demonstration at noon. HOST'S NOTE: Click here for the terms under which this is listed on the eG Forums.
-
I've always hand washed, so maybe that's where the cleaning nightmare comes into play. And maybe my loathing also comes from the fact that I have a mild love affair with my chef's knife. :-) I use garlic presses and have never had a problem with cleaning them. I put mine in the dishwasher too but often just clean it using a nail brush that I use exclusively for cleaning stuff that needs a brush - such as container lids with grooves, pastry brushes, rubber or silicone spatulas and anything with holes or depressions - best way to clean a grater. Works a treat. (I have several of these handy-sized brushes next to the sink. Different colored handles - one for my hands and nails, one for utensils and one for veggies.)
-
Didn't we have this discussion a couple of years ago. I remember posting about making grilled cheese sandwiches with my vintage sandwich press or sandwich grill, which sparked a discussion about the reappearance of these appliances after a lapse of several decades, now called by other names such as panini press, etc. I like them both ways. Using the press, I lightly toast the bread, butter it on both sides, add the cheese and whatever else I want to add flavor and grill it in the sandwich press.
-
I agree, it looks like it is awkward to use and would take a lot more time than a pizza wheel or a big pizza cutter knife.
-
Someone gave me one in a cute garlic head shape. I admit to having it in the drawer even though I have a stainless sink. It has grooves and rounded edges I can get around my fingertips better than the sink. I did not use it when I had a Wusthof set with stainless handles. I teared up when I read this. It reminded me of Fifi and her stainless steel mushroom. For those who have joined since then, Fifi was a very active member who had the SS mushroom as her avatar. She was also a gadget fan.
-
Actually the banana slicer was originally aimed at families with small children. Kids can use it where one would not want to turn a child loose with a knife and unlike anything with a blade (even plastic ones) they are acceptable at schools. Really? My one year old just eats them whole. I peel and he chows down. Big giant bites for Mr. Piggy. He eats a whole banana in one sitting. It's one of the few fruit he'll actually eat, and he eats them about one every other day. Very picky in that some days are banana days and some days are not banana days. There's no telling. It's for having sliced bananas in cereal. Consider having to slice bananas for 7 kids who want their breakfast all at once. Having one or more of the kids handle this chore is helpful.
-
Sign up to get the periodic email newsletters from the various suppliers. Purcell and Barry Farm in addition to Rancho Gordo for beans. I buy a lot of grains from Barry farm. Some vendors occasionally offer free shipping or flat rate reduced shipping for orders over a certain amount. I often buy from Prepared Pantry and King Arthur Flour when they offer free shipping. I forgot to mention Seed Savers Exchange also sells heirloom beans. Some organic. Sometimes they have varieties not available elsewhere.
-
Different types of rice behave differently in pudding. I have some Madagascar Pink Rice ordered from Lotus Foods. It's only available in 11 pound bags but I have used a lot of it. It produces a beautiful pink rice pudding but it works best if it has a prolonged soaking prior to cooking. I soak it overnight in cold water, rinse and soak again for an hour or so before transferring to the rice cooker. I've made pudding with black rice, purple rice and other heirloom rices. I like rice puddings made with short grain rice, sticky rice and with Carnaroli rice, the latter made just like risotto, only with a sweet instead of savory flavoring. It works great with fruits, especially mango, even canned mango puree.