Fat Guy
-
Posts
28,458 -
Joined
-
Last visited
Content Type
Profiles
Forums
Store
Help Articles
Everything posted by Fat Guy
-
The discussion of how to clean a Silpat reminded me of the silliness of so many manufacturers' directions and warnings when it comes to cookware. On any given day, I'm sure half the stuff in my dishwasher is not "dishwasher safe." Life is too short to hand wash anything you don't have to hand wash. I put plenty of stuff in the freezer, oven and microwave even when it says not to. Once in a while this turns out to be a mistake, but rarely. I ignore most instructions on how to season and otherwise care for cookware. What I don't understand is why manufacturers' instructions often display so little understanding of their products. What's up with that?
-
Dishwasher here too. Definitely. It's too much trouble to clean them by hand, especially at home where you don't have a power sprayer and three basins. If after a few hundred washings the dishwasher destroys them, I'll get new ones. I mean, it's a $15 piece of plastic not a $300 copper pot -- how much wasted time is it really worth? But I've had four half-sheet-size Exopats for years, my wife does quite a bit of baking, and there has been no damage from the dishwasher.
-
The CIA uses weight in its professional books but volume in its books for home cooks. I'm not sure if there was much of a to-do about it, but I was certainly disappointed by this decision. It was a missed opportunity for leadership. When Rachel Perlow and I spent a day baking at the CIA in connection with the release of "Baking at Home with The Culinary Institute of America," she asked about this in the Q&A session. The editors, chef-instructors and audience members (other than us) were uniformly and totally closed-minded on the subject. They were not under any circumstances even going to consider giving weights in a book for home cooks. Posting about it, Rachel wrote: And I wrote:
-
A few years ago I spent an exhausting, painful shift in a professional pastry kitchen. It was the first time I was emphatically exposed to the idea of weighing ingredients. Chris Broberg, then the pastry chef at the St. Regis hotel (and most notably its restaurant, Lespinasse), really drilled the message into me. My first question was "What about eggs?" This definitely highlights a workflow difference between home and commercial kitchens. In a home kitchen, you might have one or two dozen eggs in the fridge. Maybe they're large, maybe they're extra large, maybe jumbo. The most workable unit is 1, as in "1 egg," or "2 eggs." Most home recipes contain 1-6 eggs. The problem is that as you get into recipes with more than a couple of eggs, the whole-egg measures get more and more inaccurate. If you use 5 jumbo eggs instead of 5 large eggs, you're looking at something like 1 egg difference. There's also a loss of some egg product with each egg you crack, because of what gets left behind with the shell (you can mitigate this by running your finger around the halves of the shell to get the last bits of white out, but most people don't bother). Meanwhile, in a commercial kitchen, they deal in cartons of hundreds of eggs and the recipes often call for several dozen eggs. So those inaccuracies with whole-egg measurements get seriously amplified: you crack 50 eggs, there might be a 10-egg difference between your result and someone else's result using different eggs and cracking technique. That won't do. So they generally work with eggs as a liquid: crack a bunch into a vessel and mix, then pour to weigh, or use pasteurized eggs that are already in liquid form (pasteurized beaten eggs are a great product for a lot of pastry-and-baking recipes, very common in food service but hard to find retail). Wasting a few eggs isn't much of a concern -- just the amount that sticks to a big mixing bowl after pouring could be the equivalent of a couple of eggs. For the cornbread recipe I gave, the recipe is flexible enough that you can just round off to the nearest whole egg. In other words, crack eggs into the bowl until you go over the desired weight by a little or get very close to it. This will get you close enough for success with that recipe -- it will get you as close as you get when using regular cookbook recipes. Better, for a few reasons, is to crack all the eggs into a separate bowl, mix with a fork, then pour to weigh and discard the remaining fraction of an egg unless you have an immediate use for it. This strategy not only gets you better accuracy, but also protects against the risk of getting shell bits in the main bowl of the recipe. It's also insurance against defective eggs. (Once a decade or so, I crack an egg and there's something so seriously wrong with it that I just throw out whatever it has come in contact with.)
-
The Kitchen-Scale Manifesto topic just reminded me of one additional reputation maker. It's the only thing I ever bake. I'm lucky to be married to a good baker, and the division of kitchen labor is typically that I cook and she bakes. But one day I got stuck making cornbread because I had no support team during dinner prep. I grabbed the CIA Pro-Chef cookbook, now several editions out of print, and didn't see a cornbread recipe as such but found a corn muffin recipe with a note that the batter can be used for cornbread: "VARIATION Cornbread: Prepare batter as directed above, and scale into small loaf pans (for individual loaves) or small cast iron skillets or pans." Even that seemed too ambitious for me so I used two standard American 9"x13"x2" baking pans. In my cabinet I had some superior-quality cornmeal, given to us as a gift by a friend in North Carolina, from the Old Mill of Guilford. (In fancy restaurants in New York these days, Anson Mills corn products have become trendy, but I think the Old Mill of Guilford makes an even better product that's cheaper to boot.) I also ignored -- because I was in a rush not because I don't believe the theory -- the various labor-intensive instructions like "cream together the sugar, shortening and salt" and "sift together the flour and the baking powder (two times)." I simply put a bowl on my kitchen scale and added the ingredients in the order listed, then mixed with a wooden spoon until I had batter. I had no idea what kind of shortening was called for (the recipe just says "Shortening") so I used corn oil because, well, it seemed appropriate to use corn oil for cornbread. The recipe called for pastry flour but I used all-purpose. This cornbread came out so well, I got more requests for the recipe than for any other item I've baked. I believe 100% of the people we served it to asked for the recipe either on the spot or in follow-up email. But the recipe isn't the important part. It's the quality of the cornmeal that makes the biggest difference. Try this with off-the-shelf supermarket cornmeal and you'll get an ordinary cornbread. Make it with the good stuff and it's exceptional. Every attempt I've made to improve on that first attempt -- adding cheese or whole corn kernels, reducing the amount of sugar -- has backfired. It's one of those recipes that, for me, works well this way and no other. Sugar 450 grams (1 pound) Corn oil 225 grams (8 ounces) Salt 15 grams (1/2 ounce) Eggs 225 grams (8 ounces) Milk 680 grams (1.5 pounds) (whole, skim and in-between work fine) Cornmeal 450 grams (1 pound) Flour 680 grams (1.5 pounds) Baking powder 40 grams (1.5 ounces) Add ingredients in that order, mix with a spoon, divide between two 9"x13"x2" baking pans, bake at 425 F for approximately 20 minutes (until light brown on top).
-
I've used pretty much every available lentil over time, and most of them work fine, but the best are either the small French green ones (Puy) or Pardinas, which are not identical but quite similar (except Pardinas are a lot cheaper and are available in normal American supermarkets from Goya). The dish is pretty good, though, even with the cheapest large split green-gray supermarket lentils. The only lentils that have been a real disaster are the yellow ones, because they turn to mush so readily.
-
I just reached for the Ratio book and opened to "Make a basic tempura mixture of 3/4 cup cake flour, 1/4 cup cornstarch..." It doesn't much matter who you are or how much you believe in weighing dry ingredients, unless you're writing for a professional audience most publishers and editors still force you to use volume. I have to wonder if this is a form of planned obsolescence. At some point in the future, when the world's remaining home cooks are weighing ingredients in grams, cookbooks from the 20th and early 21st centuries will be looked at as curiosities, like measuring Noah's ark in cubits.
-
A few years back, we published the Kitchen-Scale Manifesto. Written by then-host Darren Vengroff as part of our RecipeGullet initiative, the Kitchen-Scale Manifesto is a plea for measuring dry ingredients by weight rather than volume. Over the years, barely a week goes by when I'm not reminded of the wisdom of the Manifesto. Why, just the other day I was served some brownies that were defective most likely because they contained too much flour. If you weigh your flour, this is a lot less likely to happen. In any event, we thought it worth reprinting the Manifesto for the benefit of newer members and others who missed it the first time around. So, herein, the Kitchen-Scale Manifesto: The Kitchen Scale Manifesto Justice with Balance by Darren Vengroff What's the Big Deal? In modern home kitchens in Europe, a kitchen scale is standard equipment. In the US, one rarely sees them except in the kitchens of compulsive dieters and very serious amateur pastry chefs. Because most people in Europe have scales, recipes generally specify quantities of bulk dry ingredients as weights. For example, a cake recipe might require 250 grams of flour. In the US, the same recipe would most likely use cups, which measure volume, not weight. So why the difference, and does it really matter? Is weighing ingredients just a complicated, confusing, and unnecessary consequence of going metric? The answer is that it does really matter, and once you get the hang of it it's actually easier than using cup measures. It matters because the amount of an ingredient that fits in a cup varies a lot depending on how coarse the grain is and how tightly it is packed into the cup measure. Weights, on the other hand, tell you exactly how much of the ingredient you have, independent of how much air space exists between the particles. The amount of flour in a cup can vary as much as 25% depending on how it is packed. Sifting before or after measuring can make the difference even greater. Needless to say, this kind of disparity makes a tremendous difference in how a recipe comes out. One morning pancakes are light and fluffy, the next they are thin and rubbery. Another advantage to weighing ingredients is that when you share your recipe with others, they can more easily reproduce results similar to your own. The number one complaint of home cooks is that they followed a recipe, but it didn't turn out. The number one reason this happens is that although they used the same number of cups of each ingredient as the recipe author, they actually used a very different amount. For ingredients that require cutting or chopping, there is even more ambiguity. Despite claims to the contrary, "one cup chopped onions" isn't really a whole lot more informative than "one medium onion, chopped." How finely are they chopped, and how tightly are they packed into the cup? It makes a big difference. "Two hundred grams of chopped onion" is a much more reliable description. Weights also help you shop for a recipe, especially if you are not familiar with some of the ingredients. For example, if you don't regularly cook with parsnips and a recipe calls for "three medium or two large parsnips," what are you to do? You go to the market, and you see parsnips for sale, all about the same size, but you have no idea if they are small, medium, or large. If the recipe called for 20oz of parsnips, you could weigh them at the store, and buy just a little extra to account for loss due to trimming. Aside from being more accurate, weighing is usually easier and less messy than scooping and leveling ingredients. Breaking the Cycle So if weighing ingredients is such a good idea, why don't we all do it? The problem is a classic case of the chicken and egg. American cookbooks, magazines, and web sites don't publish recipes by weight because most of their audience don't have scales. Americans don't buy scales because few recipes call for ingredients by weight. Well, we here at the eGCI have never been ones to let convention get in the way of the quest for a good meal. So, with this manifesto, we are drawing a line in the flour. We highly recommend that every member who doesn't already own a kitchen scale make one their next kitchen equipment purchase. We request that everyone who contributes recipes to RecipeGullet specify weights of dry ingredients rather than volumetric measurements. This manifesto will introduce you to the various types of scales that are available, and guide you through the process of shopping for and using a kitchen scale. It will also show you how simple it is to update existing recipes to use weights instead of volumes. No math is required, except for the "difference method," and then it is only substitution. Types of Scales There are three basic types of kitchen scales on the market: spring scales, balance scales, and digital scales. Spring scales are the least expensive but also the least accurate. Balance scales were, for centuries, the most accurate available. Although they are extremely accurate, they can be difficult to use. Digital scales are the best of both worlds. They are extremely accurate, and simple to use. In recent years, they have even become affordable. Most kitchen scales have a maximum capacity between two and twenty pounds. The smaller the maximum capacity of the scale, the more accurate it is likely to be in the range it covers. For most home kitchens, something in the five to ten pound range is just fine. If you cook very large quantities or certain items, or are dying to know exactly how much that Thanksgiving turkey weighs, then you may want a larger scale. But in that case, you probably want two, one for every day use, and the big one for special occasions. Spring Scales Spring scales, as the name implies, use springs to measure weights. The more weight that is placed on the scale, the more the spring stretches. A needle attached to the spring moves as the spring deforms, causing it to point to a number indicating how much the item on the scale weighs. Some spring scales allow the position of the indicator to be adjusted. This is useful for resetting the scale to zero after placing an empty bowl on it. This is called taring the scale. It allows you to weigh only the product you put in the bowl, not the bowl itself. It also means that you can measure one ingredient into the bowl, then tare the scale back to zero and add a second ingredient without dumping the first out. This is convenient because you can measure and mix in the same bowl. There are two types of spring scales you are likely to see. The first is a stand-up type with a either a needle that moves up and down or a large round dial on the front to indicate the weight. The second is a low profile model where the dial is built into the base of the scale. The low profile type is normally much easier to tare. To do so, you just rotate the base. The stand-up type generally has a small knob on the side or back of the scale for taring. This is much less convenient than the low-profile type. Effectively, it means that you always have to weigh in the same bowl, and dump each ingredient out into a mixing bowl before weighing the next one. Balance Scales Balance scales determine the weight of an ingredient by comparing it to known standard weights. There are two basic varieties of this type of scale, and a third variety that combines the first two. The first type is the straight balance. This is what you see blind justice holding up. The item to be weighed goes on one side, and one or more standard weights go on the other. If the two sides are in balance, then the item being weighed weighs exactly the same as the sum of the weights on the other side. A straight balance is very accurate. Some laboratory models are good to a small fraction of a gram. But it's not very practical for the kitchen. The second type of balance scale is the sliding scale balance. With this type, there is a single known weight, but you can slide it from left to right along a scale until it balances. You have probably seen one of these in your doctor's office. These aren't as absolutely accurate as the straight balance, but they are easier to use and there are no little weights to lose. The third type of balance is the hybrid. It allows you to use individual weights like a straight balance, but also provides a sliding scale. Another drawback of balance scales is that that have the most delicate mechanical parts of any of the three types of scales. The main pivot on which the balance rests is particularly crucial. It must be as close to absolutely frictionless as possible. Over time it can wear down or become gummed up, causing the scale to lose accuracy. Balance scales can still be found, but unless you really like how they look, you are probably better off with one of the other types. Spring scales are less expensive and digital scales are as accurate, if not more, and much easier to use. Digital Scales Digital scales are the newest form of kitchen scale. As with all things digital, their prices continue to fall. Digital scales work by passing a small electrical current through a material that is pressure sensitive. A sensor determines the weight on the scale by the amount of current that flows. This is converted to digital form and displayed on a small screen. Digital scales are extremely accurate. They are also very easy to use. Taring is generally just a matter of touching a button. Most digital scales are quite small, like low-profile spring scales. Some of the newer models also have additional features, like timers, built in. Others, aimed at dieters, contain databases of common food items and can tell you not only the weight, but also the fat and calorie content of food. Historically, digital scales were quite expensive, ranging up to $250. However, that is no longer the case. As of this writing, entry-level models are selling for as low as $30. There are a number of very good full-featured options in the $60-70 range. More expensive models generally add more stainless steel, chrome and glass, but they don't weigh foods any more accurately. Shopping for a Scale Now that you know the three types of scales, it's time to start shopping for the specific model that will work best for you. For most home kitchens, a digital scale is going to be the best bet. Ten years ago, this might not have been the case due to the high cost, but that is now much less of an issue. If you really want to save money, you can get a mostly plastic low-profile spring scale for as low as $10, but chances are it is not going to be incredibly accurate or built to last. Three primary factors differentiate one digital scale from another, and determine the price for which any given scale sells. These are durability, appearance, and extra features. All digital scales are more than accurate enough for kitchen use. Some are more precise, in the sense that they measure in 1 or 2g increments instead of 5g increments, but this only matters when measuring very small quantities of ingredients. It is wrong to think that spending an extra $50 is going to get you a substantially more accurate model. The durability of a digital scale depends primarily on what materials it is constructed from and what kind of buttons it has. The most durable scale surfaces are made from stainless steel. They wipe clean and wont react if you spill acidic materials on them. Some scales have glass surfaces. These are also very easy to wipe clean, and they are stain resistant. The only drawback is that if you use your scale often you are likely to end up chipping the glass against a backsplash, mixer, or other counter-top appliance. A few digital scales are made of plastic, but this is generally reserved for low-profile spring scales. Another thing that affects the longevity of a digital scale is the type of buttons it has. Every digital scale has at least one button, for taring; some have many more for all kinds of advanced features. Ideally, these buttons should be flat sealed buttons, like those found on most microwaves. This way, food particles can't easily get into the interior of the scale and interfere with the operation of the electronics. Some models have individual buttons with gaps between them and the shell of the scale. These are less desirable. The appearance of a scale is largely a matter of personal taste. Some people like the simple industrial look of a basic metal model with a stainless steel tray. Others prefer the high-design Euro-style models made of glass and brushed aluminum, chrome, or stainless steel. At the extreme end, some of these scales look more like sculpture than kitchen appliances. When it comes to appearance, everyone's tastes are different. The best thing you can do is choose a model that you will be happy to keep out on your counter-top, instead of buried in the back of a cabinet. The more accessible your scale is, the more you will use it. Beyond just weighing things, some newer digital scales offer a number of additional features. Some, for example, include clocks and/or timers. This can be a convenience, or an unnecessary gadget. Most of us already have clocks and timers on our ovens and/or microwaves. You may also be the type who has no need for yet another appliance to constantly blink 12:00 along with your VCR. Another feature some scales offer is a calorie computer. You select the type of food you are weighing from a menu, and then the scale determines not only the weight of the food, but also the number of calories. If you really think this is a must-have feature, try to get one that lets you select by the name of the food being weighed, as opposed to entering a code number in a guidebook. Finally, there is at least one scale now for sale that includes a thermometer. A temperature probe plugs into the scale and displays temperatures on the scale's screen. This is possibly convenient for making chocolate or candy. The down side is that you may not necessarily use your thermometer directly adjacent to where you weigh raw ingredients. As you can probably tell, we aren't huge fans of lots of extras on digital scales. A scale is already a wonderfully multi-tasking device. What else other than a bowl can you use to help you make almost any dish you would ever want to make? Pushing it further than weighing things just puts all your eggs in one basket. If one part malfunctions, you have to replace the whole thing. Using Your Scale So you've got that new scale home, and it's time to start cooking. Of course you've popped over to RecipeGullet and found several tempting treats that you are eager to re-create in your own kitchen. Luckily, using a good kitchen scale is easy. In fact, it's substantially easier, not to mention a lot less messy, than old-fashioned cup measures. Taring The most important thing to remember when using a kitchen scale is to always tare it properly. Taring means eliminating the weight of the bowl of other container from the weight of the food item it contains. Normally, the best way to do this is to put the empty bowl on the scale by itself. If you are using a spring scale, there will be a knob or dial somewhere on the scale that you can turn until the scale indicates zero, even though it has a bowl on it. On most digital scales, there will be a tare button you can press which will reset the scale to zero. On a balance scale, you will either have to add some weights to the side of the balance opposite the bowl or move a sliding weight along the beam of the balance to counter the weight of the bowl. Once you have properly tared your scale, you can slowly add the ingredient you wish to measure to the bowl, carefully watching the needle or digital display until it reaches the desired weight. If you add too much, you can obviously scoop it back from the weighing bowl into the storage container it came from. With a little practice, however, you will find that you can dump in most of what you want, then carefully sprinkle in the last ounce or two so that you never overshoot your target. For ingredients where a tablespoon or less is involved, it's generally wise to stick with teaspoons and tablespoons. The reason is that many kitchen scales are just not accurate enough. For example, if you have a digital scale that works in 5g increments, and a recipe asks for 7g, what do you do? Your scale either says 5g or 10g. It can't display a 7. Newer scales are more commonly accurate to 2g, or sometimes even 1g, which makes this problem less severe. The big exceptions to the volume for small amounts rule are salt and yeast. Salt is an exception because kosher salt takes up twice the volume of regular salt, and so people will either put in double, or half the amount they need if they mistakenly use the wrong kind. Luckily, though, salt in many recipes is a matter of taste, rather than an exact amount. Yeast is an exception because getting it significantly wrong in either direction can make a mess of your bread. Getting it wrong a little can affect the rising time, which can be annoying, but is not the end of the world. If you are using fresh yeast, many recipes call for enough to weigh reasonably, around 15g or so. The Single Bowl Approach Weighing a bunch of ingredients for a recipe can take some time, although rarely as much as carefully scooping and leveling with measuring cups. Once you get pretty good at judging quantities by weight, you may wish to adopt a single-bowl approach to weighing several ingredients. The idea here is that instead of pouring each ingredient out of the weighing bowl into a mixing bowl after weighing, you simply re-tare the scale and load the next ingredient right in on top of it. There are some risks to this approach; in particular, if you put in too much of the second ingredient, you may have a hard time scooping it out without removing some of the first ingredient. Whether you use this technique or not depends largely on how careful you generally are in adding ingredients, and how much you really care about not having to wash that second bowl. If you are dealing with metric units, the single bowl approach can be extended to include water as well. The reason is that 1ml of water has a mass of exactly 1g. So if a recipe calls for 400g of flour and 300ml of water, you can weigh out the 400g of flour, tare the scale, and then weigh another 300g of water into the same bowl. Note that this does not necessarily apply to other liquids, which may have different densities than water. Also, this does not work with US standard weight and volume measures. In the US, one fluid ounce of water weighs 1.0425 ounces. Updating Existing Recipes If you have a large collection of recipes calling for cup measures, and you would like to convert them to more reliable and repeatable weight-based recipes, it is not hard to do. There are three ways you can do this. The supposedly simplest, but actually not so simple, and unreliable to boot is the estimation method. The second is by converting recipes on the fly. The third is the difference method. The latter two methods are the best to use whenever possible. The Estimation Method The estimation method for converting recipes relies on the idea that there is a standard amount of any given type of ingredient in a cup. Unfortunately, that is the same fallacy that makes cup measurement of dry ingredients problematic in the first place. However, if we are willing to assume that there is a standard for how much flour, sugar, etc., fills a cup, then we can easily construct a table of conversion factors from volume to weight. For example, an entry in the table might indicate that one cup of flour is equivalent to 125g. So, we could convert the 1-1/2c of flour to weight by multiplying 1.5 x 125 to get 187.5g, which we would probably round to 190g. Conversion tables like this can be found at various sites on the internet, but if you examine them, you will see that they don't come close to agreeing with one another. Despite the problems with this method, it is better than nothing. However, you are much better off using one of the more accurate recipe conversion methods described below. Converting Recipes on the Fly The obvious approach is to fill your cup measure with the same two cups of flour you always use, packed exactly as you always pack it, and then dump it into a pre-tared weighing bowl on your scale. Make a note of the weight on the original recipe. Repeat for each dry ingredient, and then you are done. If you are unlucky with your cup measures, and your favorite recipe doesn't come out quite right when you are gathering your weight information, all is not lost. You still know exactly how much of each ingredient you used in the botched attempt. It's much easier to use a little more or less of a particular ingredient the next time when you know precisely how much you used before. With the variation inherent in cup measures, this would be almost impossible. The Difference Method Weighing each ingredient as you go is not the only way to determine the weight of each ingredient in a recipe. If you are the kind of cook who goes more by appearance and texture than by weight, adding a few extra tablespoons of this ingredient or that, you can still accurately record how much of each ingredient you used. The method for doing this is called the difference method. The first step in the difference method is to gather each of the ingredients you intend to use, leaving them in their storage containers. Before you start cooking, weigh each container. Don't worry about taring the scale with an empty container first; simply weigh the whole container and its contents. You can record the weights either on a sheet of paper or on a post-it affixed to each container. The next step in the difference method is to actually cook your dish. But you already know how to do that. So let's move on. Once you have finished cooking, go back and weigh each of the ingredient storage containers again. The weights should be less, since you used some up. Now, subtract the after-cooking weight of each container from the before-cooking weight to determine how much of the ingredient you used. For example, suppose that before you started your flour storage container weighed 5lbs 2oz (=82oz) and after it weighed 3lbs 14oz (=62oz). This means that you used 20oz, or 1lb 4oz of flour. The difference method is also great for reconstructing secret or unknown recipes, like your grandma's famous biscuits. If she has been making them the same way for 65 years, she may not use a recipe at all. If she does, it may be a cryptic one that only makes sense to her, or in her kitchen. It may call for 2 regular scoops of flour, but only she knows which scoop that means and how to pack it. If you weigh her flour before and after the biscuit making, you'll know she uses exactly 7oz. What to do with Your Leftover Cup Measures Once you start weighing ingredients, you'll never want to go back. So what should you do with all those cup measures you have lying around. One good thing you can do with them is put one into each of your dry ingredient storage containers. You can still use them for scooping the ingredient out onto the scale, just not for measuring. Liquid volume measures are also fine to keep around. Liquids may change slightly in volume with changes in temperature, but the variation is miniscule compared to the variation in weight of a particular volume of most dry ingredients.
-
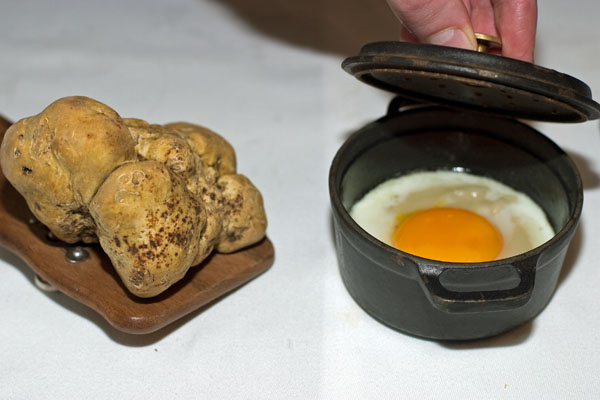
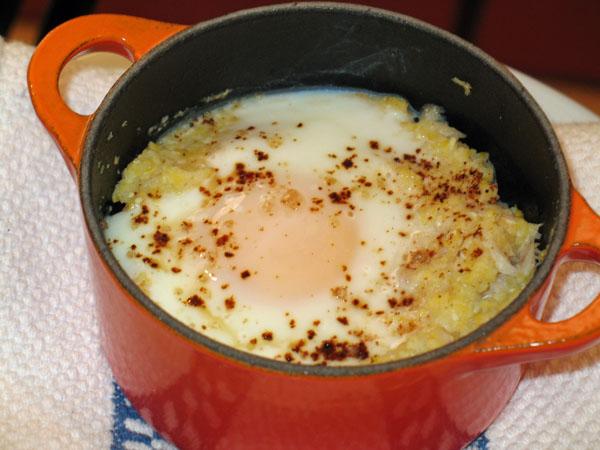
My other reputation maker is a coddled egg dish that I appropriated from the Alain Ducasse repertoire. Over the course of a dozen or so meals at his now-defunct restaurant in the Essex House in New York City, I only came across a couple of dishes I thought I could attempt to make at home without days and days of labor. Which is not to say that, even after dozens of attempts, I can produce a dish as good as what I had at the restaurant. But guests are pretty impressed with my inferior version which, in the grand scheme of things, is a better dish than one generally expects to be served outside of a fancy restaurant. The main components of the dish are an egg and some kind of vegetable puree. In this instance, at the Essex House, the dish was prepared with salsify puree. The egg (they use yolk only at the restaurant) is placed atop the warm puree in a Staub mini cocotte, which is placed in a water bath and cooked until the yolk is relatively set. This one was served during truffle season: I don't make it that nice. I use the whole egg, my purees aren't nearly as refined and creamy, and I don't have white truffles around. And my mini cocottes are Le Creuset not Staub. (The dish, however, can be made quite well in a ramekin or even ceramic teacups.) I started out doing this dish with a potato puree, but have branched out. Most recently I did it with grits into which I mixed some flaked smoked trout. Please don't laugh when you see how much worse mine looks than the restaurant version. Remember, my guests don't have that reference point, so they think it's good. Needless to say, if Ducasse ever comes over for dinner, I'll serve the lentil dish instead. (That's citrus salt on top, which is the one nice touch I came up with.)

-
Right. Another improvement to the dish is to add some vinegar to the lentils toward the end of cooking. Sherry vinegar is particularly nice.
-
Okay, I have two dishes to contribute to this discussion. Or maybe they're in the category of dish-concepts, because they're very flexible and can accommodate a lot of different ingredient sets. The first dish I'll call "short ribs with lentils." I'm sure I'm not the first person to figure out the key trick here, but I've never actually seen anybody else do it. This dish was born of my dissatisfaction with two aspects of short ribs. First, that when you serve them on the bone there's a lot of unpleasant connective tissue and fat on them. Second, that if you take them off the bone there's a lot of unutilized meat. I decided one day to take the big chunks of short rib meat off the bone and dice up the remaining bits of meat to use as part of a garnish. Not a brilliant idea, but it was the birth of one of my reputation makers. Here's what I do. At some point in advance of the dish-making process, I make as rich a beef stock as I can. The day before the dish is to be served, I braise a bunch of beef short ribs in a couple of quarts of said beef stock. I refrigerate them overnight in a zipper bag. Separately, I refrigerate the braising liquid. The next day, I cut the cold short ribs so that each yields one nice big rectangular chunk of non-fatty, non-gristly meat. I work around the short ribs with the knife and get all the other usable meat and make a pile. Then I dice all that up. A couple of hours before mealtime, I start the lentils. I start with finely chopped onions, carrots, celery, garlic, ginger, salt and pepper, cooked over a low heat with olive oil until soft and giving up a nice aroma. Then I add the lentils and cook them dry for a few minutes until they're a little wet, kind of like how you start rice for risotto. Then I add half the braising liquid and top off with a combination of water and either wine or beer. Once you get to this point and everything comes up to a simmer, the lentils will generally be done in about 45 minutes. At this time, I put the big chunks of short rib meat in the remaining braising liquid and, covered, bring it to a low simmer. Then I leave the heat on simmer until it's time to serve. When the lentils are still a bit firm but getting close to done, I mix in the diced short-rib meat. The dish is best served in a wide bowl. Put a bunch of lentils in the bowl. Top with a chunk or two of short rib meat. Spoon some of the braising liquid (from the short-rib reheat) around the lentils to get them a bit wetter. Top with coarse salt and some sort of chopped fresh herb. For every step of this process, there are refinements that improve the dish. For example the dish was greatly enhanced when I switched to pardina lentils (these are the small green-gray lentils, available pretty cheap). Although short ribs were the inspiration for the dish, it works well with brisket, chuck or whatever. Adding various spices to the lentils gives the dish an eastern inflection. Etc. I'll get to my other one later.
-
It's not trying to be a Neapolitan pie at all. It's a square pan pizza/whatever and it's soggy. A Neapolitan pie can be wet in the center, and some people call that soggy -- an defensible position -- but I'd call that a desirable sogginess. The Veloce pies are undesirably soggy.
-
Sumeet who?
-
After a few years of trying every other solution, I've recently returned to grinding my own spices. This task falls into the category of "kitchen inconveniences that are worth it." I don't care where you get them (Penzey's, Kalustyan's, some magical little shop with extremely high turnover) or what you do with them (freezer, Food Saver, both), pre-ground spices just don't have the same force or range of flavors and aromas as spices ground just prior to use. Two nights ago, I made two batches of lentils, one with the pre-ground spices and one with spices ground on the spot. (I used cumin, coriander, allspice, cardamom and black peppercorns in roughly equal parts.) The difference was dramatic -- so much so that there would be little point in bothering with a blind challenge. As could have been predicted, the fresh-ground spices were more powerful. So, in gradually seasoning the batches, I wound up using less. Yet, even with a smaller quantity of spices, that batch had far more vibrant flavors and, especially, aromas. This was the case even after reheating the following day. In terms of time invested, the mini coffee mill makes grinding the spices a 10-second operation. That barely counts. The main time commitment is keeping the device clean, which seems to be nearly impossible.
-
I confess that, when I was a kid, I went through a phase of being keenly interested in magic, specifically sleight of hand (card tricks, coin tricks, etc.). A while ago I was cleaning out my book collection (well, I cleaned out about 1/10 of my book collection to make room for new cookbooks) and I came across about 25 magic books. It struck me that the taxonomy of these books very much paralleled the taxonomy of cookbooks. For the most part, the standard format of those books is that they're thick books with instructions for hundreds of tricks. The bigger the book, the more the cover trumpets how many tricks it contains. The descriptions of the tricks are short, and you have to weed out 20 stupid tricks for every good one. There's also a much smaller group of books that are more technique-oriented. And then there's one book I came across, a small book by the brilliant Harry Lorayne, titled Reputation Makers. It's the opposite of the Joy of Cooking-style magic books. The book is 87 pages long and contains detailed instructions for just a few tricks. The proffer is that every single one of them is absolutely fantastic -- a reputation maker. I'm not aware of anybody ever pulling together a cookbook based on that strategy. A book of X number of recipes, with every recipe being an absolutely terrific one that results in a dish that will make people say wow. I figure, maybe there's no book, but there's no reason we can't do something like that together. So this topic is for your reputation makers. The dishes that you serve when you have someone coming over who really knows food. The dishes that make your guests think you're a better cook than you are. The dishes that make you wonder why you bother eating in restaurants. The dishes your guests talk about a year later. Here's the deal: 1 - Unless your name is Robuchon, Ducasse or Troisgros, you don't have a long list of reputation makers. You have one or two. So we all have to exercise self-restraint here: please only post about one or two dishes. 2 - Chances are, your reputation makers are the result of years of experimentation and refinement, and you've made them many times. But here, nobody else has made your reputation makers, so please describe the process in painstaking detail. 3 - If it comes from a cookbook or chef, say which one and how you've made it your own. 4 - Under no circumstances should you say your reputation makers are "simple," "so easy," etc. -- they may seem that way to you but may not to others. Likewise, "whatever is fresh and delicious at the farmers' market" doesn't count. 5 - Photos or other media if you have them. If I can awaken myself a bit more this morning, I'll post mine. But please feel free to start without me.
-
I'm surely not the first person to notice that, when you buy X pounds of meat for braising, you wind up with a lot less than X pounds of edible finished produce. But the extent of the inefficiency varies widely by cut. For example, with beef short ribs (or, I suppose, the short ribs of any animal), you need to buy about a million pounds of short ribs per person. Not only do they shrink a lot, but also there's a lot of inedible tissue as well as all those bones. Whereas, with something like beef brisket, you also lose a lot of weight but not nearly as much. I have never attempted to quantify any of this. Has anybody else? I'd love to see a chart. Or, barring that, what are your rough guidelines of per-person raw amounts for short ribs, shanks, brisket, chuck, etc., and why?
-
I'm also a big fan of rice bowls, though in my case I have several cheap-Chinese-restaurant-style melamine bowls with Chinese patterns on the outside. I bought them ages ago and they've had uncanny longevity. I use them for prep, for rice and for lots of other things. I don't even want to know how much melamine I've eaten over the years as a result of my use and abuse of these bowls. I also have a lot of other prep bowls. It's kind of absurd how many I have.
-
Very rewarding early dinner at L'Ecole last night. The way the L'Ecole dinner seatings work is that if you start before 7pm you're in the first sitting and you get a four-course meal (starter, main, salad and dessert), whereas if you start after 8pm you get a five-course meal (starter, fish, meat, salad and dessert). They don't take reservations between 7 and 8pm. Two different crews of students prepare the meals for the first and second sittings. The second sitting crew are, I gather, the evening students who start their day at 5:45pm -- so they need that time to prep. Anyway, this was my first first-sitting dinner. It didn't make a difference quality-wise. There was one less course, though we added a cheese course so it was still quite a large meal. Actually it would have been a large meal even without the cheese course. The four- and five-course dinners each cost the same $42, so if you're paying full price the five-course is a better value assuming you have the capacity to eat and enjoy that much food. But if you have a 100% discount, it doesn't really matter. Appetizers sampled: Grilled smoked salmon, a piece of salmon that still maintains a lot of its fresh flavors and textures -- I assume it's lightly smoked that day, not smoked to preserve -- with a hard-cooked quail egg, yellow beets and orange-curry vinaigrette. I thought this was the most competitive of the three appetizers we tried -- competitive as in something you'd expect to see in an upscale restaurant with two or three New York Times stars (setting aside that the star ratings are, at the moment, somewhat incoherent). Also "sauteed" sweetbreads (fried seems more like it, but I wasn't there watching the preparation) with bacon, crispy shallots, Pommery mustard sauce and apple-cucumber salad. A good dish, and while the three little sweetbreads don't look like much they are quite filling. And the always-correct charcuterie assortment, last night with pate, fromage de tete and duck rillette. Mains: "sauteed" (here I'd say more like pan-seared) sea scallops -- great big scallops of very high quality, cooked to medium-rare -- with oyster mushrooms, a carrot-curry sauce and some sauteed greens. The spa-cuisine-type of dish last night was steamed steelhead trout (it was either really steamed or, more likely, cooked in the C-Vap oven) with braised leeks, celeriac-Asian pear puree and maitake mushrooms. An excellent piece of fish if you're looking for a minimalist, lowfat dish. And the best dish, in my opinion: a modern interpretation of duck a l'orange, roasted and served with creamed kale (with little pieces of duck confit mixed in), mustard and lime leaves and a sweet-and-sour orange sauce, with a piece of potato terrine on the side. Every duck dish I've had at L'Ecole has featured excellent, well-prepared duck. This one was noteworthy for the big, thick chunks of breast meat cooked medium-rare, slowly and lovingly so a lot of the fat layer under the skin had rendered out. The cheeses were three from New York State but I didn't note them all. The best was the Old Chatham blue, though. For wine throughout the meal we nursed a bottle of Dr. Konstantin Frank's Rkatsiteli from the Finger Lakes (NY). I had creme brulee for dessert -- textbook -- and didn't try the other desserts on the table.
-
I believe the price of pork bellies is right now very near historical lows. I don't know exactly how to interpret the price chart but here's the info: http://futures.tradingcharts.com/chart/PB/M
-
It's not so much that I'm having trouble understanding what Mr. Shalmanese is saying about relativism v. absolutism. It's that I think the preferences he's describing have nothing to do with relativism or absolutism. Furthermore, I can't see any of those arguments being logically derived from the quoted language. As implied above, the "absolutist" model leads to a reductio ad absurdum: once we identify the best food in the world, in order to satisfy the model you must eat only that food. The pizza question seems to be a separate one. I don't necessarily agree with any of the above characterizations. The reason a Neapolitan-style pizza or any other minimalist product is appealing is, in part, because it offers the opportunity to taste just a few great ingredients in their most flattering incarnations and, in part, because of the synergy that results from marrying a small number of great ingredients and cooking them a given way. The best crust, tomatoes and cheese, taken together, are greater than the sum of their parts. If you bury all that under a bunch of toppings, you extinguish the ideal. Not that I'm opposed to pizza with a bunch of toppings. But it's not the minimalist ideal.
-
Yes, Frank Bruni's affection for Veloce is mystifying.
-
The city recently chose not to renew Tavern't lease, and shortly thereafter Tavern filed for bankruptcy. The New York Times reports:
-
For those not up on the terminology, the Green Cart program is as follows, according to the city governement website: I've also been noticing more news coverage of the Green Cart phenomenon. Here's something from the New York Times profiling a Green Cart vendor in Queens. Among other things, it establishes the basic tension between Green Carts and bricks-and-mortar vendors:
-
I got a thing today on Facebook from Fleisher’s Meats that indicates a new Sunday operation at the Seaport. I guess not a Greenmarket as such, but intriguing nonetheless:
-
I'm not familiar with every book on the subject, but of the few I've seen and own Vegetables A-Z by Schneider, mentioned above, is by far the best.