

keychris
-
Posts
821 -
Joined
-
Last visited
Content Type
Profiles
Forums
Store
Help Articles
Everything posted by keychris
-
That's kind of what they're designed for, Smithy, (but they make a whole egg at a time without having to stick the two halves together), but Pastrygirl wants to put a filling inside them, which would involve (I imagine) putting a small hole probably at the base and injecting the filling into the egg. You could probably do it with a wide gauge needle and a big syringe, but it would be time consuming, and of course you'd have to then seal the hole afterwards. I would just use some coarse grit sandpaper and sand off the alignment nubs - I've never done it on that side of the mould before though, only on the base of a few I had that wouldn't sit flat. Hmm, now I want to inject caramel into eggs. I might just try that this easter Edit: Link works for me, Kerry.
-
Molded and Filled Chocolates: Troubleshooting and Techniques
keychris replied to a topic in Pastry & Baking
More details on your process for the colour, please. But IMO it's not in temper. -
Couverture: Sources, Favorites, Storage, Troubleshooting
keychris replied to a topic in Pastry & Baking
Here's the formula that I use for salted caramel. I imagine if you're getting a butterscotch flavour you are perhaps cooking your milk solids. 36.4% sugar 16% cream 21.3% glucose syrup 25% butter 0.3% salt dry caramelise the sugar - I do it in three batches, ie. first bit caramelised, put the next bit on top of that, caramelise, put remaining thirds in, finish. Whilst that's caramelising, boil the cream then whisk into the sugar when it's caramelised, watch out for steam. remove from heat, add glucose & butter, whisk to combine. Cool to ~30C, add the salt, mix, pipe into shells. Leave at least 24hrs before capping. These last at least 4 weeks at 15C. You shouldn't be refrigerating your product, as a rule. -
Couverture: Sources, Favorites, Storage, Troubleshooting
keychris replied to a topic in Pastry & Baking
if you mix dark and milk together, temper it to the lower working temperature - ie, the milk. It's not wrong to do that, IMHO, so long as people are informed about where the chocolate comes from - don't represent that you made the chocolate from scratch -
Molded and Filled Chocolates: Troubleshooting and Techniques
keychris replied to a topic in Pastry & Baking
If your arms aren't sore from stirring and you haven't got blisters on your hands, you haven't been stirring enough -
The issue with bars is that as that large mass of chocolate sets, it releases energy in the form of heat, which can have an effect on the final product. I believe this is what has happened here, if your test was good. The fix is easy - you need to remove that excess heat, which you can do by placing the filled moulds in the refrigerator for 10-15 minutes to set, then let the chocolate contract fully at normal temperatures.
-
Molded and Filled Chocolates: Troubleshooting and Techniques
keychris replied to a topic in Pastry & Baking
no, no. Unless it's supercold in the middle of winter, then I will warm them a little with a short blast from a heat gun. -
Molded and Filled Chocolates: Troubleshooting and Techniques
keychris replied to a topic in Pastry & Baking
Starting to go a bit off topic, but if you're using a high-fluidity couverture that's giving shells that are too thin, you could try double casting them - cast once, tap out the excess (as much as possible), leave it to just set and then repeat a second time so you have a double thickness shell. It's only worth doing with really fluid chocolate though, otherwise you'll get ridiculously thick shells. -
Molded and Filled Chocolates: Troubleshooting and Techniques
keychris replied to a topic in Pastry & Baking
streaks on the shells after demoulding are usually either unpolished moulds (the marks were there before you put the chocolate in) or contraction marks from the chocolate pulling away from the mould. In the last picture you posted of the empty shells, you can see some streaks in the chocolate - usually indicates temper is still not quite right. And definitely scrape the moulds again before you fill with ganache a cap them, as Kerry suggests! Those demoulded chocs look pretty good though -
That's interesting - the school I occasionally attend exclusively uses Martellato tanks, they're run 24/7 all the time and they don't have those issues.
-
This. I had a smaller 3kg bowl for about 4 months before I got my 6kg melt tanks, and got sick of moulding half-moulds, waiting for that to set, moulding other half very, very quickly.
-
lustre => coloured cocoa butter => white cocoa butter => couverture well, that's how I would do it, naturally omit the white step if you're using white couverture
-
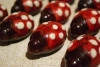
A kahlua caramel for someone who's favourite colour is green
-
it's like balloon animals for foodies
-
Your Daily Sweets: What are you making and baking? (2014)
keychris replied to a topic in Pastry & Baking
Jim, I reckon those are tiles like those that you're pretty damn good at now -
They look like what I call release marks, I see them on big pieces like easter eggs when the chocolate pulls away from the mould. Did you have thicker shells and then do something that would have caused the chocolate to contract quickly, eg. Put into the fridge? And tbh, every time I've done something which has had a finish I've been unhappy with, not one single person has noticed the issue! I bet everyone thought they looked amazing, because they still do
-
the curling is easy to fix: wait for the chocolate to be set to touch, put a piece of parchment or guitar sheet on it, then place the whole lot between two flat sheet pans to set completely. The trimming you could just try with a heated knife, so you're melting through instead of cutting through. HTH
-
heh, I scrape and wipe! Scrape the mould upside down back into the melt tank for the excess cocoa butter, then wipe on a thick layer of paper towels, long enough so I can do a long wipe without wiping off the end of the paper. I always heat before closing, too.
-
Looks like you're getting a tiny amount of chocolate slipping into the gap that's created between the mould and the shell when it contracts. I'm not sure if there is a fix for that.
-
yup! It's on my wish-list... depends how much product I can sell before then http://www.savourschool.com.au/classes/guest-chefs/jean-marie-auboine-panning/classes-detail.aspx
-
He's a great teacher, thinks he's funnier than he is though I'm looking forward to seeing what he's learned about panning next year at one of his classes down here
-
^^ This. I've had moulds that look perfect on the outside with a lovely bloom on the inside that no-one sees Keep a close eye on the temperature (even though it's not the be all and end all) - if you're out of the working temp range you're more likely to see problems. I find this with my tanks that the temp can slowly creep up even though I don't move the dial, they're starting to get old and worn out (just like me!) Do a test set on a spatula or a knife 10 minutes before you start, if that sets up nicely with no streaks, you should be good to go.
-
streaking and bloom (what you're describing) means your chocolate wasn't quite right. Was your room a little warm? Perhaps the heat release as the chocoplate set up was enough to cause the problems. I always try to have my ceiling fan on when I'm dipping to improve air circulation around the pieces and allow the heat to dissipate quickly
-
I'm guessing it's just piped milk chocolate with a very fine hole in the piping bag then cast in dark.
-
Christmas selection As well as about 10kg worth of reindeer and sleigh
