

EvillyChic
-
Posts
19 -
Joined
-
Last visited
Content Type
Profiles
Forums
Store
Help Articles
Posts posted by EvillyChic
-
-
Hi Panaderia,
Thank you for trying out this recipe. I hope to hear more from your oven.

Rose,
-
Hi Fred,
Please do try this recipe.
It has had great results in my oven. The vitamin C is quite vital in making Banh Mi because acid ascobic (chemical name of vitamin C) is a great dough enhancer, it increases the strength of the gluten, help the structure of the loaves more stable, hence bigger volume, hence lighter crumb. About the crispy crust, it depends very much on your steaming.
Hope to hear more from your kitchen Fred,
Rose,
-
Hi DianaM,
Hope to hear more from your oven. I am very excited that you are willing to help me trying this croissant recipe.
I have never tried Julia Child croissant recipe before, I will, soon.Rose,
-
Hi everyone,
I would like to ask you for a favor and try a croissant recipe, please. I want to hear more from others' oven.
Here is the ingredient list for recipe:
Dough:
- 200g (preferably bread) flour
- 7g fresh yeast
- 120 ml cold milk
- 15g sugar
- 4g of salt (3g if you use salted butter in the dough)
- 20g unsalted butter, at room temperature
Butter:
- 112g cold unsalted butter
Egg wash:
- ½ egg
- 1 tbsp. water
Recipes
- Cold ingredients.
- Mix all and knead to medium gluten development
- No bulk fermentation, flat the dough out and chill in the fridge for 2 hours while plasticize the butter.
- Use the English butter lock-in method, not the usual French one.
- Perform a double fold, then chill for 1 hour.
- Perform a single fold, then chill over night.
- Next morning, roll the dough out and shaping.
- Proof for 2 hours. Oven preheated at 220 degree C.
- Bake at 200 degree C for 20 minutes.
I have worked on it for some times now with good results, but this recipe does seem unsual. Feedback and suggestions are highly appreciated.
Many thanks in advance,
Rose,
- 200g (preferably bread) flour
-
Hi,
Apple snail is a very common edible freshwater snail in Vietnam. We Vietnamese use them in cooking.
For more info of it, here is: http://en.wikipedia.org/wiki/Ampullariidae.Because it is a bit uncommon in other countries, I am afraid that if you are familiar with eating it and it will make your stomach uneasy because of food intolerance or you may have some allergy symtoms reaction to strange protein. That's the entail for my caution. But if you have tried apple snail before and are ok with that, then I would recommend using it in the recipe.
Hope my answer your question,
Rose,
-
Hi,
I love cooking with eggplant. Today, I want to share of my completely irresistible “signature” dishes of eggplant. Hope you guys enjoy!
Ingredients (Serving 3)
- 2 medium size eggplants (about 500g)
- 300g pork (cut of your choice, recommended with medium high fat ratio)
- 100g apple snail meat (Optional, it is not poisonous and delicious in my opinion but if you are not used to eating seafood, simply leave it out, since it has distinct taste and smell, and sometimes weird reaction with your stomach. Warning: consume with caution)
- 200g firm tofu
- 2 medium size tomatoes
- 3 cloves of garlic
- ½ bulb of onion
- 5 shiso leaves (Encouraged, it does create a distinct smell for this dish, but if you cannot find it, just take it easy. Both green and purple is acceptable.)
- Some spring onion for garnish (optional)
- Condiments
- 2 tsp. salt
- 1 ½ tbsp. sugar
- 3 tbsp. fish sauce (More or less to your own taste)
- 1 tsp. ground black pepper
- ½ tsp. turmeric powder (Please take some time to look for these in Asian markets, it’s the specialty of this dish)
- 2 tsp. salt
Instructions
Preparations
Step 1: Cut the pork into bite size. Marinate them with 1 tsp. of salt, 1 tsp. grounded black pepper, ½ tbsp. sugar, and 1 tbsp. of fish sauce.
Marinate the apple snail meat with ½ tsp. of turmeric powder and ½ tsp. of salt.
Step 2: Cut the eggplant into bite size. Submerge them into light salty water to prevent them from being oxidized and browning up.
Step 3: Crush and chop the garlic finely. Slice onion into thin rings. Slice the tomatoes. Picture shows below.
Step 4: Slice tofu into cubes like this. Fried them in preheated pan with canola oil until both sides are golden. Get them out, and leave cool on the counter.
Real cooking
Step 5: Start cooking this dish by adding about 2 tbsp. of oil into a preheating pot of at least 2 liters. Add the prepared garlic and onion, stir constantly on medium high heat until they start to be aromatic, about 4 minutes.
Step 6: Add the marinated pork in, stir well for 2 minutes.
Step 7: Add the marinated snail meat, stir well for another minute.
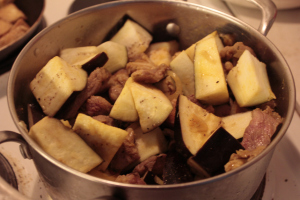
Step 8: Strain the sliced eggplant. Put them all into the pot. At first, it will look like the pot is so full, like this. Give it some stir and then cover the pot with its lit. Keep the heat to medium high. Don’t worry, It won’t burn out. Raw eggplant is filled with water, by heating them up on high heat with lit covered, you are giving a chance for water to come out of the eggplant, reducing its volume visibly.
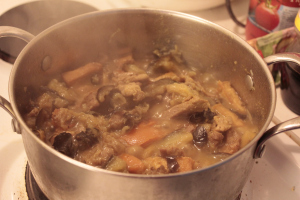
Here is my pot after 10 minutes. The volume decreases to sufficient level, and there is lots of stock water in the pot.
Step 9: Add the sliced tomatoes and fried tofu into the pot. Stir well but gently, you don’t want to smash the delicate soften eggplant in your pot right now. Now keep the lit away from the pot. Let it cooked on medium high heat and evaporate some of the stock water, for approximately 20 minutes.
Step 10: Now you can see that the water level in the pot has been reduced like in this picture, simply taste it and adjust the savor to your own taste. In my pot, I add 1 tsp. salt, 1tbsp. sugar, and 2 tbsp. fish sauce.
Step 11: Chop shiso leaves into very fine strip. Chop the scallion. Add them into the pot, and stir well. Take the pot off the heat.
Step 12: Scoop them onto a serving plate together with warm cooked rice.

Enjoy!
What about you? what is your favorite way to cook eggplant?
Rose,
- 2 medium size eggplants (about 500g)
-
Hi Minas,
Thank you for your suggestion.
It is very tempting. Hope to hear more from your kitchen when you bake these babes.
Rose,
-
Hi Jmolinari,
Thank you for your kind words. I hope to hear more from your kitchen about this recipe.
And yes, you should break the boiled eggs and remove all the hard shell before consuming it. I totally forgot to include that to the recipe.I don't know if this answer your question?
Rose,
-
Hi everyone,
I have something to show you today, a rather quick and easy recipe, suitable for serving as an Asian fusion salad or with cooked rice: Vietnamese Roasted Eggplant.
Ingredients (serving 4, with white rice)
- 1 large eggplant, washed
- 2 eggs
- 2 tbsp. canola oil
- Chopped green part from 2 scallions (only green part needed for this recipe, but keep the white for other use, because they are the most aromatic part of the scallions)
- Fish sauce mix
2 tbsp. Fish sauce + ½ tbsp. water
1 ½ tbsp. sugar
1 tbsp. sweet sour chili sauce (optional, can be replaced by 1 tsp. of lime juice and ¼ finely chopped chili. But beware, its hotness and spiciness depends on different kinds of chili you use, so use with caution.)
Instructions
Step 1: Prepare a hot, fill half with water baking pan on the bottom of your oven. Place your rack on the next lowest level. Put the eggplant with skin on the rack, like mine. Turn the oven to 300 degree Celsius (or yours’ highest temperature). Leave the eggplant in the oven for 30 to 45 minutes; check at 30 minutes and then at 5-minute-regular level.

Don’t worry; it won’t get burn because of the water pan at the bottom of the oven. It creates enough steam to keep the temperature stable and even everywhere the whole oven, rather than focusing on burning the top of our precious eggplant.
In Vietnam, we usually make this eggplant dish in BBQ style, meaning roasting eggplant on rack heated by burning coals underneath (open fire). This style will bring out the most flavor of the eggplant, in addition to giving them a smoky edge to bring them to the next level of wonderfulness. If you have the chance, try it.
Step 2: while your eggplant are being roasted in the oven. Let’s make soft boiled eggs. I used to have lots of problems with boiling eggs; can you believe it? But now, I have learned to boil eggs to exactly how I want them to be, by using a timer.
To use my method, first put medium-size eggs in cool-water-filled pot, heat them up until they start to boil. Then start counting. (Remember; only count when the water starts to boil) The fun starts now! If you want soft-boiled eggs (the white cooked, but the york is just heated to warm, not cooked), count for 5 minutes. Then take them out of the heat immediately, submerge them into ice-cold water for 2 more minutes to prevent any further cooking. If you want medium-boiled eggs (the white cooked, outer part of the york is cooked, but the center remained runny), count 7 minutes. Then use the ice water to quickly cool them down. If you want firm-boiled (both white and york are fully cooked through) eggs count 12 minutes. Then again, the ice water rapid cooling method is used.
My method is for standard for medium size commercial eggs, regularly sold in supermarket. If using different sizes of eggs, kindly adjust accordingly.
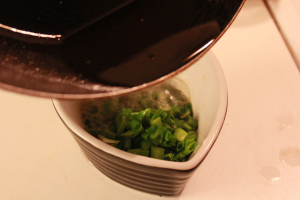
Step 3: is the making of the fish sauce mix. It is super duper easy. Just mix all of the ingredients listed above into a bowl, stir well until all dissolved. Pour it into the halved boiled eggs. Like this. Leave them there to help the egg absorb the savor of the fish sauce mix. Also, the runny york will enrich the fish sauce. Uhhm, nom nom.

Step 4: Put the chopped scallion into a heatproof glass bowl or a baking ramekin. Prepare the scallion infused oil by heating 2 tbsp. of canola oil in a pan until very hot, pour it into the chopped scallion bowl. Leave until further use.
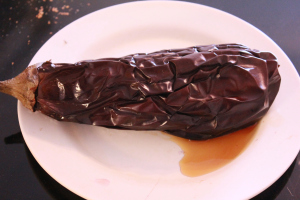
Step 5: By now, your eggplant should be ready. Check the readiness of your eggplant by its softness. The eggplant is ready when it is very soft, the size of the eggplant also decreases by very visible amount, and the skin is wrinkled up. Like in this picture. Take it out of the oven. Leave it on a plate and let cool down a bit until able to touch.
Step 6: Now your eggplant is still warm but easy to the touch. Rip the skin all out and discard. Like Lovely demonstrated in this picture. If your eggplant skin do not come out very easily, put it back in the heated oven and roast for another 5 minutes.
Step 7: Tear up the eggplant into thin strips. Then cut the strips vertically into bite size. Like this.
Step 8: Spoon oil-scallion mix onto the prepared eggplant. Pour the egg – fish sauces mix all over.

Serve warm. Enjoy!
Rose,
- 1 large eggplant, washed
-
Hi all,
Today, I want to bake some cookies: Something sweet, buttery, super crunchy, and something cat-like… I still have some egg whites left from yesterday baking. Eureka! I know what I should bake today! I will bake langue de chat cookies (French for cat’s tongue).
So why do they called them cat’s tongue cookies. No one knows. I have a funny theory. They have that name because they have shape like real cat tongue, and they also have rough surface after baked, just like real cat tongue. So that should explain the name.
It is a very easy to bake and easy to eat-up-all-of-them-at-once cookies. It only contains only 5 basic ingredients for baking. This is a recipe that I recommended for beginners to enter the wonder world of baking.
Ingredients
- 120g butter at room temperature.
- 120g granulated white sugar
- 100g egg whites (approximately 3 egg whites from regular size eggs)
- 130g all-purpose flour
- ½ tsp. vanilla extract
- ¼ tsp. salt
The original recipe that I used to work with does not use salt. But one thing that I learn from my baking experience is that contrary is the key for dynamic flavor, like in Indian curry, you adding sugar to make the your dish more spicy. By adding a very small amount of salt, you are actually enhancing the sweetness and complexity flavor in your baking. So, what the harm?
Instructions
Step 1: Preheat your oven to 200 degree Celsius.
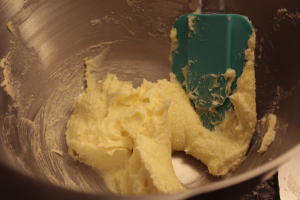
Put sugar and butter into your mixing bowl. Cream them up with the paddle attachment of the stand mixer. Or use the whisks of the hand mixers.
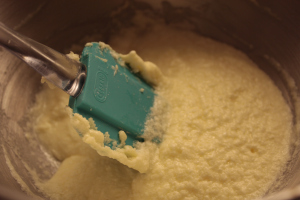
Start at low speed to incorporate the sugar into the butter. At first, they will look grainy and they butter color is yellow. Keep beating at high speed. Be patient.
After 5 minutes of creaming, they should look like this. The butter color is now pale yellow, almost white and it has gained some volume too since this step is to introduce air into the mixture. Like below.
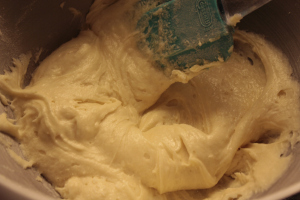
Step 2: Add egg whites into the mixture, one by one, with stirring by paddle attachment every time. After adding the 3rd egg whites, your mixture might look like everything is not well combined, almost like egg or tofu curds. It is totally normal. Don’t worry, mine are like that too, look.
Step 3: Now add 1/3 of the flour, vanilla extract, and salt in. Mix well just until incorporated. Add another 1/3, mix again, and repeat one last time. You don’t want to add all the flour in at once, it might cause lumps in your batter. As I said, be patient and delicate.
After 3 times adding and mixing flour in, you should have a very thick batter like this.
Step 4: Put the batter into a big piping bag. I usually put mine into a big tall glass, open it up and the scoop my batter in. That way, the batter is more manageable and you will have less cleaning to do after.
Step 5: Prepare your cookie trays (recommended 2) with baking papers. Pipe the batter out from the bag in form of small long cigarettes of 1cm wide, 5 cm long, each 3cm away from each other. DO NOT pipe them any closer to each other than 2cm. Be generous, these cookies do know how to spread.
Step 6: Bake that cookie tray in the middle rank of your oven for 10 to 11 minutes, just until the edge have light brown color.
At first the cookies are soft and bendable. But they will crisp up very quickly after 3 minutes. And they should come out of the tray very easily.
Do stay near the oven and watch those little cookies, because once they brown up, they brown up real fast.
Here is how I arrange these cookies baking. When I put the 1st tray into the oven, I start piping batter out on the 2nd tray. When the 1st tray is ready, I take it out and put the 2nd tray in. I then let the 1st tray cool down a bit, let’s say 5 minutes, take all the cookies out, and pipe another batch on (while CAREFULLY watch the 2nd batch in the oven). The batter may spread a bit on the 1st tray because it’s till a bit hot and that’s OK, they still perform the same inside the oven.
Step 7: Let the cookies cool down for 10 minutes. In the meanwhile, prepare yourself a cup of rose tea.
And then, enjoy! Happy Baking!
- 120g butter at room temperature.
-
Hi rickster,
I have heard many myths about Banh Mi, too, some of them including using rice flour in the recipe. But the Vietnamese bakery that I used to work for does not use any rice flour in their recipe (and they have worked in the business for more than 10 years). So I just assume that maybe it can be excluded.
And I have had stable successes with the one I posted in here. I think the secret of Vietnamese bakeries is on using vitamin C and bread improver (sadly), and how they shape the loaf.
Rose,
-
Hello every one,
Today, I want to share one of my favorite pastry recently: Portuguese Egg Tart.
I first knew about this tart from KFC. One time, I went to our favorite KFC spot in HCMC when they were promoting these. They asked if I wanted to try. It looked so irresistible, so why not? Since then, I have been in love with this pastry. But it’s so expensive buying them from the shops, comparing to its easy-to-find ingredients and easy-to-make nature; especially now I are studying in Finland. I decide to make them myself.
So here is how I make Portuguese Egg Tart. (12 mini tarts)
Ingredients
Tart crust
500g store-bought puff pastry
Filling
150g heavy whipping cream
200g whole milk
¼ tsp. vanilla extract
60g granulated white sugar
2 whole egg + 2 egg yolk
Instructions
Step 1: My puff pastry is already cut into rectangles like this, 125g per, so I use 4. Roll them in to tight cylinders. Stick layers of dough up at the end of the roll using a bit of water.
Step 2: Cut each cylinder into 3 smaller ones. 3 multiplies by 4 is 12, that’s how I divide mine. If yours comes in bigger or smaller size, divide them accordingly to have 12 even balls of puff pastry.
Step 3: Dip every ball into a dish of flour generously. Then roll them out into a thin round sheet with the cycle side facing up, like this.
Here is where my mistake happened. I should have roll these a bit thin toward the edge, leave the inner thicker because the filling will make the puff pastry crust wet while baking and make the tart more fragile that usual egg tart.
Step 4: Prepare your tart pans by grease the with melted butter, or put some cupcake paper cups in, like me. This is very important because if you don’t, the tart will stick heavily to your pan. Then adjust all the crust into your tart pan, in my case, cupcake pan.
Step 5: Preheat your oven to 200 degree Celsius. Prepare a rack on the last level.
Step 6: Separate your eggs. Put eggs and yolks into one bowl with all the sugar. Beat them lightly with your whisk until there is no string of egg white left.
Step 7: Add heavy whipping cream and milk into the egg mixture above, whisk until everything combined. Add the vanilla extract. And you are done.
Originally, the filling must be made by double boiling method, meaning the egg mixture must be cooked on a heatproof bowl that stay on top of a boiling pan, until it thicken up. Then let cool to room temperature for about almost 1 hour. I decide to go shortcut on this since Bear was OK with that the last time and I do not wish to prolong my baking time further. It totally depends on you to choice how you want to do in this situation.
Step 8: Pour the filling into the prepared tart pans, through a strainer.
Step 8: Put the tarts into the preheated oven, last rack.
Step 9: Bake them for 25 to 30 minutes or until the top of the custard caramelize a bit. During the baking time, I see my tart fillings popping up like balloons.
I just did a little sneak and my egg custard like of crack on the surface.
Step 10: Take the tarts out of the pan. You can enjoy them now, as they are warm, some forks prefer that. Personally, I enjoy them cool, because by then, the crust will be settled and less fragile, and the filling is more enjoyable. If you prefer mine, put them in the fridge for 30 minutes before serving.
Eating these tarts are like having a Fandango dance on your tongue. The buttery flavor of puff pastry combines with the soft, rich custard. Uhhmm. My limited vocabulary cannot fully explain this.
Hope you enjoy the recipe. I have some problems this time, for instant, my filling pop like balloons while being baked. Then it cracked on the surface, and my crust seem a bit too fragile after being bake.
Here is its innards
.

How could I avoid these problems? Thank you so much in advance.
Anyhow, Happy Baking!
Rose,
-
Hi,
I am glad that I could be helpful.
rotuts: it does take time and practices to have the perfect slashes. And I am still working on mine, too. Let's make some Banh Mi and practice our slashing skill.
ElsieD: You are very welcome. This Banh Mi used to be a myth for me too. But after creating and using this recipe. I start to believe that it is hard, but still achievable for home bakers like us. Please do try this recipes. I am new to all these online cooking and baking communities so I highly appreciate constructive comments and feedbacks.

Rose,
-
Hi everyone,
I am Rose, a Vietnamese student from Finland.
Today, I want to share a Vietnamese dish that is so easy to make, yet super tasty, and almost foolproof: my version of (Southern) Vietnamese Quick Braised Pork Belly in Fish Sauce. (Fear not the fishy smell of the Vietnamese traditional fish sauce; it’s perfectly complimented with this dish thanks to the roasted garlic and black pepper)
I don't know how to add picture in this post so if you want an extra detailed instruction with photos in every step. Kindly refer to my blog post here: http://simplyafoodblog.wordpress.com/2012/04/29/vietnamese-quick-braised-pork-belly/
Ingredients
500g of pork belly with skin still on
2 tbsp. fish sauce
3 tbsp. granulated white sugar
1 tbsp. water
2 garlic cloves, crushed and finely chopped
½ tsp. grounded black pepper (freshly grounded is best)
Instructions
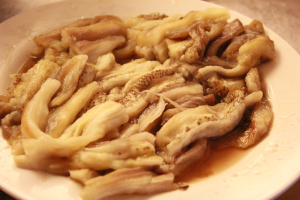
Step 1: Wash the belly with salty water and dry it with kitchen towel. Slide pork belly into thin rectangular vertically.
Step 2: Get a clean small bowl and mix fish sauce + sugar + water together. It does not need to be completely dissolved.
Step 3: Place the slices of pork belly on a small non-stick frying pan.
Step 4: Put the pan onto the stove, turn the heat on high. Without adding any excess oil. Leave the pan there for 3 minutes. After 3 minutes, you can see the steam coming out from your pan, that’s totally normal and not a sign of burning.
Step 5: Now you can starting hearing the fat coming out of the pork belly sizzling on the pan. Let the pan sit on heated stove for 3 more minutes, until the under of the belly slides start to turn golden. Flip all over, like this.
Step 6: Wait for 5 more minutes until the other sides turn golden too. Put all the garlic in; give it another stir until the garlic start to be aromatic.
Step 7: Then pour all the fish sauce mixture into the pan.
Give it a quick and even stir. At first you can see the water in the fish sauce mix boil and evaporate very quickly while the sugar start to caramelize.
Step 8: Wait for 5 more minutes or more with flipping the pork belly from side to side for even browning, until you achieve this: golden brown shiny slices of pork belly slices. The water should almost all evaporated, just a little sauce left, enough to coat the outside of every slices.
Step 9: Sprinkle grounded black pepper on top. You can now enjoy the most wonderful aroma in Vietnamese cuisine: the mixed heaven in your nose of roasted garlic, caramelized sugar, freshly grounded black pepper, and fish sauce.
Try a slice now. Chew. Uhhhmmm. I know! Hey, let’s resist trying another, because if you continue, who knows if there is anything left for real serving, LOL.
Step 10: Serve warm with cooked white rice. And dig in! Challenge your chopstick handling skill!
This is a super easy Vietnamese dish to try if you are new to our cuisine.
So fear not, and hold up your fish sauce bottle.Rose,
__________________
-
Hi everyone,
My name is Rose. I am new to the forum.
I don't know yet how to upload photo into my post. So here is just text without any picture. For a clearer instruction with detail on my notes and pictures of every step, please refer to my blog post at: My link
Here in this post, I would describe how I make Bánh mì in my own way, which suitable for home bakers, who share the same dream of conquering this challenge to successfully recreate the mysterious Bánh mì baguette.It is quite long, but I hope you stay and read.
Below is how I make Bánh mì baguette. (6 loaves, 75g per loaf)
————————————————
Utensils needed
- An electric mixer with dough hook attachment (recommended)
- Clean bowls
- A digital scale
- A baguette perforated baking tray
- A spray bottle
- A double razor slashing lame
————————————————
Ingredients and Instructions
- 160ml lukewarm water (around 35 degree Celsius)
- 6g fresh yeast
Step 1: Dissolve fresh yeast into the measured warm water (Remember: warm water is needed to activate the yeast, do not use too cool or hot-to-touch water). Let sit for 5 minutes or so until there is bubble on the surface. This is a necessary step to check if your yeast is still alive and active. If the mixture does not bubble up after 5 minutes, discard it, and make a new one, maybe this time with a different yeast source, or pay attention to the water temperature.
Personally, fresh yeast is what I am always to use in making my Bánh mì. I have tried making it with different brands of dry yeast without stable success, so I just drop that and stick with fresh yeast. Surprisingly enough, my Bánh mì dough, when being made with fresh yeast, comes out a bit firmer and cohesive than when being made with dry yeast (and Bánh mì or other baking products baked with fresh one has less yeasty smell. It has been claimed that bread baked with fresh yeast have superior flavor, too.) So just some more reasons why I stick with my precious little fresh yeast cubes in my bread baking.
However, if fresh yeast is not available, or you are not familiar with it, try sticking with your normal dry yeast because technically, they should react the same way and produce the same result. So for this recipe, if you wish to use dry yeast, use 3g of dry yeast. If you wish to use instant yeast, use 2g of instant yeast. Just make sure that you activate the yeast correctly according the manufacturer instruction.
- 230g bread flour
- 20g finely grounded rye flour
- 20g sugar
- 4g salt
Step 2: Mix all the dry ingredients in to a large mixing bowl. I use a combination of bread flour and rye flour (8% of total flour weight) because as I researched and experimented, rye flour does add some advantages to my Bánh mì dough.
- Firstly, a small amount of rye – 5-10% of the total flour by weight – has a definite effect on the flavor of the bread. The distinctive flavor of the rye itself may not be noticed, yet the bread’s overall flavor seems better. This may be due to the action of the amylases in rye releasing more sugars. This is necessary for this bread because originally, Bánh mì has quite plain taste.
- Secondly, dough with rye flour added often require a bit higher proportion of water than pure wheat dough. Therefore, even though this dough is 64% hydration, by adding 20g rye flour, the dough is less sticky and easier to handle.
- Thirdly, rye has more free sugars than wheat, so rye added dough ferments faster than pure wheat dough. You can cut down the fermenting time by adding bit rye flour into the dough.
- Fourthly, this point does not have scientific background though, by adding a small amount of rye flour, I noticed that the bread crust is crispier than pure wheat loaves’. It’s almost like hard flakes, which resembling original Bánh mì’s crust a lot.
If you don’t have rye flour in hand, simply just leave it and add the same amount of bread flour, meaning 250g in total. I used to use only pure bread flour with many successes too.
NOTE: The bread flour I use is semi-coursed 13% protein bread flour (which is normal and usable, because wheat produced in Europe tends to have higher protein percentage than in other regions). The rye flour I use is finely grounded rye flour.
I also add sugar in the recipe to increase the complexity in flavor for this bread since this is not long fermented bread, the flavor can be cut back quite deeply, and have to be support by outside substances. About salt, I use regular table salt, nothing fancy about that.
- 20g odorless oil such as sunflower or canola (or a mixture of 10g melted butter – 10g oil)
Step 3: Add oil or oil-melted butter mix into the dry ingredients bowl. Usually, there is no oil in baguette recipe. But please do, in this recipe. Oil will make the crumb moist and soft, resembling original Bánh mì. In Vietnam, bakers use bread improver to increase the moisture in the crumb, but I do not support any kind of addictive added to homemade breads, so I recommend to stick with the oil. A mixture of melted butter and oil can create the buttery smell of the finish products, so, use this mix if you like your bread to smell like a bit more like heaven when it’s being baked and done.
- ½ vitamin C tablet (100mg acid ascorbic per tablet)
Step 4: Crust ½ tablet of vitamin C into fine powder and sprinkle into the mixing bowl, together with other ingredients. Acid ascorbic creates an acidic environment for the yeast that helps it work better. It also acts as a preservative & deters mold and bacterial growth. With just a touch of ascorbic acid, your breads, the yeast will work longer and faster. By adding this amount of Vitamin C as an improver, my bread dough strength improves significantly; the loaves are also lighter, airier, which make it a lot lot like Bánh mì in Vietnam. However, it gets destroyed during baking, so no health benefits!
I do not recommend using orange/lemon flavor fizzy tablets or Vitamin C candy (even though they contain acid ascorbic), as they do not react the same way as pure acid ascorbic. Vitamin C tablets can easily be found in pharmacy shops and one small bottle of them can be use like forever, so if you want to conquer Bánh mì, the addition of acid ascorbic is a must.
Step 5: After your water-yeast mixture has bubbled up, add it in to the dry-oil-vitamin C mixture in the same mixing bowl.
Step 6: Start combining all your ingredients first by starting the mixer at low speed until you achieve a mass. If your mass looks wetter, simply add more flour at 10g each addition. If you mass look dryer, simply add more water at 5g each addition. This can happen due to different flour type that you use, or because of the environment differences such as humidity.
Use the dough hook if you have a stand mixer like me. Some hand mixers also have a duo of dough hooks, which can also be used. Or if you make bread by hand, just create a well in the center of the mixing bowl, add water gradually when using your hand to in a circular motion to help the flour absorb the water, until you achieve a mass like above.
Step 7: increase the speed to medium high speed if using electric mixers. Stop at 5 minutes interval to check the level of gluten development in the dough (a.k.a the strength of the dough). Here is my dough at 13 minutes of mixing, fully developed gluten, that my dough can be stretched out in to very thin, almost see-through sheet.
Step 8: Shape your dough into a ball and let it rest in a lightly oil container for 1 hour or until double in size. This is the bulk fermentation stage, which let the dough rest for further gluten and flavor development. My apartment is always a bit cold, around 20-22 degree Celsius inside, so my solution is that I cover my container with a warm damp towel, put it inside my oven, which light turned on but no heat applied.
Step 9: After the 1 hour bulk fermentation. Flip the dough out onto your working surface, which already oiled lightly also. It should come out very easily since the containing bowl was oiled. It will deflate a bit and that’s alright.
Step 10: divide the dough into 6 equal parts, 75g each. Then gently shape them into short cylinders, like this. The them bench rest for 10 minutes, covered with plastic wrap.
Step 11: After 10 minutes rest; turn 1 ball on to the lightly oiled surface. (As I explain the previous post here, Bánh mì baguette shaped on a lightly oiled working bench, not by using excess flour). Stretch it into very thin sheet, like this. But not too thin that makes it tear apart. Pay attention to the edge of the dough sheet because it tends to be thicker than the inner part, keep the edge very thin. (Otherwise, you will end up with a bone-like shaped baguette)
Roll the sheet very very tightly into a firm torpedo. You should feel the tightness of the torpedo, or else, it will not spring properly when baked. Continue with the remaining balls. When finished, you have a tray like this.
Step 12: Mist the loaves with a spraying bottle a couple of time to create the needed humidity for the proofing. Let the tray go through the final proofing stage in a homemade proof box like this, in room temperature, for 1 more hour. Basically, it’s a big size black plastic bag I found somewhere in my apartment, clean thoroughly and let dry.
After 45 minutes of final fermentation, preheat your oven to it’s maximum temperature, in my case is 300 degree Celsius
Step 13: At this stage, your oven should be preheated properly to 300 degree Celsius. Your loaves have been proofed to the right stage. You have to make sure that your loaves have a smooth, not totally dried-out but not wet surface. If they are still wet outside, or stick to your finger, you should consider leaving it out in room environment for like 5 minutes to create a “skin” to your baguette.
Now it’s time for some slashing. I used to have countless troubles with slashing my baguettes. But after viewing this wonderful video I open up my eyes.
Here is how I perform my slashing:
- Stand vertically from the loaf, not horizontally; you are facing the loaf length-wise not height-wise.
- Hold the lame like holding a key to open a door.
- The lame should be hold not perpendicularly with the loaf but at a slight angles of about 30 – 45 degree. The cuts should not enter deeply into the loaf, but rather making a lift right under
- Slashing motion is done with the entire arm, not just the hand.
- Imagine dividing the dough into 3 equal strips length-wise. Your cuts should all fall into the center trips but not across the whole loaf.
- Your cuts should be around 0.8cm deep, 5 cm long, with around 1.5cm overlapping with the previous cut.
- After cutting the loaf, I pipe a small line of shortening/margarine into the cut. When baking, the shortening or margarine melts leave the inner part of the cut moister and more fragile than the outer crust, therefore, if the loaves spring while baking, it will choice the weakest point to rise up, which is the moistest part of the loaves.
These following steps are critical in the making of Bánh mì. So read the instruction first, and then follow them exactly.
Step 14: Prepare your oven properly now. Check carefully if there is any air vents in the oven, if there is, cover the exit tightly with a cool damp towel. Mine have one but I did not notice for such a long time, so you’d better check, for the best.
Prepare 200ml of hot water. Boiling is best.
Step 15: Right after slashing your Bánh mì loaves, mist them generously with water from spray bottle.
Step 16: Open the oven’s door, splash the prepared hot water onto the oven floor, and put your prepared baguette tray onto the center rack, close the door immediately. This is how I create steam for my oven.
There are more ways to create steam for your oven. Feel free to explore all the possibilities.
Step 17: Turn down the heat to 275 degree Celsius. Bake with steam for the first 7 minutes.
Step 18: Open your oven’s air vent (that previously covered by a damp towel), ajar your oven door for 1 minute by a wooden spoon to let the steam evaporate completely. Then close the door, reduce the heat to 250 degree Celsius and bake for 8 more minutes.
Turn your tray inside out if needed for even browning. If your baguettes brown too quickly or too slowly, simply adjust the baking time or the heat accordingly.
Step 19: Turn off the heat, ajar the oven door, and let the tray sit in the oven for 2 more minutes. Then take them out and let cool off for 5 to 10 minutes.
Step 20: Enjoy. You can see in this picture below that the bread has almost little white moist crumb. Perfect for adding layers of your favorite fillings in and eat them up. Nom Nom…
What do you think? What is your favorite Banh Mi recipes? Any comments and discussions are highly appreciated.
Thank you,
Rose
- An electric mixer with dough hook attachment (recommended)


Is it a bread? or is it a cake?
in Food Traditions & Culture
Posted
Hi everyone,
I have a question. Have anyone try Bill's famous coconut quick bread recipe somewhere?
Here is my version of Bill’s Famous Coconut “Quick Bread” (It is confusing, isn't it?)
Ingredients (for 1 loaf of 23x7cm)
Dry mixture
200g all-purpose flour
75g grounded flaxseed (if you don’t have this in hands, just omit it and replace by the same amount of flour, so in total of 275g flour)
150g dried coconut flakes
1 cup = 201g white granulated white sugar
2 tsp. baking powder
2 tsp. cinnamon powder
Wet Mixture
2 eggs
300ml milk
1 tsp. vanilla extract
75g melted butter
—————————————–
Instruction
Step 1: preheat your oven to 180 degree Celsius. Line a 23x7x7cm baking tray with parchment paper.
Step 2: Now weight all the dry ingredients listed above into a big mixing bowl. Mix well.
Step 3: Now weight all the wet ingredients in another bowl. Mix well, too.
Step 4: Now slowly pour the wet mix into the dry mix bowl while constantly whisking using a hand whisk.
Continue whisking just until all ingredients combined and lump-free. Stop your whisking right away when you reach this stage. No more or your loaf will be dense.
Step 5: Pour the batter into the prepared pan. Even it out by gently “slamming” the pan against the kitchen counter a couple of times.
Step 6: Put the loaf on the lowest rack, in my case because my upper heat is stronger than my lower heat and this quick bread does take long to bake.
Step 7: Bake the loaf for approximately 50 minutes or more until the skew sticks inside the loaf coming out clear.
After 30 minutes, your kitchen will start to smell heavenly amazing. The combination of coconut, cinnamon and vanilla is irresistible.
If your loaf browned on the top too much while the inside is still not done, simply take the loaf out, cover the top with aluminum foil, and continue your baking until the skew test is achieved.
Step 8: When your loaf is done, let it sit on the counter for 20 minutes.
20 minutes are up. Now flip your loaf out of the pan. Slice and serve.
I am a bit confused? Is it a bread or is it a cake? Could some one define it for me please?)
Rose,