mostlylana
-
Posts
418 -
Joined
-
Last visited
Content Type
Profiles
Forums
Store
Help Articles
Everything posted by mostlylana
-
I'm intrigued with the 'inverting too much sugar' explanation. It makes so much sense. I'm wondering about making brittle in a copper pot. Doesn't the acidity of a copper pot, like adding lemon juice to a stainless steel pot, cause more sugar to invert? I'm thinking that making brittle in a copper pot wouldn't be the best idea then...
-
Yeti, I'm not an expert with cocoa butter but have done lots of research as I was having similar issues when using a spray gun. One thing that you are doing that most likely caused your outcome was chilling after each colour. Derek Tu Tan Phoo (I'm sure I've spelled that wrong!) from the Montreal Callebaut Academy told me that chilling such a thin layer of cocoa butter will cause it to turn from Beta 5 crystals (the good ones) to Beta 6 crystals. This will give you release problems. Just let set at room temp. If your other mold without cocoa butter released just fine - it wasn't your temper. And not buffing the molds wouldn't lead to such drastic release problems. I'm sure that's not it. Another thing you want to make sure of is that your cocoa butter is in temper. People do this in different ways. Some heat slightly and shake. What you want to be careful of is heating too high and melting out all of the beta 5 crystals. I heat and pour out all of my cocoa butter colours when I get them and temper the whole thing by tabling. I then pour it onto parchment and let set. I break it all up and store the chards. When I want to use colour I melt out what I need and use some chards as seed. I do it this way for a couple of reasons... I don't use a lot of coloured cocoa butter so by keeping it solid it will last longer. Also, the cocoa butters I use are the Natural ones made with natural colours. They are sensitive to light, heat etc. so don't like being melted out all of the time. Also, by ensuring that I have the cocoa butter in temper, I haven't had any more release problems. Yay! I should note that when I temper, I do it at the very high end of the temper range as I know that I will be encouraging more crystal growth by spreading it around with my finger. I have never had an issue with new molds. I wouldn't say 'seasoning' them is necessary but it wouldn't hurt. Good luck
-
I finally got the courage up to try using an immersion blender when making French caramels. The one I have has a stainless steel head with varying speeds. I used the lowest speed strictly out of fear! The reason for using the immersion blender was to reduce the amount of lecithin required for caramels with a high butter content. It worked! And no splatering at all! (whew) For a full recipe I only used 1/4 tsp. lecithin. I just used the blender at the end - just before it came to temp. (but I was using the whisk the rest of the time). I just cut and dipped today and the caramels had no greasy feel whatsoever. I do use less butter than what is called for in the recipe given on this thread - but not much! Woo Hoo! Thanks so much prospectbake!!
-
I'm finally ready to buy my ISI Gourmet Whip. I'm now deciding on size... I would like to have the option to do a full frame of bubbled chocolate - my frames hold 1400g - but I want to use it for smaller applications as well. I was going to get the 1 litre (1 quart) model but have since read that it needs to be completely full when used. Hmmmmmm.... I was hoping someone could let me know how much the chocolate expands onced 'foamed'?? Would a pint dispenser be adequate for my frame? That means the chocolate would have to expand almost 3x's. I'm thinking I might have to go with the 1 litre (1 quart)... So if I have to go with the 1 litre, will that size work with smaller amounts of ingredients?? If anyone has experience using a smaller quantity than recommended in the ISI, I would love to hear about it. If it does work, would you need to use more chargers for 500ml (a pint) of ingredients in a 1 litre dispenser as compared to a pint dispenser? Maybe I need 2 of these puppies.
-
Thanks for the info Edward. 1 tsp. isn't much. And it sounds like you do this right in the panning attachment... Would cocoa butter also work as a sealer? If I recall, it does.
-
I'm wondering if it is imperitive that nuts are 'sealed' before panning? I make nut bark and do not process the nuts in any way other than roasting. I've held bark for months with no signs of blooming. Do you think there is a difference between nuts in bark and panned nuts? Can you expand on how to use the gum arabic Edward? - I've never used it. ie. amount in water? amount to use per ?? grams of nuts? I would prefer this to the additional sugar of caramelizing. Thanks!
-
Advice Needed: Basil Ice Cream with Eggs /Cornstarch
mostlylana replied to a topic in Pastry & Baking
Thanks so much for the recipe Paul! I had made the ice-cream prior to seeing your recipe (I, too, couldn't access eG??). It turned out great. I also added a tsp. of vanilla extract at the end. Perfect texture - very scoopable. I did whiz up the xanthan gum with everything else at the beginning of the recipe. I then added all of the milk and the yolks and processed it in the Thermomix. No problems - and very easy. I had more sugar in my recipe than yours. I will try it again with the reduced amount of sugar - I found it a bit too sweet and the texture was soft enough to allow a reduction. I already want a professional ice cream machine though. I found a great article on stabilizers in ice cream: http://www.lucidgroup.com/knowledge-center/stabilizer.pdf I'd like to try locust bean gum one of these days. Has anyone tried it? -
Advice Needed: Basil Ice Cream with Eggs /Cornstarch
mostlylana replied to a topic in Pastry & Baking
Dear Emperor ... Well I've done lots more reading and I'm ready to try my second batch of ice cream. I checked my bowl in the freezer and it's frozen solid (unlike the last time - it still had some slush going on - woops...) I have a few questions before I start... I'm making my base in the Thermomix so have no need to fuss over the custard base. In the Thermomix ice cream recipes you put all the ingredients in the Thermomix, set to to 80C and go! My question is about the xanthan gum. I notice that most professional recipes add the stabilizer to the custard and it's cooked. I'm wondering if I can do that with the xanthan? On a technical page I found, it said that it is heat stable and unlike starch will not continue to thicken. It keeps it's properties regardless of heat. So I'm thinking I can go ahead and heat it?? What I would like to do is blend the sugar, destrose, salt, gelatin and xanthan in the Thermomix and then add the remaining ingredients. That seems like a good way to disperse it to me... Any thoughts? I'm going to stick to your proportions pretty closely. In searching out other professional recipes, I've come up with the proportion of 1/2c. white sugar, 1/4 cup dextrose and 1 tbsp. invert sugar for the sweeteners. Does this sound reasonable to you? Also, I notice that most professional recipes use more milk powder than your original recipe states. Mind you, they are also using a higher ratio of milk to cream. Are you still using 25g. per 1-1/2 cups milk / 1-1/2 cups cream? I worked out my % of solids and it works perfectly with this amount - but I still have room to go higher. Oh and for anyome interested (although most of you ice cream fans probably already know about this...), I found this great butterfat calculator. So easy to use! http://www.icecreamgeek.com/?page_id=817 -
Advice Needed: Basil Ice Cream with Eggs /Cornstarch
mostlylana replied to a topic in Pastry & Baking
Wonderful - thanks! I must admit, I changed the David Lebovitz recipe to add some invert sugar. Silly really as I have no clue what I'm doing in regards to ice cream... I found your recipe here on eG - in the recipe section. In nosing around all of the ice cream posts, I noticed that you are somewhat of an ice cream master! If you have an ice cream book recommendation I would love to know of it. I'm particulariy interested in the science behind it so I can learn to play. One that came up is 'The Science of Ice Cream' by Clarke. Do you know of it? -
Advice Needed: Basil Ice Cream with Eggs /Cornstarch
mostlylana replied to a topic in Pastry & Baking
I made my first ice cream (vanilla) a few days ago in the KitchenAid attachment using the French Vanilla ice cream recipe from David Lebovitz. It was delicious but unfortunately the end result was icy. After much reading I've determined that the bowl wasn't cold enough. I gave it 14 hours in the deep freeze (they recommend a minimum of 15 hours). My reading also led me to an interesting formula that I want to try - a vanilla ice cream posted several years ago by you Paul! I see here that it looks like you've changed your formula somewhat. So no more cornstarch? What about Vodka and Milk Powder? I'll post the old recipe and perhaps you can coach me with the changes you've made? Can't wait to try it! Here it is... Vanilla Ice Cream (really good!) Serves 6 as Dessert. I wanted to create an Ice Cream base with the smoothness, body, and stability of an egg yolk-ladden, very rich, custard-based Ice cream--but without the strong egg flavor or the greasy film that these Ice creams can leave in your mouth. I turned to some of the tricks used by my favorite pastry chefs. There are two yolks per quart, instead of the usual six or more. There are also added milk solids, and very small amounts of gelatin, starch, and alcohol. The recipe is a bit more complex than typical homemade Ice cream, but I think it's worth it. It has a full body, a natural and creamy melt, and it will last several days in the freezer without deflating or getting icy. It will be a bit too hard to serve when it's at freezer temperature, but not rock-hard like typical home recipes. This recipe will work best with a slow-turning machine that doesn't introduce a lot of air (overrun). It will give you between 3/4 and 1 quart of 15% butterfat Ice cream. You can replace the Vanilla with the seasoning of your choice. You can also increase or decrease the amount of fat by changing the proportion of milk to cream. I like to use less fat with fruit flavored Ice creams, and much less fat with chocolate. •1-1/2 c Whole Milk* (367g) •1 tsp Cornstarch (2.8g) •1 Vanilla bean (I like Madagascar, but Mexican is also good) •3/4 c minus 1 TB Granulated Sugar (128g) •2-1/2 T Nonfat Dry Milk** (25g) •1/3 tsp Powdered Gelatin (1g) •1 pinch Salt (1g) •2 Egg Yolks (36g) •1-1/2 c Heavy Cream* (358g) •2 tsp Vodka or alcohol-based Vanilla extract (10g) -Make slurry with cornstarch and a small portion of the milk -Add cornstarch slurry to 1/2 of the milk and bring to a light simmer in a saucepan. Stir until it thickens. -Add the rest of the milk. Stir and heat just until it steams (about 180 degrees F). While it's warming up, split the Vanilla bean lengthwise and scrape the seeds into the milk with the tip of a finger or paring knife. Add the bean pod to the milk. When the mixture reaches temperature, remove from heat. let it sit covered for 30 minutes. -Whisk yolks until pale (optional—to diminish yellow color of base) -Remove Vanilla bean from milk and set aside. Thoroughly mix the dry milk, powdered gelatin, and salt into sugar. Whisk this mixture into the milk. -Temper yolks with a portion of the warm milk and pour the milk / yolks back into the saucepan. -Cook over medium heat, stirring constantly and scraping the bottom and corners with a spatula until the custard thickens (about 180 to 185 degrees).*** Turn down heat and continue stirring vigorously for 15 seconds, then remove from heat and stir another 15 seconds. -Pour the custard into the heavy cream. Stir in the vodka or extract. Put the Vanilla bean back in. Chill thoroughly, at least 8 hours. If making a large quantity (more than 1 quart) chill in an Ice bath before refrigerating. -Strain with a fine strainer or chinois (important). Rinse and reserve Vanilla bean for something else. Freeze the mix in your Ice Cream maker. With a mulitispeed machine, start on slowest speed. At end when Ice Cream firms up and begins to expand, raise speed until you get the volume you want (this recipe works best with a low overrun). -Harden for several hours (ideally overnight) in a cold freezer. If you can set your freezer to -5 degrees F or lower, you'll get better results. Ice Cream will have to warm up several degrees before serving. 20 to 30 minutes in the fridge works well. Ideal serving temperature is 5 to 10 degrees F. -
I'm late to the party on this one! I can't wait to try this technique. I have a question I hope someone can answer... Some time ago I started a thread about mousse ganache: if you want to take a look. I had tried mousse ganache in Paris and loved the soft, airy texture. It seems the predominant flavour in mousse ganache from several different chocolatiers was caramel mousse (it was always a caramel/chocolate ganache). It got me thinking that using a runny caramel to make the ganache would result in the perfect texture to use the ISI with. Having never used one I am only surmising this from the chocolate + 10% oil formulation. Am I way off base here? Do you think the ISI could make a caramel mousse ganache?
-
My vote is also with Maldon. There doesn't seem to be any harshness at all to it. If a salt can be smooth - this one is! It's a flake sea salt so it has a nice crunch that's not too hard.
-
Thanks for the clarification Edward. Another tip I will definitely try!
-
I second Kerry's 'brilliant'! I'm still smiling from your silicone brush tip too. I have a question about your 'secret method'. I'm sure it's a dumb question but... oh well... You said after you sheet it you score it. I don't get how to score it?? As I'm picturing it - the caramel is between 2 silicone sheets (stuck on!). Do you score through the paper? Do you use a sharp knife to cut right through? Thanks!
-
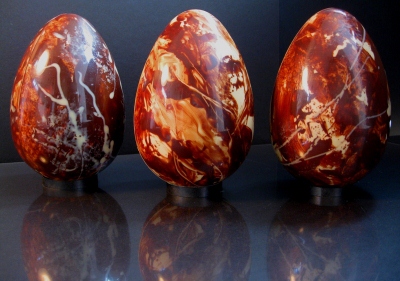
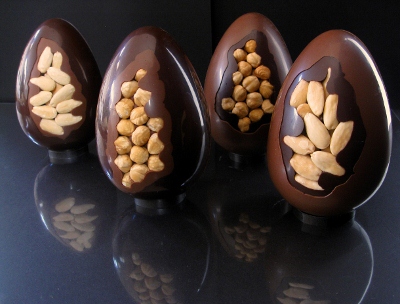
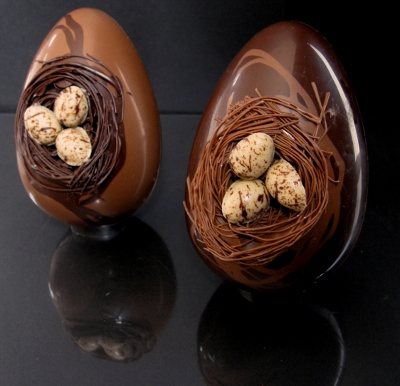
Sorry for the late response. I think I've finally caught up with myself! I'm not sure which one you mean in regards to method... The marble eggs are done just as you would paint a mold - different layers with different chocolates. I use sponge brushes, saran wrap to roll in the wet chocolate to get a marble effect and a piping bag. They're fun! The nut eggs use the technique I learned from Paul DeBondt in Italy. I think Wybauw also shows that method in his decorations book - yes, I remember - he does. Add nuts to mold. Pipe over nuts carefully to create a basket for them. You want to make sure there are no big holes that the other chocolate can seep into. Add molding chocolate when the other is set. The nest egg technique I got straight from the Wybauw decorations book. I didn't have success using a silicone egg in the mold to make the indent so I molded some nest like shapes from another mold I had into shell. I then added this shell to the mold (open part facing the mold) and piped it down all around. When set I added my molding chocolate. When they are out of the mold the egg now has an indent. To make the nest is tricky. It requires piping onto a frozen surface and scooping it up into a nest shape before it sets too much. I found the hard part not getting the nest chocolate onto the egg. It's slippery to work with! Does anyone have ideas about this?! What I did learn after doing a few was if I DID get chocolate on the egg - just to leave it and take it off when set. This gives a much better result than trying to wipe it off. OK - back to work. That's the only problem with the nest eggs - they take some time to make.
-
As promised Sebastian...


-
Oh my goodness - they're beautiful! I like that you dipped the stems as well. I am eying the vase as well. Is it chocolate?
-
If you store it in a cool dry place it will keep for years. You could divide it into portions and vacuum seal the ones you aren't using right away. It sounds like a treat - any idea who the maker is?
-
So cool! Thanks Sebastian - and have fun in the jungle!
-
I'll post some once I've finished my Easter production. Yes, I remember reading that the addition of too much lecithin has the opposite effect. What factors are at play in those ratios? Is it just a volume thing or does it depend on, for instance, the amount of moisture that might be present in the chocolate? ie. Will a chocolate, like the one I'm using, accept more lecithin before thickening than another chocolate that might not have as much moisture in it? I haven't used more than 0.5% - that seems to be working well for the purposes I'm using it for. I wouldn't attempt to use this chocolate for dipping though!
-
An update on the addition of lecithin: WOW! What a difference! Thanks again Sebastian. I've tried it in both the white and milk chocolates that had no lecithin added already. I can't believe the difference a few grams of lecithin can make. It still thickens more than my other milk chocolate over time (most likely due to the brown sugar) but it is much more responsive to a quite blast of heat than it was before. So I guess I won't be needing to try the PGPR...
-
Edward, I have to say a big thank you for this tip. I LOVE using the silicone brush! As you say, it's OK for performance but clean up is SOOO easy. Easy clean up always gets top marks with me! And I like the mini 'aero bar' you get when you pull the set chocolate off the brush Thanks again for sharing...
-
Sounds absolutely fair to me! I will try the lecithin in the milk and white chocolates this week and report back.
-
Sebastian - thank you so much! I had an inkling it most likely had something to do with the milk ingredients they were using but hadn't even thought of the sugar. Of course the raw sugars would hold more moisture than white sugar... I will try the lecithin and see how that works. I looked up PGPR - it looks like it's gaining popularity as an emulsifier in chocolate. Sounds interesting. I have never heard of it before so don't have any idea about availability. If the lecithin doesn't work I'll nose around some more and get back to you about how to use it Thanks again for being so willing to share your expertise. I really appreciate it!
-
Congrats on the HSN shows. That's awesome! Thanks for posting your egg method. You are absolutely right on about putting down a layer of chocolate that will be well crystallized first. What a difference that makes. I've been having success with 2 layers of chocolate. I make sure that the end result is opaque - so fairly thick layers. When I add chocolate and spin, I first spin for not quite a minute at room temp. and then hold the mold in front of a fan and continue spinning for approx. 4 minutes. I find this long but the results are great. How long do you spin for? Oh, and then it goes in the fridge to set. I am definitely going to try that! I can see the brush wouldn't be as good for putting down chocolate but what great benefits. Right now I'm trying a foam brush. I can 'squeeze' the chocolate out. I don't prefer it to a regular pastry brush though. Anyone else have clever brush ideas?