

pazzaglia
-
Posts
182 -
Joined
-
Last visited
Content Type
Profiles
Forums
Store
Help Articles
Everything posted by pazzaglia
-
Thanks Anna, I try not to spam the forums too much with links to my own website, but I'm glad you intervened and shared the right page! Ciao, L
-
Rotuts congrats on getting started with your pressure cooker. You have two things working together that each need their own little tweaks. First, have you done the water test? Also, at what heat setting are your bringing and maintaining pressure with your induction burner - pressure cooking is tricky but not impossible with these. I'm not familiar with this recipe - but I think the recipe author means for you to pressure cook for 3 minutes at high pressure, and then let the cooker release pressure naturally for 3 minutes (don't open) and then release pressure. You don't need to carry your cooker to the sink, the pressure selection valve has the option to release pressure: It looks like a little cloud with lines going to it. Ciao, L
-
There is no way around it, steamed ground meat looks terrible. However, it is tender, moist, and delicious. I haven't looked online but I have my own meatloaf recipe in the "Hip Pressure Cooking: Fast, Fresh & Flavorful" cookbook. Although I can't share the recipe, I can tell you that it does not look like a "pie". Basically, you form a long strip of ground meat and then place it in the steamer basket as a ring. This has two functions: 1 it is thinner so steam/heat can go around all of the sides and cooks faster; 2 the slices don't look like crazy meat pie wedges. Top it with a creamy mushroom sauce or ketchup before serving and it won't look so dull, anymore. It's meatloaf. Ciao, L
-
Chris's post reminds me... also to use stock as cooking liquid for beans. YUM!!
-
Use it in place of water when cooking rice and grains to serve with those braised meats - also, stock is a great base for polenta and gnocchi alla romana (made with semolina mush). Ciao, L
-
Generally, when referring to pressure in vessels (pressure cookers, autoclave, pressure canners and.. I guess now pressure ovens) it is the pressure in addition to atmospheric pressure. If you want to know more about cooking with pressure, history, international differences, standards, altitude and more I wrote an article... Pressure Cooker PSI FAQ: The stuff you didn't think to ask http://www.hippressurecooking.com/pressure-cooker-psi-faq-the-stuff-you-didnt-think-to-ask/ Ciao, L
-
After reading this discussion, I contacted KitchenTek and asked at what pressure the Wolfgang Puck Pressure Oven operates and how long it takes for the oven to get there. This is what they told me:. "It uses 1 PSi of pressure and takes approximately 5-10 minutes for that pressure to build." To me, this "pressure oven" is more gimmick than actually useful - it's just a toaster oven that seals. Although 1psi is faster than 0psi the difference in cooking time is negligible. If you're really interested in a pressure oven Miele and Kuhn Rikon make them - they're kind of like a horizontal pressure cooker with super-powers (electric pressure controls and automatic steam injection). Unfortunately, as far as I know, they are only being sold in Germany. Now, if they could only make it brown too! Ciao, L
-

Unvented Pressure Cookers (Kuhn Rikon, Fissler) and PSI control
pazzaglia replied to a topic in Kitchen Consumer
Interesting! Thanks for circling back and letting us know the cause. Ciao, L -
I've boiled it, risottoed it and steamed it. Barley still keeps its toothsome qualities even when you add pressure. I've only used the perlated barley 1:2 liquid ratio for 18 minutes stovetop or 20 minutes electric and open with natural release. Ciao, L
-
Unvented Pressure Cookers (Kuhn Rikon, Fissler) and PSI control
pazzaglia replied to a topic in Kitchen Consumer
The automatic noise-cancellation in the mic is removing the hiss so we can clearly hear the clanking in your kitchen. : ) I suspect the pressure safety plug may be to blame (again). The "metal" part of the plug is actually aluminum and contact with anything corrosive to aluminum (acids, salt, chlorine, etc) will damage it. I live right next to the Mediterranean Sea so I have to change those plugs about once a year due to the heavy salinity and humidity in the air. But before you "spring" for another one see what KR has to say. Good luck! L -
Unvented Pressure Cookers (Kuhn Rikon, Fissler) and PSI control
pazzaglia replied to a topic in Kitchen Consumer
takadi, I don't expect your cooker's warranty is valid anymore but I'm sure that Kuhn Rikon will trouble-shoot with you and find the issue. Personally, I did not see (or hear) any operation out of the norm in the video you just posted. You can shoot KR a message here: http://us.kuhnrikon.com/us/en/company/contact.html What intrigues me is that you say that it didn't hiss before and it does now. Can you share what kind of cooktop you are using with your pressure cooker and what heat settings you use to reach and maintain pressure? Also, how do you clean the lid? Dishwasher? Bleach? ...? Ciao, L -
Unvented Pressure Cookers (Kuhn Rikon, Fissler) and PSI control
pazzaglia replied to a topic in Kitchen Consumer
Can you explain to me what you're doing in the video? Because spinning the signal around and pushing it down (or pulling it up) while it's a pressure would release some steam - so it appears to be working correctly. Ciao, L -
Well, the Fissler is a tight fit. Measure the diameter of your Fissler above the trivet and then the height up to the edge. Go to a cheap housewares store, like IKEA, and look for stainless steel pot sets with plastic handles with very visible screws (since you'll be taking them off). For example, something like this: http://www.ikea.com/us/en/catalog/products/60139363/ Then, simply remove the handles and use inside the pressure cooker. You might want to McGyver what is left after you remove the handles to make it easier to lift the mini pot out of the pressure cooker. Remove the handle from the lid, too. Depending on the height of the inner pot inside your pressure cooker you may only be able to fit the lid of the inner pot upside-down, anyway. Remember: no hermetic seals inside the pressure cooker unless you plan to let it cool down COMPLETELY before opening. Ciao, L
-
Franci, I don't have this posted on the website, but I've found a small dim-sum basket to use in the pressure cooker. It looks-like the basic Kuhn Rikon trivet but it has extra feet to keep it taller. It has no handles, but to lift it out the holes are perfectly suited to inserting two chopsticks at an angle and lifting. Also, you know those silicone rectangles with shapes like flowers, hearts, ect. ? Since they're cheap I just cut the rectangle to a round shape to fit in the pressure cooker. Jo, in Italy we don't use "sauce" we use tomato puree' on pizza! As someone who pressure cooks almost anything, I don't really see the benefit to pressure cooking a canned tomatoes with a garlic clove and olive oil for 45 minutes - especially since the garlic nearly disappears and the tomatoes, well, they are already cooked. Now that you've made it, what do you think? Ciao, L
-
The pressure cooker will not reduce fresh tomatoes, so after pressure cooking you will get cooked fresh tomatoes with all of their water. But you can start from a tomato puree and work your way from there. My up-coming cookbook has a technique for making a pasta sauce using fresh tomatoes but the book is not coming out until September. : ( Ciao, L
-
Unvented Pressure Cookers (Kuhn Rikon, Fissler) and PSI control
pazzaglia replied to a topic in Kitchen Consumer
You should contact Kuhn Rikon to ask them about the different SI valve models and whether they are interchangeable. My educated guess says yes. They just snap into a hole in the lid - as long as the hole is the same size it should not matter what SI valve you have in what Kuhn Rikon model lid. There can be variations in the design and color, too. My new Kuhn Rikon came with a gray silicone stopper to the valve, but the replacement one was blue. What kind of cook top are you using? The Kuhn Rikon instructions say to "turn the heat source up to full power" for it to reach pressure - medium heat should only be used to build pressure on induction (http://bit.ly/1bgMUA8). Pressure cookers take an average of 10 minutes to build to full pressure - this can take longer if the cooker is very full. If you were making stock, I imagine the cooker was 2/3 full and since you used medium heat to bring it to pressure it would make sense that it would take 15-20 minutes to reach pressure. There is a low hiss when Kuhn Rikon is at pressure, this is completely normal. Non-venting is a bit of a misnomer because all non-venting cookers vent a little bit. What it really means is that a non-venting cooker does not regulate pressure by venting (like the older weight-modified valves) instead, pressure is regulated by turning down the heat (venting cookers need medium heat to maintain pressure while non-venting cookers need low or very low heat). Ciao, L -
Personally, I wouldn't go any larger - especially if you're cooking for just two. A few months ago, I wrote a little article to answer your "is bigger better" question. It explains the whats and why's along with a little chart that figures out how many servings of rice and soup you can get from each pressure cooker size: Does pressure cooker size matter? Of course! http://www.hippressurecooking.com/pressure-cooker-sizes-and-types/ I recommend my readers to start with a 6 or 8L pressure cookers (the one you linked to is 8L - so, you're in!). You can make 6 servings of rice or 16 cups of soup in that one. Of course, the nice thing is that you can also make less without adjustments since you can still get away with adding just a cup of cooking liquid for most recipes with that size. You chose a nice shape, too. The pressure braisers are wide and have a larger browning area than your typical stockpot-shaped pressure cooker. You made an excellent choice! Ciao, L
-
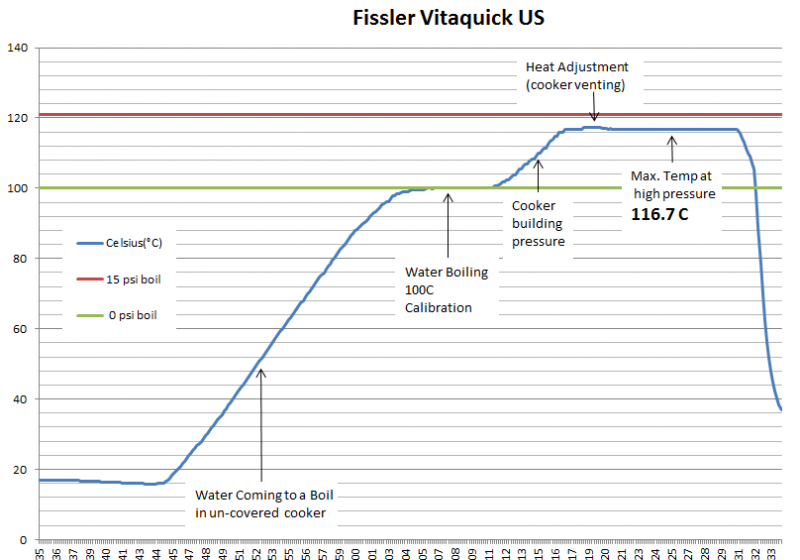
Venting a spring-valve cooker is something that I learned from a Kuhn Rikon engineer that could be done with their pressure cookers to ensure ALL of the oxygen exits the cooker for niche uses - sterilization or canning - where maximum temperatures are important. However, that is not recommended for daily use or even noted in the manufacturer's manual - because going into over-pressure is a safety feature. I personally do not recommend anyone do this and and then depend on secondary or, in some cases, tertiary safety systems to keep the pressure where it should be. The only exception would be if this action is recommended by the manufacturer (such as certain models from Fagor) or during the inevitable learning process. The Fissler manual does not recommend venting prior to pressure cooking. It's important to note that today's high-quality pressure cookers already vent 90-95% of the oxygen when building pressure so that extra 5% will not make a significant difference in the cooking temperature. During my test, the cooker did begin to vent, but that was just because it was my fist time using this cooker and I hadn't gotten the feel for the right heat to keep it at pressure. If you see from the temperature chart, I turned the heat down after building pressure but initially, it was not enough. Ciao, L
-
P.S. Here is a copy of the Fissler US Vitaquick manual: http://www.hippressurecooking.com/fissler-vitaquick-pressure-cooker-manual-usa/ It was sent to me and uploaded with Fissler's permission.
-
OK, I got a chance to run the test this morning, and my findings are that the US Vitaquick’s operating pressure is consistent with what is printed in their manual 60kpa (8.7psi). The maximum temperature achieved while operating the US Vitaquick cooker at high pressure during my test was 116.6C (about 240F) – just a tad higher than the US Fissler Vitaquick manual 's note that high pressure is "approx. 237F". My results differ from what America’s Test Kitchen reportedly achieved 250F (121.1C). I’m posting all of data here, for you, but this (and other information I will gather later) will be the basis for an article to be published on the hip pressure cooking website. Max Temp at High Pressure Matrix I ran the test following the testing matrix I set-up for all pressure cookers – the only deviation from that matrix is that I used a different stand for the remote logging monitor because the one I developed and used with other cookers could not fit in the Vitaquick– the base was too narrow and the base of the sling stopped mid-way up the cooker. The matrix is as follows: -Submerge monitor with approx. 2cm of water and ensure it does not come in contact with the base, sides or any other conductive material (the monitor is in a cotton sling) -Bring the contents of the cooker to a rolling boil (without pressure lid) and then boil for 10 minutes to calibrate the monitor and ensure it is working properly. -Add pressure cooking lid and bring cooker up to high pressure according to the manufacturer’s instructions -Maintain high pressure (without going into over-pressure) according to the manufactuer’s instructions for 15 minutes -Open the cooker, cool down the monitor and download the logging data Here’s a a photo documentary of the test (also includes raw test data worksheet): https://drive.google.com/folderview?id=0BzgwNX-MdvL2Qy1IUHZlcHFZRW8&usp=sharing Ciao, L
-
Here is a chart that shows that stainless steel, pyrex glass and aluminum have a much higher conductivity than water: http://www.engineeringtoolbox.com/thermal-conductivity-d_429.html However, your test and set-up is a likely scenario of how ATK measured temperature in their pressure cookers. I don't know enough about chemistry to comment on whether the acidity of a tomato sauce could further influence conductivity. I'm taking measurements of water under pressure because what interests me is the temperature at which the food cooks not the temperature of the pressure cooker base nor the steam above the food. I'm in the middle of a big project now, but will post photos of the sling and, once tested, charts from the tests and my testing procedure when I get some free time. In the meantime, here are the specs of my remote data logger: http://www.lascarelectronics.com/temperaturedatalogger.php?datalogger=382 Ciao, L
-
That's a very creative set-up Jo, but a jar and lid can conduct heat directly from the base of the cooker. Even if the jar is on a trivet the heat will come from the trivet/steamer basket, to the jar, and lid. ATK's video about the reviews very briefly flashed a remote logging thermometer. Though they were talking about stove top pressure cookers, they showed a sine graph that could only be achieved in an Electric cooker -looks better on camera than a line going straight up and flat. There is no information written or recorded on HOW they used that thermometer for their tests. Shortly after they published their reviews I wrote ATK and asked what methods they used for their tests and received no answer. I have a remote logging thermometer (which measures temperatures every 10 seconds up to 125c), a sling that keeps the thermometer suspended in water without touching any heat-conducive elements, and developed a testing routine that includes calibration at 100C before the test begins. A US Fissler Vitaquick just arrived at my door via express courier so as soon as time permits I will be doing my own measurements. I'll gladly share my results and testing procedure here, in case anyone is interested in reading or re-producing them. Very interesting info! Ciao, L
-
Unvented Pressure Cookers (Kuhn Rikon, Fissler) and PSI control
pazzaglia replied to a topic in Kitchen Consumer
Franci, You should bring your pressure cookers up to pressure on medium heat using induction - they should take the same time to come up to pressure as they used to on your other cook top (probably 5 or 6 minutes for the Lagostina and 10 minutes for the kuhn) on induction in order for them to properly expel all of the air while they're building pressure. I'm working on an article about pressure cooking on induction with more details. Ciao, L P.S. Yes, your two cookers have different operating pressures (temperatures). Likely your Lagostina is operating at 9 or 10 psi (check your manual for anything that says kpa, bar or psi) while you're Kuhn Rikon operates at 15psi (a little after the second red ring comes out). -
Unvented Pressure Cookers (Kuhn Rikon, Fissler) and PSI control
pazzaglia replied to a topic in Kitchen Consumer
Thanks for letting me know about this topic and giving me an opportunity to answer. From your question, I see that venting and non-venting cookers are getting mixed-up with selector-type and rod-type pressure indicators. So let me explain a bit.. Venting vs. Non-Venting Pressure Cookers A venting cooker operates with a weighted valve that either lifts up or jiggles to release pressure when the pressure inside the pressure cooker is higher than the weight. This type of cooker has a much higher evaporation rate than non-venting cooker, needs more energy to stay at pressure and the food inside is jostled whenever the cooker vents (releases pressure) due to constant sharp drops of pressure. A good example of this type of cooker is the Presto you saw, or Fraci’s Lagostina. A non-venting cooker operates with a spring valve that is calibrated to resist up to a maximum pressure. When the pressure goes beyond what the spring’s resistance, it yields and cooker begins to release pressure. The pressure is regulated in these cookers by heat. Less heat, makes less steam, which makes less pressure. This type of cooker has a very low evaporation rate (about a tablespoon or so every 10 minutes), needs very little energy to maintain pressure and once the fire/heat/induction are adjusted to the precise amount this type of cooker needs to maintain pressure, the food in the cooker remains completely still (no small boils) and cooks at the same continuous temperature the entire time. An interesting aside about electric pressure cookers. Even though they do not vent, internally they have similar temperature swings as venting cooker because the heat source (electrical coil) is constantly turning on and off to maintain a certain temperature. Rod vs. Selector Pressure Indicators The pressure on spring-valve non venting cookers can be indicated with either a rod that raises progressively out of the cooker (with marks to indicate high and low pressure) or a selector switch that works in concert with a pressure signal to indicate whether the selected pressure is reached. Between the two, the rod is more accurate because it’s very easy to see the progress. Although the selectors give a nice satisfactory “click” (which I like, too) there is actually some play with the range of pressures for each selection. An excellent example is the Fagor Duo – where you select high or low pressure but that pressure has not actually been reached until a small wift of vapor comes out of the valve and the little yellow pressure signal is completely solid. The most accurate of all pressure indicators is a calibrated gauge with a needle to show the exact internal pressure. Unfortunately, this type of pressure signal is not available for any pressure cookers designed for home use! Since your focus is on the Vitaquick, you should know that Fissler makes a different Vitaquick for the U.S. The Euro model operates at 11 .6psi (80kpa) and the American model operates at 8.7psi (60kpa) at the high pressure setting - the US model has the letters "US" engraved in the metal on the lid just near the lip and to the right of where the handle connects. As mentioned earlier, by ojisan, when using a pressure cooker on an electric cook top. Bring the pressure cooker up to high pressure on a burner at high heat, while pre-heating a smaller burner at low heat. When the cooker reaches pressure delicately move it over to the lower heat burner and turn off the higher heat one. Ciao, L -
The Fissler Vitaquick manual it says 3-year warranty on defective parts and 10-year guarantee that they will keep replacement parts around for you. There is nothing written there about it being void if you bought it from an UN-authorized dealer or that it's a lifetime warranty. Generally the warranty travels with the item, even it's used. I don't know about Germany but in Austria and Italy when you buy used electronics the seller will tell you how much time is left on the warranty and also give you the original receipt and info so that it can be used if needed. So it is also transferable. If you had a busted or defective Vitaquick I would recommend pushing the issue and consulting an attorney to get more details about whether a manufacturer can refuse to fix or replace a defective item based on who sold it. No matter what route it took to your house - it originated from their factory. Ciao, L

