

jgarner53
-
Posts
1,201 -
Joined
-
Last visited
Content Type
Profiles
Forums
Store
Help Articles
Posts posted by jgarner53
-
-
I do add a little bit of flour to my beurrage, about 10% of the total flour weight. The way I was taught, you want to make the two products closer to each other, so you add a little butter to the flour, and a little flour to the butter. I haven't found that the flour in the beurrage diminishes the puffing capability of the pastry, but then again, I haven't done side by side comparisons between the two either.
I, too, was intimidated by making puff before I learned how to do it. It really is relatively easy, and the results are so worth it!
-
Apple pie again - this time it was the pie I made for the pie crust demo thread. Definitely superior to the one from last week.
-
Flaky Pastry
This recipe is based on a classic pastry recipe from my 1963 edition of the Good Housekeeping cookbook.
- 2-1/4 c all-purpose flour
- 1 tsp salt
- 1/4 c shortening
- 1/2 c cold butter, cut into 1/2-inch cubes
- 2 T cold butter, cut into 1/2-inch cubes
- 5 T cold water
Food processor:
Pulse flour and salt together briefly to combine. Add shortening and pulse about 10 times, in one-second bursts, until combined and no visible pieces of fat remain. Add butter (one stick plus 2 tablespoons) and pulse until pieces of butter are about the size of large peas (about 10-12 pulses). Sprinkle half of water over flour/fat mixture and pulse 2-3 times. Sprinkle remaining water over and pulse again. Dough should not come together in the bowl, but should hold together if you pick up a clump and squeeze it.
Dump dough out onto work surface and gather into a ball. Divide into two and wrap in plastic wrap or waxed paper. Refrigerate one hour or up to two days before rolling out.
Hand method:
Using a pastry blender or two knives (something I could never get to work), stir together flour and salt. Add shortening and cut into flour until combined. Add butter and mix with pastry blender until pieces are the size of peas. Sprinkle water on one tablespoon at a time and toss with fork until dough begins to hold together.
Gather into a ball, divide in two, and wrap each half in waxed paper or plastic wrap. Refrigerate one hour or up to two days before rolling out.
Yield: Crust for one two-crust pie
( RG1404 )
- 2-1/4 c all-purpose flour
-
It was good, but I like a bit of caramelly gooey stuff in an apple pie. This pie filling was all apple, with no caramelly goo.
I agree with you completely Patrick. I like the goo (like you see in Wendy's pictures in the pie crust thread).
But even still, it was apple pie for dessert. That's not all bad.
 You can always top it with caramel sauce.
 -
Lovely fluting Anne! It looks like you lose some of the detail as the pie bakes, or is that just a trick of the photography?
-
Im determined to make and enter a pie in our town fair. I just read an article about a deep dish apple pie( once again, i think it was CI) and they cooked the filling first. Anyone ever try that?
Calipoutine, I just made that pie this week! Except that I used all one kind of apple (it's what I had). But it turned out fine, if a bit to the tart side because of the apples.
I did find that the very center of the bottom crust didn't seem to bake thoroughly, in spite of having a heated cookie sheet on the bottom rack of the oven, etc. per the directions. I was using a pottery pie plate, though, rather than Pyrex. Perhaps that had an effect. The crust in the same issue is a good one, and very easy to work.
In fact, here's a photo!
-
Soapstone is my dream kitchen counter. I love the feel of it because it's not as cold as granite is. It has a softer touch to it in spite of its durability that I like better than hard, cold, highly polished granite. Plus, as to the mineral oil upkeep, mineral oil is cheap cheap cheap, and the sealants for granite cost what? I'm sure they cost more.
I doubt that any kitchen surface is absolutely perfect, or has no drawbacks whatsoever. The key thing is to look at those drawbacks and ask yourself if they are something you can live with.
I do know that you can get soapstone tiles (usually 12x12 or something like that) that are significantly less expensive than the slabs, if you decide you love the look and feel but can't put out the cash.
-
Ling, what about a caramel buttercream? I love dacquoise and caramel together (did one with plain genoise layers for a friend's wedding, and it came out great).
-
Tonight it will be fresh apple pie with apples from a co-worker's tree. I don't know what kind they are, but they're relatively tart. The pie's in the oven right now.
-
PB gets refrigerated in my house because it says to on the label (it's natural, so the cold helps keep it emulsified once I've stirred it back together).
Out of the cold box:
soy sauce
ex. virgin olive oil
tomatoes
most other fresh fruit (right now it's peaches & nectarines)
butter (though that's only one stick at a time - the rest is in the freezer)
-
Patrick, it's beautiful! I bet they loved it, too.
For me today, it's chocolate kirsch cake, brought home from work: two layers of devil's food cake, which is dandy all by itself, but made even better by a soaking with kirsch syrup and a chocolate kirsch mousse filling. You'd think I'd get sick of the stuff from work, but I don't.
-
Be sure to bake it in a pan you can invert (like a traditional angel food cake/tube pan) while the cake is cooling. This allows the cake to set while it cools. Otherwise, it will collapse under its own weight.
When you're folding in the flour (do sift it if the recipe calls for it, as most do), sift it over the batter, about 1/3 to 1/4 at a time. While you're folding, think about maintaining the air you've spent all that time beating into the egg whites and treat them accordingly (that is, fold gently - don't stir vigorously!)
I'm sure you'll do great with it.
-
Who really needs one of these? Unless you really want to get nuts about battering things...
Or a special cooker, just for eggs?
And once they're cooked, of course, you need one of these:
This site's just flush with useless items to clutter up your kitchen (and the rest of your house)
-
When my husband and I have been on bus tours (more or less voluntarily), we have quickly abandoned the sanctioned lunch stop or in-hotel dining unless there really isn't any other option, and we've never been sorry. We're more sorry when we're stuck with what the other tourists on the bus are eating.
In Greece, on a 4-day bus tour of ancient sites (Olympia, Delphi and the like, which we figured was an easier way to get around than renting a car and doing it ourselves), we got stuck at a tourist trap/truck stop of a place. At least two to three times what we'd been paying for any meal on our own for greasy, fatty lamb and insipid potatoes. After that, we made a point of finding our own when we could - rallying any other independently minded souls on our trip (and we usually make friends that way) for fantastic $1 or so gyros about a mile from the bus in Olympia, even going so far as to get our tickets to Delphi from the tour guide so we could go there first thing in the morning before it was mobbed with tourists instead of doing the museum first the way the others were going to do.
In Thailand, we did the same thing from the get-go, frequently eating where the bus drivers themselves were eating, avoiding overpriced meals with watered down Thai flavors (or oddities like chow mein). At one stop, we ate at a shack not two doors down from the hotel where the others ate, at a restaurant with no menu and the owners spoke no English. We'd look up a dish in our Thai-English food dictionary and point to the Thai to ask if they had it. It was one of the best meals of the trip.
-
I imagine (though I am merely guessing here) that it is a combination of both western food hysteria, fostered by the makers of anti-bacterial products, toss-away cutting boards, and the like, and the nasty, disgusting, shit-filled, dangerous factory farming process that produces most of the chicken eaten in this country.
-
I'd say the biggest con to using Corian, compared to Silestone, is that you can not place a hot pan onto the Corian without damaging it. Silestone is a stone product and will not be damaged by heat that way.
As someone who's had tile countertops most of my life (which are also heat resistant), I'm very used to placing hot things down and would not like to have to worry about that. If it doesn't bother you, then don't worry about this. Get out the trivet or hot pad.
-
Didn't do fast food, but my first job was in a Wil Wright's ice cream parlor that switched over to selling Bud's ice cream (from San Francisco) shortly after I started, the summer after my junior year of high school. I'd filch nuggets of frozen cookie dough - we baked up Otis Spunkmeyer cookies fairly regularly in addition to the ice cream. I burned my fingers making waffle cones too many times to count. I worked there all through senior year of high school, often doing my homework in the back, just out of the customer's view, frequently alone the whole night, even closing alone. A big night was being able to run next door to the Mongolian BBQ place and spend $5 on a full dinner instead of just rice and egg rolls. Not too many hijinks, since I so often worked alone, and the owner/manager always kind of creeped me out.
But after freshman year of college, I went to work at a busy Häagen-Dazs store in a touristy area. That was where we really got creative and had much more fun. Late at night, we'd occasionally dip a chef's knife in the cassis sorbet and freak each other out - "I cut myself!" or make triple dipped ice cream bars (which we were hand-dipping at the time). I don't think we officially got any discount, though you could go in and one of your friends would scoop you a "single" and fill up a pint cup. My last night there, we had a whipped cream fight after closing, before we started cleaning.
Aaaah, memories...
-
I have bought bagged greens before, but since my local produce purveyor has a lovely greens mix, I no longer bother with the bagged stuff. I will buy prepared stuff for snacks or days when I know I don't want to cook (things like Trader Joe's gyoza), but as for the kits? Nope. I tried Hamburger Helper a few times when I was just starting out after college but they just were so salty! I do admit, though, that the idea behind HH (esp. the cheeseburger macaroni) appeals to the child in me, but I'd probably be more likely these days to do it from scratch, if I did it at all.
I happened to see the pasta salad mix the other day at Target; I didn't even know they still made that stuff. How hard is pasta salad?
-
I think chocolate chip cookie dough is my favorite. I'll take tastes of most other cookie doughs that I make, but don't get heady thinking about eating them raw the way I do with chocolate chip.
Pie dough, though, is the best.
-
I guess this is where the San Franciscans, in 60-some odd degree foggy weather get to gloat and say that we never quite have to give up those warming fall foods. Big pot of soup simmering all day on the stove? Bring it on! Roast chicken? Sounds great!
In my SF microclimate, I doubt it's gotten much above 60 degrees today. Up from a low this morning of 57. Oh yeah, it's summer. I'm wearing my slippers and a sweatshirt and thinking of making some hot tea. A steaming bowl of pho is welcome anytime.

-
Your galette looks great! I can't wait to hear how it turned out.
Another way to prep those plums (or other stone fruit), though slightly more wasteful, is to cut off the "cheeks" on either side of your Prime Meridian, getting as close to the pit as you can (just cut straight down). Then cut off the two remaining sides, and you have nice flat sides to lay down for slicing. Though looking at the wedges on your tart, that might not have worked in this case.
 But it's great for doing slices of the fresh fruit.
 -
I've made mango mousse before (from fresh mangoes) and didn't have to boil anything. It set just fine.
-
I hope they continue to let Scharffen Berger work the way they have been (particularly when it comes to buying quality beans and paying fair trade prices). I only rarely use their chocolate in baking (mostly use E. Guittard), but I love eating it! I'd hate to give up that tasty habit. Give me one of their 62 or 70 percent 5-gram squares over a Hershey's Kiss anyday.
-
Strange. I just googled Hershey's and Scharffen Berger and didn't find any information about the buyout. Odd that google didn't pick up on the Yahoo News story.
It's a sad day.
Demo: Pie Pastry Crusts
in Pastry & Baking
Posted
OK, my turn on the demo! I'm a bit nervous because I am a newly minted pro, and I don't make much dough at work. But I have always loved pie, and ever since I started out on my own after college, some 15+ years ago, I've striven to perfect my pie crust recipe and technique.
I started out with the recipe my mom's always used. I made a lot of tough crusts initially because I was overworking the dough, mixing too much. This was in the days when, like Anne, I used a pastry blender. Then I read somewhere about the problems of overmixing, and for a while I was terrified that any mixing I did would make my crust tough. So then I had problems with undermixed doughs that leaked, or cracked, or were almost impossible to roll out. My mom had always been more or less adamant about following the recipe exactly, so for a long time, I would stick to the amount of water in the recipe, which sometimes gave me soggy crusts, and sometimes I'd have a pile of flour/fat crumbs that I was trying to roll into a cohesive dough.
Somewhere in there, things started to click, and I started to get a better sense of how to do this. One year, when I was making pies for Thanksgiving, I decided to try two things: using my food processor and changing out half the shortening for butter. From that point on, my pie crusts have gotten consistently better. But as a point of reference, I still use the proportions in my 1963 edition of the Good Housekeeping cookbook.
You can't see it very well, but the recipe I use is Flaky Pastry II, located on the right-hand page, with the asterisk by it. The recipe itself (with my variations) is here
Good Housekeeping doesn't want you using butter, but doesn't specify the type of fat used in the recipe (or its temperature). They suggest lard, shortening, oil, or margarine. Obviously, using all of one type will change the flavor and even the texture of this dough. My mom swears by all shortening, but I prefer a mix of 2/3 butter, 1/3 shortening.
Gather your ingredients together. If you look carefully, you can see a date on the lid of my shortening can. After discovering one Wednesday night before Thanksgiving that my can had gone off, I now use a marker to keep track of how old the can is. I haven't measure the water yet, but as I'll be taking it tablespoon by tablespoon it doesn't really matter. Contrary to many pie pastry recipes, this one does not include any acid (lemon juice, vinegar, what have you). It also doesn't have any sugar in the crust. Personally, I like the slightly salty taste this crust has and find that it's a nice counterpoint to the sweet filling.
If you're new to baking, one of the first and most important things I learned about pie dough particularly is how important it is to measure ingredients exactly. Level off your cups of flour, the shortening, etc. While experience has taught me how to fiddle with a recipe, if I'd been lackadaisical when I first started, my pie crusts would likely have been even worse than they were already!
Pulse the flour and salt briefly together in your food processor, then add the shortening. Pulse briefly (one-second pulses) about 10 times, or until the shortening is combined with the flour, and you can't see any pieces.
Next, add the butter, and pulse just until the butter chunks are about the size of large peas. Because I do the whole dough in my f.p., I leave the chunks slightly larger than I would if I were going to add the water by hand. But I'm lazy and don't want to wash another bowl (I usually dump the flour straight into the f.p.).
Time to add the water. Remove the lid of your food processor and sprinkle half of the water over the flour/fat mixture. I find this to be more effective than trying to pour it though the feed tube. You want to distribute your water over the greatest area, as evenly as possible. Pulse once or twice, and then add the rest of the water. Pulse until the dough almost starts to hang on to the side of the workbowl, and when you pick up a handful of it and squeeze, it will hold together. When I made this batch, I needed two more tablespoons of water before it did this.
It's important not to process the dough until it forms a ball. If you do that, you've overworked your pastry, and it will likely be tough (ask me how I know).
If you're intimidated by this method, I'd recommend dumping the dough out before you add the water and doing it by hand, tossing the water in with a fork, tablespoon by tablespoon. You have much more control this way. But, like I said, I'm lazy about washing dishes.
Dump the contents of your food processor out onto a work surface. It will look like this:
Don't worry. If you start pressing all those crumbs together, you will wind up with a ball of dough, like this. See the pieces of butter? That's good. They're about the size of small peas at this point.
Cut the ball in half, shape into a ball and flatten to a thick disk, wrap in plastic, and refrigerate for at least an hour. This will give the flour bits time to hydrate so that the dough will be more cohesive when you start rolling it out. In my case, I waited two days before rolling. Any longer, and I would have frozen the dough and thawed it in the fridge.
When you're ready to roll out your dough, get one packet out 5-10 minutes before you're ready to give it time to warm up just a bit. This will help minimize cracking. Once you start rolling out the first packet, get the second one out.
For a long, long time, I rolled out my dough between sheets of waxed paper. This kept the dough from sticking to the counter, but as my technique's improved, I've been able to dispense with this and just go with a floured board. They key is to keep turning the dough to help keep it round and from sticking. I flour the top lightly, too.
Roll out the dough, easing up before you get to the edge. This will help keep the edges from getting too thin. You want it about an inch or more larger than your pie plate. I use mine to measure my progress. See all the lovely buttery streaks? Yum!
Use a pastry brush to dust off the excess flour and roll the dough onto your pin. There are a variety of ways to get your dough into the pan. This one works for me. If another one works for you, great!
I have a little crack on the left side there, which I press together. Unlike Wendy, I'm too impatient or disorganized to fill and freeze my pie ahead of time, so I stick the empty crust into the fridge while I roll out the top crust. Using a ruler, make sure it's a couple of inches larger than your pie plate so there's room to crimp and for the crust to fit over the mound of filling. (I've highlighted the measurement on the ruler for you).
Slide the crust onto a cookie sheet and into the fridge while you prep your filling. Today's pie is apple, due to my continuing bounty of apples. The recipe comes from the same cookbook - old-fashioned, no pre-cooking of the apples. Just layer in fruit and the sugar/flour/seasoning mixture, dot with butter, and you're good to go.
After shooting and reviewing these photos, I realize how difficult/unattractive it is to have a beige object (pie crust) on a beige background (ugly, nasty tile).
Trim the bottom crust (I agree with Wendy that scissors work best) to the edge of the pie pan. Moisten with water or egg wash, and add the top crust. Trim to about half an inch overhang from the edge of the pan. Press gently to seal and fold the top crust over the bottom. Crimp as desired. Add a glaze (milk, egg, egg white) and top with sugar if desired (I did), and cut slits to vent. If you're Martha Stewart, you have cute, tiny, apple-shaped cutters, and you can cut out apple shapes and apply the cut outs to the top of the pie.
I'm not her.
And onto the lowest rack of a preheated 425ºF oven. I have a pizza stone and use that, with some foil on it to catch any drips. My stone's stained enough as it is.
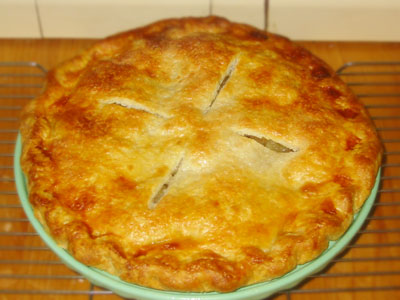
Some 45 minutes later:
And 10 minutes after that:
And, finally, here's a slice:
The crust is perfectly done - brown and crisp on top, flaky underneath. I wish the juices had thickened just a little bit more. There's some in the pan after cutting and serving half of the pie. You can see that there's a small gap from the reduced apples, but it's not appreciable.
I hope I've been helpful!